1.0 Intro
1.0 Introduction
1.0.1 Aside
This project, including both the code and the notes, was recorded while I was self-studying Rust. There may be places where the writing is not precise enough or the expression is not clear enough, so I ask for your understanding. If you can benefit from it, that would be even better. Here I recommend the original video Rust Programming Language Beginner’s Tutorial (Rust Language / Companion to The Rust Programming Language) [completed].
1.0.2 Why Use Rust
-
Rust code is reliable and efficient.
-
Rust can replace C and C++. With similar performance, Rust is safer than them. In practice, the most obvious difference is that Rust does not require you to compile every few lines just to check for errors, the way the first two languages often do. Specifically:
- Memory safety: no null pointer dereferences, dangling pointers, or data races
- Thread safety: multithreaded code can be guaranteed safe before the program runs
- Avoids undefined behavior: such as out-of-bounds array access, uninitialized variables, and using freed memory
-
Rust provides modern language features such as generics, traits, and pattern matching.
-
Rust provides a more modern toolchain. Rust’s Cargo and Python package managers such as pip follow the same philosophy. Anyone who has used C/C++ knows that dependency configuration for those languages can be cumbersome, while Python’s package management tools are flexible and simple. Cargo gives Rust users a similarly comfortable dependency-management experience while still delivering C/C++-level performance.
1.0.3 Suitable Scenarios
-
When you need speed: Rust can control memory as finely as C through
unsafe, while also providing the conveniences of modern high-level languages, such as the ownership system and pattern matching. Python is a very high-level language with high development efficiency, but it sacrifices performance and control. -
When you need memory safety: Rust provides strong memory-safety guarantees through compile-time static checks, making it extremely suitable for scenarios where memory errors must be avoided, such as operating systems, embedded development, and network servers.
-
When you need efficient use of multiple processors: Rust provides native support for efficient concurrency and multi-processor programming without sacrificing safety. This is especially important for scenarios that handle high throughput and concurrent tasks, such as web servers, distributed systems, and real-time computing.
Areas where Rust excels:
- Web services
- WebAssembly (C# and Java lag far behind Rust and C/C++ in performance comparisons)
- Command-line tools
- Network programming
- Embedded devices
- System programming
1.0.4 Comparison with Other Languages
| Category | Language | Features |
|---|---|---|
| Machine language | Binary instructions | Closest to hardware, executed directly by the CPU |
| Assembly language | Assembly | Uses mnemonics instead of machine instructions, such as MOV AX, BX |
| Low-level languages | C, C++ | Closer to hardware, provide limited abstraction |
| Mid-level languages | Rust, Go | Performance close to low-level languages, but with higher abstraction |
| High-level languages | Python, Java | Higher-level abstraction, easier to read and use |
High-level languages and low-level languages are not absolute opposites; they form a continuous spectrum:
- Lower-level languages provide more control over hardware, but code is more complex to write and development efficiency is lower.
- Higher-level languages provide more abstraction and automation, but they may introduce runtime overhead and reduce fine-grained hardware control.
Rust’s advantages:
- Good performance
- Strong safety guarantees
- Excellent concurrency support
As a mid-level language, Rust has these advantages over other languages:
- C / C++ offer excellent performance, but they are not safe enough; Rust can maintain roughly the same performance while also ensuring safety.
- Java / C# can guarantee memory safety with a GC (garbage collector) and provide many features, but their performance is not as good; Rust not only offers comparable safety, but also stronger performance.
1.0.5 Rust’s History
Rust began as a research project at Mozilla, and the Firefox browser is an important real-world example of its use.
Mozilla used Rust to create Servo, an experimental browser engine (started in 2012 and first preview released in 2016), and its components were designed to run in parallel. Unfortunately, in August 2020, Mozilla laid off most of the Servo development team. Starting on November 17, 2020, Servo was taken over by the Linux Foundation. Some Servo features have now been integrated into Firefox.
Firefox Quantum includes Servo’s CSS rendering engine. Rust has brought Firefox major performance improvements.
1.0.6 Rust Users and Case Studies
- Google: the Fuchsia operating system, with Rust accounting for 30% of the codebase
- Amazon: an operating system based on Linux that can run containers directly on bare metal or virtual machines
- System76: developed the next-generation secure operating system Redox entirely in Rust
- Stanford University and the University of Michigan: an embedded real-time operating system used in Google’s cryptographic products
- Microsoft: rewriting some low-level components in Windows using Rust
- Microsoft: the WinRT/Rust project
1.1 Install Rust
1.1.1 Installing from the Official Site
Go to the official Rust website, where you can change the language in the top-right corner.
 Click “Get Started” and you will see the following page:
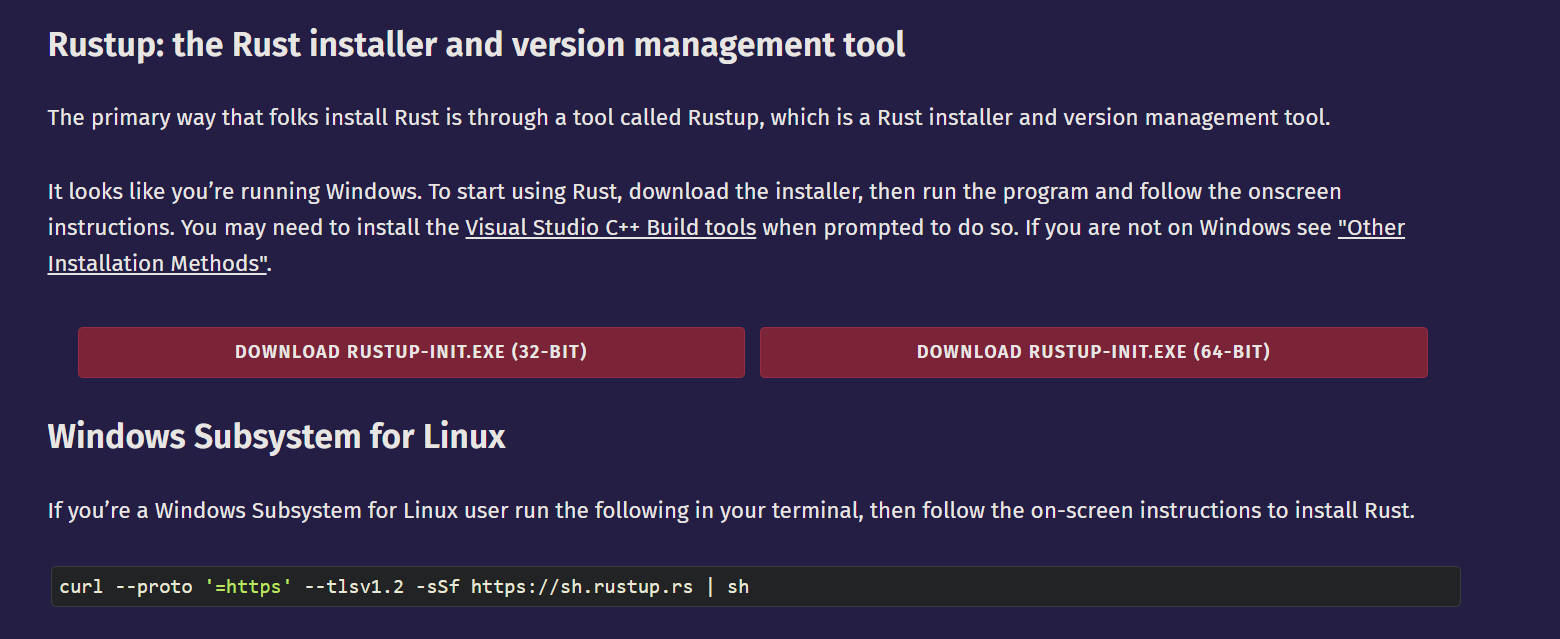 Choose the download that matches your system: 32-BIT for 32-bit systems and 64-BIT for 64-bit systems. Most computers today are 64-bit. If you do not know whether your computer is 64-bit or 32-bit, and it is not an ancient machine, 64-bit will probably work.
If you want to install Rust on macOS, Linux, or the Windows Subsystem for Linux, run the following command in the terminal:
curl --proto '=https' --tlsv1.2 -sSf https://sh.rustup.rs | sh
Open the downloaded installer and you will see the following screen:
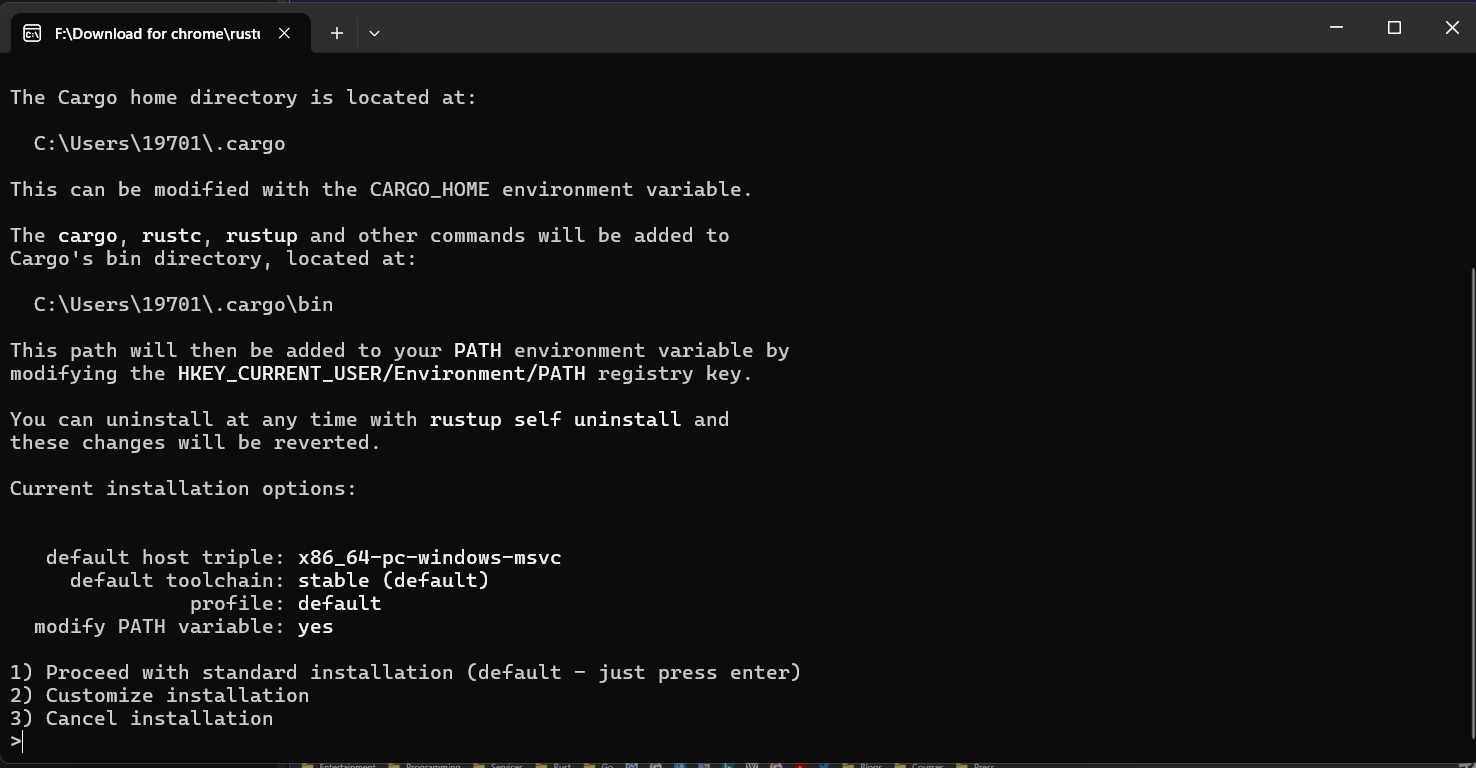
There are three options here:
- Option 1 (default): standard installation
- Option 2: custom installation, where you can choose the installation path, components, toolchain version, and more
- Option 3: cancel installation
For most people, Option 1 is enough (either type 1 and press Enter, or just press Enter directly).
If you see the following screen, Rust has been installed successfully:
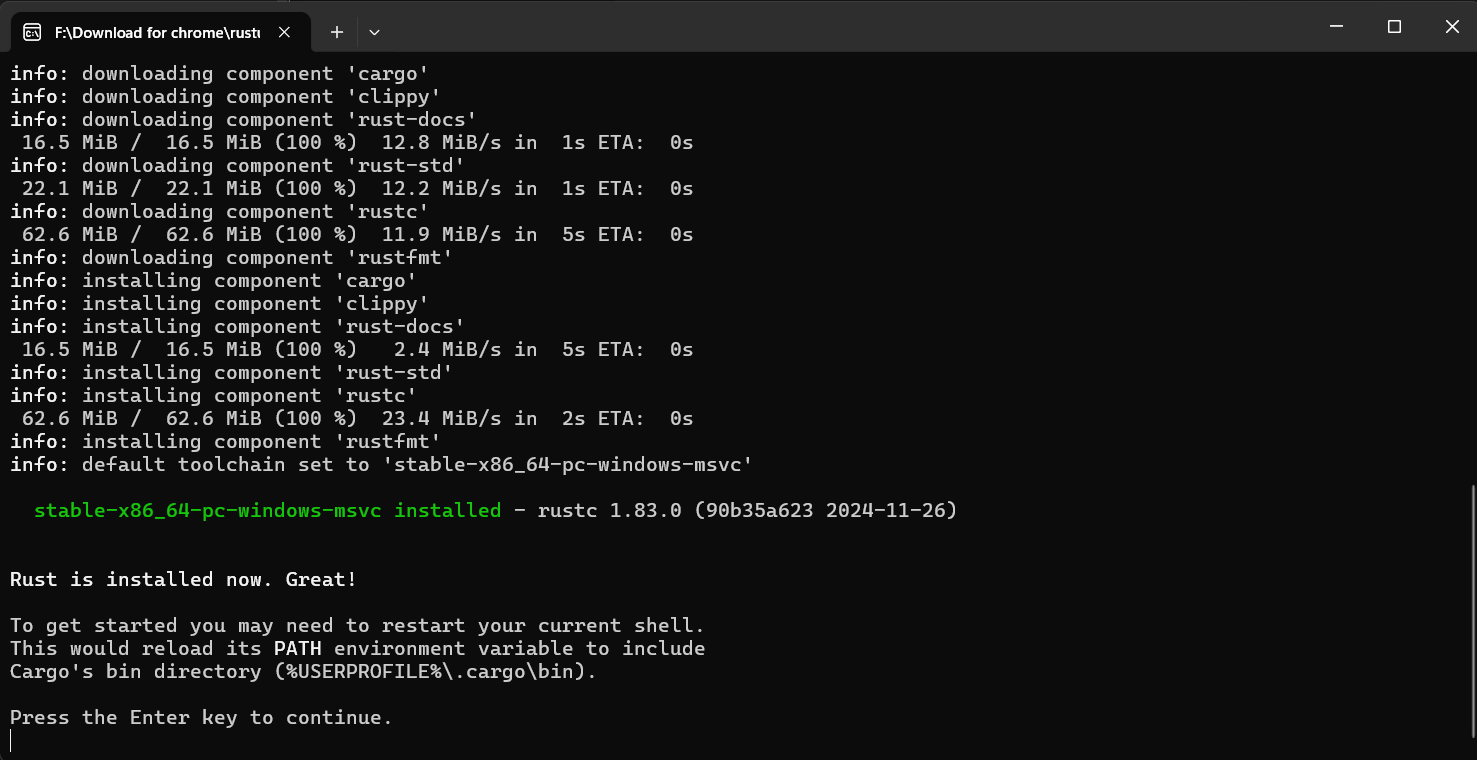 The installer will prompt you to restart your shell. Press Enter and the program will exit, and Rust will be installed.
1.1.2 Rust Command-Line Operations
Rust commands on Windows can be run in Terminal (it comes with Windows 11; if you do not have it, search for Windows Terminal in the Microsoft Store and install it).
-
Update Rust:
rustup updateRust is a relatively new language and is updated very frequently, so it is recommended to run this from time to time to get the latest version. -
Uninstall Rust:
rustup self uninstall -
Check the installation:
rustc --versionorrustc -VOutput format:rustc x.y.z (xxxxxxxxx yyyy-mm-dd)x.y.zindicates the version numberxxxxxxxxxindicates the hash of the current versionyyyy-mm-ddindicates the commit date of that version in that year
-
Open the local Rust documentation manual:
rustup doc
Development Tools
- Install the Rust plugin for VS Code
- VIM
- Helix
- RustRover
- …
1.2 Basic Understanding of Rust and Printing “Hello World”
1.2.0 Aside
I strongly recommend using RustRover developed by JetBrains (it is currently free for non-commercial use) as the IDE for writing Rust. I will also continue using RustRover for demonstrations in later articles. This article assumes you already have some programming experience, and C/C++ experience would be even better.
1.2.1 Writing Rust Programs
-
File extension:
.rs -
Naming convention: snake case, using lowercase letters and underscores to separate words Example:
hello_world.rs
1.2.2 Printing Hello World
Step 1: Create a New Rust Project
Open RustRover and click New Project. You will see the following screen:
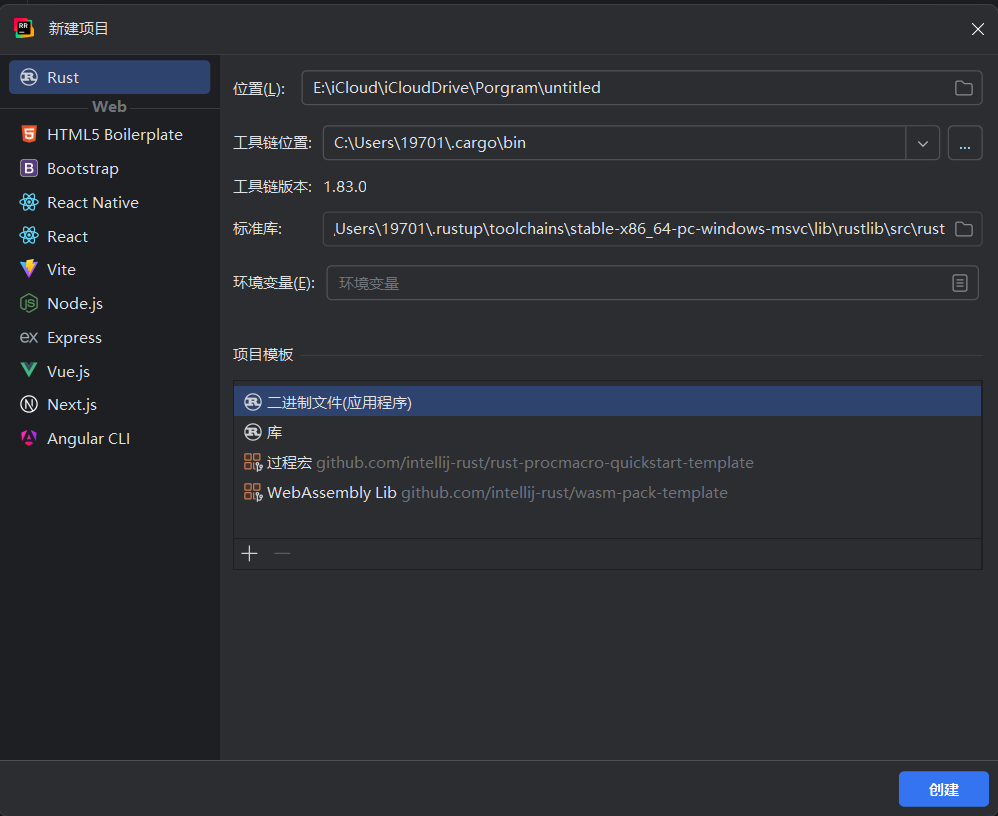 Change the project save path or choose the location of the toolchain according to your needs, then click Create. If the IDE does not recognize the toolchain, check whether Rust has been downloaded and installed. The installation guide is on the homepage.
Step 2: Write the Code
Because RustRover automatically configures Cargo for new projects (which will be covered in the next article), the project will directly generate main.rs and include code for printing Hello World:
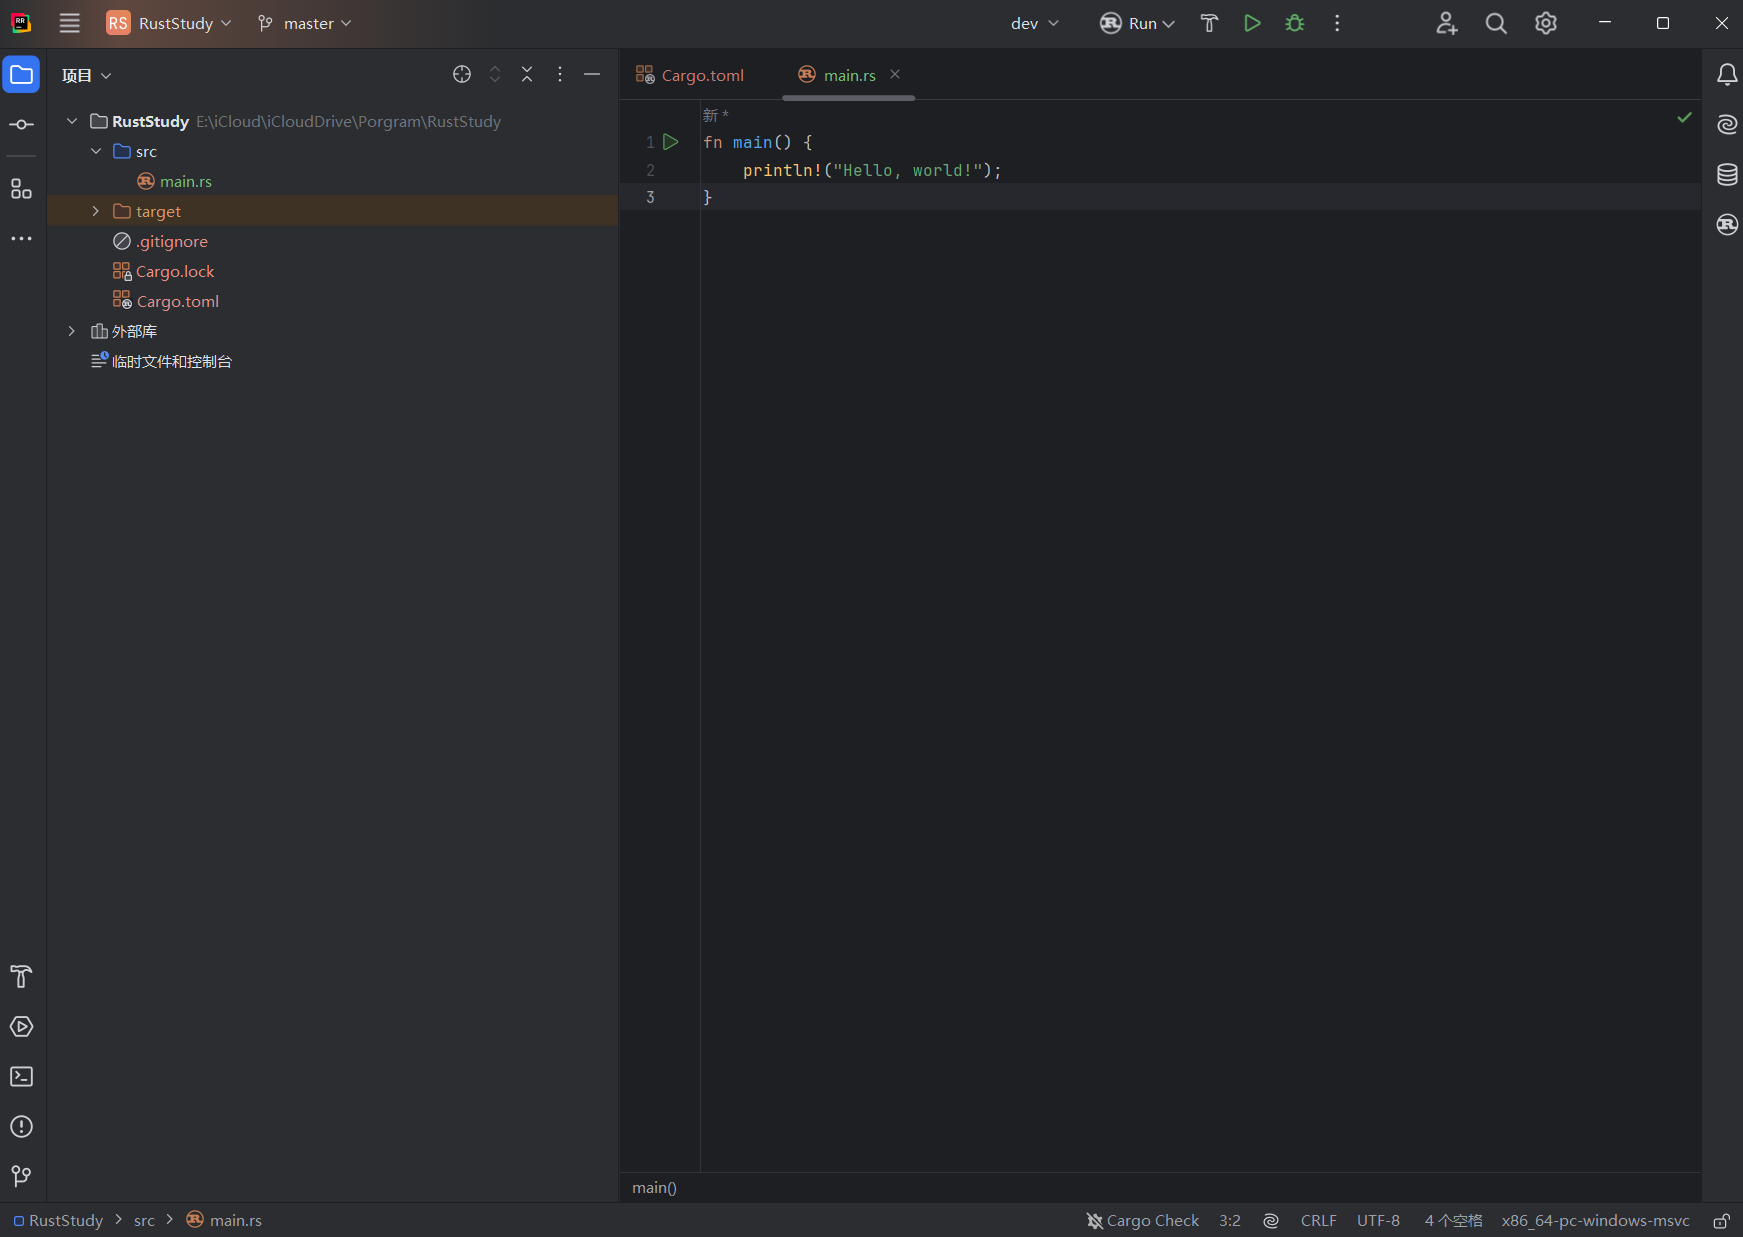
Understanding the code:
fn main(){
    println!("Hello World");
}-
fn: indicates that a function is being created (equivalent tofunctionin JS,funcin Go, anddefin Python) -
main(){}:mainis the function name. The()contains parameters; if there are none, nothing is written. The{}contains the function body. Themainfunction is special: it is the first code executed by every Rust executable program -
println!();:println!()is the print function. The parentheses contain the content to print. The!in the function name means this is a macro function, which will be covered later. This macro call must end with;because it behaves like a statement. -
"Hello World":""represents a string, andHello Worldis the content of that string
Note: Rust indentation uses 4 spaces instead of 1 tab. The reason is that tabs have a drawback: they can appear differently depending on editor settings; some use 2 spaces, some use 4 spaces, so space indentation is more stable.
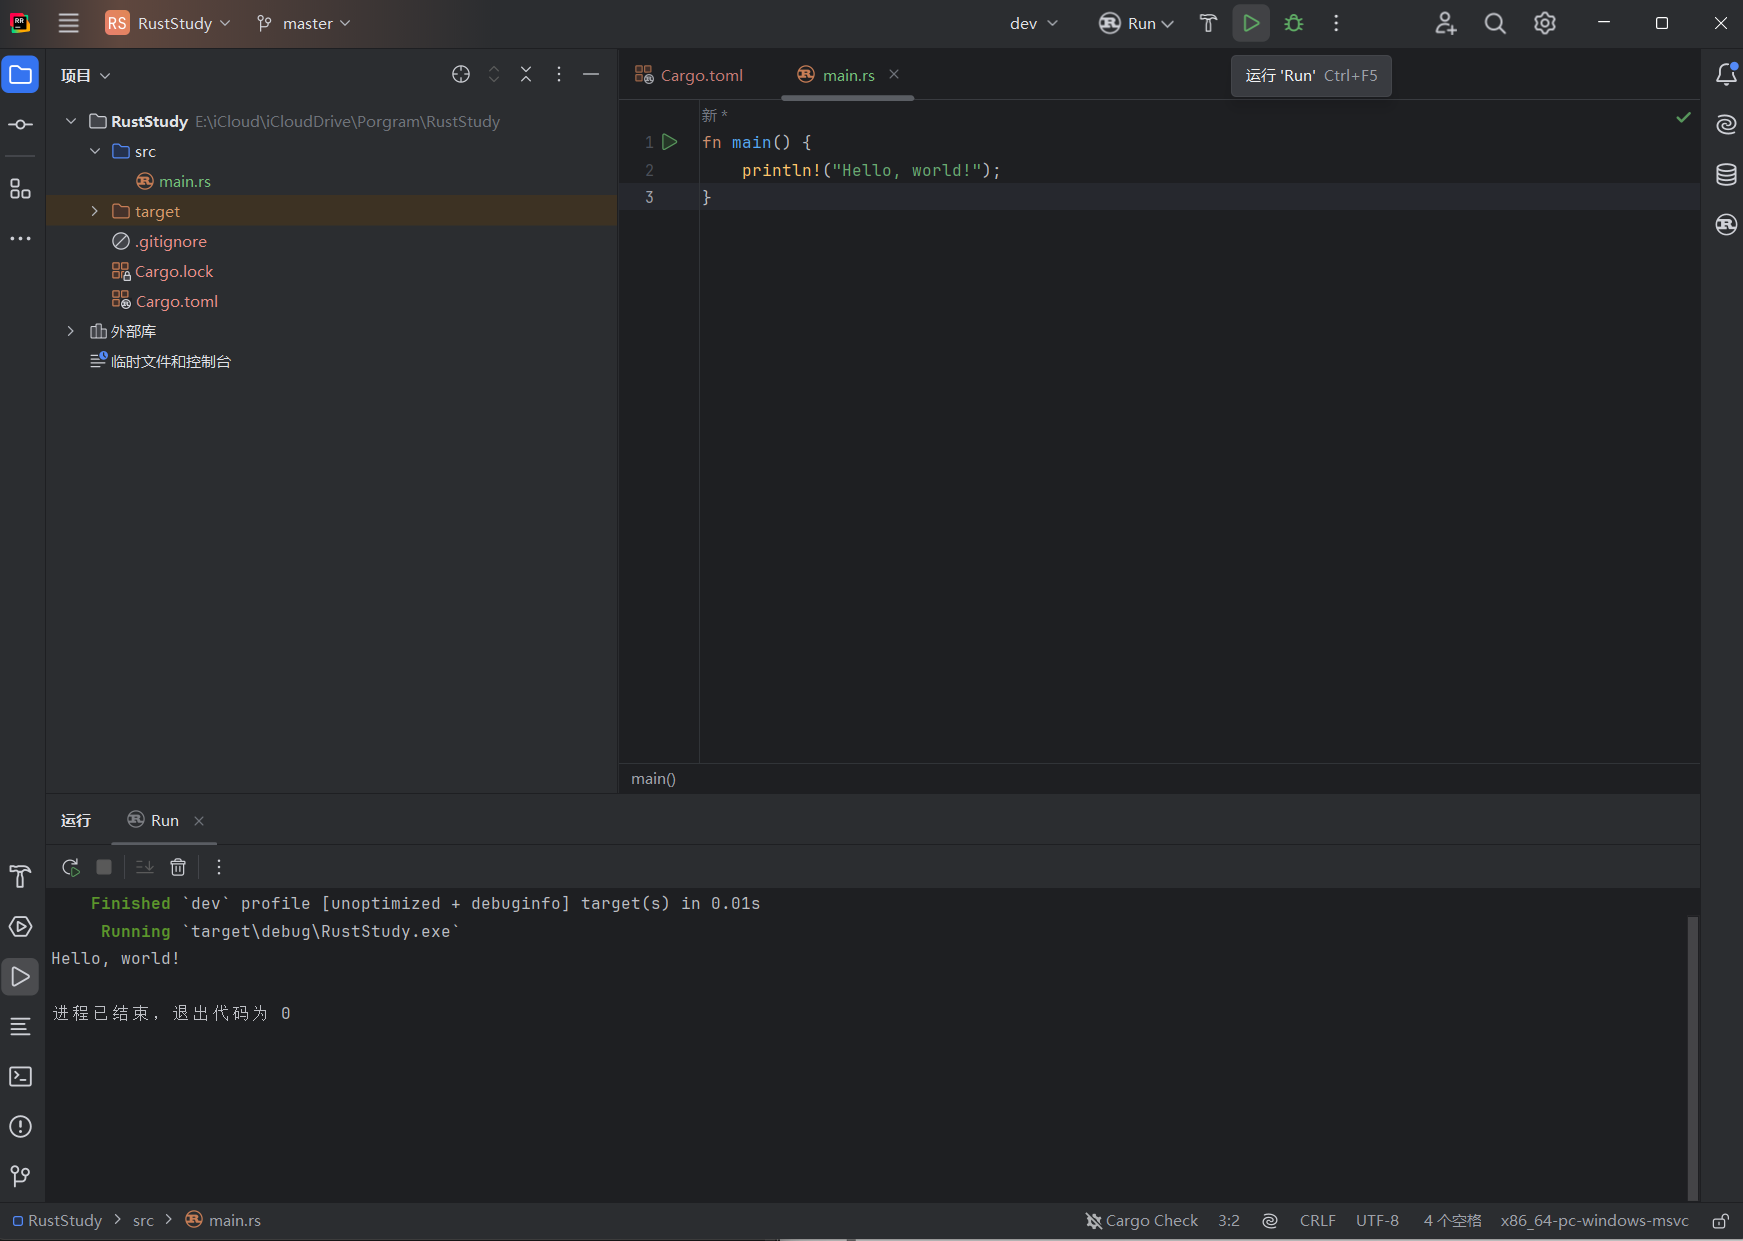
Step 3: Run
Simply click the Run button in the top-left corner of RustRover (or press Ctrl + F5) and you will see Hello World printed successfully.
For non-RustRover users, you can also run the program through Terminal:
-
Open the terminal, copy the folder path containing the
.rsfile, and entercd folder_pathto open that folder in the terminal.
-
Enter
rustc main.rsto compile. If your program file is not namedmain.rs, you can replace it with your own file name. You will see two extra files with the same name but different extensions in the directory where the program is located (on Linux/macOS, there is only one and no.pdbfile). The.pdbfile is a Windows debugging symbol file, and.exeis the executable file.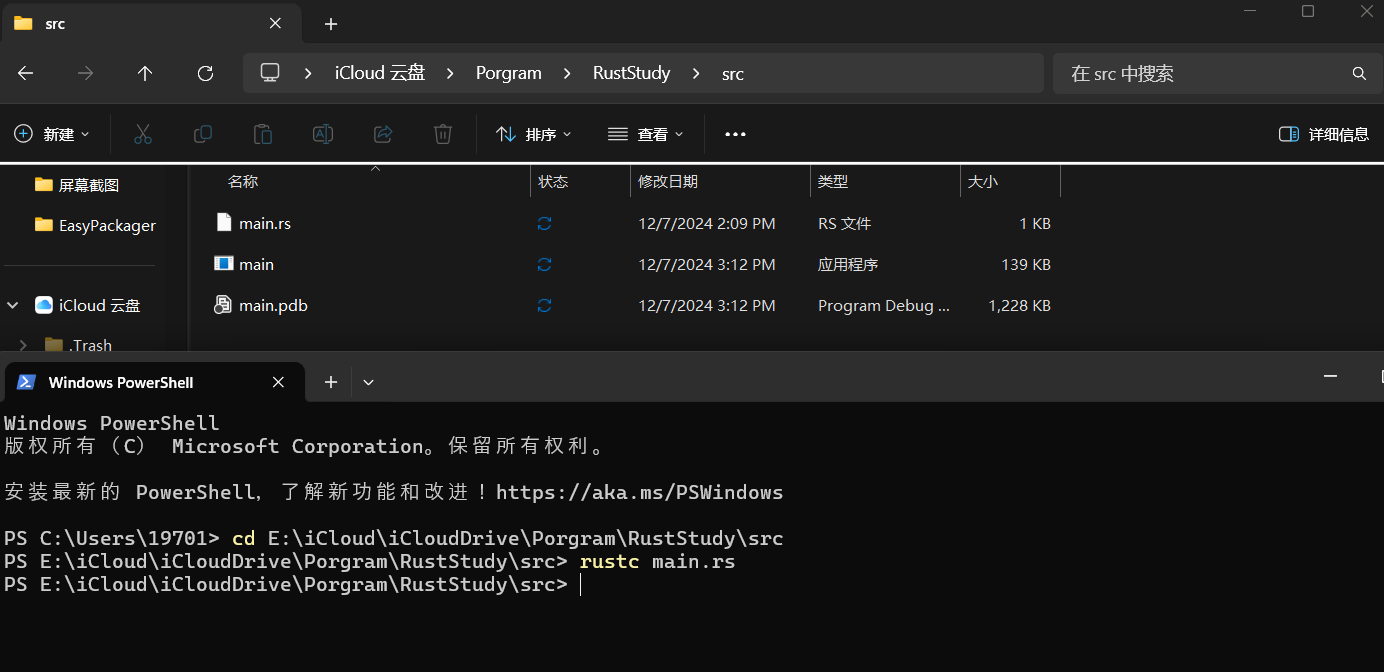
-
For Windows, enter
.\main.exein the terminal; for Linux/macOS, enter./main. If your program is not namedmain, just replacemainwith your program name.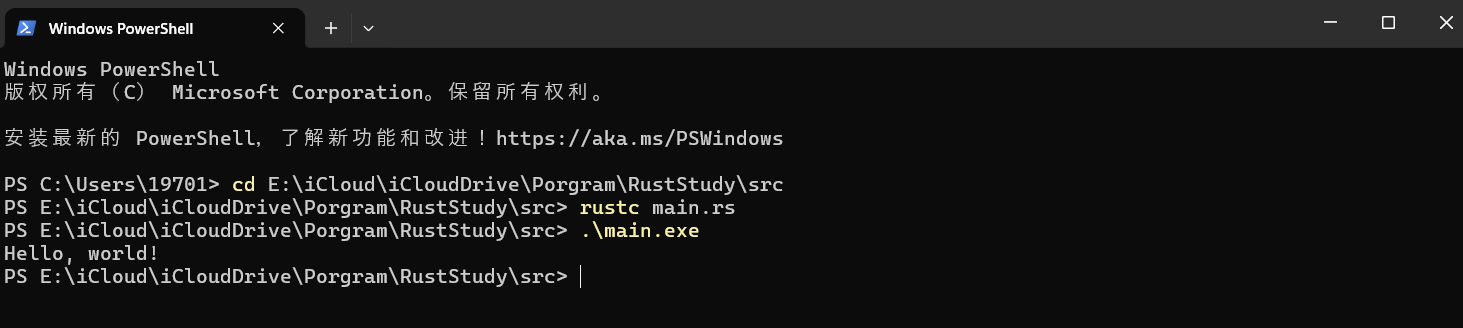
Note: compilation and execution are two separate steps
- Before running a Rust program, you must compile it first with
rustc your_program_name.rs - After successful compilation, a binary file will be generated (on Windows, a
.pdbfile will also be generated) - Rust is an ahead-of-time compiled language, which means you can compile the program first and then hand the executable to someone else to run without installing Rust
rustcis suitable only for simple Rust programs; complex Rust programs need Cargo (which will be discussed in the next chapter)
1.3 Basic Knowledge of Rust Cargo
1.3.0 Review
At the end of the article 1.2. Basic Understanding of Rust and Printing “Hello World”, it was mentioned that only small and simple Rust projects are suitable for compilation with rustc, while large projects need Cargo. This article introduces Cargo in detail.
1.3.1 What Is Cargo
Cargo is Rust’s build system and package manager. It can build code, download dependent libraries, build those libraries, and more.
Cargo is installed together with Rust. To check whether Cargo is installed correctly, run the command cargo --version in the terminal.

1.3.2 Creating Projects with Cargo
Projects created in RustRover automatically come with Cargo configuration, and you can see a file named Cargo.toml in the project tree on the left.
For users who do not use RustRover, you can configure Cargo in the terminal:
- Copy the folder path where you want the Cargo project to be, open the terminal, and run
cd desired_path - Then run
cargo new desired_project_nameto create the project - Open this path in your IDE, and the project will be inside the folder named after your Cargo project
The final project structure should look like this:
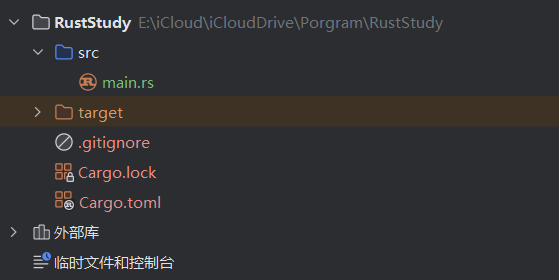 PS: Some IDEs do not create the
 target folder and the Cargo.lock file immediately; they appear only after the first compilation
Project structure explained:
-
srcis short for Source Code. This folder stores your code. -
.gitignoreindicates that a Git repository has been initialized when the project was created. You can also use another VCS (Version Control System) or no VCS at all; just set it when creating the project (cargo new desired_project_name), using the--vcsoption. -
The contents of
Cargo.tomlwill be explained below.
1.3.3 Cargo.toml
The .toml format (Tom’s Obvious, Minimal Language) is Cargo’s configuration file format.
Its content is as follows:
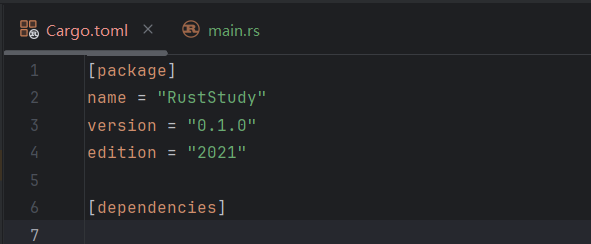
Content explanation:
-
[package]is a section header indicating that the content below is used to configure the packagenamespecifies the project nameversionspecifies the project versionauthorsspecifies the project authors. It is optional and not included here. If present, the format should be:authors = ["your_name <your_email@xxx.com>"]editionspecifies the Rust edition being used
-
[dependencies]is another section header. The content below is used to configure dependencies, and it lists the project’s dependencies. If there are no dependencies, this section is empty.
PS: In Rust, code packages (libraries) are called crates.
1.3.4 Project Structure Format
- All source code should be placed in the
srcdirectory Cargo.tomlshould be placed in the top-level directory- The top-level directory can contain README files, licenses, configuration files, and other files unrelated to source code
1.3.5 Converting a Non-Cargo Project to Cargo
- Move the source code into the
srcdirectory - Create
Cargo.tomland fill in the configuration based on the source code
1.3.6 Building a Cargo Project
-
Copy the folder path where the Cargo project is located, open the terminal, and run
cd Cargo_project_path -
Run
cargo build. This command creates an executable file. On Windows, its path istarget\debug\your_Cargo_project_name.exe; on Linux/macOS, its path istarget/debug/your_Cargo_project_name -
Run that executable file; first make sure you have completed the first step. On Windows, enter
.\target\debug\your_Cargo_project_name.exein the terminal; on Linux/macOS, enter./target/debug/your_Cargo_project_name -
The first time you run
cargo build, acargo.lockfile will be generated in the top-level directory
1.3.7 Cargo.lock
cargo.lock is generated after the project is compiled for the first time (some IDEs generate it automatically before the first compilation). Its content looks like this:
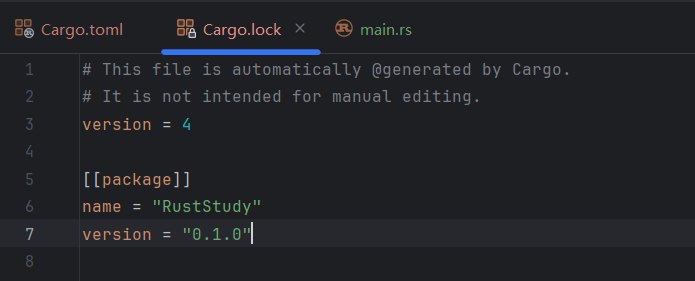 This file is used to track the exact versions of the project’s dependencies. As the comment in the file says, you do not need to and should not manually edit this file.
1.3.8 Running a Cargo Project
- Copy the folder path where the Cargo project is located, open the terminal, and run
cd Cargo_project_path - Run
cargo run
cargo run actually performs two steps: compile the code and execute the result. It first generates an executable file and then runs that file. If the project compiled successfully before and the source code has not changed, it will run the executable directly.
1.3.9 Checking Code
The purpose of cargo check is to check whether the code can be compiled successfully, but it does not produce an executable file. cargo check is much faster than cargo build, so you can use it repeatedly while writing code to improve efficiency.
Usage:
- Copy the folder path where the Cargo project is located, open the terminal, and run
cd Cargo_project_path - Run
cargo check
1.3.10 Building for Release
The cargo build command is used during development (debugging). When you finish writing the code and want to release it, you should use cargo build --release, which builds a release version instead of cargo build. Compared with the development build, the former takes longer to compile but runs faster. The executable generated by the former will be in target/release instead of target/debug.
2.1 Number Guessing Game Pt.1 - One Guess
2.1.0 What You Will Learn
In this chapter, you will learn:
- Variable declarations
- Related functions
- Enum types
- Advanced use of
println!() - …
2.1.1 Game Goal
- Generate a random number between 1 and 100
- Prompt the player to enter a guess (covered in this chapter)
- After the guess, the program will tell the player whether the guess is too large or too small
- If the guess is correct, print a celebration message and exit the program
2.1.2 Code Implementation
Step 1: Print the game title and prompt the user
- Build the
mainfunction. How to build a function and its format were mentioned in 1.2. Basic Understanding of Rust and Printing “Hello World”, so I will not repeat them here:
fn main() {

}- Use the
println!()macro to print text:
fn main() {
    println!("Number Guessing Game");

    println!("Guess a number");
}
Step 2: Create a variable to store the user’s input
After prompting the user for input, the program needs a variable to store that input. The code line should look like this:
#![allow(unused)]
fn main() {
let mut guess = String::new();
}letdeclares a new variable, and by default the variable is immutable.- Adding
mutafterletmeans the declared variable is mutable. guessis the name of the variable.=is used for assignment.String::new()is a static method used to create a new, empty string.Stringis the UTF-8 dynamic string type provided by Rust’s standard library.::indicates thatnew()is an associated function of theStringtype, meaning it is implemented for the type itself rather than for a specific string instance, similar to a static method in C# or Java. CallingString::new()returns a newStringinstance with no content, that is, an empty string.
Many types in Rust have a new() function, and new() is a common name for creating instances of a type.
Step 3: Read the user’s input
Next we need to read the user’s input. The code is:
#![allow(unused)]
fn main() {
io::stdin().read_line(&mut guess).expect("Could not read the line");
}iois the module name. This module contains thestdin()function we need.::is used to access an associated function.stdin()is a function that obtains the standard input stream and returns an instance of theStdintype. It is used as a handle to process standard input from the terminal..read_line()is a method provided by theStdintype. It reads a line from standard input into a string and passes it to a mutable string variable.read_line()also returns aResult, an enum with two variants:OkandErr. Ifread_line()succeeds, it returnsOkwith the number of bytes read; if it fails, it returnsErrwith the reason for failure.&mut guesspasses the content read by.read_line()into the mutable variableguess. Here,&means taking a reference, which allows the same data (memory address) to be accessed in different parts of the code.mutmeans the referenced variable is mutable.- Errors may occur while reading, so we need to call
.expect(), which is a method on theResulttype returned byread_line(). If reading fails,read_line()returnsErr, and.expect()immediately triggerspanic!, ends the current program, and prints the error message provided toexpect. If reading succeeds,read_line()returnsOk, and.expect()gives back the attached value.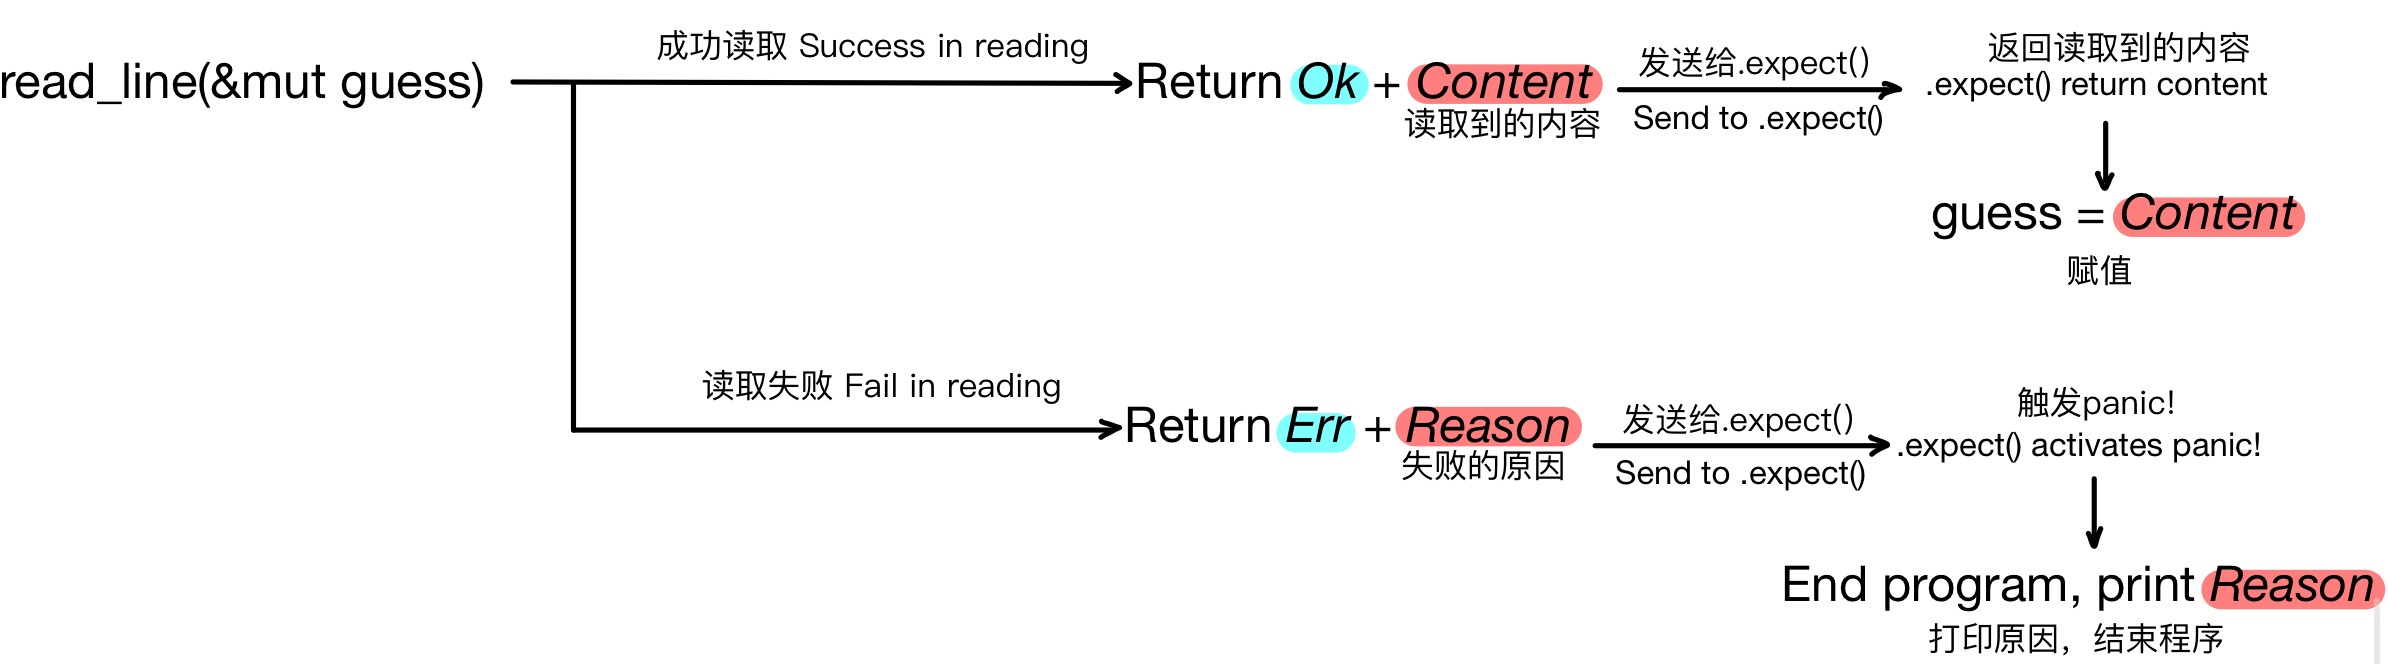 PS: You can omit
 .expect(), butcargo buildwill emit a warning.
If you are writing this in an IDE, you may notice that io is highlighted in red. That is because this program has not yet declared that module as a dependency. You only need to add the import at the beginning of the program:
#![allow(unused)]
fn main() {
use std::io;
}useis the keyword for importing items.std::iorefers to theiomodule under the standard library (std).
You can also add the library name directly on the line that uses the io module, so you do not need to add an import at the top of the program:
#![allow(unused)]
fn main() {
std::io::stdin().read_line(&mut guess).expect("Could not read the line");
}
In fact, by default Rust imports the contents of a module called prelude into the scope of every program (a concept we will discuss later). Some people call it the prelude module. If the type you want to use is not in the prelude, you need to import it explicitly.
Step 4: Print the user’s input
Finally, print the user’s input:
#![allow(unused)]
fn main() {
println!("The number you guessed is:{}", guess);
}- In
"The number you guessed is:{}",{}is a placeholder whose value will be replaced at output time by the value of the following variable, which isguesshere.
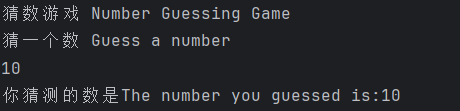
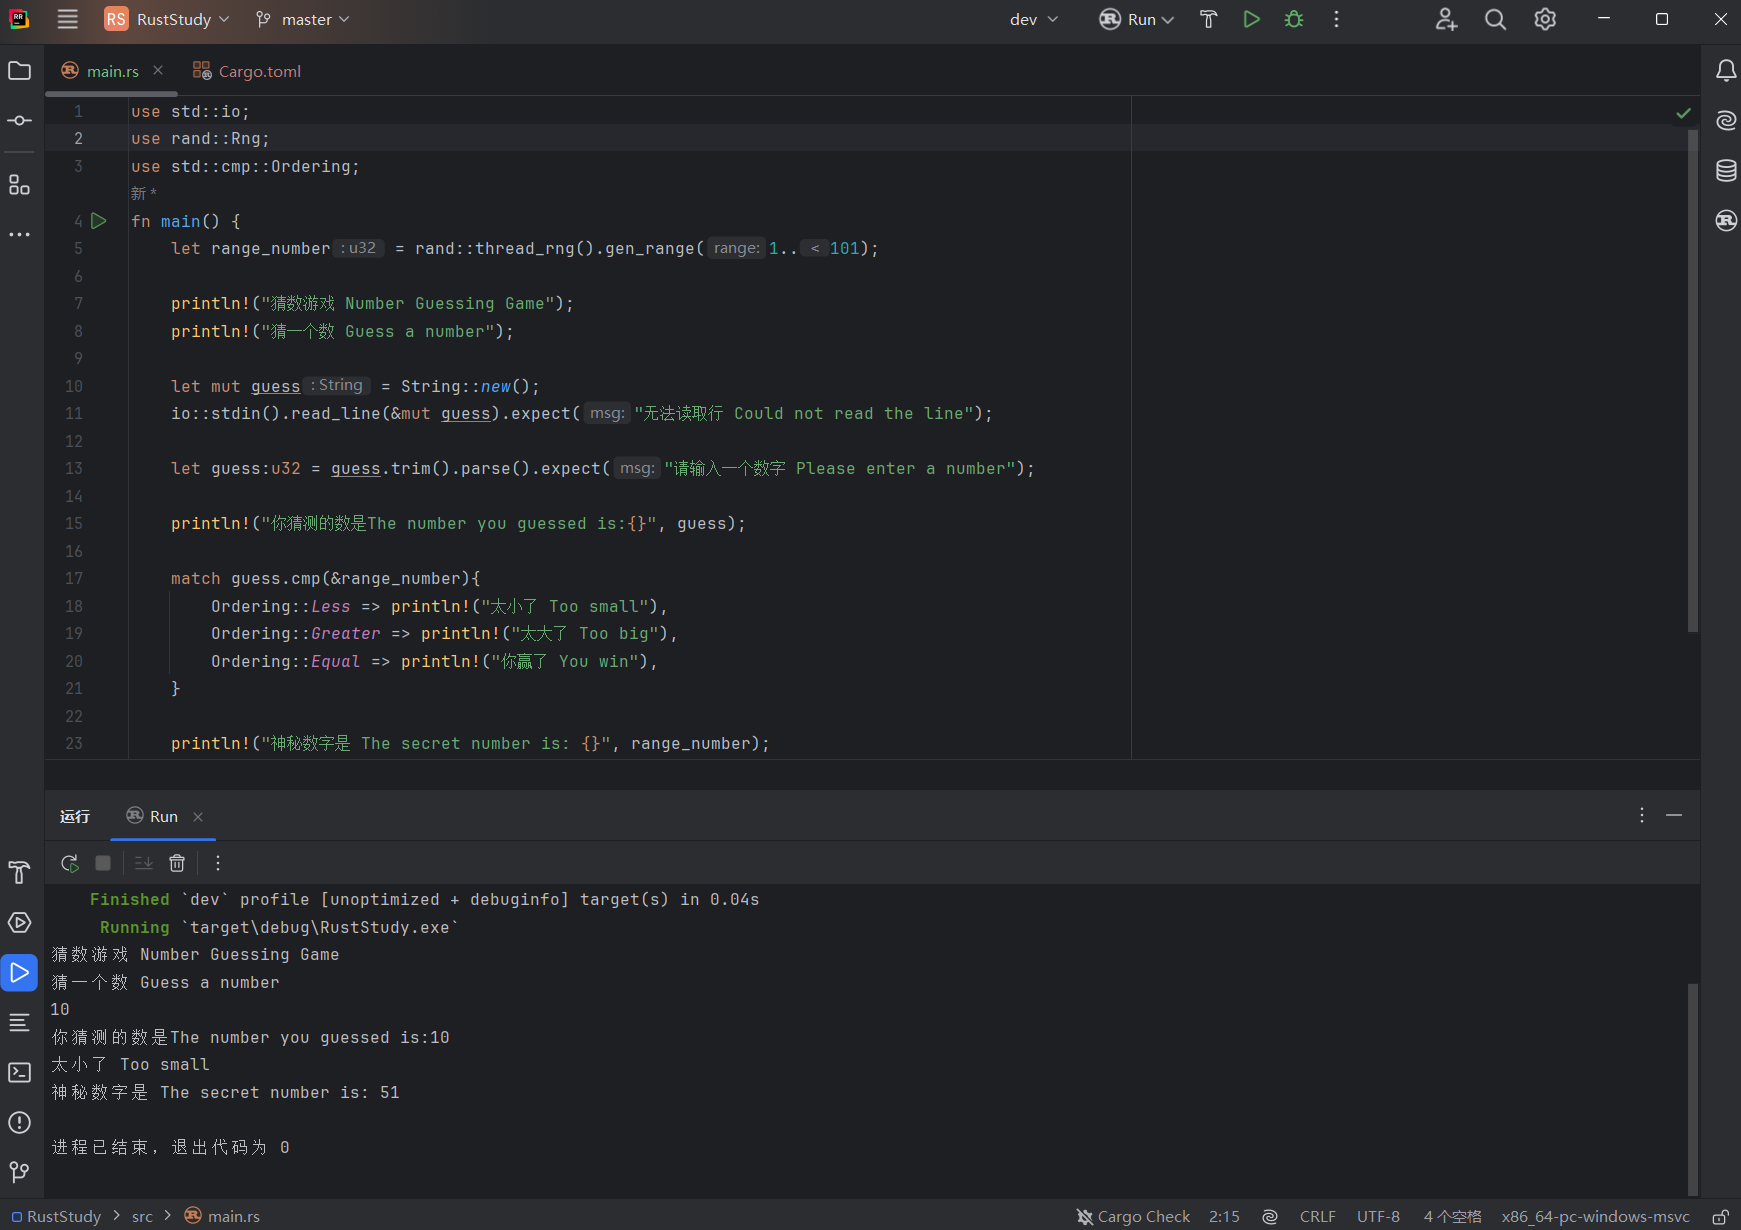
2.1.3 Result
Here is the complete code:
use std::io;

fn main() {
    println!("Number Guessing Game");

    println!("Guess a number");

    let mut guess = String::new();

    io::stdin().read_line(&mut guess).expect("Could not read the line");

    println!("The number you guessed is:{}", guess);
}
Result:
2.2 Number Guessing Game Pt.2 - Generating Random Numbers
2.2.0 What You Will Learn
In this chapter, you will learn:
- Searching for and downloading external crates
- Cargo dependency management
- Semantic versioning rules for upgrades
- The
randrandom-number generator - …
2.2.1 Game Goal
- Generate a random number between 1 and 100 (covered in this chapter)
- Prompt the player to enter a guess
- After the guess, the program will tell the player whether the guess is too large or too small
- If the guess is correct, print a celebration message and exit the program
2.2.2 Code Implementation
Step 1: Find an external library
Although Rust’s standard library does not provide functions for generating random numbers, the Rust team has developed an external library with this capability. Search for rand on the official Rust crates registry to find it. The page provides a very detailed introduction to the crate.

Rust crates are divided into two types:
- Library crate: a crate that provides functionality or logical modules. It does not have a
mainfunction and cannot run on its own. It is typically used to share functionality with other code. Therandcrate is a library crate. - Binary crate: an executable program that contains a
mainfunction and produces a runnable binary after compilation. It is used to build independent, runnable Rust applications.
Step 2: Add the external crate to Cargo dependencies
Next, add the external crate to Cargo dependencies (Cargo was introduced in 1.3. Basic Knowledge of Rust Cargo, so I will not repeat that here) so that the program can use it.
Open the project’s Cargo.toml file and add the dependency under dependencies in the form dependency_name = "dependency_version" (this format can also be found under the Install section on the crate page). This program needs the rand dependency, version 0.8.5, so you should write rand = "0.8.5". If this dependency has its own dependencies, Cargo will automatically download them during compilation.
In fact, the version format 0.8.5 is shorthand. Its full form is ^0.8.5, which means any version that is compatible with the public API of 0.8.5 is allowed. For example, if a dependency version is 1.2, that means it can be upgraded to any 1.2.x version, but not to 2.0.0 or later.
Cargo keeps using the version you specify until you manually choose a different version.
If a dependency update breaks code that was written against an older version, what happens after rebuilding? The answer is in Cargo.lock. During a build, Cargo checks whether a Cargo.lock file already exists. If it does, Cargo uses the versions specified there, which avoids compatibility issues.
If you want to update versions to the current standard, you can use cargo update in the terminal. The steps are:
- Copy the path to the Cargo project, open the terminal, and enter
cd Cargo_project_path - Enter
cargo update
This command ignores Cargo.lock and uses the updated registry to find the latest dependency versions that satisfy the requirements in Cargo.toml, but the versions written in Cargo.toml will not change. For example, if a dependency is declared as version 1.2 in Cargo.toml, cargo update can upgrade it to the latest 1.x.x version, but not to 2.0.0 or later; the version written in Cargo.toml remains 1.2.
Step 3: Use the dependency in code
At the top of the program, use the use keyword to import the dependency:
#![allow(unused)]
fn main() {
use rand::Rng;
}
rand::Rng is a trait. Traits are similar to interfaces in other languages, such as Java interfaces or C++ pure virtual base classes, and define a set of functions and methods that types must implement. rand::Rng defines the methods needed by random-number generators.
Next, use this trait in main to generate a random number:
#![allow(unused)]
fn main() {
let range_number = rand::thread_rng().gen_range(1..101);
}
PS: In older versions, this would be written as gen_range(1, 101).
let range_number: declares an immutable variable namedrange_number=: assignmentrand::thread_rng(): returns aThreadRngvalue, which is a random-number generator. This generator lives in local thread space and obtains its seed from the operating system..gen_range(1..101): a method onrand::thread_rng()that takes a range and generates a random number within it. Here, it generates a number from 1 up to, but not including, 101.
Finally, print the random number (the use of println! was introduced in the previous article, so I will not repeat it):
#![allow(unused)]
fn main() {
println!("The secret number is: {}", range_number);
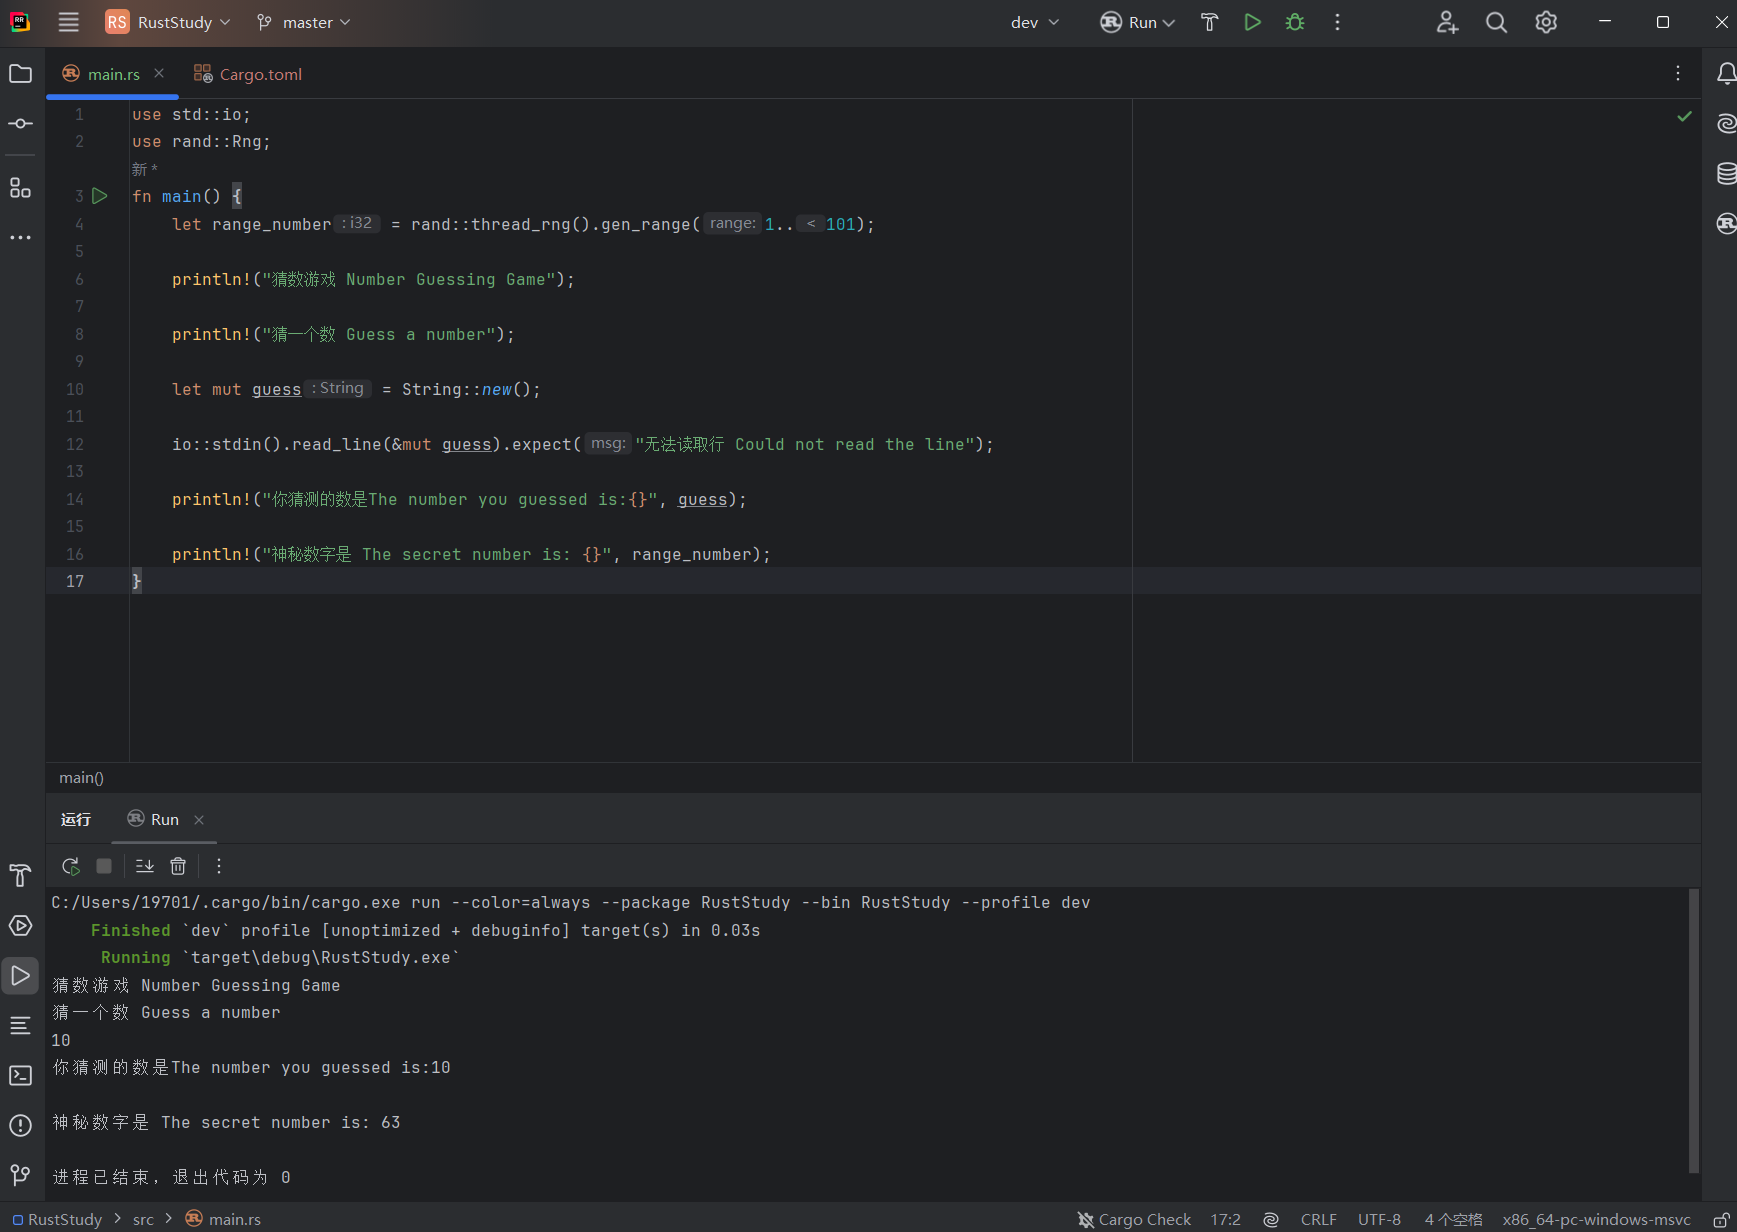
}2.2.3 Result
Here is the complete code:
use std::io;
use rand::Rng;

fn main() {
    let range_number = rand::thread_rng().gen_range(1..101);

    println!("Number Guessing Game");

    println!("Guess a number");

    let mut guess = String::new();

    io::stdin().read_line(&mut guess).expect("Could not read the line");

    println!("The number you guessed is:{}", guess);

    println!("The secret number is: {}", range_number);
}
The result is:
2.3 Number Guessing Game Pt.3 - Comparing Input and Random Number
2.3.0 What You Will Learn
In this chapter, you will learn:
- How to use
match - Shadowing
- Type casting
- The
Orderingtype
2.3.1 Game Goal
- Generate a random number between 1 and 100
- Prompt the player to enter a guess
- After the guess, the program will tell the player whether the guess is too large or too small (covered in this chapter)
- If the guess is correct, print a celebration message and exit the program
2.3.2 Code Implementation
Here is the code written up to the previous article:
use std::io;
use rand::Rng;

fn main() {
    let range_number = rand::thread_rng().gen_range(1..101);

    println!("Number Guessing Game");

    println!("Guess a number");

    let mut guess = String::new();

    io::stdin().read_line(&mut guess).expect("Could not read the line");

    println!("The number you guessed is:{}", guess);

    println!("The secret number is: {}", range_number);
}
Step 1: Convert the data type
From the code, we can see that guess is a string, while range_number is u32. The return type of gen_range follows the numeric type of the range. In this case, because 1 and 101 are inferred as u32, the return value is also u32. These two variables have different types and cannot be compared directly. We need to convert the string into an integer.
#![allow(unused)]
fn main() {
let guess: u32 = guess.trim().parse().expect("Please enter a number");
}-
let guess: u32: declares a variable namedguessof typeu32(an unsigned 32-bit integer, which means it cannot represent negative numbers). But there is a problem here: in the previous code (let mut guess = String::new();), a variable namedguesshas already been declared. Would this cause an error? No, because Rust allows a new variable with the same name to shadow the old one. This is called shadowing (when a variable, function, or type name is redefined in the current scope, it hides the variable, function, or type with the same name in the outer scope). It allows the code to reuse the same variable name without declaring a new one. We will discuss this feature in detail in the next chapter.Here is an example:
fn main() {
    let a = 1;
    println!("{}", a);
    let a = "one";
    println!("{}", a);
}
This code does not produce an error, and it prints:
1
one
When the program executes the second line, a is assigned the value 1, so 1 is printed. On the fourth line, the program notices that a is being reused, discards the old value 1, and assigns "one" to a, so the next line prints one. This is shadowing.
=: assignmentguess.trim(): here,guessrefers to the oldguess, whose type is a string containing the user’s input. Becauseread_line()records the user’s Enter key as well, we need to use.trim()..trim()removes leading and trailing spaces and newlines from the string, similar to.strip()in Python..parse(): parses a string into some numeric type. The user’s normal input will be a number between 1 and 100, and that value can fit into types likei32,u32, ori64. So what type does it become after parsing? You need to tell Rust which type you want, which is why the variable declaration explicitly specifiesu32(similar to static type annotations in Python, by adding:desired_typeafter the variable name). Of course, conversion can fail. For example, if the input isxyz, it cannot be parsed as an integer. Rust is smart enough to make.parse()return aResulttype (which we covered in Pt. 1). This enum has two variants:OkandErr. If conversion succeeds, the enum returnsOkand the converted result; if it fails, it returnsErrand the reason for the failure..expect(): a method on theResulttype, which is the same type returned by.parse(). If parsing fails,.parse()returnsErr, and.expect()immediately triggerspanic!, ends the current program, and prints the error message insideexpect. Otherwise,.parse()returnsOk, and.expect()returns the attached value, which is the converted number assigned toguess.
Step 2: Compare the numbers
After the data type conversion succeeds, we can compare the two numbers. First, import the type at the top of the code:
#![allow(unused)]
fn main() {
use std::cmp::Ordering;
}
This code imports the Ordering type from the std standard library. Ordering is an enum with three variants (you can think of them as three possible values): Ordering::Less, Ordering::Greater, and Ordering::Equal, which mean less than, greater than, and equal to.
Then write the comparison code in main:
#![allow(unused)]
fn main() {
match guess.cmp(&range_number) {
    Ordering::Less => println!("Too small"),
    Ordering::Greater => println!("Too big"),
    Ordering::Equal => println!("You win"),
}
}-
guess.cmp(&range_number):guesshas a method called.cmp()(cmpis short for compare). It compares the value before the dot with the value inside the parentheses. Here, the value before the dot isguess, and the value inside the parentheses is a reference torange_number(&is the address-of operator, which represents a reference). The return type of.cmp()isOrdering, which is the type imported above.This also involves Rust’s type inference. Here are two IDE screenshots, one before this
matchexpression was written and one after it was written. Pay attention to the linelet range_number = rand::thread_rng().gen_range(1..101);(line 5):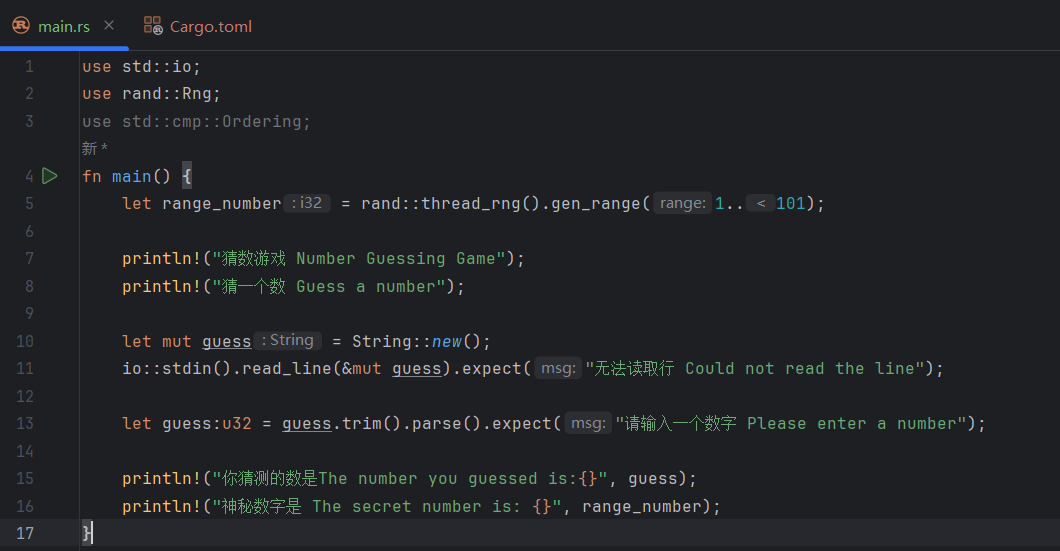
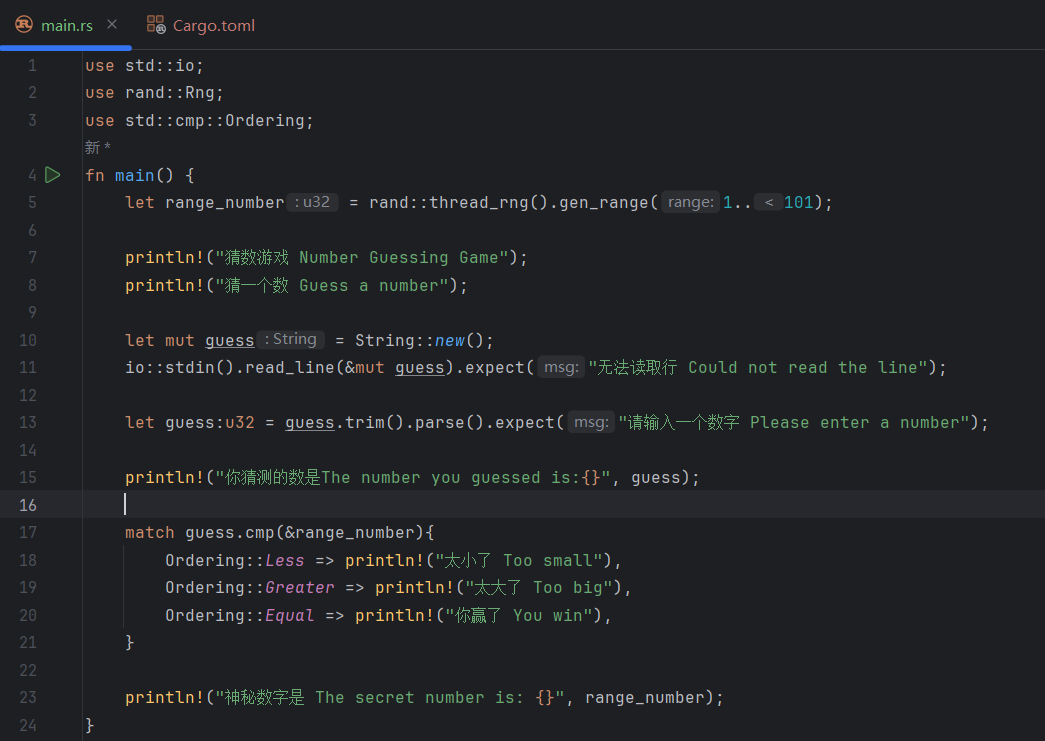 You can see that without the
 matchexpression, the IDE suggests thatrange_numberisi32. After writing thematchexpression, the IDE suggests thatrange_numberisu32. Why is that? Becauseguess.cmp(&range_number)performs a comparison, and althoughrange_numberis not explicitly typed,guesshas already been explicitly defined asu32. Thanks to Rust’s powerful context-based type inference, the requirement ofguess.cmp(&range_number)causesrange_numberto be inferred asu32. Without thematchexpression, because Rust’s default integer type isi32and there are no other constraints forcingrange_numberto be another type, the compiler infersi32. -
match: Rust’s pattern-matching expression. It lets us decide what to do next based on the value returned by.cmp(), which is theOrderingenum. Amatchexpression is made up of multiple arms (also called branches). Each branch contains a matching pattern (the condition used to match the input value) and a code block to execute (the block that runs when the pattern matches). If the value aftermatch(in this program,guess.cmp(&range_number)) matches one branch, the program runs that branch’s code.In this program,
Ordering::Less,Ordering::Greater, andOrdering::Equalare the matching patterns, andprintln!("Too small"),println!("Too big"), andprintln!("You win")are their corresponding code blocks. For example, ifguessis equal torange_number,.cmp()returnsOrdering::Equal,matchfinds the third branch that matches it, and then executes that branch’s code block, namelyprintln!("You win").matchchecks branches from top to bottom. In this program, that means it checksOrdering::Lessfirst, thenOrdering::Greater, and finallyOrdering::Equal.We will explain
matchin more detail in the next chapter.
2.3.3 Result
Here is the complete code so far:
use std::io;
use rand::Rng;
use std::cmp::Ordering;

fn main() {
    let range_number = rand::thread_rng().gen_range(1..101);

    println!("Number Guessing Game");
    println!("Guess a number");

    let mut guess = String::new();
    io::stdin().read_line(&mut guess).expect("Could not read the line");

    let guess: u32 = guess.trim().parse().expect("Please enter a number");

    println!("The number you guessed is:{}", guess);

    match guess.cmp(&range_number) {
        Ordering::Less => println!("Too small"),
        Ordering::Greater => println!("Too big"),
        Ordering::Equal => println!("You win"),
    }

    println!("The secret number is: {}", range_number);
}
The result is:
2.4 Number Guessing Game Pt.4 - Repeated Prompting with Loop
2.4.0 What You Will Learn
This is the final part of the number guessing game. In this chapter, you will learn:
- The
looploop breakcontinue- Flexible use of
match - How to handle enums
2.4.1 Game Goal
- Generate a random number between 1 and 100
- Prompt the player to enter a guess
- After the guess, the program will tell the player whether the guess is too large or too small
- Repeatedly prompt the player. If the guess is correct, print a celebration message and exit the program (covered in this chapter)
2.4.2 Code Implementation
Step 1: Implement the loop
In the previous code, we implemented a single round of input and comparison. Next, we need to make the program ask and compare repeatedly until the user guesses the correct number.
Here is the code up to the previous chapter:
use std::io;
use rand::Rng;
use std::cmp::Ordering;

fn main() {
    let range_number = rand::thread_rng().gen_range(1..101);

    println!("Number Guessing Game");

    println!("Guess a number");

    let mut guess = String::new();

    io::stdin().read_line(&mut guess).expect("Could not read the line");

    let guess: u32 = guess.trim().parse().expect("Please enter a number");

    println!("The number you guessed is:{}", guess);

    match guess.cmp(&range_number) {
        Ordering::Less => println!("Too small"),
        Ordering::Greater => println!("Too big"),
        Ordering::Equal => println!("You win"),
    }

    println!("The secret number is: {}", range_number);
}
The code we need to repeat is the part from prompting the user to comparing the guess and printing the result:
#![allow(unused)]
fn main() {
println!("Guess a number");

let mut guess = String::new();
io::stdin().read_line(&mut guess).expect("Could not read the line");

let guess: u32 = guess.trim().parse().expect("Please enter a number");

println!("The number you guessed is:{}", guess);

match guess.cmp(&range_number) {
    Ordering::Less => println!("Too small"),
    Ordering::Greater => println!("Too big"),
    Ordering::Equal => println!("You win"),
}
}
Rust provides the keyword loop for an infinite loop. Its structure is:
#![allow(unused)]
fn main() {
loop {
	// Write code here that wants to loop indefinitely
}
}
Just place the code that needs to be repeated inside this structure:
#![allow(unused)]
fn main() {
loop {
    println!("Guess a number");

    let mut guess = String::new();
    io::stdin().read_line(&mut guess).expect("Could not read the line");

    let guess: u32 = guess.trim().parse().expect("Please enter a number");

    println!("The number you guessed is:{}", guess);

    match guess.cmp(&range_number) {
        Ordering::Less => println!("Too small"),
        Ordering::Greater => println!("Too big"),
        Ordering::Equal => println!("You win"),
    }
}
}
Step 2: Condition for exiting the program
However, note that although this gives us repeated prompting, the program will keep asking forever and never exit. Logically, once the user guesses correctly and the program prints the congratulatory message, it should stop asking. This is where the keyword break for breaking out of a loop is needed. Put it after the Ordering::Equal arm (the concept of arms was explained in the previous article, so I will not repeat it here). Also remember that if an arm needs to execute multiple lines of code, wrap the code block in {}.
#![allow(unused)]
fn main() {
match guess.cmp(&range_number) {
    Ordering::Less => println!("Too small"),
    Ordering::Greater => println!("Too big"),
    Ordering::Equal => {
        println!("You win");
        break;
    }
}
}
Step 3: Handling invalid input
This code still has another problem: if the user’s input is not an integer, .parse() returns Err, and .expect() immediately terminates the program. The correct behavior is to print an error message and then let the user try again.
What should we do? In 2.1 Number Guessing Game Pt.1 - One Guess, we mentioned that .parse() returns an enum. If conversion succeeds, the return value is Ok plus the converted content; if it fails, the return value is Err plus the reason for failure. So where did we use this enum before? That’s right — in the previous article, we introduced the Ordering enum. There, we used match to handle the greater-than, less-than, and equal cases. Here, we can also use match to handle the return value of .parse() and perform different actions for different cases: if conversion succeeds, continue execution; if it fails, skip the rest of the code and start the next loop iteration. The keyword for skipping the current loop iteration in Rust is the same as in other languages: continue.
How do we change the code? We replace let guess: u32 = guess.trim().parse().expect("Please enter a number"); with:
#![allow(unused)]
fn main() {
let guess: u32 = match guess.trim().parse() {
    Ok(num) => num,
    Err(_) => continue,
};
}
Ok(num) => num: this branch handles the case where conversion succeeds. The return value isOkplus the converted value.Okis a variant of this enum, and the value inside the parentheses afterOkis the converted content (u32). Writingnumhere means binding the converted content tonum, andnumis then passed to thematchexpression as the result and ultimately assigned toguess.Err(_) => continue: this branch handles the case where conversion fails.Erris the enum variant, and the value inside the parentheses afterErris the reason for failure (&str). The_means we do not care about the error message; we only need to know that it isErr.
Using match instead of .expect() to handle errors is a common Rust pattern.
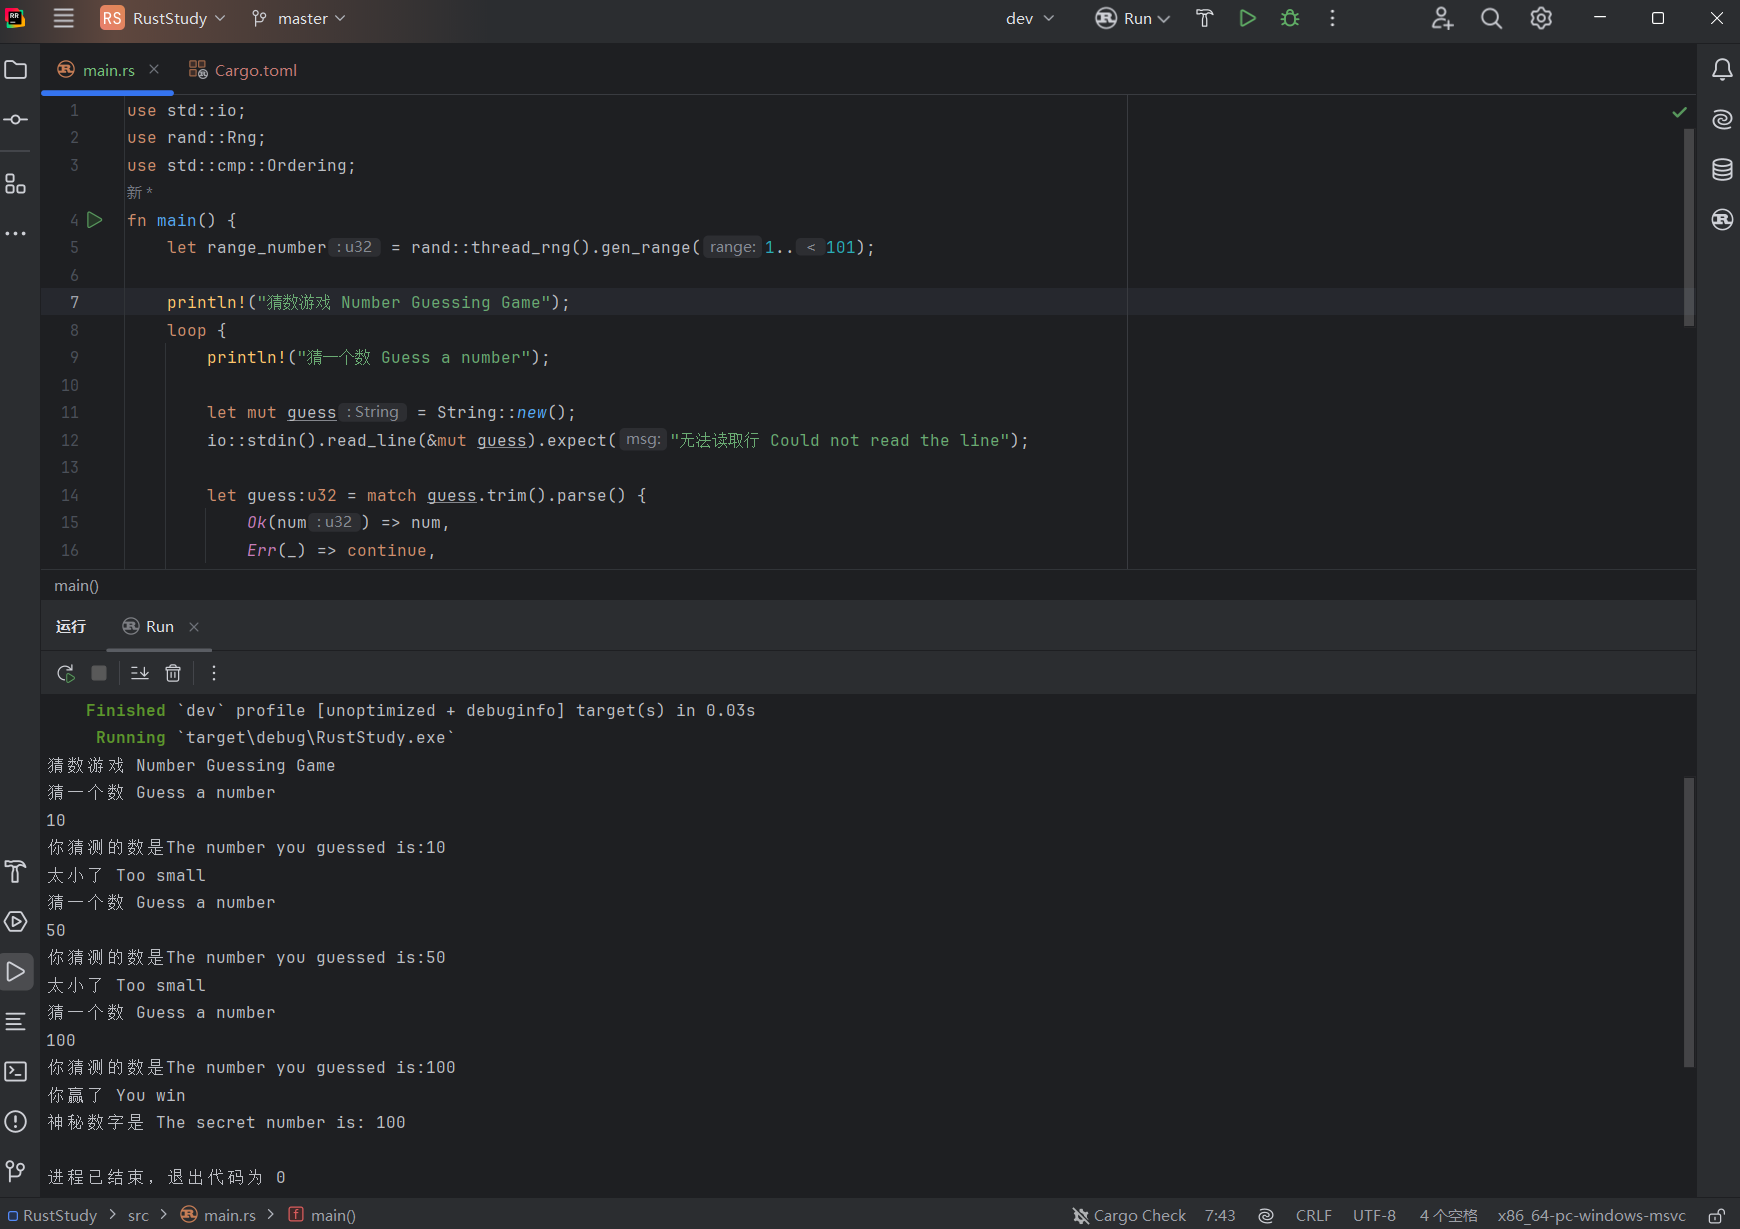
2.4.3 Result
Here is the complete code:
use std::io;
use rand::Rng;
use std::cmp::Ordering;

fn main() {
    let range_number = rand::thread_rng().gen_range(1..101);

    println!("Number Guessing Game");
    loop {
        println!("Guess a number");

        let mut guess = String::new();
        io::stdin().read_line(&mut guess).expect("Could not read the line");

        let guess: u32 = match guess.trim().parse() {
            Ok(num) => num,
            Err(_) => continue,
        };

        println!("The number you guessed is:{}", guess);

        match guess.cmp(&range_number) {
            Ordering::Less => println!("Too small"),
            Ordering::Greater => println!("Too big"),
            Ordering::Equal => {
                println!("You win");
                break;
            },
        }
    }

    println!("The secret number is: {}", range_number);
}
Result:
3.1 Variables and Mutability
3.1.0. Before We Begin
Welcome to Chapter 3 of this Rust self-study series. It has 6 sections:
- Variables and Mutability (this article)
- Data Types: Scalar Types
- Data Types: Compound Types
- Functions and Comments
- Control Flow:
if else - Control Flow: Loops
Through the guessing game in Chapter 2 (beginners who have not read it are strongly encouraged to take a look), you should now have learned the basic Rust syntax. In Chapter 3, we will go one level deeper and learn the general programming concepts in Rust.
3.1.1. Declaring Mutable and Immutable Variables
-
Use the
letkeyword to declare a variable. -
By default, variables are immutable. Here is an incorrect example; the error is shown in the comment:
fn main(){
	let machine = 6657;
	machine = 0721; // Error: cannot assign twice to immutable variable
	println!("machine is {}", machine);
}- You must add
mutafterletto declare a mutable variable. Here is a successful example; the output is shown in the comment:
fn main(){
	let mut machine = 6657;
	machine = 721;
	println!("machine is {}", machine); // Output: machine is 721
}
3.1.2. Variables and Constants
Many people who are just starting to learn Rust get confused about the difference between immutable variables and constants. Constants are immutable after they are bound to a value, but they differ from immutable variables in several important ways:
- Constants cannot use
mut; once declared, they are immutable. - Constants must be declared with the
constkeyword, and their type must be explicitly annotated; immutable variables do not have to be. - Constants can be declared in any scope, including the global scope.
- Constants can only be bound to constant expressions; they cannot be bound to the result of a function call or to values that can only be computed at runtime.
- During program execution, a constant remains valid for the entire scope in which it is declared.
- Naming convention: Rust constants use all-uppercase letters, with underscores between words, for example:
MAX_POINTS.
Here is an example of a constant declaration:
const WJQ: i32 = 66570721;
fn main(){
    const WJQ_MACHINE: u32 = 6_657;
    let mut machine = 6657;
    machine = 721;
    println!("machine is {}", machine); // Output: machine is 721
    println!("WJQ is {}", WJQ); // Output: WJQ is 66570721
    println!("WJQ_MACHINE is {}", WJQ_MACHINE); // Output: WJQ_MACHINE is 6657
}
i32 and u32 are the types. Rust allows underscores to improve readability. In this example, 6_657 could also be written as 6657.
This constant can be declared globally, inside main, or in any other scope.
3.1.3. Shadowing
In the guessing game from earlier, we already briefly mentioned that Rust allows a new variable with the same name to shadow the original one. This is called shadowing (when a name is redefined in the current scope, it hides a variable, function, or type with the same name from an outer scope). Each time a name is shadowed, the original variable’s value and type are replaced by the new variable. This lets you reuse the same variable name without declaring a brand-new one.
Here is an example:
fn main(){
let a = 1;
println!("{}", a);
let a = "one";
println!("{}", a);
}
This program does not error, and it prints:
1
one
When the program reaches the second line, a is bound to 1, so it prints 1. On the fourth line, the program notices that a is being reused, so it discards the original value 1 and binds a to "one", which is why the next line prints one. This is shadowing.
Note that shadowing and making a variable mutable are different:
- In shadowing, the new variable declared with
letis still immutable. - In shadowing, the type of the newly declared variable with the same name can be different from the previous one.
fn main(){
	let machine = "wjq";
	let machine = 6657;
	println!("{}", machine);
}
The program above uses shadowing and will not error. The second let machine = 6657; declares a brand-new variable, which has nothing to do with the previous machine.
fn main(){
    let mut machine = "wjq";
    machine = 6657;
    println!("{}", machine); // Error: expected `&str`, found integer
}
The program above uses a mutable variable. Rust is a strongly typed language, and a variable’s type is determined when it is first declared. The assignment machine = 6657 tries to assign an integer to a string-typed variable, so the types do not match and the compiler reports an error: expected &str, found integer.
3.2 Data Types - Scalar Types
3.2.0. Before We Begin
Welcome to Chapter 3 of this Rust self-study series. It has 6 sections:
- Variables and Mutability
- Data Types: Scalar Types (this article)
- Data Types: Compound Types
- Functions and Comments
- Control Flow:
if else - Control Flow: Loops
Through the guessing game in Chapter 2 (beginners who have not read it are strongly encouraged to take a look), you should now have learned the basic Rust syntax. In Chapter 3, we will go one level deeper and learn the general programming concepts in Rust.
3.2.1. Variable Characteristics in Rust
Rust is a statically compiled language, so the compiler must know the type of every variable at compile time.
- Based on how a value is used, the compiler can usually infer its exact type.
- If there are too many possible types, you must add a type annotation, otherwise compilation will fail. Here is an example:
#![allow(unused)]
fn main() {
let guess = "6657".parse().expect("Please enter a number");
}
If you put this line into an IDE, you will see an error such as type error: type annotations needed. That is because the string 6657 could be parsed into types such as i32 or u32, and the compiler does not know which one you want, so you need to explicitly annotate the type. Changing the code to the following will make it compile:
#![allow(unused)]
fn main() {
let guess: u32 = "6657".parse().expect("Please enter a number");
}
3.2.2. An Introduction to Scalar Types
- A scalar type represents a single value.
- Rust mainly has four scalar types:
- Integer types
- Floating-point types
- Boolean types
- Character types
3.2.3. Integer Types
- Unsigned integer types, which cannot represent negative numbers, start with
u;uis short for unsigned. - Signed integer types, which can represent negative numbers, start with
i;iis short for integer. - The number after the letter indicates how many bits the type occupies. For example,
32inu32means it uses 32 bits and can represent values from0to2^32 - 1. - The list of Rust integer types is shown below:
- Each type comes in both
ianduvariants, with fixed bit widths. - Signed range:
-(2^(n-1))to2^(n-1) - 1 - Unsigned range:
0to2^n - 1
- Each type comes in both
| Length | Signed | Unsigned |
|---|---|---|
| 8-bit | i8 | u8 |
| 16-bit | i16 | u16 |
| 32-bit | i32 | u32 |
| 64-bit | i64 | u64 |
| 128-bit | i128 | u128 |
| arch | isize | usize |
The isize and usize types are special integer types whose size depends on the computer architecture on which the program is running:
- On a 64-bit machine, they are 64 bits.
isizeis equivalent toi64, andusizeis equivalent tou64. - On a 32-bit machine, they are 32 bits.
isizeis equivalent toi32, andusizeis equivalent tou32.
The main use case for isize and usize is indexing collections.
fn main(){
	let machine: u32 = 6657;
}
3.2.4. Integer Literals
Integers are not limited to decimal notation; other bases are also supported. Using fixed formats lets the program understand the base you intended and also makes your code easier for other people to read.
| Number literals | Example |
|---|---|
| Decimal | 98_222 |
| Hex | 0xff |
| Octal | 0o77 |
| Binary | 0b1111_0000 |
| Byte (u8 only) | b’A’ |
- Underscores can be added to decimal numbers to improve readability.
- Hexadecimal numbers start with
0x. - Octal numbers start with
0o. - Binary numbers start with
0b, and underscores can also be added to improve readability. - Byte literals are a special case. In Rust, a byte integer literal is written as
b'X', whereXis a single character representing a byte value. This literal can only be used withu8, because a byte value ranges from 0 to 255, andXmust be an ASCII character. For example,b'A'has the value 65 because the ASCII code forAis 65. - Aside from byte literals, all numeric literals may use a type suffix.
- If you are not sure which type to use, you can rely on Rust’s corresponding default type.
- The default integer type is
i32, which is generally very fast even on 64-bit systems.
3.2.5. Integer Overflow
For example, the range of u8 is 0 to 255. If you set the value of a u8 variable to 256, two things can happen:
- In debug builds, Rust checks for overflow. If overflow occurs, the program panics at runtime.
- In release builds (
--release), Rust does not check for overflow that could lead to panic.- If overflow does occur, Rust performs wrapping arithmetic: 256 becomes 0, 257 becomes 1, and so on, but it does not panic.
3.2.6. Floating-Point Types
Rust has two basic floating-point types:
f32: 32-bit single precisionf64: 64-bit double precision
Rust uses the IEEE-754 standard to represent floating-point types.
f64 is the default type because on modern CPUs, f64 runs about as fast as f32, and f64 is more precise.
fn main(){
	let machine: f32 = 6657.0721;
}
3.2.7. Numeric Operations
- Add:
+ - Subtract:
- - Multiply:
* - Divide:
/ - Remainder:
%These are no different from other languages.
3.2.8. Boolean Types
Rust’s boolean type is no different from that of other languages. It has two values: true and false, occupies one byte, and the keyword is bool.
fn main(){
	let machine: bool = true;
}
3.2.9. Character Types
- Rust’s
chartype is used to represent the most basic single characters in a language. - Character literals use single quotes.
- It occupies 4 bytes.
- It is a Unicode scalar value, so it can represent far more than ASCII, including pinyin, Chinese, Japanese, and Korean characters, zero-width characters, emojis, and more. Its range is from
U+0000toU+D7FFand fromU+E000toU+10FFFF. - Unicode does not actually have a concept of a “character” in the way we usually think about it, so the characters we intuitively recognize may not line up exactly with Rust’s concept.
fn main(){
	let x: char = '🥵';
}
3.3 Data Types - Compound Types
3.3.0. Before We Begin
Welcome to Chapter 3 of this Rust self-study series. It has 6 sections:
- Variables and Mutability
- Data Types: Scalar Types
- Data Types: Compound Types (this article)
- Functions and Comments
- Control Flow:
if else - Control Flow: Loops
Through the guessing game in Chapter 2 (beginners who have not read it are strongly encouraged to take a look), you should now have learned the basic Rust syntax. In Chapter 3, we will go one level deeper and learn the general programming concepts in Rust.
3.3.1. An Introduction to Compound Types
- Compound types can group multiple values into a single type.
- Rust provides two basic compound types: tuples and arrays.
3.3.1. Tuple
Tuple characteristics:
- A tuple can group multiple values of different types into a single type.
- Tuples have a fixed length: once declared, they cannot change.
Creating a tuple:
- Place the values inside parentheses, separated by commas.
- Each position in the tuple corresponds to a type, and the types of the tuple’s elements do not have to be the same.
fn main(){
	let tup: (u32, f32, i64) = (6657, 0.0721, 114514);
	println!("{},{},{}", tup.0, tup.1, tup.2);
	// Output: 6657,0.0721,114514
}
Getting tuple element values:
- You can use pattern matching to destructure a tuple and obtain its element values.
fn main(){
	let tup: (u32, f32, i64) = (6657, 0.0721, 114514);
	let (x, y, z) = tup;
	println!("{},{},{}", x, y, z);
	// Output: 6657,0.0721,114514
}
Accessing tuple elements:
- Use dot notation after the tuple variable, followed by the element index.
#![allow(unused)]
fn main() {
println!("{},{},{}", tup.0, tup.1, tup.2);
}
3.3.2. Arrays
Array characteristics:
- Every element in an array must have the same type.
- Arrays can also store multiple values in a single type.
- Arrays have a fixed length.
Declaring an array:
- Put the values inside square brackets, separated by commas.
#![allow(unused)]
fn main() {
let a = [1, 1, 4, 5, 1, 4];
}
Uses for arrays:
- If you want your data on the stack instead of the heap, or you want to guarantee a fixed number of elements, arrays are a better choice.
- Arrays are less flexible than vectors (which we will discuss later).
- Vectors are provided by the standard library, while arrays are built into the language and available through the prelude module, which is also part of the standard library.
- A vector’s length can change.
- If you are unsure whether to use an array or a vector, you probably should use a vector.
Array type syntax:
- The type of an array is written as
[type; length].
#![allow(unused)]
fn main() {
let machine: [u32; 4] = [6, 6, 5, 7];
}
Another way to declare an array:
- If every element in the array has the same value, you can:
- Specify the initial value inside square brackets
- Follow it with a
; - Then add the array length
#![allow(unused)]
fn main() {
let a = [3; 2];
let b = [3, 3, 3];
}
In this example, a and b are equivalent.
Accessing array elements:
- Arrays are a single contiguous block of memory allocated on the stack.
- You can use an index to access an array element.
#![allow(unused)]
fn main() {
let machine = [6, 6, 5, 7];
let wjq = machine[0];
}- If the index is out of bounds:
- Rust may detect it at compile time in cases where the compiler can prove the error
- Otherwise, it will panic at runtime, because Rust does not allow the program to keep reading memory at that address
An array is backed by a contiguous block of memory. Suppose the first element of an array is at memory position x; then the second element is located at x + the size of the first element, and so on.
If the index is larger than the actual length of the array, the program will read memory outside the array, and that memory may contain anything. In C, there is no bounds checking at all. In C++, ordinary arrays do not have it either; only std::array does. In Rust, bounds checking is enforced.
| Feature | C | C++ | Rust |
|---|---|---|---|
| Memory model | Contiguous | Contiguous | Contiguous |
| Safety | No bounds checking | std::array has bounds checking; ordinary arrays do not | Bounds checking is enforced |
| Dynamic arrays | Manual memory management required | std::vector | Vec |
| Multidimensional arrays | Yes | Yes | Yes |
| Special abilities | Simple and efficient | Rich STL containers | Ownership and borrow checking |
But Rust only performs simple bounds checks on arrays. If the code becomes slightly more complex, the compiler may not be able to check it at compile time, so the check has to happen at runtime.
#![allow(unused)]
fn main() {
let a = 5;
let machine = [6, 6, 5, 7];
let wjq = machine[a];
}
This code will compile, but it will panic at runtime if a is out of bounds.
#![allow(unused)]
fn main() {
let a = [1, 9, 10, 4, 5];
let machine = [6, 6, 5, 7];
let wjq = machine[a[4]];
}
Depending on how much the compiler can determine ahead of time, this code may also fail early, but if it is not caught at compile time, it will panic at runtime.
3.4 Functions and Comments
3.4.0. Before We Begin
Welcome to Chapter 3 of this Rust self-study series. It has 6 sections:
- Variables and Mutability
- Data Types: Scalar Types
- Data Types: Compound Types
- Functions and Comments (this article)
- Control Flow:
if else - Control Flow: Loops
Through the guessing game in Chapter 2 (beginners who have not read it are strongly encouraged to take a look), you should now have learned the basic Rust syntax. In Chapter 3, we will go one level deeper and learn the general programming concepts in Rust.
3.4.1. The Basics of Functions
- Use the keyword
fnto declare a function. - By convention, function names and variable names use snake case:
- All letters are lowercase, and words are separated with underscores
- Example:
another_function
- Rust does not care whether a custom function is written before or after the place where it is called. As long as the function has been declared and can be called, it works. This is much nicer than some older languages (C/C++: feeling offended). Here is an example: even though the custom function is written after it is declared, it still runs normally.
fn main(){
	println!("Hello World");
	another_function();
}

fn another_function(){
	println!("Another Function");
}
3.4.2. Function Parameters
Function parameters actually have two terms: parameter and argument.
- A parameter is a placeholder declared when defining a function or method, used to receive the value passed in when the function is called. Its purpose is to give the function a general way to handle external data without depending on a specific value.
- An argument is the actual value passed into the function. Its purpose is to provide a concrete value for the function logic to use during execution.
fn main() {
    greet("Alice");
}

fn greet(name: &str) {
    println!("Hello, {}!", name);
}
In this example:
- The
"Alice"passed togreetfrommainis the argument. It is the actual value passed to the parameternamewhen callinggreet. namein thegreetfunction is a parameter, meaning thatgreetexpects a value of type&stras input.
In a function signature, you must declare the type of every parameter, so the compiler does not need to infer it. In the previous example, the &str in name: &str is the type of name.
A function can have multiple parameters, and each parameter is separated by a comma.
3.4.3. Statements and Expressions in Function Bodies
- A function body consists of a series of statements, optionally ending with an expression.
- Rust is an expression-based language, and much of the syntax below is similar to Scala, because both are programming models centered on expressions.
- Statements are instructions that perform some action.
- Expressions evaluate to a value; an expression is itself a value.
- The definition of a function is also a statement.
- Statements do not return a value, so you cannot use
letto assign a statement to a variable.
fn main(){
	let x = (let y = 6); // Error: expected expression, found statement (`let`)
}
In this example, the Rust compiler expects the right-hand side to be an expression, but it finds a statement instead, so it reports an error. Some languages allow similar syntax, but Rust does not.
fn main(){
	let y = {
		let x = 1;
		x + 3
	};
	println!("The value of y is: {}", y);
}
In this example, the code inside the braces after let y = is an expression. The block first defines a variable x and assigns it the value 1, then computes a value through x + 3. Here, x + 3 is an expression, and because it is the last expression in the block, its value (the result of 1 + 3, which is 4) becomes the return value of the entire block. That return value is then assigned to y. When the program runs, it prints The value of y is: 4.
If you add a semicolon ; after x + 3, then x + 3 is no longer an expression but a statement. Because statements do not return a value, the return value of the whole block becomes (), which is the unit type. In Rust, () is a special type whose only value is () itself. Therefore, if you add a semicolon after x + 3, the type of y becomes (), meaning that y no longer stores the calculation result but instead stores a unit value. Note that () is a valid type, but it cannot be printed directly with println!. If you try to print y, the compiler will report an error saying that values of type () cannot be formatted.
3.4.4. Function Return Values
- Declare the return type after the
->symbol, but you cannot name the return value. - In Rust, the return value is the value of the last expression in the function body.
- To return early, use the
returnkeyword and specify a value.
fn machine() -> u32 {
	6657
}

fn main(){
	let wjq = machine();
	println!("The value of wjq is: {}", wjq);
}
In this example, the return type of the machine function is declared as u32. The function body contains only one expression, 6657. Since it is an expression, there is no semicolon after it. And because it is the last expression in the function body (in fact, the only expression), it becomes the function’s return value.
3.4.5. Comments
- Single-line comments start with
//. - Multi-line comments use the
/* */structure. Example:
fn machine() -> u32 {
	6657
}
/*Let's go G2
Let's go Spirit
Let's go NAVI
*/
fn main(){
	let wjq = machine(); // 6657, go, go!
	println!("The value of wjq is: {}", wjq);
}
Rust also has an important kind of documentation comment, which we will cover separately later.
3.5 Control Flow - If Else
3.5.0. Before We Begin
Welcome to Chapter 3 of this Rust self-study series. It has 6 sections:
- Variables and Mutability
- Data Types: Scalar Types
- Data Types: Compound Types
- Functions and Comments
- Control Flow:
if else(this article) - Control Flow: Loops
Through the guessing game in Chapter 2 (beginners who have not read it are strongly encouraged to take a look), you should now have learned the basic Rust syntax. In Chapter 3, we will go one level deeper and learn the general programming concepts in Rust.
3.5.1. The Basics of if Expressions
- An
ifexpression allows different code branches to run depending on a condition.- The condition must be a boolean type. This is different from Ruby, JS, and C++, which convert non-boolean values after
ifinto boolean values. - The condition can be a literal, an expression, or a variable.
- The condition must be a boolean type. This is different from Ruby, JS, and C++, which convert non-boolean values after
- In an
ifexpression, the code associated with the condition is called a branch (we already mentioned this concept when discussingmatch). - Optionally, you can add an
elseexpression afterward.
fn main(){
	let machine = 6657;

	if machine < 114514 {
		println!("condition is true");
	} else {
		println!("condition is false");
	}
}
In this example, the value of machine is less than 114514, so the program executes the line println!("condition is true");. If you change the value of machine so that it is no longer less than 114514, then the program will execute the code block after else.
3.5.2. Handling Multiple Conditions with else if
If you need to evaluate multiple conditions and do not want to keep nesting under else, then else if is a very good choice.
fn main(){
	let number = 6;
	if number % 4 == 0 {
		println!("Number is divisible by 4");
	} else if number % 3 == 0 {
		println!("Number is divisible by 3");
	} else if number % 2 == 0 {
		println!("Number is divisible by 2");
	} else {
		println!("Number is not divisible by 4, 3, or 2");
	}
}
Since 6 is divisible by both 3 and 2, both else if number % 3 == 0 and else if number % 2 == 0 are true. Because if, else if, and else are evaluated in order from top to bottom, whichever branch appears first is the one that runs. In this example, else if number % 3 == 0 appears first, so the program executes println!("Number is divisible by 3");, and the code block under else if number % 2 == 0 is not executed.
If your program uses more than one else if, it is usually better to refactor it with match.
For example, the code above can be refactored like this (one possible solution):
fn main() {
    let number = 6;

    match number {
        n if n % 4 == 0 => println!("Number is divisible by 4"),
        n if n % 3 == 0 => println!("Number is divisible by 3"),
        n if n % 2 == 0 => println!("Number is divisible by 2"),
        _ => println!("Number is not divisible by 4, 3, or 2"),
    }
}
Obviously, the match version is more intuitive.
3.5.3. Using if in a let Statement
if is an expression in Rust, so you can put it on the right-hand side of the equals sign in a let statement.
fn main(){
	let condition = true;
	let number = if condition { 5 } else { 6 };
	println!("The value of number is: {}", number);
}
In this example, because condition is true, 5 is assigned to number, and the final output is The value of number is: 5. If condition is false, then the value after else, 6, is assigned to number.
This syntax is very similar to Python, but there is a fundamental difference between the two:
-
Rust:
- In Rust,
if-elseis an expression and can directly return a value. In other words, theifconstruct itself can participate in the evaluation of other expressions. - In Rust, almost any code block can be an expression, so a
{}block can also return a value.
- In Rust,
-
Python:
- In Python,
if-elseis a specific ternary-like form designed for single-line conditional expressions. - Python’s ordinary
if-elsestatement is part of control flow; it does not return a value and cannot be embedded inside other expressions.
- In Python,
fn main(){
	let condition = true;
	let number = if condition { 5 } else { "6" };
	println!("The value of number is: {}", number);
}
This example will fail to compile with the error: if` and `else` have incompatible types. This means that if and else return incompatible types. Because Rust is a statically typed, strongly typed language, it must know a variable’s type at compile time so that the variable can be used elsewhere. In this example, the return value of the if branch is i32, while the return value of the else branch is a string type. The compiler cannot determine at compile time whether the type of number should be i32 or a string, so it reports an error.
In one sentence: the branches of an if-else expression must return values of the same type.
3.6 Control Flow - Loops
3.6.0. Before We Begin
Welcome to Chapter 3 of this Rust self-study series. It has 6 sections:
- Variables and Mutability
- Data Types: Scalar Types
- Data Types: Compound Types
- Functions and Comments
- Control Flow:
if else - Control Flow: Loops (this article)
Through the guessing game in Chapter 2 (beginners who have not read it are strongly encouraged to take a look), you should now have learned the basic Rust syntax. In Chapter 3, we will go one level deeper and learn the general programming concepts in Rust.
3.6.1. Loops in Rust
Rust provides three kinds of loops:
loopwhilefor
3.6.2. The loop Loop
The loop keyword tells Rust to keep executing a block of code over and over until told to stop. Here is an example; it will keep printing 6657 up up!.
fn main(){
	loop {
		println!("6657 up up!");
	}
}
You can use the break keyword inside a loop to tell the program when to stop.
fn main(){
	let mut counter = 0;
	let result = loop {
		counter += 1;

		if counter == 10 {
			break counter * 2;
		}
	};
	println!("The result is: {}", result);
}
Code logic:
counteris initialized to0and increments by1on each loop.- When
counterequals10,breakexits the loop and returnscounter * 2(that is,20). loopis an expression, and its return value is the value passed tobreak, so it can be assigned directly toresult.resultis finally printed as20.
Code features:
- Rust’s
loopis an expression, so its result can be bound directly to a variable. breakcan carry a return value (here,counter * 2) and use it as the result of theloop.- A
letstatement requires a semicolon after the assignment expression, so the closing brace}of theloopmust be followed by a semicolon.
3.6.3. while Conditional Loops
The while loop checks its condition before each execution of the loop body.
fn main() {
    let mut countdown = 10; // Start the countdown at 10

    println!("Rocket Launch Countdown:");

    while countdown > 0 {
        println!("T-minus {}...", countdown);
        countdown -= 1; // Decrease by 1 each time
    }

    println!("🚀 Liftoff!");
    println!("Houston, we have a problem.");
}
This is a simple while loop example, and its output is:
Rocket Launch Countdown:
T-minus 10...
T-minus 9...
T-minus 8...
T-minus 7...
T-minus 6...
T-minus 5...
T-minus 4...
T-minus 3...
T-minus 2...
T-minus 1...
🚀 Liftoff!
Houston, we have a problem.
3.6.4. Using for Loops to Traverse Collections
Of course, you can also use while and loop to iterate over a collection, but that is error-prone and inefficient.
Here is an example using while:
fn main() {
    let numbers = [10, 20, 30, 40, 50];
    let mut index = 0;

    println!("Using while loop:");
    while index < 5 {
        println!("Number at index {}: {}", index, numbers[index]);
        index += 1;
    }
}
When using while, it is very easy to trigger a panic from an out-of-bounds index, and it also runs more slowly because the condition index < 5 must be checked every time.
Here is an example using for that achieves the same result:
fn main() {
    let numbers = [10, 20, 30, 40, 50];

    println!("Using for loop:");
    for (index, number) in numbers.iter().enumerate() {
        println!("Number at index {}: {}", index, number);
    }
}
1. numbers.iter()
- Calls the
.iter()method on the collectionnumbersto create an immutable iterator that visits the elements one by one. In Rust, aforloop does not operate on the collection directly; it operates on an iterator that implements theIteratortrait..iter()is a commonly used method onVecand other collections that produces an iterator of references to the elements.forloops are concise and clear, and they can run code for every element in a collection. Because of their safety and simplicity, they are used the most in Rust.
2. .enumerate()
• Attaches an index to each element of the iterator. The index starts at 0 and is a usize value. .enumerate() wraps each element of the iterator into a (index, value) form, where index is the element’s position in the collection and value is the current element pointed to by the iterator. .enumerate() returns a new iterator whose item type is (usize, &T), where T is the type of the elements in the collection. Here, numbers is an array of i32, so &T is &i32.
3. for (index, number) in ...
• The for loop supports destructuring tuples. (index, number) means that we directly destructure the (usize, &T) tuple produced by enumerate() into two variables: index, the current element’s index; and number, the current element’s reference (immutable).
Suppose numbers is [10, 20, 30, 40, 50]; the execution flow is as follows:
- Call
numbers.iter()to create an iterator. - Call
.enumerate()to produce an iterator of(index, element reference)pairs. - The
forloop destructures the index and the element:- First iteration:
index = 0, number = &10 - Second iteration:
index = 1, number = &20 - Third iteration:
index = 2, number = &30 - …
- First iteration:
- Print
indexandnumberto output each element’s index and value.
Because for loops are safe and concise, they are used the most in Rust.
3.6.5. Range
Range is provided by the standard library. You can use Range to generate numbers between two bounds (excluding the end). The rev method can be used to reverse a Range.
fn main() {
    println!("Rocket Launch Countdown:");

    for countdown in (1..=10).rev() {
        println!("T-minus {}...", countdown);
    }

    println!("🚀 Liftoff!");
    println!("Houston, we have a problem.");
}
This example uses for loops, Range, and rev to implement the rocket countdown shown in the while example above.
Code breakdown
(1..=10):- This is a
Rangerepresenting numbers from 1 to 10, inclusive. ..=is the inclusive upper-bound range operator.
- This is a
.rev():- Reverses the iterator, producing a descending sequence from 10 down to 1.
4.1 Ownership - Stack Memory vs. Heap Memory
4.1.0 Before We Begin
After learning Rust’s general programming concepts, you’ve arrived at the most important topic in all of Rust—ownership. It’s quite different from other languages, and many beginners find it hard to learn. This chapter aims to help beginners fully master this feature.
This chapter has three sections:
- Ownership: Stack Memory vs. Heap Memory (this article)
- Ownership Rules, Memory, and Allocation
- Ownership and Functions
4.1.1 What Is Ownership?
Ownership is Rust’s most unique feature. It allows Rust to guarantee memory safety without a GC (garbage collector).
All programs must manage how they use computer memory while running. Some languages rely on garbage collection: while the program runs, they continuously look for memory that is no longer being used (for example, C#). In other languages, the programmer must explicitly allocate and free memory (for example, C/C++).
Rust is different from both of these. Rust uses an ownership system to manage memory. This system comes with a set of rules, and the compiler checks those rules at compile time. This approach produces no runtime overhead. In other words, ownership won’t slow your program down at runtime, because Rust moves the memory-management work to compile time.
4.1.2 Stack Memory (Stack) vs. Heap Memory (Heap)
In general, programmers don’t often think about the difference between stack memory and heap memory. For a systems programming language like Rust, whether a value is on the stack or on the heap has a much bigger impact on the language’s behavior and on some of the decisions you need to make.
While code is running, both the stack and the heap are available memory, but their structures are very different.
4.1.3 Storing Data
1. Stack Memory
The stack stores values in the order it receives them, and removes them in the opposite order (last in, first out, Last In First Out, abbreviated as LIFO).
Adding data is called pushing onto the stack (push), and removing data is called popping off the stack (pop).
All data stored on the stack must have a known, fixed size. In contrast, data whose size is unknown at compile time, or whose size may change at runtime, must be stored on the heap.
2. Heap Memory
The heap is less organized. When you put data on the heap, you request a certain amount of space. The operating system finds a chunk of space in the heap that is large enough, marks it as in use, and returns a pointer (the address of that space). This process is called allocating memory on the heap, and is sometimes shortened to “allocating”.
3. Pointers and Memory
Because a pointer has a fixed size, you can store the pointer itself on the stack. But if you want the actual data the pointer points to, you must use the address in the pointer to access it.
Pushing data onto the stack is much faster than allocating on the heap:
- On the stack, the operating system doesn’t need to search for space to store new data; that location is always at the top of the stack (the end of the stack)—that is, the beginning of the currently available stack memory.
- Allocating space on the heap requires more work: the operating system must first find a chunk of space large enough to hold the data, and then keep records so it can allocate again later.
4.1.4 Accessing Data
Accessing data on the stack is faster than accessing data on the heap, because you must follow a pointer to find data on the heap—an extra level of indirection. For modern processors, because of caching, the fewer jumps memory access needs to make, the faster it tends to be.
If data is stored closer together, the processor can work faster—for example, on the stack. Conversely, if the data is farther apart, processing can be slower—for example, on the heap (and allocating a large chunk of heap space also takes time).
4.1.5 Function Calls
When code calls a function, values are passed into the function (including pointers to data on the heap). The function’s local variables are pushed onto the stack. When the function ends, those values are popped off the stack.
4.1.6 Why Ownership Exists
The problems ownership solves:
- Tracking heap memory allocated by the code—in other words, tracking which parts of code are using which data on the heap
- Minimizing duplicate data on the heap
- Cleaning up unused data on the heap to avoid running out of space
Once you understand ownership, you won’t need to constantly think about the stack and the heap. But knowing that managing heap data is the reason ownership exists helps explain why it works the way it does.
4.2 Ownership Rules, Memory, and Allocation
4.2.0 Before We Begin
After learning Rust’s general programming concepts, you’ve arrived at the most important topic in all of Rust—ownership. It’s quite different from other languages, and many beginners find it hard to learn. This chapter aims to help beginners fully master this feature.
This chapter has three sections:
- Ownership: Stack Memory vs. Heap Memory
- Ownership Rules, Memory, and Allocation (this article)
- Ownership and Functions
4.2.1 Ownership Rules
Ownership has three rules:
- Every value has a variable, and that variable is the owner of the value
- Every value can only have one owner at a time
- When the owner goes out of scope, the value is deleted
4.2.2 Variable Scope
Scope is the valid range of an item in a program.
fn main(){
	// machine is not available
	let machine = 6657; // machine is available
	// operations can be performed on machine
} // machine’s scope ends here, and machine is no longer available
In the third line of the sample code, the variable machine is declared, while in the second line the variable has not yet been declared, so it is not available there. In the third line, since it is declared, it becomes available. In the fourth line, you can perform related operations on machine. In the fifth line, machine’s scope ends, and from that line onward, machine is no longer available.
This example involves two key points:
machinebecomes valid once it enters its scopemachineremains valid until it leaves its scope These two points are similar in other languages, so there is no need to go into detail.
4.2.3 The String Type
To demonstrate some ownership-related rules, we need a slightly more complex data type, and String fits the need.
The String type is more complex than scalar types: the basic data types mentioned earlier store their data on the stack, and their data is popped off the stack when they go out of scope; the String type is stored on the heap.
This chapter focuses on the ownership-related aspects of String. If you want to understand String itself in depth, you will have to wait for later chapters.
String literals (&'static str) are the string values you write directly in code. But they cannot meet all needs. First, they are immutable; second, not all string values are known when writing the program (for example, user input).
For these cases, Rust provides a second string type, String. String can allocate on the heap, and it can store text whose size is unknown at compile time.
4.2.4 Creating String Values
Use the from function to create a String from a string literal, for example:
#![allow(unused)]
fn main() {
let machine = String::from("6657");
}::means thatfromis a function underString. You can think of it as a static method in other languages.
The String declared this way is mutable, for example:
fn main(){
	let mut machine = String::from("6657");
	machine.push_str(" up up!");
	println!("{}", machine);
}- Adding
mutafterletmeans that the variablemachinecan be modified .push_str()is a method on this variable that appends a string literal to the end of the value; in the example, that literal is" up up!"
Its output is:
6657 up up!
Why is String mutable, while &'static str (string literals) are not:
Stringis a heap-allocated mutable string type that can grow or shrink its contents dynamically.- String literals are of type
&'static strand are stored in the program’s static memory (a read-only region).
4.2.5 Memory and Allocation
For string literals, because they are written in source code, their contents are known at compile time. Their text content is hard-coded directly into the final executable. Their speed and efficiency come from their immutability.
To support mutability, String needs to allocate memory on the heap to store text whose size is unknown at compile time. This requires the operating system to request memory at runtime (which happens through String::from).
After using a String, some way is needed to return the memory to the operating system:
-
In languages with a GC (garbage collector), such as C#, the GC tracks and cleans up memory that is no longer being used
-
In languages without a GC, such as C/C++, programmers must identify when memory is no longer in use and write code to return it
- If you forget, memory is wasted
- If you do it too early, the variable becomes invalid
- If you do it twice, a very serious bug occurs—double free. This may cause data that is still in use to become corrupted and create potential security risks. One allocation must correspond to one free.
-
Rust uses a different mechanism: for a given value, when the variable that owns it goes out of scope, Rust calls a special function—the drop function—and the memory is immediately returned to the operating system, meaning it is immediately freed.
4.2.6 How Variables Interact with Data
1. Move
Multiple variables can interact with the same data in a unique way.
#![allow(unused)]
fn main() {
let x = 5;
let y = x;
}
In this example, 5 is bound to the variable x; on the next line, it is equivalent to creating a copy of x and binding that copy to y. Because integers are simple values with known and fixed sizes, these two 5s are pushed onto the stack.
But if the situation is more complex, such as with the String type, things are different.
#![allow(unused)]
fn main() {
let machine = String::from("Niko");
let wjq = machine;
}
In this example, the first line uses the from function under String to obtain a String value from a string literal, named machine. Then the second line binds machine to wjq.
Although the code looks similar, the way the two examples run is completely different.
First we need to understand that a String consists of three parts, as shown below:
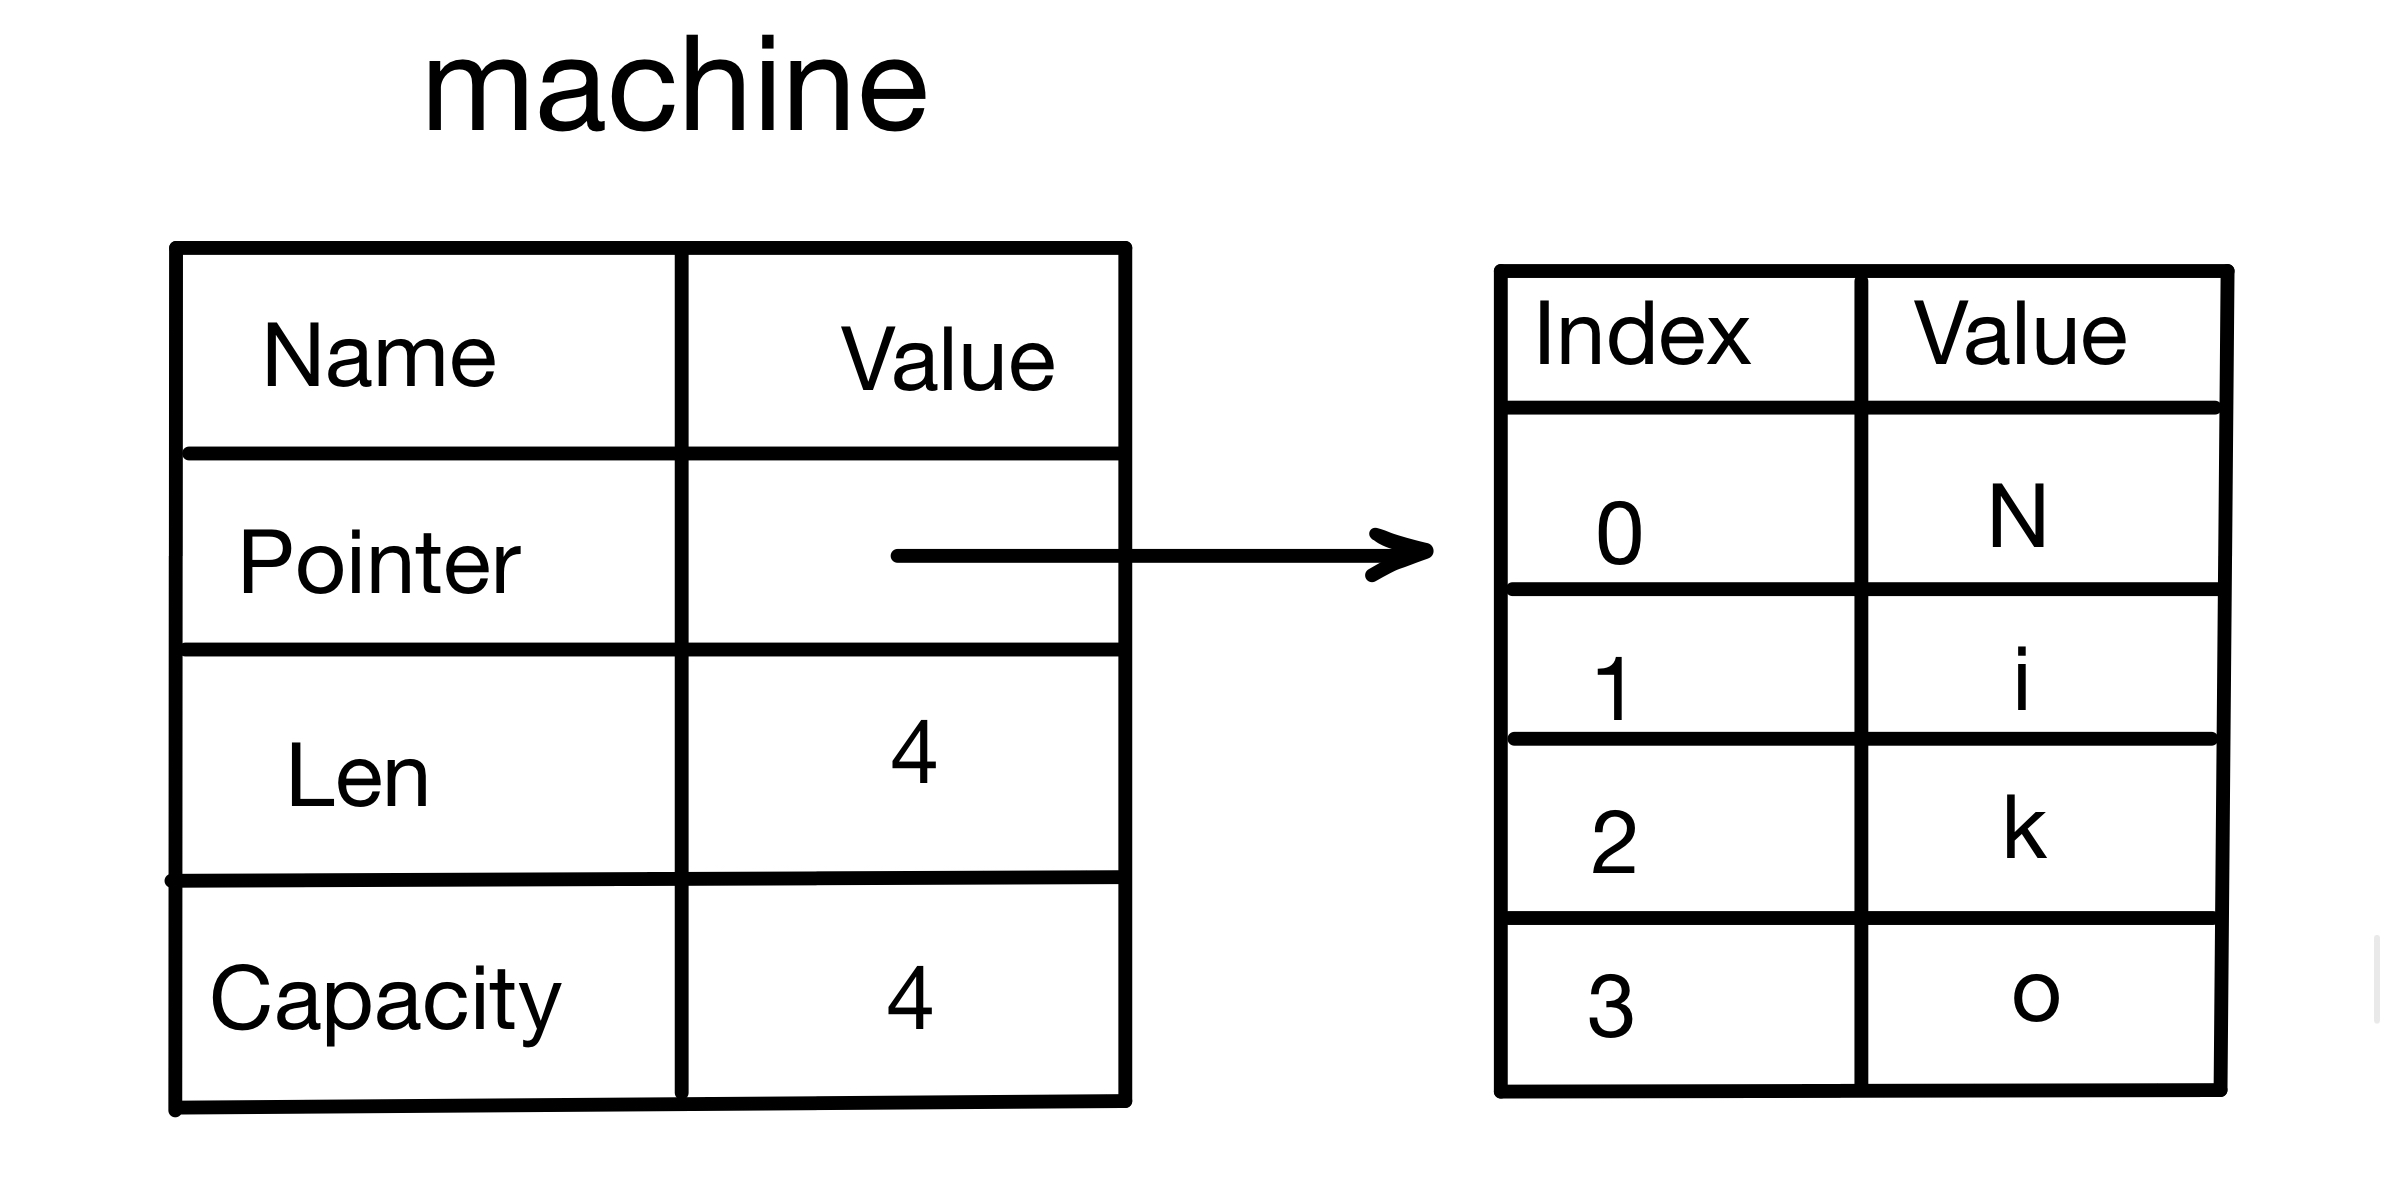
- A pointer to the memory that stores the string contents
- A length
- A capacity
This part of the data is pushed onto the stack, while the part that stores the string contents is on the heap. The length (len) is the number of bytes required to store the string contents, and the capacity (capacity) is the total number of bytes of memory String obtained from the operating system.
When the value of machine is assigned to wjq, the data on the stack is copied to wjq, but the data on the heap pointed to by the pointer is not copied.
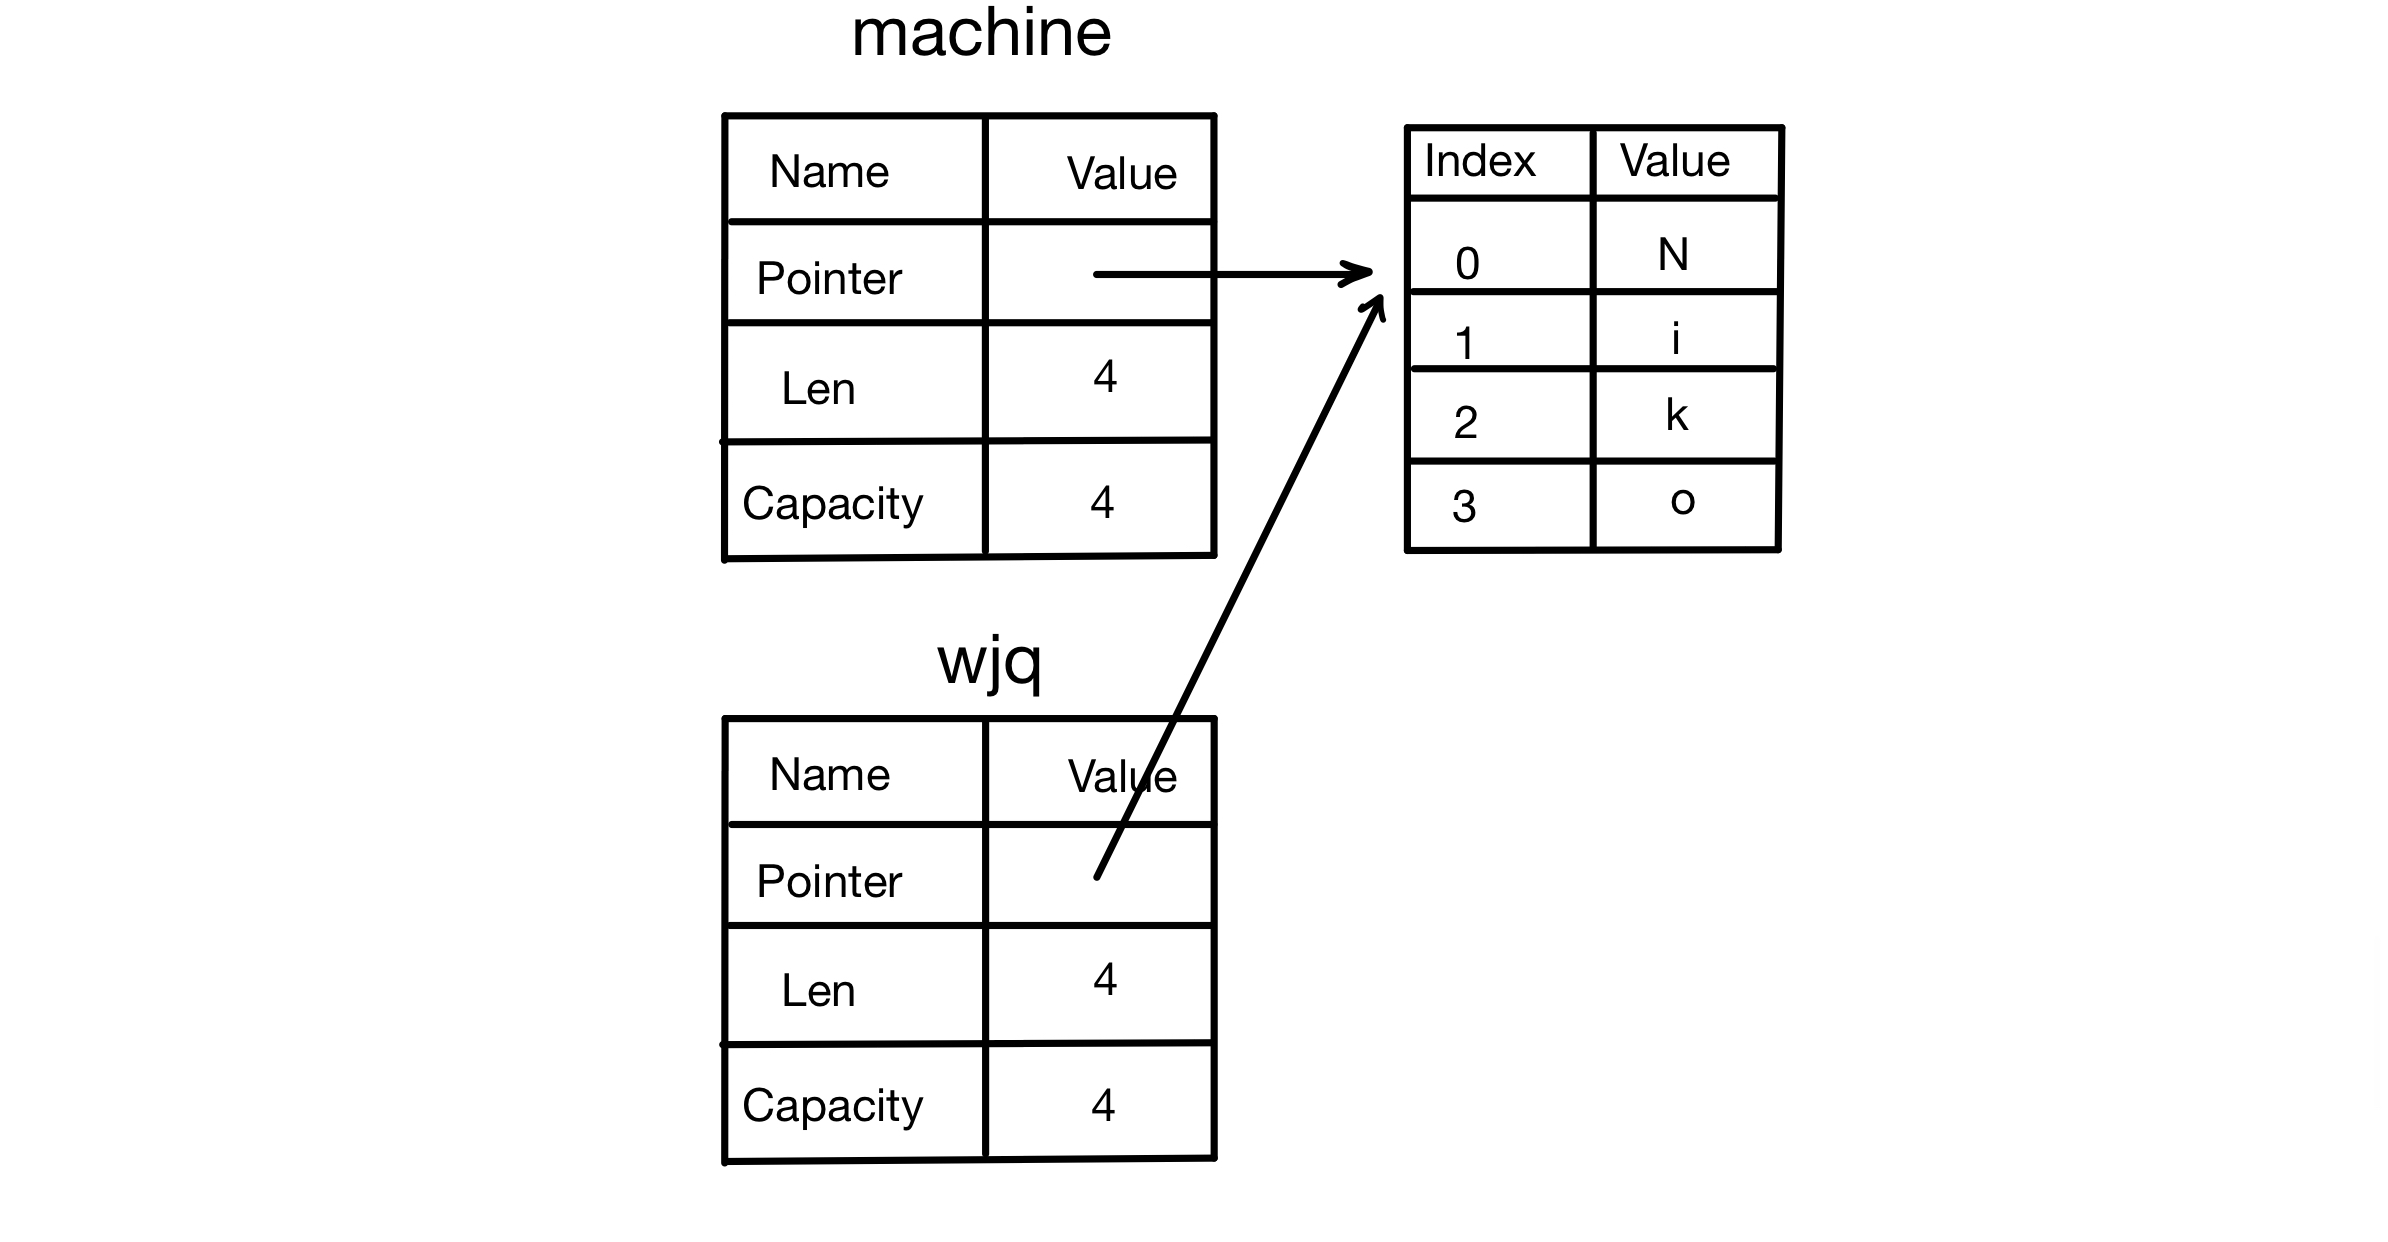
When a variable goes out of scope, Rust automatically calls the drop function and frees the heap memory used by the variable. This was mentioned above. But when machine and wjq go out of scope at the same time, both will try to free the same memory, causing a very serious bug—double free. Its danger has already been explained above, so it will not be elaborated here.
To ensure memory safety, Rust directly invalidates the first variable machine and moves the value to wjq. When machine goes out of scope, Rust does not need to free any memory related to machine (of course wjq still needs to be freed, because it is valid), because machine has already become invalid.
If you try to use machine after it has been invalidated, an error will occur (the code and result are shown below):
Code:
fn main(){
	let machine = String::from("Niko");
	let wjq = machine;
	println!("{}", machine);
}
Result:
error[E0382]: borrow of moved value: 'machine'
People who have studied other languages may have encountered shallow copy and deep copy. Some people consider copying the pointer, length, and capacity to be a shallow copy, but because Rust invalidates machine, a new term is used here: move.
There is a hidden design principle here: Rust does not automatically create deep copies of data. In other words, in terms of runtime performance, any automatic assignment operation is cheap.
2. Clone
If you really want to deeply copy String data on the heap, rather than just the data on the stack, you can use the clone method.
#![allow(unused)]
fn main() {
let machine = String::from("Niko");
let wjq = machine.clone();
}
Using this method, both the stack data and the heap data are fully copied.
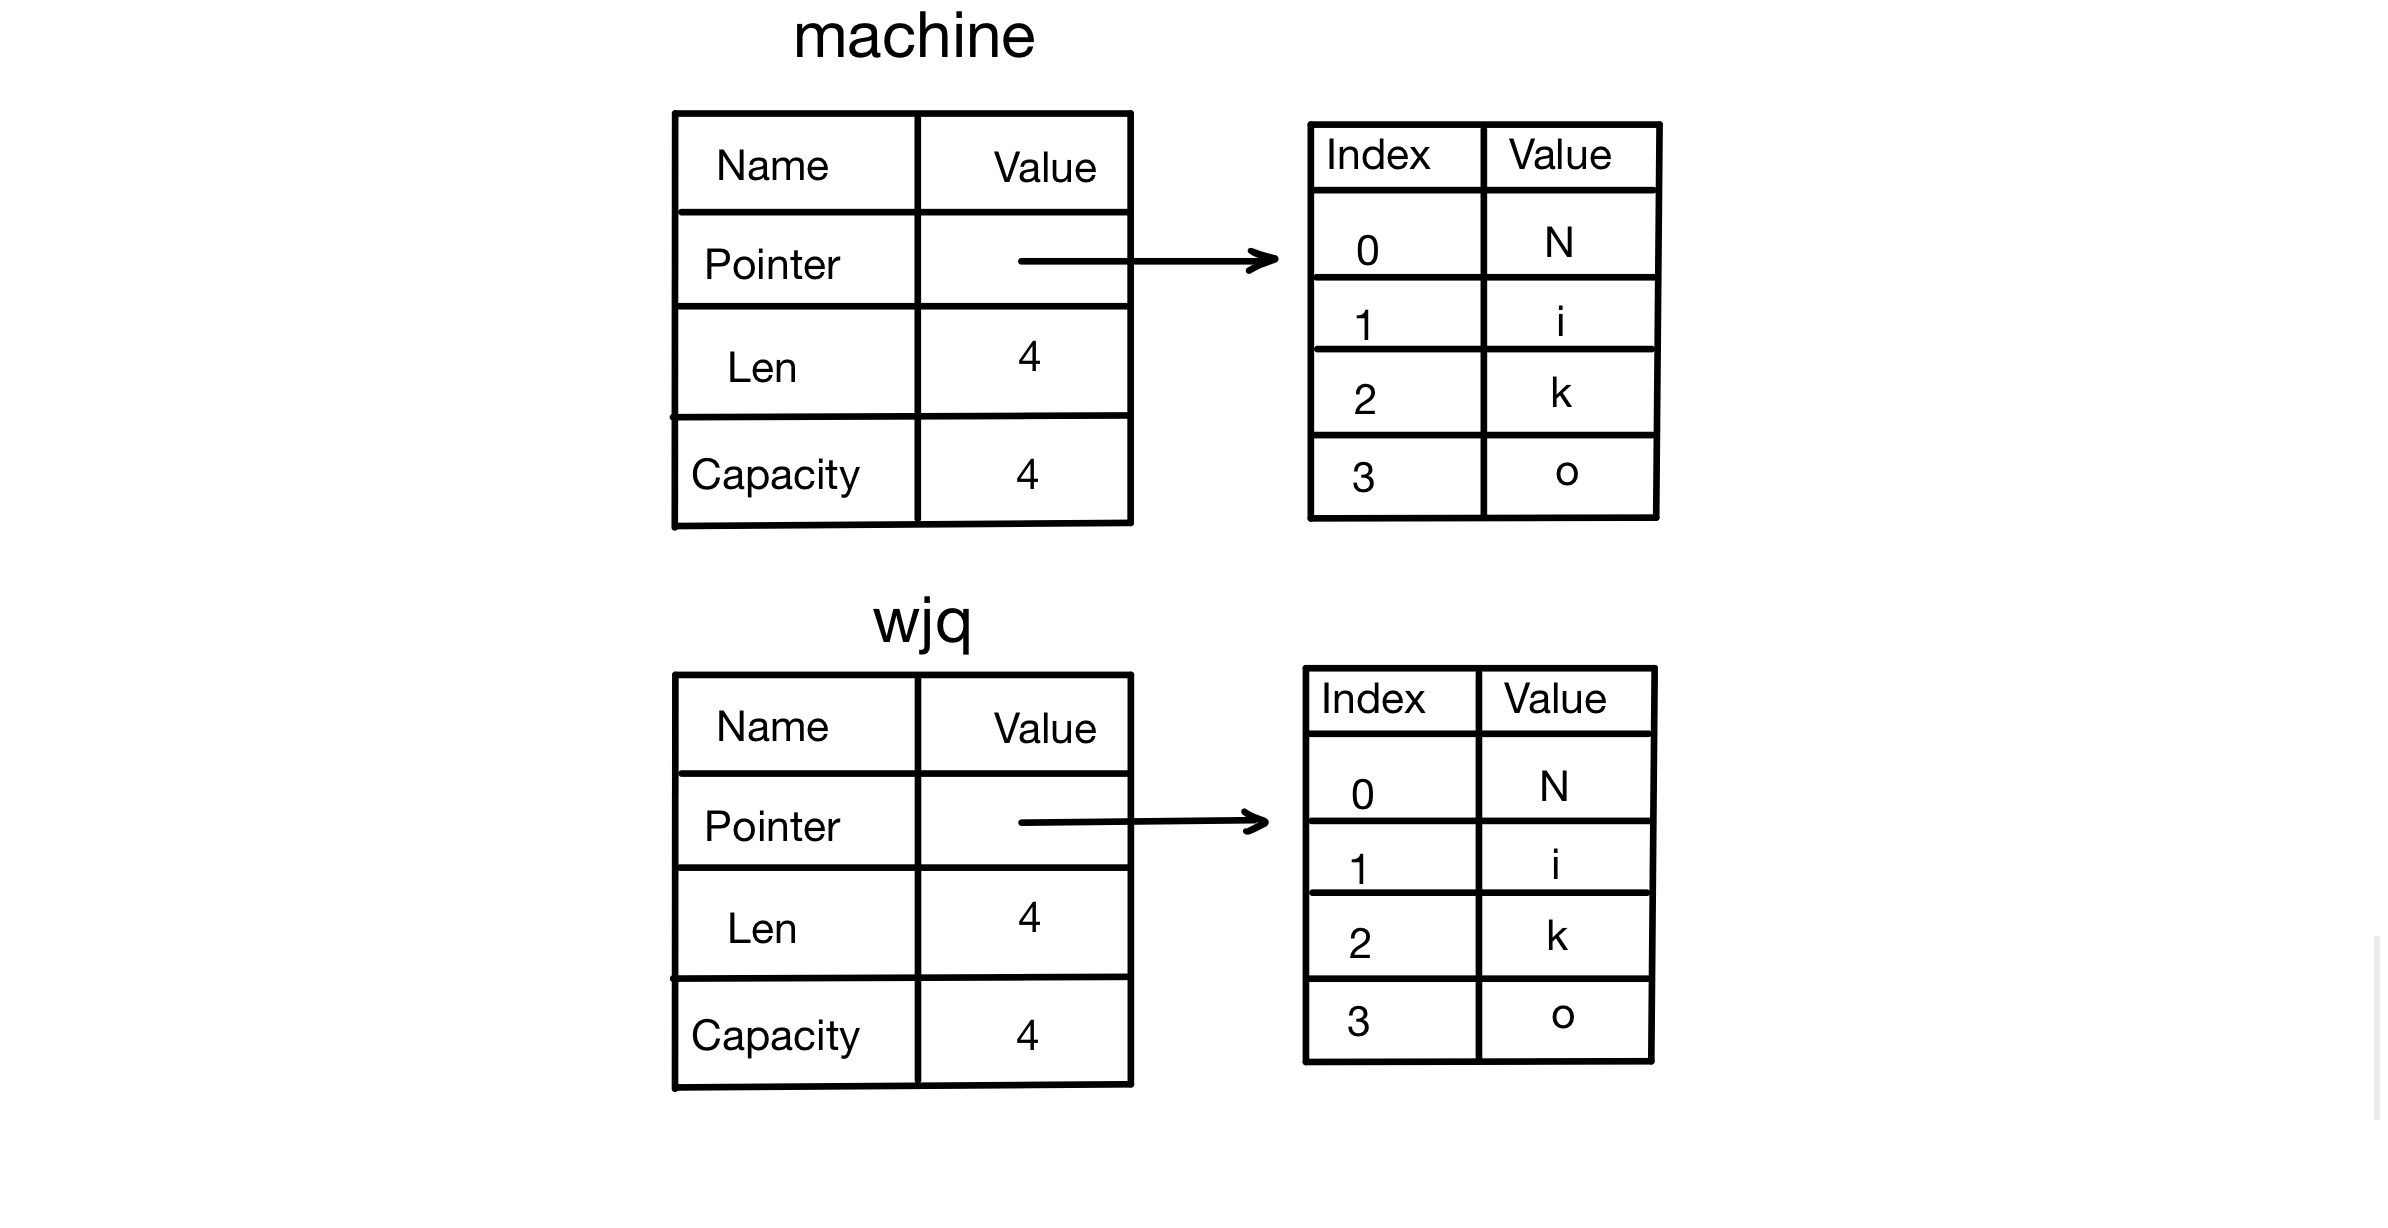
However, cloning is relatively resource-intensive, so use it carefully.
3. Stack Data: Copy
For data on the stack, cloning is not needed; copying is enough.
#![allow(unused)]
fn main() {
let x = 5;
let y = x;
println!("{},{}", x, y)
}
In this example, both x and y are valid because x is an integer type. Integer types are basic types in Rust (such as i32, u32, and so on). Their sizes are already known at compile time, and their values are fully stored on the stack. Because these types implement the Copy trait (you can think of a trait as an interface), assignment is actually a direct copy of the value rather than a transfer of ownership.
For types that implement the Copy trait, creating a new variable such as y triggers a bitwise copy operation, which is very efficient. At the same time, the original variable such as x remains valid. Therefore, in this case, calling clone makes no difference from direct assignment, because the copying behavior is essentially the same.
If a type implements the Copy trait, the old variable is still usable after assignment. If a type or part of a type implements the Drop trait, Rust will not allow it to implement the Copy trait.
Some types that have the Copy trait:
- Any composite type made up only of simple scalar values can implement the Copy trait
- Anything that needs to allocate memory or some other resource cannot implement the Copy trait
For tuples, if all of the elements can implement the Copy trait, then the tuple can as well; if even one element cannot implement the Copy trait, then the entire tuple cannot.
(i32, u32)can implement the Copy trait(i32, String)cannot implement the Copy trait becauseStringcannot implement the Copy trait
4.3 Ownership and Functions
4.3.0 Before the Main Text
After learning Rust’s general programming concepts, you reach the most important part of all of Rust—ownership. It is quite different from other languages, and many beginners find it difficult to learn. This chapter aims to help beginners fully master this feature.
This chapter has three subsections:
- Ownership: Stack Memory vs. Heap Memory
- Ownership Rules, Memory, and Allocation
- Ownership and Functions (this article)
4.3.1 Passing Values to Functions
In terms of semantics, passing a value to a function is similar to assigning a value to a variable, so to put it in one sentence: function parameter passing works the same way as assignment
Next, let’s explain it in detail: passing a value to a function will cause either a move or a copy.
- For data types that implement the Copy trait, a copy occurs, so the original variable is not affected and can continue to be used.
- For data types that do not implement the Copy trait, a move occurs, so the original variable is invalidated and cannot be used.
A detailed introduction to the Copy trait, moves, and copies was given in the previous article, 4.2. Ownership Rules, Memory, and Allocation, so it will not be repeated here.
fn main() {
    let machine = String::from("6657");
    wjq(machine);

    let x = 6657;
    wjq_copy(x);
    println!("x is: {}", x);
}

fn wjq(some_string: String) {
    println!("{}", some_string);
}

fn wjq_copy(some_number: i32) {
    println!("{}", some_number);
}-
For the variable
machine:Stringis a complex data type, allocated on the heap, and it does not implement the Copy trait.- When
machineis passed to thewjqfunction, a move occurs, meaning ownership is transferred from the variablemachineto the function parametersome_string. - At this point, ownership of
machinehas been transferred. The functionwjqcan use it normally, but the original variablemachineis no longer available. If you try to usemachineafterward, the compiler will report an error.
-
For the variable
x:i32is a basic data type with a fixed size, allocated on the stack, and it implements the Copy trait.- When
xis passed to thewjq_copyfunction, a copy occurs, meaning the value ofxis copied and passed to the function parametersome_number. - Because this is just a value copy, the original variable
xis unaffected and can still be used after the function call.
-
For the variable
some_string:- Its scope starts when it is declared on line 10 and ends when the
}on line 12 is reached. - When it leaves scope, Rust automatically calls the
dropfunction to free the memory occupied bysome_string.
- Its scope starts when it is declared on line 10 and ends when the
-
For the variable
some_number:- Its scope starts when it is declared on line 14 and ends when the
}on line 16 is reached. - Nothing special happens when it leaves scope, because types that implement the Copy trait do not call
Dropwhen they go out of scope.
- Its scope starts when it is declared on line 14 and ends when the
4.3.2 Return Values and Scope
Ownership is also transferred during the process of returning a value from a function.
fn main() {
    let s1 = give_ownership();
    let s2 = String::from("6657");
    let s3 = takes_and_gives_back(s2);
}

fn give_ownership() -> String {
    let some_string = String::from("machine");
    some_string
}

fn takes_and_gives_back(a_string: String) -> String {
    a_string
}-
The behavior of the
give_ownershipfunction:- The
give_ownershipfunction creates aStringvariablesome_string, and ownership of it belongs to thegive_ownershipfunction. - When
some_stringis returned as the function’s return value, ownership is transferred to the caller, namely the variables1. - As a result,
some_stringwill not be dropped after leaving the scope ofgive_ownership, because its ownership has been handed over tos1.
- The
-
The behavior of the
takes_and_gives_backfunction:- The
takes_and_gives_backfunction accepts aStringparametera_string. When the function is called, ownership of the passed-in argument (s2) is transferred to the function parametera_string. - When the function returns
a_string, ownership is transferred once again froma_stringto the caller, namely the variables3. - At this point,
s2is no longer available, because its ownership has been transferred totakes_and_gives_back, and the function’s return value is assigned tos3.
- The
The ownership of a variable always follows the same pattern:
- Assigning a value to another variable causes a move. Only types that implement the Copy trait, such as basic types like
i32andf64, are copied during assignment. - When a variable containing heap data leaves scope, its value is cleaned up by the
dropfunction, unless ownership of the data has been moved to another variable.
4.3.3 Letting a Function Use a Value Without Taking Ownership
Sometimes the intent of the code is for a function to use a variable, but you do not want to lose the right to use the data as a result. In that case, you can write it like this:
fn main() {
    let s1 = String::from("Hello");
    let (s2, len) = calculate_length(s1);
    println!("The length of '{}' is {}", s2, len);
}

fn calculate_length(s: String) -> (String, usize) {
    let length = s.len();
    (s, length)
}
In this example, s1 has to give ownership to s, but when this function returns, it also returns s intact and hands ownership of the data to s2. In this way, ownership of the data is given back to a variable in the main function, allowing the data under s1 to be used again in main (even though the variable name has changed).
This approach is too troublesome and too clumsy. Rust provides a feature for this scenario called reference, which lets a function use a value without taking ownership of it. This feature will be explained in the next article.
4.4 Reference and Borrowing
4.4.0 Before the Main Text
This section is actually similar to how C++’s move semantics for smart pointers are constrained at the compiler level. The way references are written in Rust becomes, through compiler restrictions, the most ideal and most standardized way to write pointers in C++. So anyone who has studied C++ will definitely find this chapter very familiar.
4.4.1 References
References let a function use a value without taking ownership of it. When declaring one, add & before the type to indicate a reference. For example, a reference to String is &String. If you have studied C++, the dereference operator in C++ is *, and it is the same in Rust.
After learning references, you can simplify the example at the end of the previous article.
Here is the previous code:
fn main() {
    let s1 = String::from("hello");
    let (s2, len) = calculate_length(s1);
    println!("The length of '{}' is {}", s2, len);
}

fn calculate_length(s: String) -> (String, usize) {
    let length = s.len();
    (s, length)
}
Here is the modified code:
fn main() {
    let s1 = String::from("hello");
    let length = calculate_length(&s1);
    println!("The length of '{}' is {}", s1, length);
}

fn calculate_length(s: &String) -> usize {
    s.len()
}
Comparing the two, in the latter version, a pointer to the data is passed into the calculate_length function for it to operate on, while ownership of the data remains with the variable s1. There is no need to return a tuple, and there is no need to declare another variable s2, which makes it much more concise.
The parameter s of the function calculate_length is actually a pointer that points to the stack memory location where s resides (it does not directly point to the data on the heap). When this pointer goes out of scope, Rust does not destroy the data it points to, because s does not own it. Rust only pops the pointer information stored on the stack, which means it frees the memory occupied by the leftmost part in the image below.
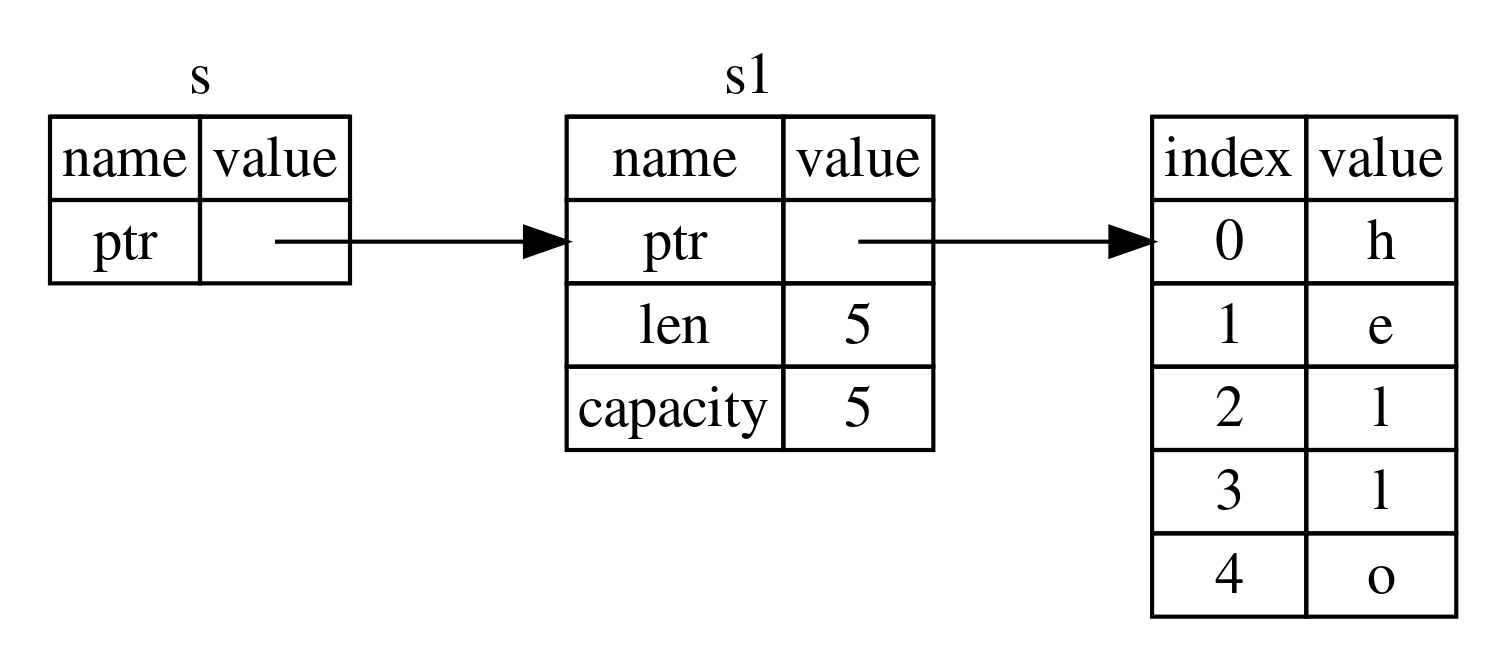
Using a reference as a function parameter is called borrowing.
4.4.2 Properties of Borrowing
Borrowed content cannot be modified unless it is a mutable reference.
Take a house as an example: if you rent out a house that you own, that is borrowing. The tenant can live in it but cannot freely renovate it; this is the property that borrowed content cannot be modified. If you allow the tenant to renovate it, that is a mutable reference.
Using this code as an example:
fn main() {
    let s1 = String::from("hello");
    let length = calculate_length(&s1);
    println!("The length of '{}' is {}", s1, length);
}

fn calculate_length(s: &String) -> usize {
    s.push_str(", world");
    s.len()
}
This code will produce a compile-time error:
error[E0596]: cannot borrow `*s` as mutable, as it is behind a `&` reference
The reason for the error is the line s.push_str(", world");: references are immutable by default, but this line modifies the data.
Just like ordinary variable declarations, references are immutable by default, but they become mutable when the mut keyword is added:
fn main() {
    let mut s1 = String::from("hello");
    let length = calculate_length(&mut s1);
    println!("The length of '{}' is {}", s1, length);
}

fn calculate_length(s: &mut String) -> usize {
    s.push_str(", world");
    s.len()
}
Writing it this way will not cause an error, but remember to declare s1 as a mutable variable when you declare it.
This kind of reference that can modify the data is called a mutable reference.
4.4.3 Restrictions on Mutable References
Mutable references have two very important restrictions. The first is: within a specific scope, for a particular piece of data, there can only be one mutable reference.
Using this code as an example:
fn main() {
    let mut s = String::from("hello");
    let s1 = &mut s;
    let s2 = &mut s;
}
Because both s1 and s2 are mutable references pointing to s, and they are in the same scope, the compiler will report an error:
error[E0499]: cannot borrow `s` as mutable more than once at a time
The purpose of this is to prevent data races. A data race occurs when the following three conditions are all met at the same time:
- Two or more pointers access the same data at the same time
- At least one pointer is used to write to the data
- No mechanism is used to synchronize access to the data
The error message mentions at a time, meaning simultaneously, which is to say within the same scope. So as long as they are not simultaneous, that is, two mutable references pointing to the same data in different scopes are allowed. The following code illustrates this:
fn main() {
    let mut s = String::from("hello");
    {
        let s1 = &mut s;
    }
    let s2 = &mut s;
}
s1 and s2 do not have the same scope, so pointing to the same piece of data is allowed.
The second important restriction on mutable references is: you cannot have one mutable reference and one immutable reference at the same time. The purpose of a mutable reference is to modify the data, while the purpose of an immutable reference is to keep the data unchanged. If both exist at the same time, then once the mutable reference changes the value, the immutable reference no longer serves its purpose.
fn main() {
    let mut s = String::from("hello");
    let s1 = &mut s;
    let s2 = &s;
}
Because s1 is a mutable reference and s2 is an immutable reference, and both appear in the same scope pointing to the same piece of data, the compiler will report an error:
error[E0502]: cannot borrow `s` as mutable because it also borrowed as immutable
Of course, multiple immutable references can exist at the same time.
In summary: multiple readers (immutable references) can exist simultaneously, multiple writers (mutable references) can exist but not simultaneously, and multiple writers together with simultaneous read/write access are not allowed.
4.4.4 Dangling References
When using pointers, it is very easy to cause an error called a dangling pointer. It is defined as: a pointer refers to some address in memory, but that memory may already have been freed and reassigned for someone else to use.
If you reference some data, Rust’s compiler guarantees that the data will not go out of scope before the reference goes out of scope. This is how Rust ensures that dangling references never occur.
Using this code as an example:
fn main() {
    let r = dangle();
}

fn dangle() -> &String {
    let s = String::from("hello");
    &s
}- A local variable
sis created: The variablesis aString. It is allocated on the stack, but its underlying data is stored on the heap. - A reference to
sis returned: The function returns a reference tosvia&sat the end. sgoes out of scope: After the functiondanglereturns, the variablesleaves scope. According to Rust’s ownership rules, the memory forsis automatically freed. The memory data pointed to by&sno longer stores the data ofs, so the returned reference points to an already freed memory address and becomes a dangling reference.
Rust’s compiler will detect this and report an error at compile time.
4.4.5 Reference Rules
- At any given time, you can only satisfy one of the following conditions:
- One mutable reference
- Any number of immutable references
- References must always be valid
4.5 Slice
4.5.0 Before We Begin
This is the last article in Chapter 4, so let’s also take the opportunity to summarize this chapter:
The concepts of ownership, borrowing, and slices ensure memory safety in Rust programs at compile time. Rust allows programmers to control memory usage in the same way as other systems programming languages, but letting the owner of the data automatically clean it up when it goes out of scope means you do not need to write and debug extra code to gain that control.
After reading this article, I believe you will sincerely marvel at how magical and advanced Rust’s ownership mechanism really is.
4.5.1 Slice Features
-
1. Type and structure
- Slice types are represented as
&[T]or&mut [T], whereTis the type of the elements in the slice. - Immutable slices:
&[T], which only allow read operations. - Mutable slices:
&mut [T], which allow modification.
- Slice types are represented as
-
2. Do not own data
- A slice is essentially a reference to the underlying data, so it does not own the data.
- A slice’s lifetime is the same as the underlying data. When the underlying data is destroyed, the slice becomes invalid too.
4.5.2 String Slices
Take a problem as an example: Write a function that accepts a string as an argument, and returns the first word it finds in that string. If the function does not find any spaces, the entire string is returned.
fn main() {
	let s = String::from("Hello world");
	let word_index = first_word(&s);
	println!("{}", word_index);
}
fn first_word(s:&String) -> usize {
	let bytes = s.as_bytes();
	for (i, &item) in bytes.iter().enumerate() {
		if item == b' ' {
			return i;
		}
	}
	s.len()
}- Because you need to iterate over
Stringelement by element and check whether each value is a space, you use theas_bytesmethod to convertStringinto a byte array. - We will talk about iterators later. For now, all you need to know is that
iteris a method used to retrieve each element in a collection one by one.enumerateis a tool that adds an index to each element on top ofiterand returns the result as a tuple. The first element of the returned tuple is the index, and the second element is a reference to that element.
The program compiles successfully, and the output is 5. That is the index of the space after Hello.
We now have a way to find the index of the end of the first word in a string, but there is a problem. We return a usize ourselves, but it is only a number that has meaning in the context of &String. In other words, because it is a value different from String, there is no guarantee that it will still be valid in the future.
For example, for some reason the code writes s.clear(); after calling first_word to clear s. At that point, the word_index variable no longer means anything. Put another way, the Rust compiler cannot detect the error where the code uses s.clear() while word_index still exists. If you later use word_index to print a character in your code, an error will obviously occur.
This kind of API design requires constantly paying attention to the validity of word_index, and ensuring the synchronization between this index and the String variable s. Unfortunately, this kind of work is often quite tedious and very error-prone, so Rust provides string slices for this kind of problem.
A string slice is a reference to part of a string.
Adding & in front of the original string name indicates a reference to it, and adding [start_index..end_index] after it indicates a reference to part of that string. Note that the range inside [] is left-closed, right-open, so the end index is the next index after the end position of the slice. In plain terms: include the left, exclude the right.
fn main() {
	let s = String::from("hello world");
	let hello = &s[0..5];
	let world = &s[6..11];
}
In this example, the index range from 0 to 5 in s (including 0 but not including 5), namely "Hello", is assigned to the hello variable; the index range from 6 to 11 (including 6 but not including 11), namely "world", is assigned to the world variable.
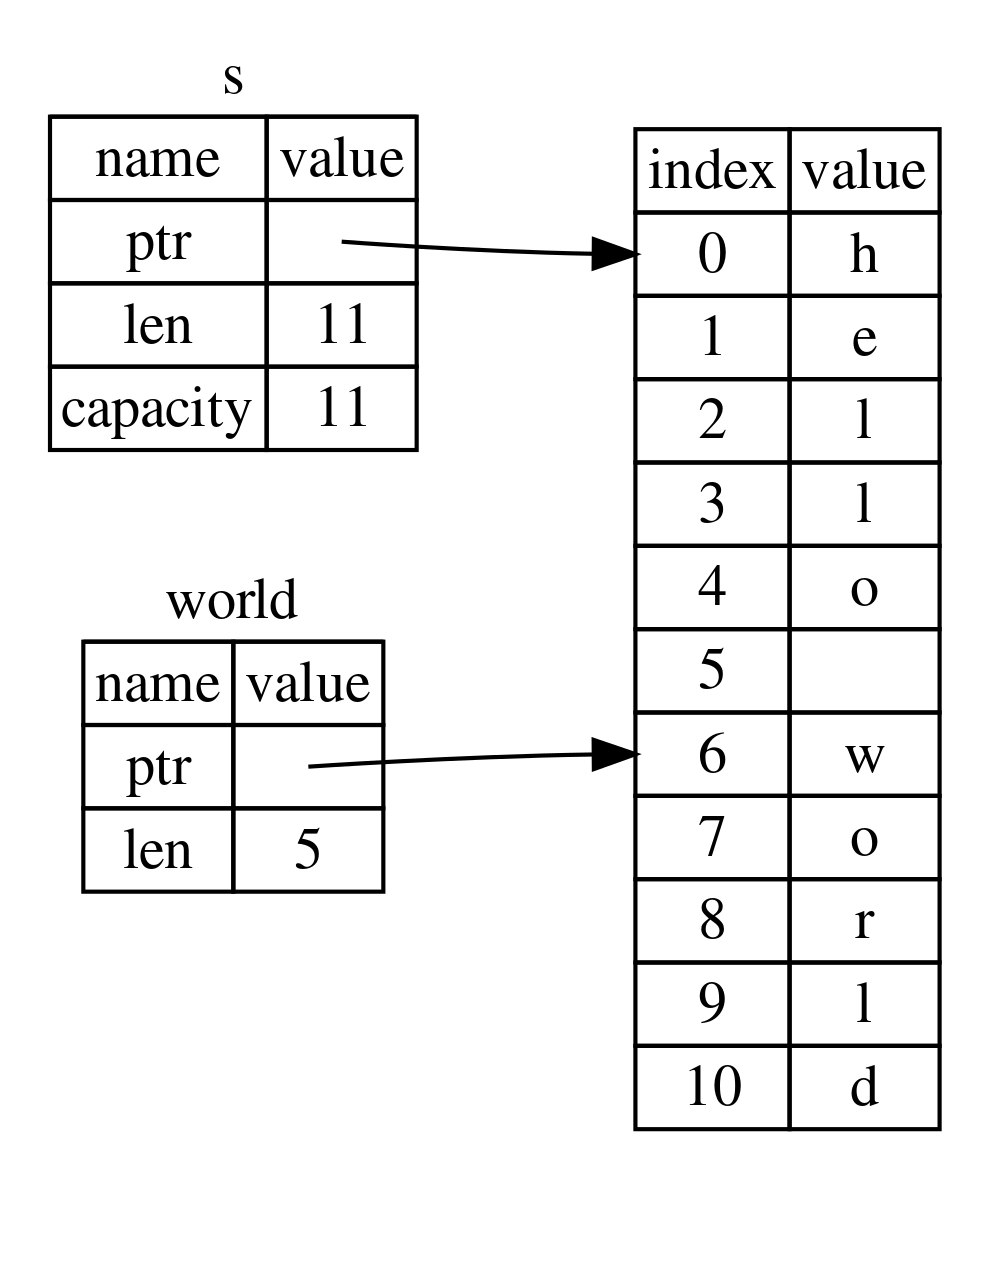 As you can see from the diagram, the
 world variable does not exist independently of s, which allows the compiler to detect many potential problems during compilation.
Of course, there are also a few shorthand forms for indexing:
#![allow(unused)]
fn main() {
let hello = &s[0..5];
}
This variable is sliced starting from index 0, and Rust allows this equivalent form:
#![allow(unused)]
fn main() {
let hello = &s[..5];
}
#![allow(unused)]
fn main() {
let world = &s[6..11];
}This variable is sliced up to the last element of s, and Rust allows this equivalent form:
#![allow(unused)]
fn main() {
let world = &s[6..];
}
If you want to slice the entire string, you can write:
#![allow(unused)]
fn main() {
let whole = &s[..];
}
Notes
- The range indices for string slices must fall on valid
UTF-8boundaries. - If you try to create a string slice from part of a multibyte character, the program will panic and exit.
Rewriting the Code
Now that we have learned slices, we can modify the code at the beginning of the article to optimize it further:
fn main() {
	let s = String::from("Hello world");
	let word = first_word(&s);
	println!("{}", word);
}
fn first_word(s:&String) -> &str {
	let bytes = s.as_bytes();
	for (i, &item) in bytes.iter().enumerate() {
		if item == b' ' {
			return &s[..i];
		}
	}
	&s[..]
}&strmeans a string slice.
If you add s.clear(); after the word = first_word(&s); line, Rust will detect the error and report it:
error[E0502]: cannot borrow `s` as mutable because it is also borrowed as immutable
This is because a mutable reference s.clear() and an immutable reference &s appear in the same scope, violating the borrowing rules.
PS: s.clear() is equivalent to clear(&mut s)
4.5.3 String Literals Are Slices
String literals are stored directly in the binary program and are loaded into static memory when the program runs.
#![allow(unused)]
fn main() {
let s = "Hello, World!";
}
The variable s has type &str, which is a slice pointing to a specific location in the binary program. &str is immutable, so string literals are immutable too.
4.5.4 Passing String Slices as Parameters
#![allow(unused)]
fn main() {
fn first_word(s:&String) -> &str {
}
This is the line that declares the function in the optimized code we just wrote, and there is nothing wrong with this form itself. But experienced Rust developers use &str as the parameter type for s, because then the function can accept both String and &str arguments:
- If the value you pass in is already a string slice, you can call it directly.
- If the value is a
String, you can pass an argument of type&String. When a function parameter needs&strand you pass&String, Rust will implicitly invokeDerefto convert&Stringinto&str.
Using a string slice instead of a string reference as a function parameter makes the API more general without losing any functionality.
Based on this, we can further optimize the earlier code:
fn main() {
	let s = String::from("Hello world");
	let word = first_word(&s);
	println!("{}", word);
}
fn first_word(s:&str) -> &str {
	let bytes = s.as_bytes();
	for (i, &item) in bytes.iter().enumerate() {
		if item == b' ' {
			return &s[..i];
		}
	}
	&s[..]
}
This line:
#![allow(unused)]
fn main() {
let word = first_word(&s);
}
can also be written as:
#![allow(unused)]
fn main() {
let word = first_word(&s[..]);
}
For the former, Rust will implicitly invoke Deref and convert &String into &str; the latter manually converts it to &str.
4.5.5 Slices of Other Types
fn main() {
    let number = [1, 2, 3, 4, 5];
    let num = &number[1..3];
    println!("{:?}", num);
}
Arrays can also use slices. The essence of the num slice is that it stores the pointer to the starting point of the slice in number (index 1 in this example) and the length information.
The output is:
[2, 3]
5.1 Defining and Instantiating Structs
5.1.1 What Is a Struct
The meaning of struct is “structure”. It is a custom data type that allows programs to name and bundle related values into meaningful combinations. It is similar to a “class” or “structure” in other programming languages, but it only provides data storage and does not include methods.
People who have studied C/C++ may already be very familiar with the struct keyword, but there are differences:
-
C:
structis a simple aggregate type used to organize data. It can contain only data and no methods. -
C++:
structis very similar toclass. It can contain data and methods, and the only syntax difference is that the default access level instructispublic, while inclassit isprivate. -
Rust:
structis used only to define data structures and does not include methods. Methods must be defined for the struct through animplblock. Rust provides stricter ownership, lifetime, and memory management mechanisms.
5.1.2 Defining a Struct
- Use the
structkeyword to name the entire struct using CamelCase. - Inside curly braces, define the name and type of every field.
Example: Create a struct customized to store various data for CS professional players on HLTV (additional info: CS professional player data generally consists of Rating, DPR, KAST, Impact, ADR, and KPR).

#![allow(unused)]
fn main() {
struct Stats{
    rating: f32,
    dpr: f32,
    kast: f32,
    impact: f32,
    adr: f32,
    kpr: f32,
}
}
5.1.3 Instantiating a Struct
To use a struct, you need to create an instance of it:
- Assign a concrete value to each field; you cannot omit field values.
- There is no need to specify them in the order in which they were declared.
Using donk as an example, create his database:
fn main() {
    let donk = Stats {
        rating: 1.27,
        impact: 1.4,
        dpr: 0.67,
        adr: 88.8,
        kast: 74.1,
        kpr: 0.85,
    };
}
5.1.4 Accessing the Value of a Field in a Struct
You can use dot notation to access a field’s value in a struct:
fn main() {
    let mut donk = Stats {
        rating: 1.27,
        impact: 1.4,
        dpr: 0.67,
        adr: 88.8,
        kast: 74.1,
        kpr: 0.85,
    };
    donk.rating = 2.59;
}
If you want to change a struct’s values, remember to use the mutable variable keyword mut when instantiating it.
In a struct, the smallest unit of mutability is the entire instance, so you cannot control the mutability of a single field on its own. Once a struct instance is declared mutable, all fields in that instance are mutable.
5.1.5 Using a Struct as a Function Return Value
The last expression in a function is its return value, so if you use a struct as a return value, you only need to make sure that constructing the struct is the last expression in the function (without a semicolon):
#![allow(unused)]
fn main() {
fn change_stats(rating: f32, impact:f32, dpr:f32, adr:f32, kast:f32, kpr:f32) -> Stats{
    Stats {
        rating: rating,
        impact: impact,
        dpr: dpr,
        adr: adr,
        kast: kast,
        kpr: kpr,
    }
}
}
5.1.6 Field Init Shorthand
Rust, like JS and C#, allows field initialization to be shortened in some cases.
When a field name and the corresponding variable name for the field value are the same, you can use shorthand. For example, in the previous code snippet, all field names are the same as the variable names for their values, so it can be shortened to:
#![allow(unused)]
fn main() {
fn change_stats(rating: f32, impact:f32, dpr:f32, adr:f32, kast:f32, kpr:f32) -> Stats{
    Stats {
        rating,
        impact,
        dpr,
        adr,
        kast,
        kpr,
    }
}
}
Of course, this is not limited to cases where everything matches. As long as one field meets the shorthand condition, you can use the shorthand there and keep the normal syntax for the others.
5.1.7 Struct Update Syntax
When you create a new instance based on an existing struct instance, and the new instance has fields that are the same as the old one, you can use update syntax.
For example, if I want to create data for sh1ro, where his rating is 1.25, his impact is 1.2, and the rest are the same as donk’s, this is the basic form:
fn main() {
    let donk = Stats {
        rating: 1.27,
        impact: 1.4,
        dpr: 0.67,
        adr: 88.8,
        kast: 74.1,
        kpr: 0.85,
    };
    let sh1ro = Stats {
        rating: 1.25,
        impact: 1.2,
        dpr: donk.dpr,
		adr: donk.adr,
		kast: donk.kast,
		kpr: donk.kpr,
    };
}
This is a bit cumbersome, so Rust provides this syntactic sugar:
fn main() {
    let donk = Stats {
        rating: 1.27,
        impact: 1.4,
        dpr: 0.67,
        adr: 88.8,
        kast: 74.1,
        kpr: 0.85,
    };
    let sh1ro = Stats {
        rating: 1.25,
        impact: 1.2,
        ..donk
    };
}
You only need to write the parts that changed. For the rest, just write .. followed by the name of the other struct instance, which means that the values of the remaining unassigned fields are the same as the corresponding fields in the other instance.
5.1.8 Tuple Structs
A tuple struct is a type of struct that is similar to a tuple. The whole tuple struct has a name, but the elements inside it do not. It is useful when you want to name an entire tuple, make it distinct from other tuples, and do not need to name each element.
To define a tuple struct, use the struct keyword followed by the name and the types of the elements inside it.
Example:
#![allow(unused)]
fn main() {
struct Color(u8, u8, u8);
struct Point(i32, i32, i32);
let black = Color(0, 0, 0);
let origin = Point(0, 0, 0);
}
Some people jokingly say that tuple structs have no equivalent in traditional programming languages and come from the noble lineage of Haskell. This is because in many traditional object-oriented languages, such as Java and C++, structs or classes are named and have named fields, while tuples are anonymous and based only on order. There is no intermediate form that combines the strengths of both. Rust’s tuple struct concept is directly related to Haskell’s Newtype Pattern. In Haskell, you can define a similar pattern with newtype.
It is worth noting that even if two tuple structs have the same number of elements and the corresponding element types are identical, they should not be considered the same type, because they are different structs.
5.1.9 Unit-Like Structs
Unit-like structs are called unit-like structs because they behave similarly to the unit type (). They are used when you need a type marker or want to implement a trait on some type (which you can think of as an interface) without storing any data in the type itself. This is similar to interface{} in Go.
struct ReadOnly;
struct WriteOnly;

fn process_data<T>(_mode: T) {
    // Used only as a type marker
}

fn main() {
    process_data(ReadOnly);
    process_data(WriteOnly);
}
This example implements type markers.
5.1.10 Ownership of Struct Data
#![allow(unused)]
fn main() {
struct User {
active: bool,
username: String,
email: String,
sign_in_count: u64,
}
}
In this example, both username and email use the String type instead of &str, because String is an owned type and owns all of its data. In this case, as long as the instance is valid, the field data inside it is also definitely valid.
Reference types such as &str can also be stored in a struct, but that requires lifetimes (which we will cover later). Simply put, lifetimes ensure that as long as the struct instance is valid, the references inside it are also valid. If a struct stores references without using lifetimes, it will produce an error (missing lifetime specifier).
5.2 Struct Usage Example - Printing Debug Information
5.2.1. Example Requirements
Create a function that calculates the area of a rectangle. The width and length are both of type u32, and the area is also of type u32.
5.2.2. The Simple Approach
The simplest solution is to define the function with two parameters: one for the width and one for the length, both of type &u32 (the example says the values are u32, and in this case the function does not need to take ownership of the data, so we use references by adding & in front of the type). Inside the function, just return the product of the width and length.
fn main() {
    let width = 30;
    let length = 50;
    println!("{}", area(&width, &length));
}

fn area(width: &u32, length: &u32) -> u32 {
    width * length
}
Output:
1500
5.2.3. The Tuple Approach
The simple approach itself is fine, but it has a maintainability problem: width and length are separate parameters, so nowhere in the program is it clear that these parameters are related. Combining the width and height into one value is more readable and easier to manage. For organizing data, a tuple is perfect for this (because the values are the same data type, using an array here would also be fine).
fn main() {
    let rectangle = (30,50);
    println!("{}", area(&rectangle));
}

fn area(dim:&(u32,u32)) -> u32 {
    dim.0 * dim.1
}
Output:
1500
5.2.4. The Struct Approach
The tuple approach does improve maintainability, but the code becomes less readable, because without comments no one knows whether the first item in the tuple represents the width or the length (although that does not matter for calculating area, it matters in larger projects). Tuple elements do not have names. Even tuple structs, which were covered in the previous article, do not have named elements either.
So what kind of data structure can combine two values and give each of them a name? That’s right: struct.
struct Rectangle {
    width: u32,
    length: u32,
}

fn main() {
    let rectangle = Rectangle{
        width: 30,
        length: 50,
    };
    println!("{}", area(&rectangle));
}

fn area(dim:&Rectangle) -> u32 {
    dim.width * dim.length
}
5.2.5. Printing Debug Information for Structs
Starting from the code above, what happens if we add one more line to print the rectangle instance directly? The code is as follows:
struct Rectangle {
    width: u32,
    length: u32,
}

fn main() {
    let rectangle = Rectangle{
        width: 30,
        length: 50,
    };
    println!("{}", area(&rectangle));
    println!("{}", rectangle);  // Print the instance directly
}

fn area(dim:&Rectangle) -> u32 {
    dim.width * dim.length
}
Output:
error[E0277]: `Rectangle` does not implement `std::fmt::Display`
  --> src/main.rs:12:20
   |
12 |     println!("{}", rectangle);
   |                    ^^^^^^^^^ `Rectangle` cannot be formatted with the default formatter
   |
   = help: the trait `std::fmt::Display` is not implemented for `Rectangle`
   = note: in format strings you may be able to use `{:?}` (or {:#?} for pretty-print) instead
   = note: this error originates in the macro `$crate::format_args_nl` which comes from the expansion of the `println` macro (in Nightly builds, run with -Z macro-backtrace for more info)
First, let’s explain the error: the println! macro can perform many kinds of formatted printing. The {} placeholder tells println! to use the std::fmt::Display trait (think of it as an interface), similar to Python’s toString. The error message tells us that Rectangle does not implement the std::fmt::Display trait, so it cannot be printed this way.
In fact, the basic data types we have covered so far all implement std::fmt::Display by default, because their display format is fairly straightforward. For example, if you print 1, the program can only print the Arabic numeral 1. But for Rectangle, which has two fields, should it print both, only width, or only length? There are too many possibilities, so Rust does not implement std::fmt::Display for structs by default.
But if we keep reading the next line:
= note: in format strings you may be able to use `{:?}` (or {:#?} for pretty-print) instead
the compiler is telling us that we can use {:?} or {:#?} instead of {}. Let’s try the first one:
struct Rectangle {
    width: u32,
    length: u32,
}

fn main() {
    let rectangle = Rectangle{
        width: 30,
        length: 50,
    };
    println!("{}", area(&rectangle));
    println!("{:?}", rectangle);  // Change `{}` to `{:?}`
}

fn area(dim:&Rectangle) -> u32 {
    dim.width * dim.length
}
It still fails:
error[E0277]: `Rectangle` does not implement `Debug`
  --> src/main.rs:12:22
   |
12 |     println!("{:?}", rectangle);
   |                      ^^^^^^^^^ `Rectangle` cannot be formatted using `{:?}`
   |
   = help: the trait `Debug` is not implemented for `Rectangle`
   = note: add `#[derive(Debug)]` to `Rectangle` or manually `impl Debug for Rectangle`
   = note: this error originates in the macro `$crate::format_args_nl` which comes from the expansion of the `println` macro (in Nightly builds, run with -Z macro-backtrace for more info)
help: consider annotating `Rectangle` with `#[derive(Debug)]`
   |
1  + #[derive(Debug)]
2  | struct Rectangle {
   |
But the error message has changed. Last time it said std::fmt::Display was not implemented; this time it says Debug is not implemented. Debug, like Display, is also a formatting method. If we keep reading the note:
= note: add `#[derive(Debug)]` to `Rectangle` or manually `impl Debug for Rectangle`
the compiler is suggesting that we add #[derive(Debug)] to the code or manually implement the Debug trait. Here we will use the first option (the second one will be covered in the next article):
#[derive(Debug)]
struct Rectangle {
    width: u32,
    length: u32,
}

fn main() {
    let rectangle = Rectangle{
        width: 30,
        length: 50,
    };
    println!("{}", area(&rectangle));
    println!("{:?}", rectangle);
}

fn area(dim:&Rectangle) -> u32 {
    dim.width * dim.length
}
Output:
1500
Rectangle { width: 30, length: 50 }
This time it works. Rust itself includes debug-printing functionality, but you must explicitly opt in for structs in your own code, so you need to add the #[derive(Debug)] attribute before the struct definition. This output shows the struct name, the field names, and their values.
Sometimes a struct has many fields, and the horizontal layout produced by {:?} is not very readable. If you want a more readable output, change {:?} to {:#?}:
#[derive(Debug)]
struct Rectangle {
    width: u32,
    length: u32,
}

fn main() {
    let rectangle = Rectangle{
        width: 30,
        length: 50,
    };
    println!("{}", area(&rectangle));
    println!("{:#?}", rectangle);
}

fn area(dim:&Rectangle) -> u32 {
    dim.width * dim.length
}
Output:
1500
Rectangle {
    width: 30,
    length: 50,
}
In this output, the fields are arranged vertically, which is more readable for structs with many fields.
In fact, Rust provides many traits that we can derive. These traits can add a lot of functionality to custom types. All traits and their behavior can be found in the official guide, and I have attached the link here.
In the code above, Rectangle derives the Debug trait, so it can be printed in debug mode.
Let’s look at another example. Suppose you have a struct representing a point:
#[derive(Debug, Clone, PartialEq)]
struct Point {
    x: i32,
    y: i32,
}

fn main() {
    let point1 = Point { x: 1, y: 2 };
    let point2 = point1.clone();
    println!("{:?}", point1); // Print Point using the Debug trait
    assert_eq!(point1, point2); // Compare two Point values using the PartialEq trait
}
In this example:
#[derive(Debug)]allows you to print an instance of thePointstruct using the{:?}formatting specifier.#[derive(Clone)]allows you to create a copy of aPointinstance.#[derive(PartialEq)]allows you to compare whether twoPointinstances are equal.
5.3 Methods on Structs
5.3.1. What Is a Method?
Methods are similar to functions. They are also declared with the fn keyword, and they also have names, parameters, and return values. But methods are different from functions in a few ways:
- Methods are defined in the context of a
struct(or an enum or a trait object). - The first parameter of a method is always
self, which represents thestructinstance the method belongs to and is called on, similar toselfin Python andthisin JavaScript.
5.3.2. Practical Use of Methods
Let’s continue with an example from the previous article:
struct Rectangle {
    width: u32,
    length: u32,
}

fn main() {
    let rectangle = Rectangle{
        width: 30,
        length: 50,
    };
    println!("{}", area(&rectangle));
}

fn area(dim:&Rectangle) -> u32 {
    dim.width * dim.length
}
The area function calculates an area, but it is special: it only applies to rectangles, not to other shapes or other types. If we later add functions that calculate the areas of other shapes, the name area will become ambiguous. Renaming it to rectangle_area would be cumbersome, because every call to this function in main would also need to be changed.
So if we could combine the Rectangle struct, which stores the rectangle’s width and length, with the area function, which only calculates a rectangle’s area, that would be ideal.
For this kind of requirement, Rust provides “implementation”, whose keyword is impl. Follow it with the struct name and a pair of {} braces, and define methods inside just as you would define regular functions.
For this example, the struct name is Rectangle, so we can paste the code for the area function into the braces:
#![allow(unused)]
fn main() {
impl Rectangle {
    fn area(dim:&Rectangle) -> u32 {
        dim.width * dim.length
    }
}
}
But note that this is not yet a method, because the first parameter of a method must be self. The code above is called an associated function, which will be covered below.
There is nothing wrong with writing it this way, but it can be simplified further. As mentioned above, the first parameter of a method is always self, so we can change it like this:
#![allow(unused)]
fn main() {
impl Rectangle {
    fn area(&self) -> u32 {
        self.width * self.length
    }
}
}
Whichever type the method is bound to, self refers to that type. In this code, the area function is bound to Rectangle, so self refers to Rectangle. The area parameter does not need ownership, so we add & before self to indicate a reference.
Of course, after this change, the function call in main must also change—from a function call to a method call: instance.method_name(arguments).
fn main() {
    let rectangle = Rectangle{
        width: 30,
        length: 50,
    };
    println!("{}", rectangle.area());
}
The parentheses in rectangle.area() are empty because the area method was defined using only &self as its parameter, which means the method borrows an immutable reference to self (that is, the rectangle instance). When calling area, you do not need to pass the instance explicitly, because the method call already knows implicitly that self is rectangle.
The full code is as follows:
struct Rectangle {
    width: u32,
    length: u32,
}

impl Rectangle {
    fn area(&self) -> u32 {
        self.width * self.length
    }
}

fn main() {
    let rectangle = Rectangle{
        width: 30,
        length: 50,
    };
    println!("{}", rectangle.area());
}
Output:
1500
5.3.3. How to Define Methods
We already did this in the practical example above, so here is just a summary:
- Define methods inside
impl - The first parameter of a method can be
self,&self, or&mut self. It can take ownership, an immutable reference, or a mutable reference, just like other parameters. - Methods help organize code better, because methods for a type can all be placed inside the same
implblock, so you do not have to search the entire codebase for behaviors related to astruct.
5.3.4. Operators for Method Calls
In C/C++, there are two operators for calling methods:
->: The format isobject->something(). Use this to call methods on the object pointed to by a pointer (that is, whenobjectis a pointer)..: The format isobject.something(). Use this to call methods on the object itself (that is, whenobjectis not a pointer, but an object).
object->something() is actually syntactic sugar. It is equivalent to (*object).something(), and * means dereference. In both cases, the process is to dereference first to get the object, and then call the method on that object.
Rust provides automatic referencing/dereferencing. In other words, when calling methods, Rust automatically adds &, &mut, or * as needed so that object matches the method signature. This is similar to Go.
For example, these two lines of code have the same effect:
#![allow(unused)]
fn main() {
point1.distance(&point2);
(&point1).distance(&point2);
}
Rust will automatically add & before point1 when appropriate.
5.3.5. Method Parameters
In addition to self, methods can also take other parameters—one or more.
For example, based on the code in 5.3.2, we can add a feature that determines whether a rectangle can hold another rectangle (we will not consider rotated placement, and we will not consider the case where the rectangle’s length is greater than its width):
#![allow(unused)]
fn main() {
impl Rectangle {
    fn can_hold(&self, other: &Rectangle) -> bool {
        self.width > other.width && self.length > other.length
    }
}
}
The logic is very easy to understand: as long as both the rectangle’s width and length are larger than the other rectangle’s, it works.
Then we can declare a few Rectangle instances in main and print the comparison result to see whether it works. The complete code is as follows:
struct Rectangle {
    width: u32,
    length: u32,
}

impl Rectangle {
    fn can_hold(&self, other: &Rectangle) -> bool {
        self.width > other.width && self.length > other.length
    }
}

fn main() {
    let rect1 = Rectangle{
        width: 30,
        length: 50,
    };
    let rect2 = Rectangle{
        width: 10,
        length: 40,
    };
    println!("{}", rect1.can_hold(&rect2));
}
Output:
true
5.3.6. Associated Functions
You can define functions inside an impl block that do not take self as the first parameter. These are called associated functions (not methods). They are not called on an instance, but they are associated with the type. For example, String::from() is an associated function named from on the String type.
Associated functions are usually used as constructors, meaning they are used to create an instance of the associated type.
For example, based on the code in 5.3.2, we can add a constructor for a square (a square is also a special kind of rectangle):
#![allow(unused)]
fn main() {
impl Rectangle {
    fn square(size: u32) -> Rectangle {
        Rectangle{
            width: size,
            length: size,
        }
    }
}
}
Only one parameter is needed, because constructing a square only requires one side length.
Let’s try calling this associated function in main. The format is TypeName::function_name(arguments). The complete code is as follows:
#[derive(Debug)]
struct Rectangle {
    width: u32,
    length: u32,
}

impl Rectangle {
    fn square(size: u32) -> Rectangle {
        Rectangle{
            width: size,
            length: size,
        }
    }
}

fn main() {
    let square = Rectangle::square(10);
    println!("{:?}", square);
}
Output:
Rectangle { width: 10, length: 10 }
:: is not only used for associated functions; it is also used for modules to create namespaces (this will be covered later).
5.3.7. Multiple impl Blocks
Each struct can have multiple impl blocks.
For example, suppose I want to put all the methods and associated functions mentioned in this article into one code sample.
You can write it like this (multiple impl blocks):
#[derive(Debug)]
struct Rectangle {
    width: u32,
    length: u32,
}

impl Rectangle {
    fn area(&self) -> u32 {
        self.width * self.length
    }
}

impl Rectangle {
    fn can_hold(&self, other: &Rectangle) -> bool {
        self.width > other.width && self.length > other.length
    }
}

impl Rectangle {
    fn square(size: u32) -> Rectangle {
        Rectangle{
            width: size,
            length: size,
        }
    }
}

fn main() {
    let square = Rectangle::square(10);
    println!("{:?}", square);
}
You can also write it like this, combining everything into one impl block:
#[derive(Debug)]
struct Rectangle {
    width: u32,
    length: u32,
}

impl Rectangle {
    fn area(&self) -> u32 {
        self.width * self.length
    }

    fn can_hold(&self, other: &Rectangle) -> bool {
        self.width > other.width && self.length > other.length
    }

    fn square(size: u32) -> Rectangle {
        Rectangle{
            width: size,
            length: size,
        }
    }
}

fn main() {
    let square = Rectangle::square(10);
    println!("{:?}", square);
}
6.1 Enums
6.1.1. What Is an Enum?
Enums allow us to define a type by listing all possible values. This is similar to enums in other programming languages, but Rust enums are more flexible and powerful because they can associate data and methods, similar to classes or structs in other languages.
6.1.2. Defining an Enum
For example, an IP address has only two possibilities—IPv4 and IPv6. It is either IPv4 or IPv6, so this is a great use case for an enum, because a value of an enum can only be one of its variants (all possible values of the enum).
#![allow(unused)]
fn main() {
enum IpAddrKind{
	V4,
	V6,
}
}
This code uses the enum keyword to declare an enum type called IpAddrKind. It has two variants—V4 and V6—which represent IPv4 and IPv6 respectively.
6.1.3. Enum Values
Creating an enum value is very simple. The format is enum_name::variant. For example:
#![allow(unused)]
fn main() {
let four = IpAddrKind::V4;
let six = IpAddrKind::V6;
}
The variants of an enum live in the namespace of the enum’s identifier, and that identifier is the name of the enum type.
We can declare a function that takes IpAddrKind as its parameter, and the value passed in can be either V4 or V6:
#![allow(unused)]
fn main() {
fn route(ip_addr: IpAddrKind) {
    match ip_addr {
        IpAddrKind::V4 => println!("IPv4"),
        IpAddrKind::V6 => println!("IPv6"),
    }
}
}
Let’s try it out: Complete code:
enum IpAddrKind{
    V4,
    V6,
}

fn main() {
    let four = IpAddrKind::V4;
    let six = IpAddrKind::V6;
    // Call the function
    route(four);
    route(six);
    route(IpAddrKind::V4);
}

fn route(ip_addr: IpAddrKind) {
    match ip_addr {
        IpAddrKind::V4 => println!("IPv4"),
        IpAddrKind::V6 => println!("IPv6"),
    }
}
Output:
IPv4
IPv6
IPv4
6.1.3. Attaching Data to Enum Variants
An enum is a custom data type, so it can be used as the type of a field in a struct, for example:
#![allow(unused)]
fn main() {
struct IpAddr {
    kind: IpAddrKind,
    address: String,
}
}
The kind field in IpAddr is of type IpAddrKind and stores the network protocol; the other field, address, is of type String and stores the specific IP address.
With this struct, we can declare variables in main() that store IPv4 and IPv6 information:
fn main() {
    let home = IpAddr {
        kind: IpAddrKind::V4,
        address: String::from("127.0.0.1"),
    };
    let loopback = IpAddr {
        kind: IpAddrKind::V6,
        address: String::from("::1"),
    };
}
Rust allows data to be attached directly to enum variants, for example:
#![allow(unused)]
fn main() {
enum IpAddr {
	V4(String),
	V6(String),
}
}
You add a type after each variant (they do not have to be the same type). Here, both V4 and V6 are followed by the String type.
The advantages of this approach are:
- No need to use an extra struct
- Each variant can have a different type and a different amount of associated data
For example:
#![allow(unused)]
fn main() {
enum IpAddr {
	V4(u8, u8, u8, u8),
	V6(String),
}
}
An IPv4 address is actually made up of four 32-bit numbers (that is, four values that fit in u8), while IPv6 is a string, so String should be used. If we want to store a V4 address as four u8 values but still represent a V6 address as a String, we cannot use a struct. An enum handles this situation easily.
Let’s rewrite the code from 6.1.3:
enum IpAddrKind{
    V4(u8, u8, u8, u8),
    V6(String),
}

fn main() {
    let home = IpAddrKind::V4(127, 0, 0, 1);
    let loopback = IpAddrKind::V6(String::from("::1"));
}
That is indeed much shorter than the previous code.
6.1.4. IpAddr in the Standard Library
In fact, the standard library already provides an enum for IP addresses. Let’s see how the official version is written:
#![allow(unused)]
fn main() {
struct Ipv4Addr {
    // --snip--
}

struct Ipv6Addr {
    // --snip--
}

enum IpAddr {
    V4(Ipv4Addr),
    V6(Ipv6Addr),
}
}
The contents of Ipv4Addr and Ipv6Addr are not shown here, but that is not the point. The point is that this code shows that any type of data can be placed inside enum variants: for example, strings, numeric types, or structs. It can even include another enum.
6.1.5. Using Methods on Enums
The concept of methods was introduced in the previous article, so we will not go into too much detail here. Methods are defined with the impl keyword, as shown below:
enum Message {
    Quit,
    Move { x: i32, y: i32 },
    Write(String),
    ChangeColor(i32, i32, i32),
}
impl Message {
    fn call(&self) {
        println!("Something happens");
    }
}
fn main(){
	let m = Message::Write(String::from("hello"));
    m.call();
}
This enum has four different variants:
Quit: does not carry any data.Move: contains an anonymous struct.Write: contains aString.ChangeColor: contains threei32values.
In main, the variable m is declared as the Write variant of the Message enum, with the String value hello attached to it. Then the call method is invoked on m, which prints Something happens.
6.2 The Option Enum
6.2.1. What Is the Option Enum?
It is defined in the standard library and included in the prelude (the pre-imported module). It is used to describe a scenario where:
a value may exist, and if so, what data type it has; or it may simply not exist.
6.2.2. Rust Has No Null
In most other languages, there is a Null value, which represents no value.
In those languages, a variable can be in two states:
- Null (
Null) - Non-null
Null’s inventor, Tony Hoare, said in his 2009 talk “Null References: The Billion Dollar Mistake”:
I call it my billion-dollar mistake. At that time, I was designing the first comprehensive type system for references in an object-oriented language. My goal was to ensure that all use of references should be absolutely safe, with checking performed automatically by the compiler. But I couldn’t resist the temptation to put in a null reference, simply because it was so easy to implement. This has led to innumerable errors, vulnerabilities, and system crashes, which have probably caused a billion dollars of pain and damage in the last forty years.
In Chinese, that means: I call it my billion-dollar mistake. At the time, I was designing the first comprehensive reference type system for an object-oriented language. My goal was to ensure that all uses of references were absolutely safe, with checks performed automatically by the compiler. But I could not resist the temptation to add a null reference, simply because it was so easy to implement. This led to countless errors, vulnerabilities, and system crashes, which have probably caused billions of dollars in pain and damage over the past forty years.
The problem with Null is very obvious, and even its inventor does not think it is a good thing. For example, if a variable is of type string and needs to be concatenated with another string, but the variable is actually Null, then an error will occur during concatenation. For Java users, the most common error is NullPointerException. In one sentence, when you try to use a Null value as if it were a non-Null value, some kind of error will occur.
Therefore, Rust does not provide Null. However, for the concept that Null is trying to express—namely, a value that is currently invalid or does not exist for some reason—Rust provides a similar enum called Option<T>.
6.2.3. Option<T>
It is defined in the standard library like this:
#![allow(unused)]
fn main() {
enum Option<T>{
	Some(T),
	None,
}
}- The
Somevariant can carry some data, and its data type isT.<T>is actually a generic parameter (covered later). Noneis the other variant, but it does not carry any data, because it represents the case where a value does not exist.
Because it is included in the Prelude, you can use Option<T>, Some(T), and None directly.
Look at an example:
fn main(){
    let some_number = Some(5);
    let some_char = Some('e');

    let absent_number: Option<i32> = None;
}- For the first two statements, the values are written inside the parentheses, so the Rust compiler can infer their data types. For example,
some_numberhas typeOption<i32>, andsome_charhas typeOption<char>. Of course, you can also write the type explicitly, but it is unnecessary unless you want to force a specific type. - For the last statement, the assigned value is the
Nonevariant. The compiler cannot infer fromNonewhat typeTinOption<T>should be, so you need to declare the concrete type explicitly. That is whyOption<i32>is written here.
In this example, the first two variables are valid values, while the last variable does not contain a valid value.
6.2.4. The Advantages of Option<T>
- In Rust,
Option<T>andT(Tcan be any data type) are different types. You cannot treatOption<T>asT. - If you want to use the
TinsideOption<T>, you must first convert it toT. This prevents programmers from ignoring the possibility of null values and directly operating on variables that may be empty. Rust’sOption<T>design forces developers to handle these cases explicitly. For example, in C#, if you writestring a = null;and thenstring b = a + "12345";, and you do not check whetherais null (or ignore the possibility thatais null), an error will occur on the second line. In Rust, as long as a value’s type is notOption<T>, that value is definitely not null.
For example:
fn main(){
    let x: i8 = 5;
    let y: Option<i8> = Some(5);

    let sum = x + y;
}
If you run this code, the compiler will report an error:
error[E0277]: cannot add `Option<i8>` to `i8`
 --> src/main.rs:5:17
  |
5 |     let sum = x + y;
  |                 ^ no implementation for `i8 + Option<i8>`
  |
  = help: the trait `Add<Option<i8>>` is not implemented for `i8`
  = help: the following other types implement trait `Add<Rhs>`:
            `&i8` implements `Add<i8>`
            `&i8` implements `Add`
            `i8` implements `Add<&i8>`
            `i8` implements `Add`
The error means that the types Option<i8> and i8 cannot be added together because they are not the same type.
So how can we make x and y add together? It is simple: convert y from Option<i8> to i8:
fn main() {
    let x: i8 = 5;
    let y: Option<i8> = Some(5);

    let sum = match y {
        Some(value) => x + value, // If y is Some, unwrap and add
        None => x,               // If y is None, return x
    };
}
6.3 The Match Control Flow Operator
6.3.1. What Is match?
match allows a value to be compared against a series of patterns and executes the code corresponding to the matching pattern. Patterns can be literals, variable names, wildcards, and more.
Think of a match expression as a coin-sorting machine: coins slide down a track with holes of different sizes, and each coin falls through the first hole that fits it. In the same way, a value goes through each pattern in match, and when it “fits” the first pattern, it falls into the associated code block that will be used during execution.
6.3.2. Practical Use of match
Let’s look at an example: write a function that takes an unknown U.S. coin and determines which coin it is in a counting-machine-like way, then returns its value in cents.
#![allow(unused)]
fn main() {
enum Coin {
    Penny,// 1 cent
    Nickel,// 5 cents
    Dime,// 10 cents
    Quarter,// 25 cents
}

fn value_in_cents(coin: Coin) -> u8 {
    match coin {
        Coin::Penny => 1,
        Coin::Nickel => 5,
        Coin::Dime => 10,
        Coin::Quarter => 25,
    }
}
}-
The
matchkeyword is followed by an expression, which in this example is the valuecoin. This looks very similar to the conditional expression used inif, but there is one big difference: the condition ofifmust be a boolean value, whilematchcan work with any type. In this example, the type ofcoinis theCoinenum we defined in the first line. -
Next comes the braces. Inside the braces there are four branches (called arms in English), and each branch is made up of a pattern to match and the code corresponding to that pattern. The first branch,
Coin::Penny => 1,, usesCoin::Pennyas its pattern. The=>separates the pattern from the code to run, and here the code to run is the value1, meaning it returns1. Different branches are separated by commas. -
When a
matchexpression runs, it compares the expression aftermatch—here,coin—with the branches inside from top to bottom. If a pattern matches the value, the code associated with that pattern runs. If it does not match, the next branch is checked. The code expression corresponding to the successful branch is returned as the value of the entirematchexpression. For example, ifmatchmatches a 5-cent coin, that is,Coin::Nickel, then the whole expression evaluates to5. And because thematchexpression is the last expression invalue_in_cents, its value—5—is returned by the function. -
Here each branch’s code is very simple, so
=>is enough. But if one branch contains multiple lines of code, you need to wrap those lines in braces. For example:
#![allow(unused)]
fn main() {
fn value_in_cents(coin: Coin) -> u8 {
    match coin {
        Coin::Penny => {
            println!("Lucky penny!");
            1
        }
        Coin::Nickel => 5,
        Coin::Dime => 10,
        Coin::Quarter => 25,
    }
}
}
6.3.3. Patterns That Bind Values
Branches in a match can bind to part of the matched value, allowing you to extract values from enum variants.
For example, a friend is trying to collect all 50 state quarters. When we sort change by coin type, we also label the state name associated with each quarter (there are too many U.S. states, so only Alabama and Alaska are shown here):
#[derive(Debug)] // For easier debug printing
enum UsState {
    Alabama,
    Alaska,
}

enum Coin {
    Penny,
    Nickel,
    Dime,
    Quarter(UsState),
}

fn value_in_cents(coin: Coin) -> u8 {
    match coin {
        Coin::Penny => {
            println!("Lucky penny!");
            1
        },
        Coin::Nickel => 5,
        Coin::Dime => 10,
        Coin::Quarter(state) => {
            println!("State quarter from {:?}!", state);
            25
        }
    }
}

fn main() {
    let c = Coin::Quarter(UsState::Alaska);
    println!("{}", value_in_cents(c));
}-
Give the
Coinvariant for a quarter coin a piece of associated data, namely theUsStateenum above. -
In the
value_in_centsfunction, theQuarterbranch also needs to be adjusted. The match pattern changes fromCoin::QuartertoCoin::Quarter(state), which means the value associated withCoin::Quarteris bound to the variablestate, so it can be used in the following block to access that associated value. In some situations, the value associated withCoin::Quartermay not be needed. In that case, you can use the wildcard_to indicate that you do not care about the contents:Coin::Quarter(_) -
In
main, a variablecis declared first, holdingCoin::Quarter(UsState::Alaska). In other words, it stores theCoin::Quartervariant and its associated value is theUsState::Alaskavariant. Thenvalue_in_centsis called.
Let’s look at the output:
State quarter from Alaska!
25
6.3.4. Matching Option<T>
Let’s analyze the last code example from the previous article:
fn main() {
    let x: i8 = 5;
    let y: Option<i8> = Some(5);

    let sum = match y {
        Some(value) => x + value, // If y is Some, unwrap it and add
        None => x,               // If y is None, return x
    };
}- If
yis notNone, unwrap it, bind the value associated withSometovalue, and returnx + value. - If
yisNone, return only the value ofx.
6.3.5. match Must Be Exhaustive
Rust requires match to cover all possibilities so that code remains safe and valid.
Make a small modification to the previous code:
fn main() {
    let x: i8 = 5;
    let y: Option<i8> = Some(5);

    let sum = match y {
        Some(value) => x + value,
    };
}
Output:
error[E0004]: non-exhaustive patterns: `None` not covered
   --> src/main.rs:5:21
    |
5   |     let sum = match y {
    |                     ^ pattern `None` not covered
    |
note: `Option<i8>` defined here
   --> /Users/stanyin/.rustup/toolchains/stable-aarch64-apple-darwin/lib/rustlib/src/rust/library/core/src/option.rs:571:1
    |
571 | pub enum Option<T> {
    | ^^^^^^^^^^^^^^^^^^
...
575 |     None,
    |     ---- not covered
    = note: the matched value is of type `Option<i8>`
help: ensure that all possible cases are handled by adding a match arm with a wildcard pattern or an explicit pattern as shown
    |
6   ~         Some(value) => x + value,
7   ~         None => todo!(),
    |
Rust detected that the possibility of None was not covered, so it reported an error. Once you add a branch to handle None, everything is fine.
If there are too many possibilities or you do not want to handle some of them, you can use the wildcard _.
6.3.6. Wildcards
First write the branches you want to handle as usual, and use the wildcard _ for everything else.
For example: v is a u8 variable, and we want to determine whether v is 0.
use rand::Rng;  // Use an external crate
fn main(){
    let v: u8 = rand::thread_rng().gen_range(0..=255);  // Generate a random number
    println!("{}", v);
    match v {
        0 => println!("zero"),
        _ => println!("not zero"),
    }
}
u8 has 256 possible values, so it is naturally impossible to write one branch for each value using match. Therefore, you can write a branch for 0 and use the wildcard _ for everything else.
Output:
136
not zero
6.4 Simple Control Flow - If Let
6.4.1. What Is if let?
The if let syntax allows if and let to be combined into a less verbose way to handle a value that matches one pattern while ignoring the rest of the patterns.
You can think of if let as syntactic sugar for match, meaning it lets you write code for just one specific pattern.
6.4.2. Practical Use of if let
For example, v is a u8 variable. Determine whether v is 0, and print zero if it is.
use rand::Rng;  // Use an external crate
fn main(){
    let v: u8 = rand::thread_rng().gen_range(0..=255);  // Generate a random number
    println!("{}", v);
    match v {
        0 => println!("zero"),
        _ => (),
    }
}
Here we only need to distinguish between 0 and non-0. In this case, using if let is even simpler:
fn main(){
    let v: u8 = rand::thread_rng().gen_range(0..=255);  // Generate a random number
    println!("{}", v);
    if let 0 = v {
        println!("zero");
    };
}
Note: if let uses = rather than ==.
Let’s make a small change to the example above: v is a u8 variable. Determine whether v is 0; if it is, print zero, otherwise print not zero.
use rand::Rng;  // Use an external crate
fn main(){
    let v: u8 = rand::thread_rng().gen_range(0..=255);  // Generate a random number
    println!("{}", v);
    match v {
        0 => println!("zero"),
        _ => println!("not zero"),
    }
}
In this case, all you need to do is add an else branch to if let:
fn main(){
    let v: u8 = rand::thread_rng().gen_range(0..=255);  // Generate a random number
    println!("{}", v);
    if let 0 = v {
        println!("zero");
    } else {
	    println!("not zero");
    }
}
6.4.3. Trade-offs When Using if let
Compared with match, if let has less code, less indentation, and fewer boilerplate parts. But if let gives up exhaustiveness.
So whether to use if let or match depends on the actual requirements. There is a trade-off here between conciseness and exhaustiveness.
6.4.5. The Difference Between if let and if
Many beginners get confused about the difference between if let and if, because it seems like anything if let can do, if can also do. But they are fundamentally different: if let is pattern matching, while if is a conditional statement.
The condition after if can only be a boolean, while if else matches whether a specific pattern is satisfied, which is suitable for extracting values from enums, Option, Result, or other types that support pattern matching.
For example:
fn main(){
	let x = Some(5);
	if let Some(value) = x {
	    println!("Found a value: {}", value);
	} else {
	    println!("No value found");
	}
}
if cannot unwrap an Option. To achieve this effect, you must use pattern matching (match and if let).
7.1 Package, Crate, and Module Definitions
7.1.1 Rust Code Organization
Code organization mainly includes:
- Which details can be exposed publicly, and which details are private
- Which names are valid within a scope
- …
These features are collectively called the module system, which includes the following concepts, from broadest to most specific:
- Package: a Cargo feature that lets you build, test, and share crates. You can think of it as a project
- Crate: a module tree that can produce either a library or an executable
- Module: it lets you control code organization, scope, and private paths
- Path: a way to name items such as structs, functions, or modules
7.1.2 Packages and Crates
There are two types of crates:
- Binary: an executable program that can run independently. It must contain a
mainfunction as the entry point. It is usually used to implement a concrete application or command-line tool. - Library: a reusable code module that cannot be run directly. It does not have a
mainfunction; instead, it exposes public functions or modules for other code to call.
A crate root refers to the source file (that is, a .rs file), and it is also the entry file such as main.rs. The Rust compiler starts here when building the root module of the crate.
A package contains:
- A
Cargo.tomlfile that describes how to build these crates - Either one library crate or no library crate
- Any number of binary crates
- But at least one crate, whether library or binary
7.1.3 Cargo Conventions
If you open the Cargo.toml of a local Rust project, for example mine:
[package]
name = "RustStudy"
version = "0.1.0"
edition = "2021"

[dependencies]
rand = "0.8.5"
you will notice that there is no mention of an entry file. That is because Cargo treats src/main.rs as the crate root of a binary crate by default, and the crate name is the same as the package name. In other words, the binary crate name and the package name are both RustStudy (as written on the second line of the TOML file). This reflects the idea that convention is better than configuration.
If this project, or package, has a lib.rs file under the src directory, that means the package contains a library crate, and that lib.rs is the crate root of the library crate. The crate name is also the same as the package name, which is RustStudy.
Cargo passes the crate root file to rustc to build the library or binary.
As mentioned earlier, a package can contain many binary crates. In that case, you can place source files (that is, .rs files) under the src/bin directory, and each file there is a separate binary crate (a separate program).
7.1.4 The Role of Crates
The role of a crate is to combine related functionality into a single scope, making it easier to share within a project. It also helps prevent naming conflicts. For example, to access the functionality of the rand crate, which generates random numbers, you need to use its name, rand.
7.1.5 Defining Modules to Control Scope and Privacy
A module is the feature that groups code inside a crate, dividing it into several modules. It improves readability and makes functionality easier to reuse. It can control the privacy of items—whether they are public or private.
To create a module, use the mod keyword, then write the module name after it, followed by curly braces.
Modules can also be nested, and the nested ones are called submodules. A module can contain definitions of other items such as structs, enums, constants, traits, and functions.
Let’s look at an example. Write this in lib.rs under the src directory:
#![allow(unused)]
fn main() {
mod front_of_house {
    mod hosting {
        fn add_to_waitlist() {}

        fn seat_at_table() {}
    }

    mod serving {
        fn take_order() {}

        fn serve_order() {}

        fn take_payment() {}
    }
}
}
In this example, hosting and serving are submodules of front_of_house, and front_of_house is the parent module. Several functions are defined under these two submodules.
main.rs and lib.rs are called crate roots. The contents of these two files implicitly form a module named crate, which sits at the root of the entire module tree (the top level in the diagram). The following is the module tree for the lib.rs example above:
crate
 └── front_of_house
     ├── hosting
     │   ├── add_to_waitlist
     │   └── seat_at_table
     └── serving
         ├── take_order
         ├── serve_order
         └── take_payment
7.2 Path Pt. 1 - Relative Paths, Absolute Paths, and the Pub Keyword
7.2.1 Introduction to Paths
In Rust, if you want to find something inside a module, you must know and use its path. Rust paths are similar to file-system paths and are somewhat like namespaces in other languages.
There are two kinds of paths:
- Absolute paths: start from the crate root, using the crate name or the literal value
crate(the example below will make this clear) - Relative paths: start from the current module, using
self(itself),super(the parent), or the current module’s identifier
A path consists of at least one identifier, and identifiers are connected with ::.
7.2.2 Using Paths
Look at an example (lib.rs):
#![allow(unused)]
fn main() {
mod front_of_house {
    mod hosting {
        fn add_to_waitlist() {}

        fn seat_at_table() {}
    }
}

pub fn eat_at_restaurant(){
	crate::front_of_house::hosting::add_to_waitlist();
	front_of_house::hosting::add_to_waitlist();
}
}
hosting is a submodule of front_of_house, and two functions, add_to_waitlist and seat_at_table, are defined under hosting.
In the same scope as front_of_house, there is also a function called eat_at_restaurant. Inside that function, add_to_waitlist is called once with an absolute path and once with a relative path.
For the absolute path, the function eat_at_restaurant and the front_of_house module containing add_to_waitlist are in the same file, lib.rs, which means they are in the same crate (lib.rs implicitly forms the crate module, as explained in the previous article). So an absolute path starts with crate and proceeds level by level, separating each identifier with :::
#![allow(unused)]
fn main() {
crate::front_of_house::hosting::add_to_waitlist();
}
For the relative path, because the function eat_at_restaurant and the front_of_house module containing add_to_waitlist are at the same level, you can start directly from the module name and still proceed level by level with :::
#![allow(unused)]
fn main() {
front_of_house::hosting::add_to_waitlist();
}
In real projects, whether you use an absolute path or a relative path mainly depends on whether the code that defines the item (for example, add_to_waitlist) and the code that uses the item (for example, eat_at_restaurant) will move together. If they move together, meaning their relative path does not change, then use a relative path. Otherwise, use an absolute path. But most of the time, absolute paths are still used, because then the code that defines an item and the code that uses it can move independently of each other.
Let’s run the code next:
error[E0603]:module `hosting` is private
Both the absolute-path call and the relative-path call report this error. The meaning of the error is that the hosting module is private.
This is a good opportunity to talk about the concept of a privacy boundary.
7.2.3 Privacy Boundary
A module does more than organize code; it can also define privacy boundaries. If you want to make a function or struct private, you can place it inside a module, just like the functions in the previous example—they are inside the hosting module.
By default, Rust makes all items (functions, methods, structs, enums, modules, constants, and so on) private. For private items, external code cannot call them or depend on them. Rust does this because it wants internal details to stay hidden by default, so programmers can clearly know which internal implementations can be changed without breaking external code.
Rust’s privacy boundary also has a rule: parent modules cannot access private items in child modules, which is still meant to hide implementation details; child modules can use all items from ancestor modules, because child modules are defined in the context of their parent and other ancestor modules. To put it another way: a father cannot read his son’s diary, but the son can use his father’s money.
To make something public, add the pub keyword when defining the module.
7.2.4 The pub Keyword
Adding pub before mod makes a module public. Let’s slightly modify the previous code:
#![allow(unused)]
fn main() {
mod front_of_house {
    pub mod hosting {
        pub fn add_to_waitlist() {}

        fn seat_at_table() {}
    }
}

pub fn eat_at_restaurant(){
	crate::front_of_house::hosting::add_to_waitlist();
	front_of_house::hosting::add_to_waitlist();
}

}
Note: both the hosting module and the add_to_waitlist() function need the pub keyword in front of them.
Compile again, and this time the compiler does not report an error.
Someone may ask: why does front_of_house not need pub? It is private, but there is no error when calling it. That is because it is the root level of the file, and root-level items can call each other whether they are private or public.
7.3 Path Pt. 2 - Accessing Parent Modules and Pub on Structs and Enums
7.3.1 super
We can access items in a parent module’s path by using super at the start of a path, just like using .. syntax to start a file-system path. For example:
#![allow(unused)]
fn main() {
fn deliver_order() {}

mod back_of_house {
    fn fix_incorrect_order() {
        cook_order();
        super::deliver_order();
    }

    fn cook_order() {}
}
}
Of course, you can use an absolute path to achieve the same result:
#![allow(unused)]
fn main() {
fn deliver_order() {}

mod back_of_house {
    fn fix_incorrect_order() {
        cook_order();
        crate::deliver_order();
    }

    fn cook_order() {}
}
}
7.3.2 pub struct
If you put the pub keyword before struct, the struct becomes public, as shown below:
#![allow(unused)]
fn main() {
mod back_of_house {
	pub struct Breakfast {
		toast: String,
		seasonal_fruit: String,
	}
}
}
Note that although this struct is public, the fields inside a struct are private by default, unless you add the pub keyword.
In Rust, in most cases if something does not have pub, then it is private. (Special cases will be discussed later.)
Making a field public is also simple. Here is the code after changing toast in Breakfast to public:
#![allow(unused)]
fn main() {
mod back_of_house {
	pub struct Breakfast {
		pub toast: String,
		seasonal_fruit: String,
	}
}
}
Let’s look at a more complex example:
#![allow(unused)]
fn main() {
mod back_of_house {
    pub struct Breakfast {
        pub toast: String,
        seasonal_fruit: String,
    }

    impl Breakfast {
        pub fn summer(toast: &str) -> Breakfast {
            Breakfast {
                toast: String::from(toast),
                seasonal_fruit: String::from("peaches"),
            }
        }
    }
}

pub fn eat_at_restaurant(){
    let mut meal = back_of_house::Breakfast::summer("Rye");
    meal.toast = String::from("Wheat");
}
}- On top of the struct, we define an associated function
summer, whose parameter is the string slicetoastand whose return value isBreakfast. The value ofBreakfast.toastwill be the value of that argument, and the value ofBreakfast.seasonal_fruitwill be set topeaches. In essence,summeris a constructor that creates an instance ofBreakfast. - In the
eat_at_restaurantfunction, we first use a relative path to callsummerand construct an instance, then assign it to the mutable variablemeal. Thetoastfield inmealis set toRye, andseasonal_fruitispeachesas written in the constructor. On the next line, because theBreakfaststruct is public,meal.toastcan be modified directly, and here it is changed toWheat.
Would writing meal.seasonal_fruit = String::from("buleberries"); inside the eat_at_restaurant function cause an error? The answer is yes, because fields inside a struct are private by default. seasonal_fruit was not declared public, so external code cannot modify it, and this line attempts to modify it, which causes an error.
7.3.3 pub enum
Just like struct, an enum also becomes public if you add the pub keyword. For example:
#![allow(unused)]
fn main() {
mod back_of_house {
    pub enum Appetizer {
        Soup,
        Salad,
    }
}

pub fn eat_at_restaurant() {
    let order1 = back_of_house::Appetizer::Soup;
    let order2 = back_of_house::Appetizer::Salad;
}
}
But unlike struct, where the fields are private by default, the variants of a public enum are public by default, so you do not need to put pub before each variant. This differs from Rust’s default-private rule because only public variants on a public enum are useful, while having some private fields in a struct does not affect its use.
But note that the prerequisite for variants of an enum to be public is that the enum itself is declared public.
7.4 Keyword Use Pt. 1 - Using Use and the As Keyword
7.4.1 The Role of use
The role of use is to bring a path into the current scope. The imported item still follows privacy rules, which means only public parts can be brought in and used.
7.4.2 Using use
Look at an example:
#![allow(unused)]
fn main() {
mod front_of_house {
    pub mod hosting {
        pub fn add_to_waitlist() { }
        fn seat_at_table() { }
    }
}

use crate::front_of_house::hosting;

pub fn eat_at_restaurant() {
    hosting::add_to_waitlist();
}
}
Here, we first declare a front_of_house module, and inside it we declare a public submodule hosting. Under hosting there are two functions: the public add_to_waitlist and the private seat_at_table.
Then we use the use keyword to bring the hosting submodule under front_of_house from crate (that is, the whole file) into the current scope. This is similar to creating a file link in a file system, and also somewhat like using namespace in C++.
After importing it this way, the name hosting can be used directly in the current scope, as if the hosting module had been defined at the crate root.
In the eat_at_restaurant function below, because hosting has already been brought into the current scope, when calling add_to_waitlist, you do not need to write an absolute path starting from crate, nor a relative path starting from front_of_house; you can start directly from hosting.
But note that the imported module still follows privacy rules, so the seat_at_table function still cannot be called.
use can use either an absolute path or a relative path. For example, the line above:
#![allow(unused)]
fn main() {
use crate::front_of_house::hosting;
}
can be changed to:
#![allow(unused)]
fn main() {
use front_of_house::hosting;
}
In general, however, absolute paths are used more often.
7.4.3 use Conventions
In the example above, we imported only up to the use level, but the function we call is only add_to_waitlist. Can we import add_to_waitlist directly? Actually, yes:
#![allow(unused)]
fn main() {
mod front_of_house {
    pub mod hosting {
        pub fn add_to_waitlist() { }
        fn seat_at_table() { }
    }
}

use crate::front_of_house::hosting::add_to_waitlist;

pub fn eat_at_restaurant() {
    add_to_waitlist();
}
}
This is also fine, but it is not recommended.
If there is a lot of code, you may no longer know whether add_to_waitlist is defined locally or in another module. Therefore, for functions, the usual practice is to import their parent module and call the function through that parent module, to indicate that the function is not defined locally. But you only need to import up to the parent of the function; no need to import too much, otherwise there will be too much repeated typing.
For other items, such as structs and enums, it is generally better to import the full path, all the way to the item itself, rather than importing only the parent module. For example:
use std::collections::HashMap;

fn main() {
    let mut map = HashMap::new();
    map.insert(1, 2);
}
When using the HashMap struct from the standard library’s collections module, you import the item itself directly. When using it, you refer to it simply as HashMap, without the parent module.
If there are items with the same name, whether they are functions or not, import them through their parent modules to distinguish them. For example:
use std::fmt;
use std::io;

fn f1() -> fmt::Result { }

fn f2() -> io::Result { }

fn main() { }
In this example (ignoring compilation issues; this is only a demonstration), I need both Result from fmt and Result from io, so I need to import the parent modules fmt and io.
If you do not want to write it this way, you can also use the as keyword.
7.4.4 The as Keyword
The as keyword can assign a local alias to an imported path. For example, let’s modify the example above:
use std::fmt::Result;
use std::io::Result as IoResult;

fn f1() -> Result { }

fn f2() -> IoResult { }
fn main() { }
This way, you do not need to import only the parent module; you can import the item directly.
7.5 Keyword Use Pt. 2 - Re-exports
7.5.1 Re-importing Names with pub use
After using use to bring a path into scope, that name is private within the lexical scope.
Using the code from the previous article as an example:
#![allow(unused)]
fn main() {
mod front_of_house {
    pub mod hosting {
        pub fn add_to_waitlist() { }
        fn seat_at_table() { }
    }
}

use crate::front_of_house::hosting::add_to_waitlist;

pub fn eat_at_restaurant() {
    add_to_waitlist();
}
}
For external code, eat_at_restaurant is accessible because it was declared with the pub keyword, but external code cannot see the add_to_waitlist used inside eat_at_restaurant, because items imported with use are private by default. If you want external code to access it as well, you need to add pub in front of use:
#![allow(unused)]
fn main() {
mod front_of_house {
    pub mod hosting {
        pub fn add_to_waitlist() { }
        fn seat_at_table() { }
    }
}

pub use crate::front_of_house::hosting::add_to_waitlist;

pub fn eat_at_restaurant() {
    add_to_waitlist();
}
}
This allows external code to access the item brought in with use.
When we want to expose code publicly, we can use this technique to adjust the outward-facing API instead of following the internal code structure exactly. In this way, the internal structure and the outward view of the code may differ a bit. After all, the person writing the code and the person calling the code usually expect different things.
To summarize: pub use both re-exports the item into the current scope and makes that item available for external code to import into their scope.
7.5.2 Using External Packages
First, add the package name and version of the dependency to Cargo.toml, and Cargo will download that package and its dependencies from crates.io to your local machine (you can also use an unofficial crate and fetch it from GitHub, but that is strongly discouraged). Then use use in the code to bring the specific item into scope.
Do you remember the guessing game from Chapter 2? Back then we needed the rand package to generate random numbers. We will still use rand as an example:
Step 1: Modify Cargo.toml
Open your project’s Cargo.toml file, and under [dependencies], write the package name and version, connected with =:
[package]
name = "RustStudy"
version = "0.1.0"
edition = "2021"

[dependencies]
rand = "0.8.5"
Step 2: Import the Package in Source Code
To use something from a package, just use use to import the corresponding path. Here I need the function that generates random numbers, so I import the parent module of that function, Rng, like this:
#![allow(unused)]
fn main() {
use rand::Rng;
}
The Rust standard library, std, is also treated as an external package, but it is built into Rust itself, so you do not need to add it to Cargo.toml. You can just import it in the source code with use, which is somewhat like libraries such as re, os, and ctype in Python.
For example, if we want to import the HashMap struct from the collections module under std, we write:
#![allow(unused)]
fn main() {
use std::collections::HashMap;
}
No changes to Cargo.toml are needed.
7.5.3 Cleaning Up Many use Statements with Nested Paths
Sometimes you use multiple items from the same package or module, and the beginning of the path is the same, but you still have to write it repeatedly. If there are many imports, writing them one by one is not practical. Rust therefore allows nested paths to simplify imports on a single line. This is similar to the brace expansion feature in bash.
The format is:
#![allow(unused)]
fn main() {
use common_part::{different_part1, different_part2, ...}
}
Look at an example:
#![allow(unused)]
fn main() {
use std::cmp::Ordering;
use std::io;
}
They share the common part std, so they can be rewritten with a nested path:
#![allow(unused)]
fn main() {
use std::{cmp::Ordering, io};
}
If one import is a subpath of another import, Rust also allows the self keyword when using nested paths, as shown below:
#![allow(unused)]
fn main() {
use std::io;
use std::io::Write;
}
This can be shortened to:
#![allow(unused)]
fn main() {
use std::io::{self, Write};
}
7.5.4 The Wildcard *
Using * brings all public items in a path into scope. For example, if I want to import all public items from the collections module under the std library, I can write:
#![allow(unused)]
fn main() {
use std::collections::*;
}
But this kind of import must be used very carefully, and is usually avoided.
Its use cases are:
- Importing all tested code into the
testmodule during testing - Sometimes used in prelude modules
7.6 Splitting Modules Into Separate Files
7.6.1 Moving Module Contents to Another File
If the module name is followed by ; instead of a code block when defining a module, Rust will look for a .rs file with the same name as the module under the src directory and load its contents. Whether the module’s contents are in the same file or in different files, the structure of the module tree does not change.
Take a look at an example(lib.rs):
#![allow(unused)]
fn main() {
mod front_of_house {
    pub mod hosting {
        pub fn add_to_waitlist() { }
    }
}

pub use crate::front_of_house::hosting::add_to_waitlist;

pub fn eat_at_restaurant() {
    add_to_waitlist();
}
}
This way, all modules are placed in the same file. If you want to move them into different files, do this:
Step 1: Create a New File
If you want to split out front_of_house, you need to create a .rs file with the same name under the src directory:
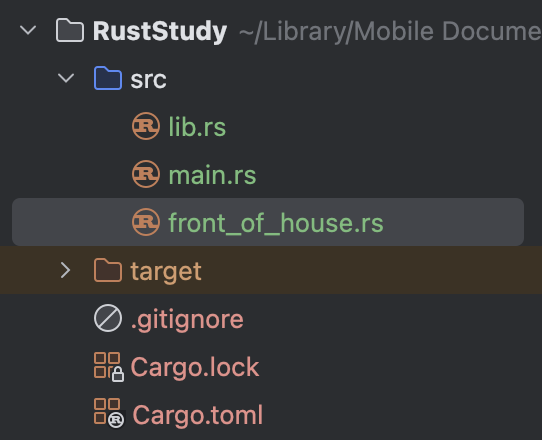
Step 2: Cut the Code
Cut the code that was originally under front_of_house from its original location into the front_of_house.rs file, that is, cut out this part:
#![allow(unused)]
fn main() {
pub mod hosting {
    pub fn add_to_waitlist() { }
}
}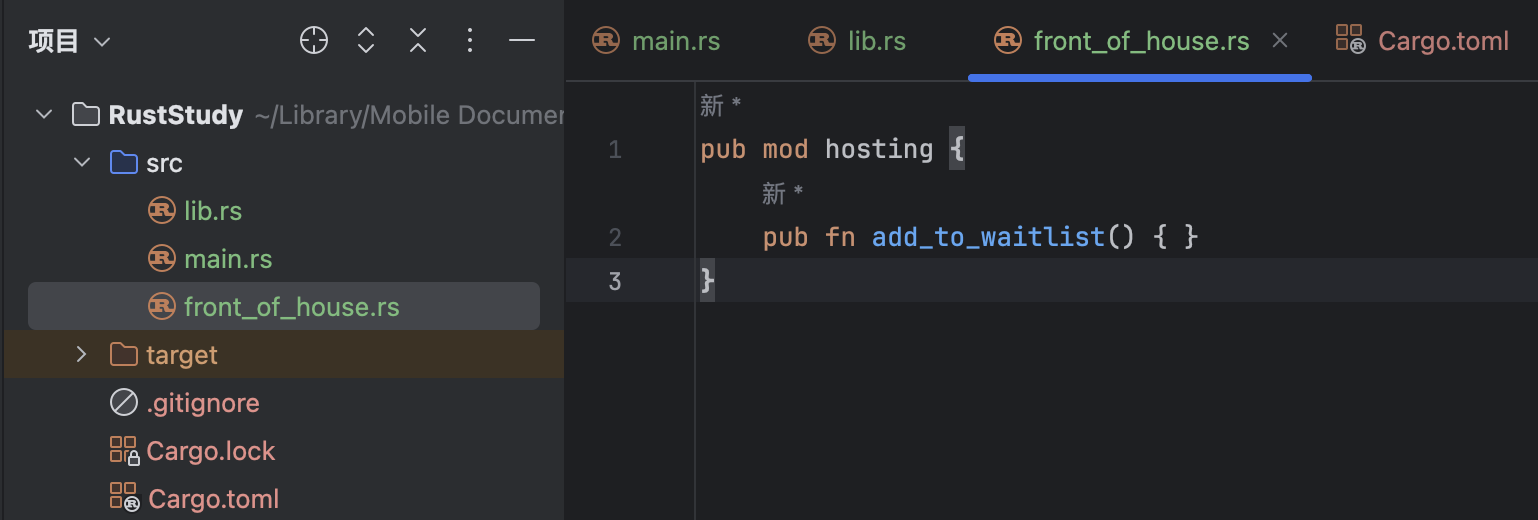
Step 3: Modify the Original Location
Open the original place where front_of_house was defined (lib.rs). At this point, you no longer need the code block after it, so delete it together with the {} and add a ; instead (do not touch other unrelated code). The original code is (lib.rs):
#![allow(unused)]
fn main() {
mod front_of_house {
    pub mod hosting {
        pub fn add_to_waitlist() { }
    }
}

pub use crate::front_of_house::hosting::add_to_waitlist;

pub fn eat_at_restaurant() {
    add_to_waitlist();
}
}
Change it to (lib.rs):
#![allow(unused)]
fn main() {
mod front_of_house;

pub use crate::front_of_house::hosting::add_to_waitlist;

pub fn eat_at_restaurant() {
    add_to_waitlist();
}
}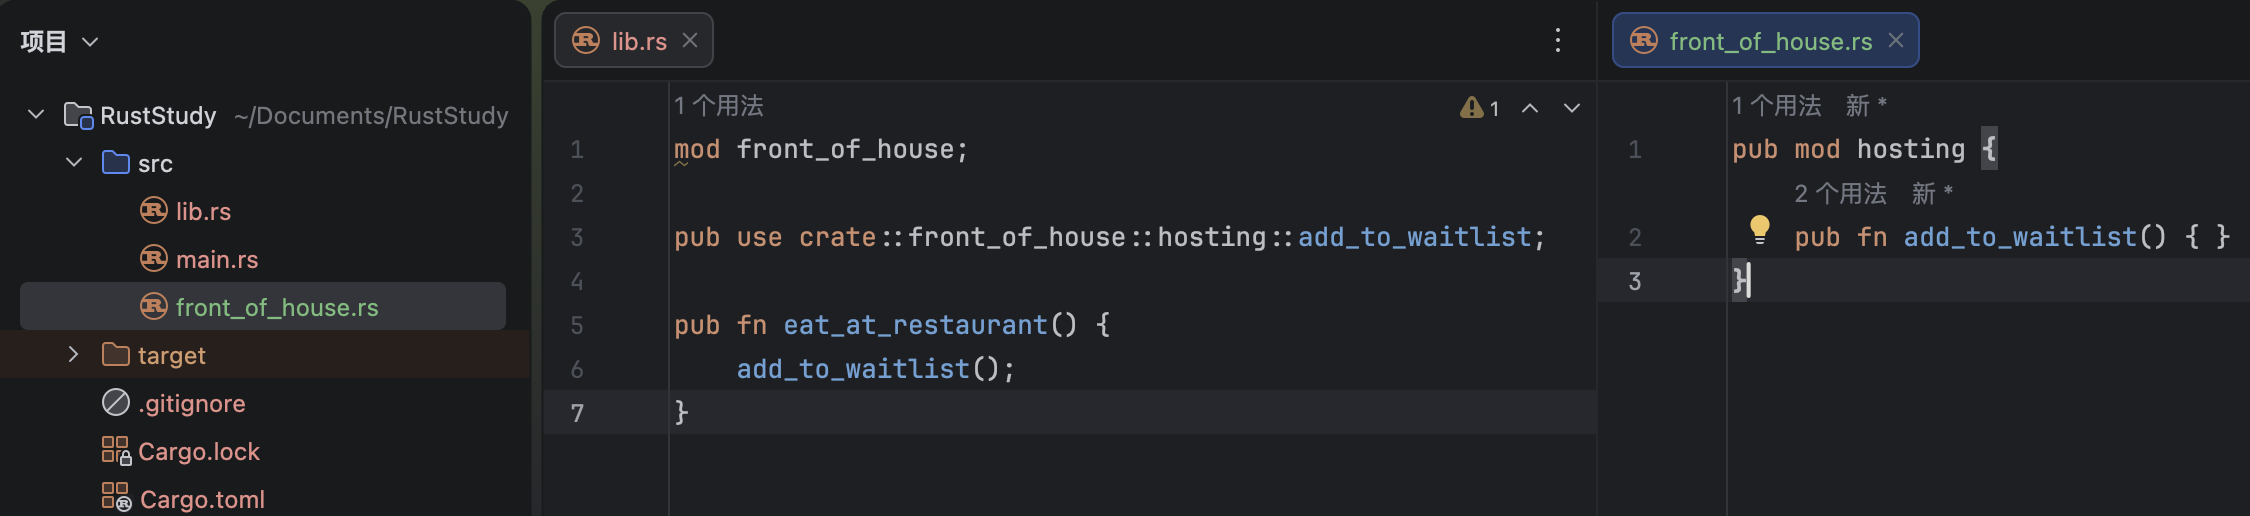
7.6.2 Splitting Submodules
What if you have many modules under front_of_house? Then you will need to put these submodules into different files to better organize code. But how? Put all submodules in the folder src like what we just did? Then src contains too many files and the hierarchical relationship between the modules cannot be displayed.
Rust gives a pretty good solution for it: put all submodule files in a folder named by their father module. Specifically, you need to create a folder with the same name as the parent module first, and then use a .rs file inside that folder to store the submodule or items.
For example, if I want to split out hosting as a separate file, I do not just create a .rs file with the same name in src. I first need to create a folder with the same name as the parent module. In this example, the parent module is named front_of_house, so I need to create a folder named front_of_house.
Then create a .rs file in that folder with the same name as the item or module. In this example, since I want to split out hosting, the file should be named hosting.rs.
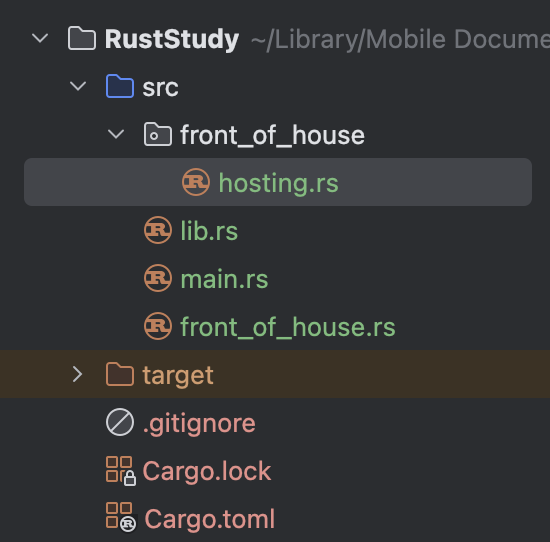
Store the contents of hosting in hosting.rs, which is:
#![allow(unused)]
fn main() {
pub fn add_to_waitlist() { }
}Now you can delete the code block of hosting module in front_of_house.rs together with the {} and add a ;, same process as what we did to lib.rs. Change it from (front_of_house.rs):
#![allow(unused)]
fn main() {
pub mod hosting {
pub fn add_to_waitlist() { }
}
}to simply:
#![allow(unused)]
fn main() {
pub mod hosting;
}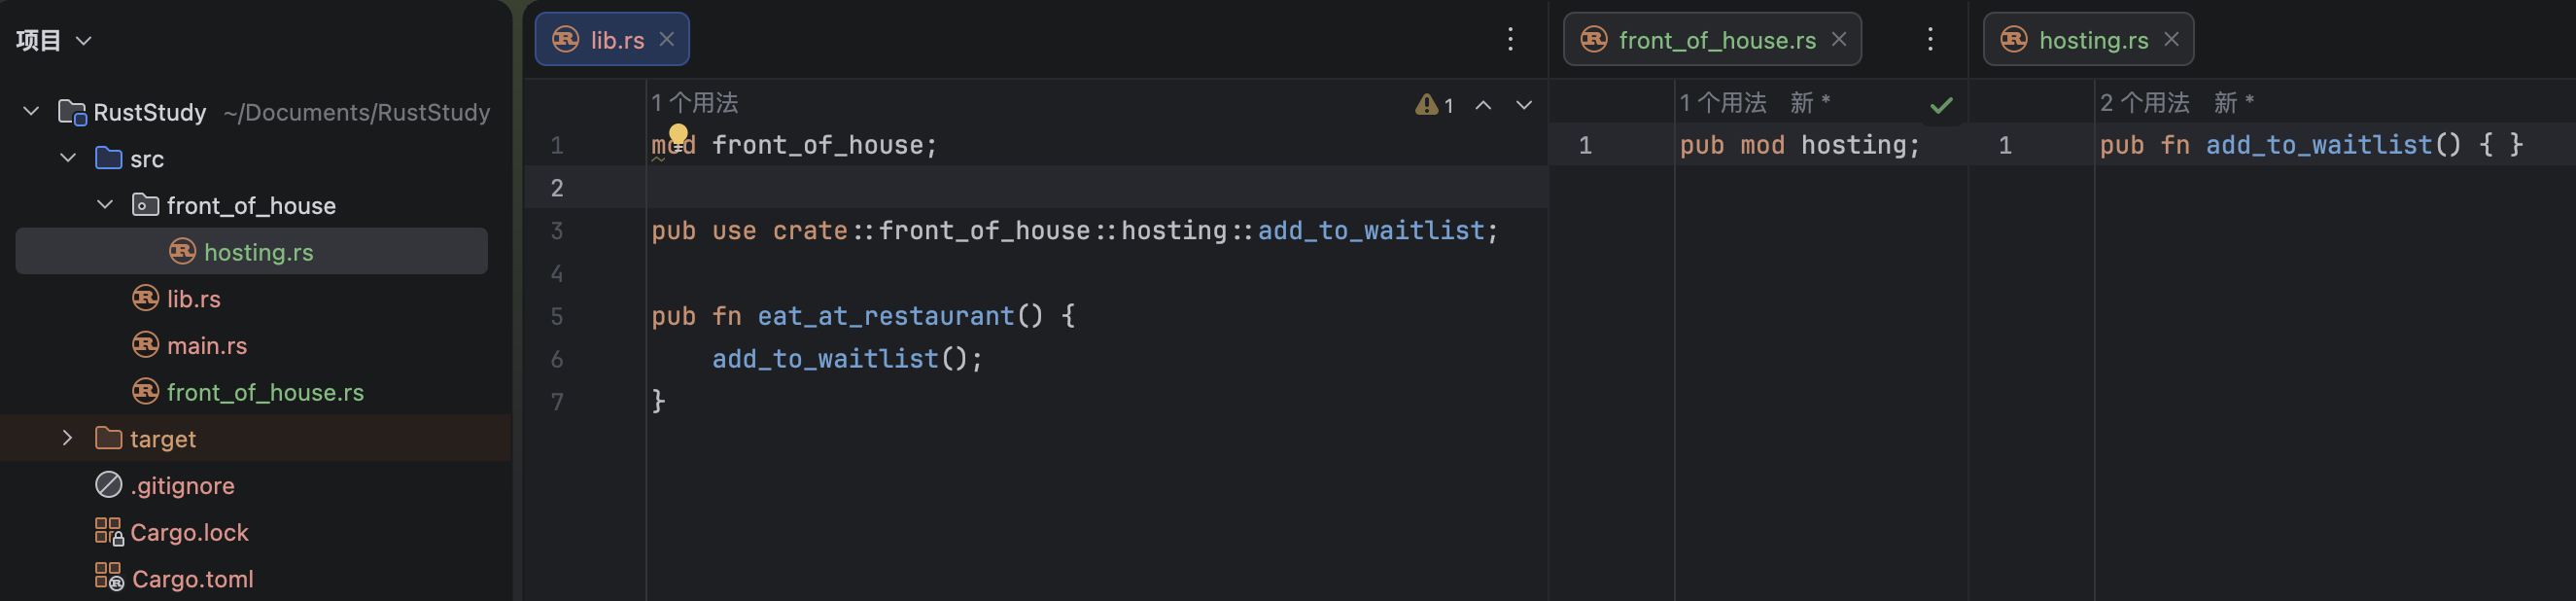
Rust also support split modules in the form ofmodule_name/mod.rs. All modules are stored in mod.rs. Folder names imply module names. This method is still fully supported in Rust, but in modern Rust code, it is usually more like a continuation of the old-style module layout rather than the default preference.
If we use this method to split modules, it will look like:
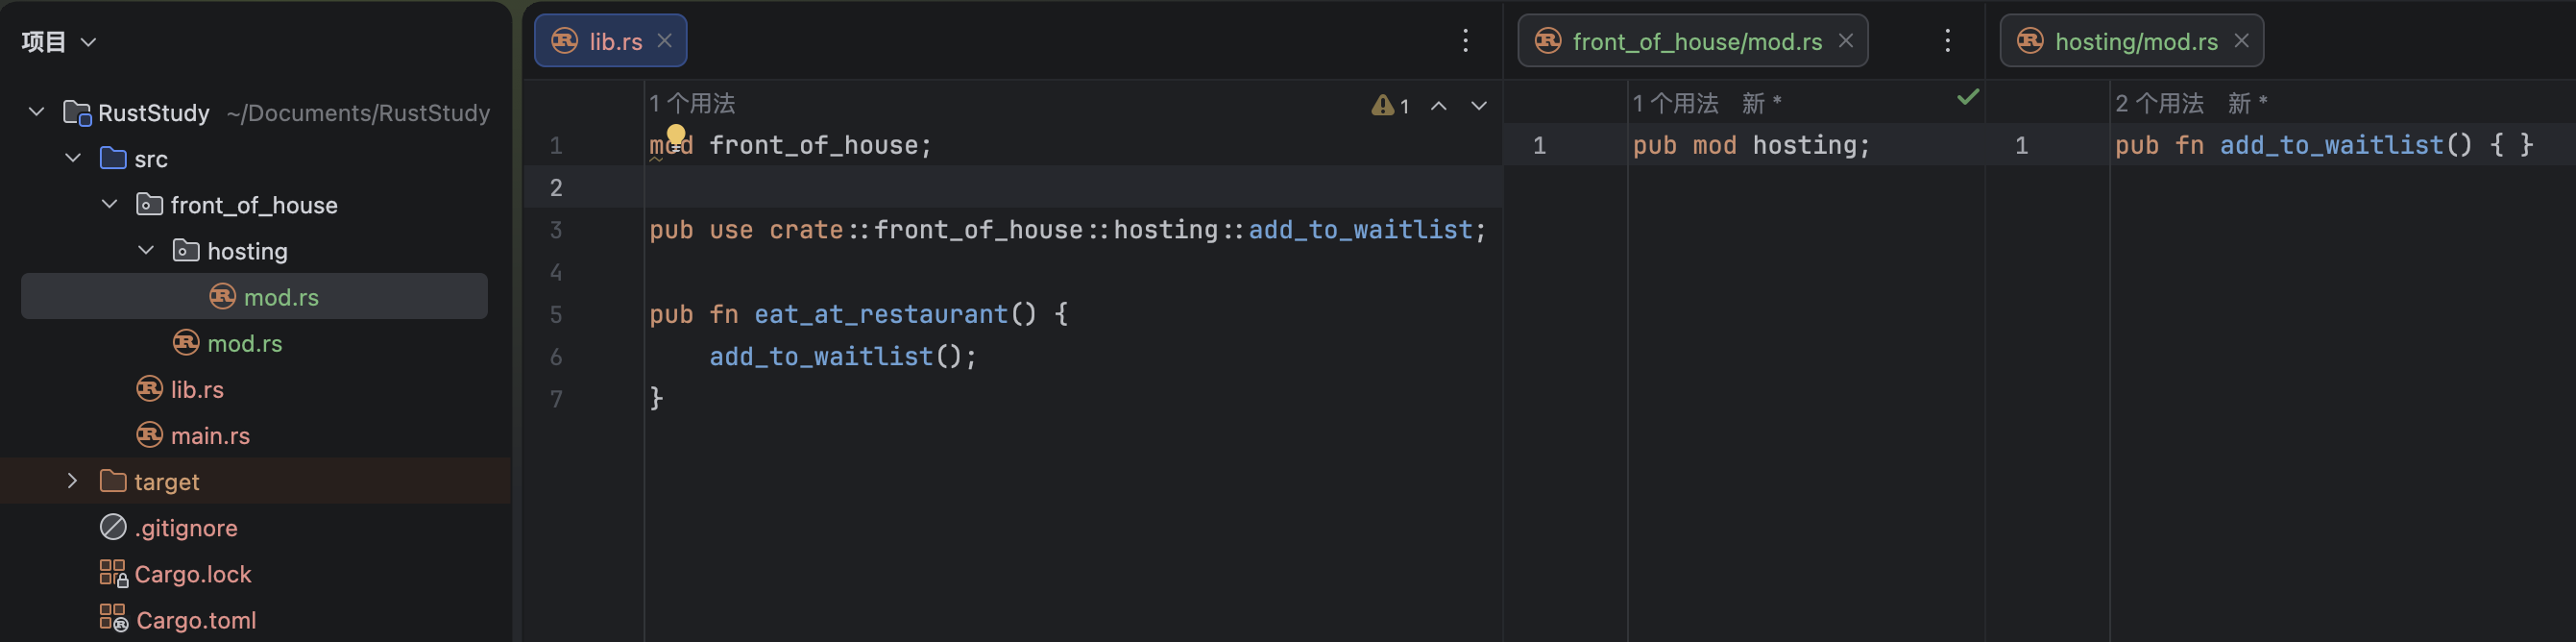
7.6.3 Benefits of Splitting
As modules grow larger, this technique lets programmers move a module’s contents into other files.
8.1 Vector
8.1.0. Chapter Overview
Chapter 8 is mainly about common collections in Rust. Rust provides many collection-like data structures, and these collections can hold many values. However, the collections covered in Chapter 8 are different from arrays and tuples.
The collections in Chapter 8 are stored on the heap rather than on the stack. That also means their size does not need to be known at compile time; at runtime, they can grow or shrink dynamically.
This chapter focuses on three collections: Vector (this article), String, and HashMap.
8.1.1. Using Vector to Store Multiple Values
Vector is written as Vec<T>, where T represents a generic type parameter that can be replaced with the desired data type during actual use.
Vector is provided by the standard library. It stores multiple values of the same type contiguously in memory. You can think of it as a resizable array.
To create a Vector, use the Vec::new function. See the example:
fn main() {
let v: Vec<i32> = Vec::new();
let v = vec![1, 2, 3];
let v = Vec::with_capacity(10);
}let v: Vec<i32> = Vec::new(): Declares aVectorwithi32elements usingVec::new(commonly used).let v = vec![1, 2, 3]: Creates aVectorwith initial values using thevec!macro. Here,1, 2, 3are inserted into the vector. Usingvec![]with no content is also valid (commonly used).let v = Vec::with_capacity(10): Creates an empty vector with pre-allocated capacity for at least 10 elements. Suitable when you know the approximate number of elements, reducing reallocations and improving performance.
The first method (Vec::new()) requires explicit type annotation (Vec<i32>) because it creates an empty vector with no elements. Without contextual information for Rust to infer the type, it would cause an error. With context, Rust can infer the element type.
The second method (vec![]) doesn’t require explicit type annotation because the Rust compiler infers the element type (i32) from the initial values.
8.1.2. Updating a Vector
1. Adding Elements
Use the push method to add elements to the end of a vector:
fn main() {
let mut v = Vec::new();
v.push(1);
}- Note: The vector must be mutable (declared with
mut) to add elements. - In
let mut v = Vec::new();, the element type is inferred asi32from the subsequentpush(1)operation.
Other methods for adding elements:
fn main() {
let mut v = Vec::new();
v.extend([1, 2, 3]); // Batch insertion
v.insert(1, 99); // Insert at index (panics if out-of-bounds)
let mut a = vec![1, 2, 3];
let mut b = vec![4, 5, 6];
a.append(&mut b); // Moves all elements from `b` to `a` (empties `b`)
}2. Removing Elements from a Vector
pop(): Removes and returns the last element wrapped in Option (covered in 6.2. The Option Enum). Returns None if empty.
fn main() {
let mut v = vec![1, 2, 3];
let x = v.pop(); // Returns Some(3)
}remove(index): Deletes the element at the specified index and returns it. Shifts subsequent elements left. Panics if index is invalid.
fn main() {
let mut v = vec![1, 2, 3];
let x = v.remove(1); // Returns 2 (v becomes [1, 3])
}clear(): Removes all elements. Length becomes 0, but capacity remains.
fn main() {
let mut v = vec![1, 2, 3];
v.clear(); // v is now []
}Like any struct, when a Vector goes out of scope, it and its elements are automatically cleaned up.
3. Reading Elements of a Vector
There are two ways to access values in a Vector: using indexing or the get method. For example, given a vector containing [1, 2, 3, 4, 5], access and print the third element:
fn main() {
let v = vec![1, 2, 3, 4, 5];
let third = &v[2]; // Indexing
println!("The third element is {}", third);
match v.get(2) { // get method with match
Some(third) => println!("The third element is {}", third),
None => println!("There is no third element."),
};
}let third = &v[2];: Uses indexing to access the element at position 2 (third element). The&indicates a reference.v.get(2): Uses thegetmethod for access. Since it returns anOptiontype, we usematch(covered in 6.3. The Match Control Flow Operator) to unpack it. If a value exists, it binds tothirdand prints; if not (None), it prints “There is no third element.”
Both methods achieve the same result but handle invalid access (e.g., out-of-bounds index) differently.
Testing with indexing (invalid access):
fn main() {
let v = vec![1, 2, 3, 4, 5];
let third = &v[100]; // Index 100 is out-of-bounds
println!("The third element is {}", third);
}Output:
index out of bounds: the len is 5 but the index is 100
The program triggers panic! and terminates.
Testing with get (invalid access):
fn main() {
let v = vec![1, 2, 3, 4, 5];
match v.get(100) { // Index 100 is out-of-bounds
Some(third) => println!("The third element is {}", third),
None => println!("There is no third element."),
};
}Output:
There is no third element.
Since get cannot access index 100, it returns None.
Guideline: Use indexing when out-of-bounds access should terminate the program via panic!. Otherwise, prefer get for safe handling.
8.1.3. Ownership and Borrowing Rules
Remember the borrowing rule discussed in Chapter 4.2. Ownership Rules, Memory, and Allocation? You cannot have mutable and immutable references in the same scope at the same time. This rule still applies to Vector. Example:
fn main() {
let mut v = vec![1, 2, 3, 4, 5];
let first = &v[0];
v.push(6);
println!("The first element is {}", first);
}Output:
error[E0502]: cannot borrow `v` as mutable because it is also borrowed as immutable
--> src/main.rs:4:5
|
3 | let first = &v[0];
| - immutable borrow occurs here
4 | v.push(6);
| ^^^^^^^^^ mutable borrow occurs here
5 | println!("The first element is {}", first);
| ----- immutable borrow later used here
- The
pushfunction has the signature&mut self, value: T.&mutmeans thatpushtreats the passed-in variable as a mutable reference. In the example,vis used as a mutable reference here. let first = &v[0];makesfirstan immutable reference tov. Because the two references exist in the same scope, an error is produced.println!treats the values passed to it as immutable references.
Because mutable and immutable references appear at the same time in this scope, the program fails to compile.
Someone might wonder: push adds things to the end of a Vector, and the earlier elements are not affected. Why does Rust make this so complicated?
That is because the elements of a Vector are stored contiguously in memory. If you add an element to the end and there happens to be something occupying the space after it, there may be no room for the new element. In that case, the system must reallocate memory and find a large enough area to hold the Vector after the new element is added. When that happens, the original memory block may be freed or reallocated, but the reference still points to the old memory address, creating a dangling reference (discussed in Chapter 4.4, Reference and Borrowing).
8.1.4. Iterating Over Values in a Vector
Using a for loop is the most common approach. Example:
fn main() {
let v = vec![1, 2, 3, 4, 5];
for i in &v {
println!("{}", i);
}
}Output:
1
2
3
4
5
Of course, if you want to modify elements inside the loop, that is also possible. You only need to make v mutable and change &v to &mut v:
fn main() {
let mut v = vec![1, 2, 3, 4, 5];
for i in &mut v {
*i += 10;
}
for i in v {
println!("{}", i);
}
}Note: the * in front of *i on the fourth line is there because i is essentially of type &mut i32. It stores a pointer rather than the actual i32 value, so you need to dereference it first and turn i into an mut i32 value to get the actual number before you can perform addition or subtraction.
Output:
11
12
13
14
15
8.2 Vector and Enum Applications
8.2.0. Chapter Overview
Chapter 8 is mainly about common collections in Rust. Rust provides many collection-like data structures, and these collections can hold many values. However, the collections covered in Chapter 8 are different from arrays and tuples.
The collections in Chapter 8 are stored on the heap rather than on the stack. That also means their size does not need to be known at compile time; at runtime, they can grow or shrink dynamically.
This chapter focuses on three collections: Vector, String, and HashMap.
8.2.1. How Vector and Enum Complement Each Other
Although Vector can grow or shrink dynamically, all of its elements must still be the same data type. But sometimes we need to store different types of data on the heap. What should we do in that case?
Remember the enum type introduced in 6.1. Enums? Enum variants can carry attached data, and that attached data can be of different types. Most importantly, the variants all belong to the same enum type. In other words, all variants are the same type, so they can be stored in a Vector.
This allows us to use an enum to make it possible to store different data types inside a Vector.
8.2.2. Vector + enum
Let’s look at a practical example of using Vector plus an enum:
enum SpreadSheetCell {
Int(i32),
Float(f64),
Text(String),
}
fn main() {
let row = vec![
SpreadSheetCell::Int(5567),
SpreadSheetCell::Text("up up".to_string()),
SpreadSheetCell::Float(114.514),
];
}This example simulates the behavior of Excel cells. A cell can store only one of the following: an integer, a floating-point number, or a string. So we define the SpreadSheetCell enum, which has three variants used to store integers (Int), floating-point numbers (Float), and strings (Text).
In the main function, we declare the variable row to store one row of cells. Because the number of cells in a row is not fixed, we need a Vector to store them. In this example, the Vector is initialized with three cells: the first stores the integer 5567, the second stores the string "up up", and the third stores the floating-point number 114.514.
Through this example, we can see that by using an enum that can carry data, we can indirectly store different data types in a Vector.
So why does Rust need to know the element type of a Vector at compile time? Because only then can Rust determine how much heap memory is needed to hold the Vector. In addition, if different element types were allowed in a Vector, some bulk operations on the elements might be valid for some types but invalid for others, which would cause the program to fail. Using an enum together with a match expression allows Rust to know all possible cases in advance at compile time, so it can handle them correctly at runtime.
In this example, Vector does make it possible to store different data types, but only if we know exactly what the possible data types are, in other words, if the set is exhaustive. If the type has infinitely many possibilities, or is non-exhaustive, then even an enum cannot help, because the enum cannot even be defined. For such cases, Rust provides traits, but that will be covered later.
8.3 String Type Pt.1 - String Creation, Updating, and Concatenation
8.3.0. Chapter Overview
Chapter 8 is mainly about common collections in Rust. Rust provides many collection-like data structures, and these collections can hold many values. However, the collections covered in Chapter 8 are different from arrays and tuples.
The collections in Chapter 8 are stored on the heap rather than on the stack. That also means their size does not need to be known at compile time; at runtime, they can grow or shrink dynamically.
This chapter focuses on three collections: Vector, String (this article), and HashMap.
8.3.1. Why Strings Are So Frustrating for Rust Developers
Rust developers, especially beginners, are often confused by strings for the following reasons:
- Rust tends to expose possible errors.
- String data structures are complex.
- Rust strings use
UTF-8encoding.
8.3.2. What Is a String?
A string is a collection based on bytes, and it provides methods that can parse bytes into text.
At the core language level in Rust, there is only one string type: the string slice str, which usually appears in borrowed form, that is, &str.
A string slice is a reference to a UTF-8 encoded string stored somewhere else. For example, string literals are stored directly in Rust’s binary, so they are also a kind of string slice.
The String type comes from the standard library, not from the core language. It is growable, mutable, owned, and also uses UTF-8 encoding.
8.3.3. What Does “String” Actually Refer To?
When people say “string,” they usually mean both String and &str, not just one of them. Both types are heavily used in the standard library, and both use UTF-8 encoding. But here we mainly focus on String, because it is more complex.
8.3.4. Other String Types
The Rust standard library also provides other string types, such as OsString, OsStr, CString, and CStr. Note that these types all end with either String or Str, which is related to the naming pattern of String and string slices mentioned earlier.
In general, types ending with String are owned, while types ending with Str are usually borrowed.
These different string types can store text with different encodings or represent data in different memory layouts.
Some library crates provide more options for strings, but we will not cover them here.
8.3.5. Creating a New String
Because the essence of String is a collection of bytes, many operations from Vec<T> can also be used on String.
String::new() can be used to create an empty string. Example:
fn main(){
let mut s = String::new();
}In general, however, String is created from initial values. In that case, you can use the to_string method to create a String. This method can be used on types that implement the Display trait, including string literals. Example:
fn main() {
let data = "wjq";
let s = data.to_string();
let s1 = "wjq".to_string();
}data is a string literal. Using to_string converts it to a String and stores it in s. You can also write the string literal directly and then call .to_string(), which is the assignment performed for s1. These two operations have the same effect.
to_string is not the only method. Another way is to use the String::from function:
#![allow(unused)]
fn main() {
let s = String::from("wjq");
}This function has the same effect as the to_string method.
Because strings are used so often, Rust provides many different general-purpose APIs for us to choose from. Some functions may seem redundant at first glance, but in practice they each have their own use. In real code, you can choose whichever style you prefer.
8.3.6. Updating String
As mentioned earlier, the size of String can grow or shrink. Because its essence is a collection of bytes, its contents can also be modified. Its operations are similar to those of Vector, and String can also be concatenated.
1. push_str()
First, let’s look at push_str(). It appends a string slice to a String. Example:
fn main() {
let mut s = String::from("6657");
s.push_str("up up");
println!("{}", s);
}Output:
6657up up
The signature of push_str is push_str(&mut self, string: &str). Its parameter is a borrowed string slice, and a string literal is a slice, so "up up" can be passed in. This method does not take ownership of the argument, so the passed-in value remains valid and can continue to be used.
2. push
The second method is push(), which appends a single character to a String. Example:
fn main() {
let mut s = String::from("665");
s.push('7');
println!("{}", s);
}Note: characters must use single quotes.
Output:
6657
3. +
Rust allows you to concatenate strings using +. Example:
fn main() {
let s1 = String::from("6657");
let s2 = String::from("up up");
let s3 = s1 + &s2;
println!("{}", s3);
}Note: the value before the plus sign must be a String, and the value after the plus sign must be a string slice.
In this example, however, the type of the value after the plus sign is actually &String, not &str. That is because Rust uses deref coercion here to force &String into &str.
Of course, because s2 is passed in by reference, s2 is still valid after concatenation. But s1 has had its ownership moved into s3, so s1 becomes invalid after concatenation.
Output:
6657up up
4. format!
The format! macro can concatenate strings more flexibly. Example:
fn main() {
let s1 = String::from("cn");
let s2 = String::from("Niko");
let s3 = String::from("fan club");
let s = format!("{} {} {}", s1, s2, s3);
println!("{}", s);
}It uses placeholders instead of variables, which is very similar to println!. The difference is that println! prints the result, while format! returns the concatenated string.
Output:
cn Niko fan club
Of course, the same effect can also be achieved with +, but the code is a little more cumbersome:
fn main() {
let s1 = String::from("cn");
let s2 = String::from("Niko");
let s3 = String::from("fan club");
let s = s1 + " " + &s2 + " " + &s3;
println!("{}", s);
}The best thing about format! is that it does not take ownership of any arguments, so all of those arguments can continue to be used afterward.
8.4 String Type Pt.2 - Bytes, Scalar Values, Grapheme Clusters, and String Operations
8.4.0. Chapter Overview
Chapter 8 is mainly about common collections in Rust. Rust provides many collection-like data structures, and these collections can hold many values. However, the collections covered in Chapter 8 are different from arrays and tuples.
The collections in Chapter 8 are stored on the heap rather than on the stack. That also means their size does not need to be known at compile time; at runtime, they can grow or shrink dynamically.
This chapter focuses on three collections: Vector, String (this article), and HashMap.
8.4.1. You Cannot Use Indexing to Access String
String in Rust is different from that in other languages: you cannot access it by indexing. Example:
fn main() {
let s = String::from("6657 up up");
let a = s[0];
}Output:
error[E0277]: the type `str` cannot be indexed by `{integer}`
--> src/main.rs:3:15
|
3 | let a = s[0];
| ^ string indices are ranges of `usize`
|
= help: the trait `SliceIndex<str>` is not implemented for `{integer}`, which is required by `String: Index<_>`
= note: you can use `.chars().nth()` or `.bytes().nth()`
for more information, see chapter 8 in The Book: <https://doc.rust-lang.org/book/ch08-02-strings.html#indexing-into-strings>
= help: the trait `SliceIndex<[_]>` is implemented for `usize`
= help: for that trait implementation, expected `[_]`, found `str`
= note: required for `String` to implement `Index<{integer}>`
The error says that the String type cannot be indexed with an integer. Looking further down at the = help line, we can see that this type does not implement the Index<{integer}> trait.
8.4.2. Internal Representation of String
String is a wrapper around Vec<u8>, where u8 means a byte. We can use the len() method on String to return the string length. Example:
fn main() {
let len = String::from("Niko").len();
println!("{}", len);
}Output:
4
This string uses UTF-8 encoding, and len is 4, which means the string occupies 4 bytes. So in this example, each letter takes up one byte.
But that is not always the case. For example, if we change the string to another language (here, Russian written in Cyrillic):
fn main() {
let hello = String::from("Здравствуйте");
println!("{}", hello.len());
}If you count the letters in this string, there are 12, but the output is:
24
That means each letter in this language takes up two bytes (Chinese characters take three bytes each). The term used to refer to a “letter” here is a Unicode scalar value, and each Cyrillic letter here corresponds to two bytes.
From this example, you can see that numeric indexing into String does not always correspond to a complete Unicode scalar value, because some scalar values occupy more than one byte, while numeric indexing can only read one byte at a time.
Another example: the Cyrillic letter З corresponds to two bytes, whose values are 208 and 151. If numeric indexing were allowed, then taking index 0 of Здравствуйте would give you 208, which by itself is meaningless because it is missing the second byte needed to form a Unicode scalar value. So to avoid this kind of bug that would be hard to notice immediately, Rust bans numeric indexing on String, preventing misunderstandings early in development.
8.4.3. Bytes, Scalar Values, and Grapheme Clusters
There are three ways to view strings in Rust: bytes, scalar values, and grapheme clusters. Among them, grapheme clusters are the closest to what we usually call “letters.”
1. Bytes
Example:
fn main() {
let s = String::from("नमस्ते"); // Hindi written in Devanagari script
for b in s.bytes() {
print!("{} ", b);
}
}This Devanagari string may look like it contains four letters. We use the .bytes() method to get the bytes it corresponds to. The output is:
224 164 168 224 164 174 224 164 184 224 165 141 224 164 164 224 165 135
These 18 bytes show how the computer stores the string.
2. Scalar Values
Now let’s view it as Unicode scalar values:
fn main() {
let s = String::from("नमस्ते");
for b in s.chars() {
print!("{} ", b);
}
}Using the .chars() method gives the scalar values corresponding to this string. The output is:
न म स ् त े
It has 6 scalar values, and some of them are combining marks rather than standalone letters. They only make sense when combined with the preceding characters.
This also explains why this Devanagari string takes 18 bytes: each of the 6 scalar values takes 3 bytes, and 6 × 3 gives 18 bytes.
3. Grapheme Clusters
Because obtaining grapheme clusters from a String is complicated, the Rust standard library does not provide this functionality. We will not demonstrate it here, but you can use a third-party crate from crates.io to implement it.
In short, if this string were printed as grapheme clusters, it would look like this:

8.4.4. Why String Cannot Be Indexed
- Numeric indexing may return an incomplete value that cannot form a full Unicode scalar value, leading to bugs that are not immediately visible.
- Indexing is supposed to take constant time, or
O(1), butStringcannot guarantee that, because it must traverse the entire contents from beginning to end to determine how many valid characters it contains.
8.4.5. Slicing String
You can use [] with a range inside it to create a string slice. For detailed coverage of string slices, see Chapter 4.5, Slices. Example:
fn main() {
let hello = String::from("Здравствуйте");
let s = &hello[0..4];
println!("{}", s);
}As mentioned earlier, one Cyrillic letter takes two bytes. This string slice takes the first 4 bytes of the string, which means the first two letters. The output is:
Зд
What if the string slice takes the first three bytes instead? That would mean the slice contains the first letter plus half of the second letter. What happens in that case? Look at the following example:
fn main() {
let hello = String::from("Здравствуйте");
let s = &hello[0..3];
println!("{}", s);
}Output:
byte index 3 is not a char boundary; it is inside 'д' (bytes 2..4) of `Здравствуйте`
The program triggers panic!, and the error message says that index 3 is not a char boundary. In other words, slicing must follow char boundaries. For Cyrillic, that means slicing in units of two bytes.
8.4.6. Iterating Over String
- For scalar values, use the
.chars()method. Example:
fn main() {
let s = String::from("नमस्ते");
for b in s.chars() {
print!("{} ", b);
}
}- For bytes, use the
.bytes()method. Example:
fn main() {
let s = String::from("नमस्ते");
for b in s.bytes() {
print!("{} ", b);
}
}- For grapheme clusters, the standard library does not provide a method, but you can use a third-party crate.
8.5 HashMap Pt.1 - Defining, Creating, Merging, and Accessing HashMaps
8.5.0. Chapter Overview
Chapter 8 is mainly about common collections in Rust. Rust provides many collection-like data structures, and these collections can hold many values. However, the collections covered in Chapter 8 are different from arrays and tuples.
The collections in Chapter 8 are stored on the heap rather than on the stack. That also means their size does not need to be known at compile time; at runtime, they can grow or shrink dynamically.
This chapter focuses on three collections: Vector, String, and HashMap (this article).
8.5.1. What Is a HashMap?
HashMap is written as HashMap<K, V>, where K stands for key and V stands for value. A HashMap stores data as key-value pairs, with one key corresponding to one value. Many languages support this kind of collection data structure, but they may call it something else—for example, the same concept in C# is called a dictionary.
The internal implementation of HashMap uses a hash function, which determines how keys and values are stored in memory.
In a Vector, we use indices to access data. But sometimes you want to look up data by key, and the key can be any data type, instead of by index, or you may not know which index the data is at. In that case, you can use a HashMap.
Note that HashMap is homogeneous, which means that all keys in one HashMap must be the same type, and all values must be the same type.
8.5.2. Creating a HashMap
- Because
HashMapis not used as often, Rust does not include it in the prelude. Before using it, you need to importHashMapby writinguse std::collections::HashMap;at the top of the file. - To create an empty
HashMap, use theHashMap::new()function. - To add data, use the
insert()method.
Example:
use std::collections::HashMap;
fn main() {
let mut scores: HashMap<String, i32> = HashMap::new();
}Here a variable named scores is created to store a HashMap. Because Rust is a strongly typed language, it must know what data types you are storing in the HashMap. Since there is no surrounding context for the compiler to infer from, you must explicitly declare the key and value types when you declare the HashMap. In this code, the keys of scores are set to String, and the values are set to i32.
Of course, if you later add data to this HashMap, Rust will infer the key and value types from the inserted data. Data is added with the insert() method. Example:
use std::collections::HashMap;
fn main() {
let mut scores = HashMap::new();
scores.insert(String::from("dev1ce"), 0);
}Because a key-value pair is inserted into scores on line 5, and the key String::from("dev1ce") is of type String while the value 0 is of type i32 (Rust’s default integer type is i32), the compiler will infer that scores is a HashMap<String, i32>, so there is no need to explicitly declare the type on the fourth line.
8.5.3. Combining Two Vectors into One HashMap
On a Vector whose element type is a tuple, you can use the collect method to build a HashMap. Put another way, if you have two Vectors and all of the values in them have a one-to-one correspondence, you can use collect to put the data from one Vector into the keys and the data from the other into the values of a HashMap. Example:
use std::collections::HashMap;
fn main() {
let player = vec![String::from("dev1ce"), String::from("Zywoo")];
let initial_scores = vec![0, 100];
let scores: HashMap<_, _> = player.iter().zip(initial_scores.iter()).collect();
}- The
playerVectorstores player names, and its elements are of typeString. - The
initial_scoresVectorstores the score corresponding to each player. player.iter()andinitial_scores.iter()are iterators over the twoVectors. Using.zip()creates a sequence of tuples, andplayer.iter().zip(initial_scores.iter())creates tuples with elements fromplayerfirst and elements frominitial_scoressecond. If you want to swap the order of the elements, you can simply swap the two iterators in the code. Then.collect()is used to convert the tuples into aHashMap.- One last thing to note is that
.collect()supports conversion into many data structures. If you do not explicitly declare its type when writing the code, the program will fail. Here the type is specified asHashMap<_, _>. The two data types inside<>can be inferred by the compiler from the code, that is, from the twoVectortypes, so you can use_as a placeholder and let it infer the types automatically.
8.5.4. HashMap and Ownership
For data types that implement the Copy trait, such as i32 and most simple data types, the value is copied into the HashMap, and the original variable remains usable. For types that do not implement Copy, such as String, ownership is transferred to the HashMap.
If you insert references into a HashMap, the value itself is not moved. During the lifetime of the HashMap, the referenced values must remain valid.
8.5.5. Accessing Values in a HashMap
You can access values with the get method. The get method takes a HashMap key as its argument, and it returns an Option<&V> enum. Example:
use std::collections::HashMap;
fn main() {
let mut scores = HashMap::new();
scores.insert(String::from("dev1ce"), 0);
scores.insert(String::from("Zywoo"), 100);
let player_name = String::from("dev1ce");
let score = scores.get(&player_name);
match score {
Some(score) => println!("{}", score),
None => println!("Player not found"),
};
}- First, an empty
HashMapcalledscoresis created, and then two key-value pairs,("dev1ce", 0)and("Zywoo", 100), are inserted usinginsert. The key type isString, and the value type isi32. - Then a
Stringvariable namedplayer_nameis declared with the value"dev1ce". - Next, the
getmethod on theHashMapis used to look up the value corresponding to theplayer_namekey inscores(&means reference). But becausegetreturns anOptionenum, theOptionvalue is first assigned toscoreand then unwrapped later. - Finally, a
matchexpression is used to handlescore. If the corresponding value is found, thescoreenum is theSomevariant, and the value associated withSomeis bound toscoreand then printed. If nothing is found, thescoreenum is theNonevariant, and"Player not found"is printed.
Output:
0
8.5.6. Iterating Over a HashMap
You usually iterate over a HashMap with a for loop. Example:
use std::collections::HashMap;
fn main() {
let mut scores = HashMap::new();
scores.insert(String::from("dev1ce"), 0);
scores.insert(String::from("Zywoo"), 100);
for (k, v) in &scores {
println!("{}: {}", k, v);
}
}This for loop uses a reference to the HashMap, namely &scores, because after iterating you usually still want to keep using the HashMap. Using a reference means you do not lose ownership. The (k, v) on the left is pattern matching: the first value is the key, which is assigned to k, and the second is the value, which is assigned to v.
Output:
Zywoo: 100
dev1ce: 0
8.6 HashMap Pt.2 - Updating HashMaps
8.6.0. Chapter Overview
Chapter 8 is mainly about common collections in Rust. Rust provides many collection-like data structures, and these collections can hold many values. However, the collections covered in Chapter 8 are different from arrays and tuples.
The collections in Chapter 8 are stored on the heap rather than on the stack. That also means their size does not need to be known at compile time; at runtime, they can grow or shrink dynamically.
This chapter focuses on three collections: Vector, String, and HashMap (this article).
8.6.1. Updating a HashMap
A variable-sized HashMap means that the number of key-value pairs can change. However, at any given moment, one key can correspond to only one value. When you want to update data in a HashMap, there are several possible cases:
-
The key you want to update already has a corresponding value in the
HashMap:- Replace the existing value with a new value
- Keep the existing value and ignore the new value
- Merge the existing value with the new value, which means modifying the existing value
-
The key does not exist: add a key-value pair
1. Replacing an Existing Value
If you insert a key-value pair into a HashMap, but the key already exists, the program assigns the new value to that key and overwrites the old one. Example:
use std::collections::HashMap;
fn main() {
let mut scores = HashMap::new();
scores.insert(String::from("dev1ce"), 0);
scores.insert(String::from("dev1ce"), 60);
println!("{:?}", scores);
}Here the same key is assigned a value twice: first 0, then 60. The first value is overwritten by the second, which means the final value corresponding to "dev1ce" is 60.
Output:
{"dev1ce": 60}
2. Insert a Value Only if the Key Has No Existing Value
This is the most common case. In this situation, you first need to check whether the original HashMap already contains the key. If it does not, then insert the new value.
Rust provides the entry method to check whether the original HashMap already contains the key. Its argument is the key, and its return value is an Entry enum, which represents whether the value exists. Example:
use std::collections::HashMap;
fn main() {
let mut scores = HashMap::new();
scores.insert(String::from("dev1ce"), 0);
let e = scores.entry(String::from("dev1ce"));
println!("{:?}", e);
}This is the case where the key already exists. Output:
Entry(OccupiedEntry { key: "dev1ce", value: 0, .. })
In other words, if the key already exists, the entry method returns the OccupiedEntry variant of the Entry enum and associates it with the existing key-value pair.
Now let’s try the case where the key does not exist. Code:
use std::collections::HashMap;
fn main() {
let mut scores = HashMap::new();
scores.insert(String::from("dev1ce"), 0);
let e = scores.entry(String::from("Zywoo"));
println!("{:?}", e);
}Output:
Entry(VacantEntry("Zywoo"))
If the key does not exist, it returns the VacantEntry variant of the Entry enum and associates it with the new key.
Now that we can check whether the original HashMap already contains the key, how do we insert or skip insertion based on whether it exists?
Rust provides the or_insert method, whose argument is the value you want to add. It accepts an Entry enum and uses its two variants to decide whether to insert. If it receives OccupiedEntry (the key already exists), it keeps the existing value and does not insert a new one. If it receives VacantEntry (the key does not exist), it inserts the provided value. Most importantly, it returns a value: a mutable reference to the value for that key. If the key already exists, it returns a mutable reference to the value already in the HashMap; if the key does not exist, it first inserts the key-value pair and then returns a mutable reference to the inserted value. This behavior can be used to build simple counters, as we will see later.
Example:
use std::collections::HashMap;
fn main() {
let mut scores = HashMap::new();
scores.insert(String::from("dev1ce"), 0);
scores.entry(String::from("Zywoo")).or_insert(100);
scores.entry(String::from("dev1ce")).or_insert(60);
println!("{:?}", scores);
}- The first
entrystatement looks up"Zywoo". Since it is not found,VacantEntryis returned, andor_insertreceives it and creates the key-value pair("Zywoo", 100)using the key associated withVacantEntryand the argument100. - The second
entrystatement looks up"dev1ce". Since it is found,OccupiedEntryis returned, andor_insertreceives it and stops the insertion of a new value, so("dev1ce", 0)remains unchanged.
Output:
{"Zywoo": 100, "dev1ce": 0}
If this still feels complicated, you can think of scores.entry(String::from("Zywoo")).or_insert(100); as two lines of code:
#![allow(unused)]
fn main() {
let e = scores.entry(String::from("Zywoo"));
e.or_insert(100);
}3. Updating Based on Existing Values
Let’s start with an example:
use std::collections::HashMap;
fn main() {
let text = "That's one small step for [a] man, one giant leap for mankind.";
let mut map = HashMap::new();
for word in text.split_whitespace() {
let count = map.entry(word).or_insert(0);
*count += 1;
}
println!("{:#?}", map);
}- First, a string literal containing a sentence is declared and assigned to
text. - Then a
HashMapcalledmapis created. - Next comes the
forloop.text.split_whitespace()splitstextinto an iterator over strings, andforis used to iterate over it. - During iteration, the code checks whether each word appears in the
map. If it does, no new value is inserted. If it does not,0is inserted as the new value for that key. The key thing to understand iscount: because the return value ofor_insertis a mutable reference to the value for that key, each time a word appears, the code dereferences the mutable reference and adds1, which is equivalent to completing one count.
8.6.2. Hash Functions
By default, HashMap uses a cryptographically strong hash function that can resist denial-of-service (DoS) attacks. However, this function is not the fastest hash algorithm available; its advantage is better security. If you think its performance is not good enough, you can also specify a different hasher to switch to another function. A hasher refers to a type that implements the BuildHasher trait.
9.1 Unrecoverable Errors and Panic!
9.1.1 Rust Error Handling Overview
Rust is extremely reliable, and that reliability extends to error handling. In most cases, Rust forces you to think about where errors might occur and then ensures at compile time that they are handled properly.
In Rust, errors are divided into two broad categories:
- Recoverable errors: for example, a file not being found. In that case, you can pass the error message to the user and let the user try again.
- Unrecoverable errors: another way to say “bug”, for example, an out-of-bounds index.
Most other programming languages do not make this distinction deliberately. They usually handle both through a single mechanism such as exceptions. Rust does not have a similar exception mechanism.
- For recoverable errors, Rust provides the
Result<T, E>type, which will be covered in the next article. - For unrecoverable errors, Rust provides the
panic!macro. When this macro is executed, the program immediately stops running.
9.1.2 panic!
Sometimes something terrible happens in code, and the developer has no real way to deal with it. To handle this situation, Rust provides the panic! macro.
When this macro runs, the following happens:
- It prints an error message.
- Then it unwinds and cleans up the call stack.
- It exits the program.
9.1.3 When panic! Happens: Unwinding or Aborting the Call Stack
Unwinding the call stack does a lot of work, because Rust walks back through the stack and cleans up data from every function it encounters along the way.
By contrast, Rust also offers the option to abort the call stack. This means no cleanup is performed; the program stops immediately, and the memory used by the program is left for the operating system to clean up later.
If you want a smaller binary, change the setting from “unwind” to “abort”: set panic = "abort" in the appropriate profile section of Cargo.toml.
Here is my Cargo.toml as an example:
[package]
name = "RustStudy"
version = "0.1.0"
edition = "2021"
[dependencies]
rand = "0.8.5"
[profile.release]
panic = "abort"
profile.release means running in release mode.
9.1.4 The panic! Macro
Let’s look at an example of the panic! macro:
fn main() {
panic!("Something went wrong");
}This is a very simple example. The argument to the panic! macro is the error message, and it will be printed when the program stops.
Output:
thread 'main' panicked at src/main.rs:2:5:
Something went wrong
stack backtrace:
0: rust_begin_unwind
at /rustc/90b35a6239c3d8bdabc530a6a0816f7ff89a0aaf/library/std/src/panicking.rs:665:5
1: core::panicking::panic_fmt
at /rustc/90b35a6239c3d8bdabc530a6a0816f7ff89a0aaf/library/core/src/panicking.rs:74:14
2: RustStudy::main
at ./src/main.rs:2:5
3: core::ops::function::FnOnce::call_once
at /Users/stanyin/.rustup/toolchains/stable-aarch64-apple-darwin/lib/rustlib/src/rust/library/core/src/ops/function.rs:250:5
note: Some details are omitted, run with `RUST_BACKTRACE=full` for a verbose backtrace.
In the earlier articles, the program also panicked, but I did not paste the stack backtrace into the article then because we had not covered it yet. What you see above is the complete panic information. Now let’s break it down:
- The first line tells you where the panic occurred — line 2, column 5 of
main.rsin thesrcdirectory. - The second line is the error message defined by the program.
- Starting from the third line, the
stack backtraceis the backtrace information. At the position labeled2ismain.rs. The backtrace contains the list of all functions that were called to reach the place where the error occurred, and below that — at position3— is the code that called our code, which may include Rust’s core library, the standard library, or third-party libraries. - The final
noteline says you can setRUST_BACKTRACEtofullto get all the detailed information. On Windows, typeset RUST_BACKTRACE=full && cargo runin the terminal. On macOS/Linux, typeexport RUST_BACKTRACE=full && cargo run.
To obtain debugging information like this, there is one more prerequisite: the program must be running in debug mode rather than release mode (--release). cargo build and cargo run use debug mode by default, so just make sure not to pass the --release flag.
9.2 Result Enum and Recoverable Errors Pt. 1 - Match, Expect, and Unwrap Handling Errors
9.2.1 The Result Enum
Usually, errors are not serious enough to stop the entire program. A function may fail or encounter an error for reasons that are often easy to explain and respond to. For example, a program may try to open a file that does not exist; in that case, you would usually consider creating the file rather than terminating the program immediately.
Rust provides the Result enum to handle these potentially failing cases. Its definition is:
#![allow(unused)]
fn main() {
enum Result<T, E> {
Ok(T),
Err(E),
}
}It has two generic type parameters, T and E, and two variants, each associated with data. Ok is associated with T, and Err is associated with E. Generics will be discussed in Chapter 10. For now, just know that T is the type of the data returned by the Ok variant when the operation succeeds, and E is the type of the error returned by the Err variant when the operation fails.
Take a look at an example:
use std::fs::File;
fn main() {
let f = File::open("6657.txt");
}This code tries to open a file, but that file may not exist. In other words, the function may fail, so the return value of File::open is the Result enum. The first type parameter in this Result is std::fs::File, the file type returned on success, and the second is std::io::Error, the I/O error returned on failure.
9.2.2 Handling Result with match
Like the Option enum, Result and its variants are brought into scope by the prelude, so you do not need to import them explicitly when writing code. For example:
use std::fs::File;
fn main() {
let f = File::open("6657.txt");
let f = match f {
Ok(file) => file,
Err(e) => panic!("Error: {}", e),
};
}If the returned value is Ok, then the value associated with it is bound to file and returned to f. If the returned value is Err, then the error message is bound to e, printed by the panic! macro, and the program stops.
9.2.3 Matching Different Errors
Let’s improve the previous example. If the file is missing, create it. Only if creating the file also fails, or if some other error occurs besides “file not found” — such as not having permission to open it — should panic! be triggered.
use std::fs::File;
use std::io::ErrorKind;
fn main() {
let f = File::open("6657.txt");
let f = match f {
Ok(file) => file,
Err(e) => match e.kind() {
ErrorKind::NotFound => match File::create("6657.txt") {
Ok(fc) => fc,
Err(e) => panic!("Problem creating file: {:?}", e),
},
other_error => panic!("Problem opening file: {:?}", other_error),
},
};
}- At the outermost level, if
fisOk, then the file is returned tof. - But the
Errcase is handled differently. The data carried byErris of typestd::io::Error. Thisstructhas a.kind()method, which returns a value of typestd::io::ErrorKind. That type is also an enum, also provided by the standard library, and its variants describe the different errors thatiooperations may cause. ErrorKindhas a variant calledErrorKind::NotFound, which means the file does not exist. In that case, the file should be created, which we will discuss below. BesidesErrorKind::NotFound, there may be other errors, such as lacking permission to read. Here, the other errors are bound toother_error, printed bypanic!, and then the program stops.- To create a file, you can use
File::create(), whose parameter is the file name. Creating a file can also fail, for example because of insufficient permissions, so the return value ofFile::create()is also aResult. Then anothermatchexpression is used to handle it. If it isOk(creation succeeded), the value associated withOk— that is, the contents of the newly created file (which are of course empty because the file is new) — are bound tofcand returned tof. If it isErr(creation failed), the error associated withErris bound toe, printed bypanic!, and the program stops.
match is indeed used quite often, but it is also fairly primitive. The nesting here greatly reduces readability, although compared with some other languages it may still be more readable. Chapter 13 will introduce a concept called a closure. Many methods on Result accept closures as parameters, and those methods are implemented using match, which can make the code much more concise. I am showing an example that uses closures here, but we will not cover it until Chapter 13.
use std::fs::File;
use std::io::ErrorKind;
fn main() {
let greeting_file = File::open("6657.txt").unwrap_or_else(|error| {
if error.kind() == ErrorKind::NotFound {
File::create("6657.txt").unwrap_or_else(|error| {
panic!("Problem creating the file: {error:?}");
})
} else {
panic!("Problem opening the file: {error:?}");
}
});
}9.2.4 The unwrap Method
match expressions are flexible and useful, but the code they produce is indeed a bit more complex. The Result enum itself also defines many helper methods for different tasks, and one of the most commonly used is unwrap.
If unwrap receives Ok, it returns the value attached to Ok; if it receives Err, unwrap calls the panic! macro. For example, here is a rewrite of the code from 9.2.2 using unwrap:
use std::fs::File;
fn main() {
let f = File::open("6657.txt").unwrap();
}unwrap is essentially a shortcut for a match expression. Its drawback is that the error message cannot be customized.
9.2.5 The expect Method
What if I want the convenience of unwrap but also want a custom error message? For that situation, Rust provides the expect method. If you remember, we already used this method in the number guessing game from Chapter 1.
Try rewriting the unwrap example with expect:
use std::fs::File;
fn main() {
let f = File::open("6657.txt").expect("file not found");
}9.3 Result Enum and Recoverable Errors Pt. 2 - Error Propagation, Question Mark Operator, and Chained Calls
9.3.1 Propagating Errors
When a function you write contains calls that may fail, you can either handle the error inside the function or return the error to the caller and let the caller decide how to handle it.
Take a look at an example:
use std::fs::File;
use std::io::{self, Read};
fn read_username_from_file() -> Result<String, io::Error> {
let f = File::open("6657.txt");
let mut f = match f {
Ok(file) => file,
Err(e) => return Err(e),
};
let mut s = String::new();
match f.read_to_string(&mut s) {
Ok(_) => Ok(s),
Err(e) => Err(e),
}
}
fn main() {
let result = read_username_from_file();
}The intention of this code is to read a username from a file:
-
Its return type is the
Resultenum. The two type parameters,TandE, correspond toStringandio::Error. In other words, when everything goes smoothly, the function returns theOkvariant ofResult, and theOkvalue contains aStringusername. If a problem occurs, the function returns theErrvariant ofResult, and that variant contains an instance ofio::Error. -
Looking at the function body, it first uses
File::opento try to open a file and assigns theResulttof. Then it performs amatchonf(the secondfis made mutable becauseread_to_stringbelow uses&mut self). If the operation succeeds, it returnsfileand assigns the value tof. If the operation fails, it returnsErr(e). Here,eis the specific error that occurred, and when the function body encounters thereturnkeyword, execution ends immediately and the value afterreturn— namelyErr(e)— is returned. The error type happens to beio::Error, so the return value matches theResulttype parameters. -
If
File::opensucceeds, the function then creates a mutableStringcalledsand callsread_to_stringto read the file contents intos. Of course,read_to_stringmay also fail, so amatchexpression follows it. -
This
matchexpression has no semicolon at the end, and it is also the last expression in the function, so it becomes the function’s return value. Thematchhas two branches. If the operation succeeds, it returns theOkvariant ofResultand wraps theStringvaluesinside it. If the operation fails, it returns theErrvariant, wraps the erroreinside it, and returns it. The return type ofread_to_stringalso happens to beio::Error, so the return value matches theResulttype parameters.
9.3.2 The ? Operator
Error propagation is very common in Rust, so Rust provides the ? operator specifically to simplify the process.
Use ? to achieve the same effect as the example above:
use std::fs::File;
use std::io::{self, Read};
fn read_username_from_file() -> Result<String, io::Error> {
let mut f = File::open("6657.txt")?;
let mut s = String::new();
f.read_to_string(&mut s)?;
Ok(s)
}
fn main() {
let result = read_username_from_file();
}- For the first
?(line 5):File::openreturns aResult, and adding?means that ifFile::openreturnsOk, the value insideOkbecomes the result of the expression and is assigned tof. IfFile::openreturnsErr, then function execution stops andErrtogether with the wrapped error information is returned as the function’s return value — that is,return Err(e). In other words, the effect of line 5 is equivalent to:
#![allow(unused)]
fn main() {
let f = File::open("6657.txt");
let mut f = match f {
Ok(file) => file,
Err(e) => return Err(e),
};
}-
For the second
?(line 7): ifread_to_stringsucceeds, execution continues. The successful return value is not actually used in the code, but if it fails, function execution stops andErrtogether with the wrapped error information is returned as the function’s return value — that is,return Err(e). -
If everything succeeds up to that point, the expression
Ok(s)wraps theStringvaluesinOkand returns it.
To summarize: when ? is used on a Result, if it is Ok, the value inside Ok becomes the result of the expression and execution continues; if the operation fails, that is, if it is Err, then Err becomes the return value of the entire function, just like using return.
9.3.3 ? and the from Function
Rust provides the from function. It comes from the std::convert::From trait, and its job is to convert between errors, turning one error type into another. Errors received by ? are implicitly handled by from, which looks at the error type the current function is supposed to return and converts to that type.
Using the code from just now as an example, the return value of read_username_from_file is Result<String, io::Error>, so from can see that the function needs io::Error as the error return type and will convert different error types into io::Error. In this case, all errors inside the function body happen to already be io::Error, so no conversion is needed.
This feature is very useful when different error causes need to be mapped into the same error type. The prerequisite is that the involved error types implement From trait so they can be converted into the error type being returned.
9.3.4 Chained Calls
In fact, the previous example can be optimized further by using chained calls. The optimized code looks like this:
use std::fs::File;
use std::io::{self, Read};
fn read_username_from_file() -> Result<String, io::Error> {
let mut s = String::new();
File::open("6657.txt")?.read_to_string(&mut s)?;
Ok(s)
}
fn main() {
let result = read_username_from_file();
}As just mentioned, when ? is used on a Result, if it is Ok, the value inside Ok becomes the result of the expression and execution continues. That means the assignment step in the original code can be eliminated, and chained calls can be used directly.
9.3.5 ? Can Only Be Used in Functions That Return Result
Take a look at an example:
use std::fs::File;
fn main() {
let result = File::open("6657.txt")?;
}Output:
error[E0277]: the `?` operator can only be used in a function that returns `Result` or `Option` (or another type that implements `FromResidual`)
--> src/main.rs:3:40
|
2 | fn main() {
| --------- this function should return `Result` or `Option` to accept `?`
3 | let result = File::open("6657.txt")?;
| ^ cannot use the `?` operator in a function that returns `()`
|
= help: the trait `FromResidual<Result<Infallible, std::io::Error>>` is not implemented for `()`
help: consider adding return type
|
2 ~ fn main() -> Result<(), Box<dyn std::error::Error>> {
3 | let result = File::open("6657.txt")?;
4 + Ok(())
|
The error message says that the ? operator can only be used with return types such as Result or Option, which implement the Try trait, while main returns (), the unit type, which is equivalent to returning nothing.
But who says the return type of main must be the unit type? If you change the return type to Result, wouldn’t that solve it?
The code is as follows:
use std::error::Error;
use std::fs::File;
fn main() -> Result<(), Box<dyn Error>> {
let result = File::open("6657.txt")?;
Ok(())
}-
Changing the return type to
Result<(), Box<dyn Error>>means that if the program runs normally, it returns theOkvariant, which contains the unit type. If it does not run normally, it returns theErrvariant, which containsBox<dyn Error>(Errorhere isstd::error::Error). This is a trait object, which will be covered later; for now, you can simply think of it as any possible error type. -
If the file is read successfully,
?returns the file data wrapped inOk, assigns it toresult, and then execution continues.Ok(())is the last expression inmain, so it returns theOkvariant and wraps the unit type. -
If the file cannot be read successfully,
?returnsErr(e)as the return value ofmain, and execution ends there.
9.4 When Should You Use Panic!
9.4.1 General Principles
Chapter 9.1, “Unrecoverable Errors and panic!”, already explained that Rust has two kinds of errors: recoverable and unrecoverable.
Calling panic! is equivalent to an unrecoverable error. Returning a Result type means the error is propagated, and such an error is recoverable.
If you think you can decide on behalf of the caller of your code that a situation is unrecoverable, then you can write panic!.
If your function returns Result, you are effectively giving the caller of the code the right to decide how to handle the error. The caller can then decide whether to recover from it, or it can consider the error unrecoverable and call panic! itself.
In short, if you are defining a function that may fail, prefer returning Result. If you believe a situation is definitely unrecoverable, use panic!.
9.4.2 Scenarios Where panic! Is Appropriate
When writing example code to demonstrate certain concepts, panic! is acceptable. In this kind of program, error handling often uses unwrap-style approaches that can trigger a panic. Here, unwrap acts like a placeholder, and code for different errors can later be written separately for each function.
You can use panic! when writing prototype code. At that stage, you may not yet know how to handle errors, and the unwrap and expect methods are very convenient during prototyping because they can trigger panics and leave clear markers in the code. Later, you can use those markers to handle the errors more specifically.
You can use panic! when writing test code. If a method call fails in test code, the entire test should be considered a failure, and failure is exactly what panic! can mark.
9.4.3 You Know Better Than the Compiler
Sometimes you can be certain that a function call will return Ok and will never panic. In that case, you can use unwrap. However, because the return type is something like Result, the compiler still thinks it may fail, while you know it cannot.
Take a look at an example:
use std::net::IpAddr;
fn main(){
let home: IpAddr = "127.0.0.1".parse().unwrap();
}This example uses the IpAddr enum. In main, the string "127.0.0.1" is parsed. We know that "127.0.0.1" is a valid IP address, so the return value is definitely Ok, which means unwrap can be used here and will never panic.
9.4.5 Guiding Advice for Error Handling
When your code may end up in a bad state, it is usually best to use panic!. A bad state means that certain assumptions, guarantees, agreements, or invariants have been broken.
For example, invalid values, conflicting values, or missing values are passed into the code. And any of the following is true:
- This bad state is unexpected.
- Code after this point cannot continue to run if it is in this bad state.
- There is no good way to encode the information in the type being used.
Let’s look at some concrete scenarios:
- A meaningless parameter value is passed in:
panic! - External uncontrollable code returns an invalid state and you cannot fix it:
panic! - If failure is expected, such as parsing a string into a number:
Result - When your code operates on a value, you should first verify that the value is valid. If it is not:
panic!This is mainly for security reasons, because attempting to operate on an invalid value may expose vulnerabilities in the code. This is also why the standard library reports an error when code tries to access out of bounds: trying to access memory that does not belong to the current data structure is a common security problem. In addition, functions usually have certain contracts: they can run correctly only when the input satisfies specific conditions, and when those contracts are violated, they should panic. Breaking those contracts often indicates a bug on the caller’s side, and the resulting error should not be left for the caller to fix. It should be dealt with immediately by panicking.
9.4.6 Creating a Custom Type for Validation
Take the number guessing game from Chapter 2 as an example. Some code has been omitted:
fn main() {
loop {
// --snip--
let guess: i32 = match guess.trim().parse() {
Ok(num) => num,
Err(_) => continue,
};
if guess < 1 || guess > 100 {
println!("The secret number will be between 1 and 100.");
continue;
}
match guess.cmp(&secret_number) {
// --snip--
}
}The original code has been changed a little:
- The type of
guesshas been changed fromu32toi32, so negative numbers can be accepted. - If the user enters a value less than 1 or greater than 100, the user is told that the secret number is between 1 and 100.
If parsing the string into an integer fails, continue is triggered to start the next iteration. If the number is outside the range 1 to 100, continue is triggered again. For this small program, the validation can be written directly inside main. In a large project, however, if every function needs validation, writing the validation logic over and over again inside each function would be quite troublesome.
In such cases, you can create a new type and put the validation logic into the constructor for that type. In this way, only values that pass validation can successfully create an instance, and you do not need to worry about whether the values you receive are valid later on.
Look at the example:
pub struct Guess {
value: i32,
}
impl Guess {
pub fn new(value: i32) -> Guess {
if value < 1 || value > 100 {
panic!("Guess value must be between 1 and 100, got {value}.");
}
Guess { value }
}
pub fn value(&self) -> i32 {
self.value
}
}
fn main() {
loop {
// --snip--
let guess: i32 = match guess.trim().parse() {
Ok(num) => num,
Err(_) => continue,
};
let guess = Guess::new(guess);
match guess.value().cmp(&secret_number) {
// --snip--
}
}new is the instance constructor. If the value is not between 1 and 100, it will panic!. If no panic occurs, a Guess instance is created and the value field is set to the value that was passed in.
There is also a method called value, which extracts the value of the value field from the struct and returns it.
In the main function below, you can remove the validation that checks whether the value is between 1 and 100 and instead use the Guess::new constructor to perform the validation.
If you need the actual value of guess, for example when using match, you can use the value method to get it.
10.1 Extract Function to Eliminate Repeated Code
10.1.1 Repeated Code
Let’s look at an example:
fn main(){
let number_list = vec![1,2,3,4,5];
let mut largest = number_list[0];
for &item in number_list.iter(){
if item > largest{
largest = item;
}
}
println!("The largest number is {}", largest);
}The purpose of this program is to find the largest value in a Vector. Its logic is easy to understand: take the first element as a temporary largest value, then use a loop to compare every element in the Vector. If the current element is greater than the value stored as the largest, assign the current element to largest.
Output:
The largest number is 5
If a new requirement is added at this point and you need to find the largest value in another Vector, you can still write it using the same logic:
fn main(){
let number_list = vec![1,2,3,4,5];
let mut largest = number_list[0];
for &item in number_list.iter(){
if item > largest{
largest = item;
}
}
println!("The largest number is {}", largest);
let number_list = vec![6,7,8,9,10];
let mut largest = number_list[0];
for &item in number_list.iter(){
if item > largest{
largest = item;
}
}
println!("The largest number is {}", largest);
}But you can see that this way produces far too much repeated code.
Repeated code is easy to get wrong. Once we need to change the logic, we have to make the same change in multiple places.
So it is highly recommended to create abstractions by defining functions. The code looks like this:
fn largest(list: &[i32]) -> i32{
let mut largest = list[0];
for &item in list.iter(){
if item > largest{
largest = item;
}
}
largest
}
fn main(){
let number_list = vec![1,2,3,4,5];
let largest_num = largest(&number_list);
println!("The largest number is {}", largest_num);
let number_list = vec![6,7,8,9,10];
let largest_num = largest(&number_list);
println!("The largest number is {}", largest_num);
}This declares a function called largest. It takes a slice whose element type is i32, and returns an i32. The logic inside the function is the same as above. Note that the parameter &[i32] is a slice, which is essentially a reference. The specific introduction to slices is in 4.5. Slices (Slice), so I won’t go into it here.
This function can also be written in the following way without changing the logic:
#![allow(unused)]
fn main() {
fn largest(list: &[i32]) -> i32{
let mut largest = list[0];
for &item in list{
if item > largest{
largest = item;
}
}
largest
}
}Compared with the previous version, this one removes the explicit iterator call .iter(), but it does not affect the code’s behavior, because the slice reference itself implements IntoIterator, so for can iterate over list directly. These two forms are semantically equivalent. Rust’s for loop automatically calls iter() for slices, so the explicit iterator call can be omitted. Which style you choose mainly depends on code style and personal preference.
There is another way:
#![allow(unused)]
fn main() {
fn largest(list: &[i32]) -> i32{
let mut largest = list[0];
for item in list{
if *item > largest{
largest = *item;
}
}
largest
}
}The biggest difference between this version and the previous two is that it explicitly dereferences item (*item) in order to compare its value.
In the previous two versions, destructuring via dereferencing pattern matching was used. You can think of it like this: &item = &i32, so if both sides drop the &, then item = i32. largest is also of type i32, so the two types match and can be compared directly. Naturally, there is no need to dereference later. If item does not have & in front of it, then item is of type &i32, while largest is of type i32. The two types cannot be compared directly, so you must first dereference it, which means adding * in front of item.
Output:
The largest number is 5
The largest number is 10
10.1.2 Steps to Eliminate Repetition
- Identify repeated code
- Create a function, extract the repeated code into the function body, and specify the function’s inputs and return value in the function signature
- Replace the repeated code with function calls
10.2 Generics
10.2.1 What Are Generics
The main purpose of generics is to improve code reusability. They are suitable for handling repeated-code problems, and can also be seen as separating data from algorithms.
Generics are abstract substitutes for concrete types or other attributes. In other words, generic code is not the final code you write; it is more like a template with some placeholders.
The compiler replaces those placeholders with concrete types at compile time. Let’s look at an example:
#![allow(unused)]
fn main() {
fn largest<T>(list:&[T]) -> T {
//......
}
}This function definition uses a generic type parameter. T is the so-called “placeholder.” When you write the code, T can represent any type, but during compilation the compiler replaces T with a concrete type based on the actual usage. This process is called monomorphization.
T is the generic type parameter. In fact, you can use any valid identifier as the type-parameter name, but by convention people usually use an uppercase T (for Type). When choosing a generic type-parameter name, it is usually very short; one letter is often enough. If you really want to make it longer, use camel-case naming.
10.2.2 Generics in Function Definitions
When defining a function with generics, you need to place the generic type parameter in the function signature. Generic type parameters are usually used to specify parameter and return types.
Using the code from the previous article as an example, here it is with a small generic modification:
#![allow(unused)]
fn main() {
fn largest<T>(list: &[T]) -> T{
let mut largest = list[0];
for &item in list{
if item > largest{
largest = item;
}
}
largest
}
}You can understand the whole function definition like this: the function largest has a generic type parameter T, it accepts a slice as its argument, the slice’s elements are of type T, and the return value is also of type T.
Try compiling it, and the output is:
error[E0369]: binary operation `>` cannot be applied to type `T`
--> src/main.rs:4:17
|
4 | if item > largest{
| ---- ^ ------- T
| |
| T
|
help: consider restricting type parameter `T`
|
1 | fn largest<T: std::cmp::PartialOrd>(list: &[T]) -> T{
| ++++++++++++++++++++++
For now, we won’t discuss the reason or how to fix it. You only need to know that this is roughly how generic parameters are written. Later articles will explain how to specify a particular trait.
10.2.3 Generics in struct Definitions
Generic type parameters defined in structs are mainly used in their fields. For example:
struct Point<T> {
x: T,
y: T,
}
fn main() {
let integer = Point { x: 5, y: 10 };
let float = Point { x: 1.0, y: 4.0 };
}Add <> after the struct name and write the generic parameter name inside it, and that generic type can be applied to each field in the struct.
In main, this struct is instantiated. The two fields in integer are both i32, and the two fields in float are both f64. Because x and y are both declared as T, the instantiated x and y must also be the same type. The two types must remain consistent.
What if I want x and y to be two different types? Easy: declare two generic type parameters.
struct Point<T, U> {
x: T,
y: U,
}
fn main() {
let integer = Point { x: 5, y: 1.0 };
let float = Point { x: 1.0, y: 40 };
}At this point, the instantiated x and y can be different types, of course they can also be the same type.
Note that although multiple generic type parameters are allowed, too many generics will reduce readability. Usually, that means the code should be reorganized into more, smaller units.
10.2.4 Generics in enum Definitions
Much like structs, generic type parameters in enums are mainly used in their variants, allowing enum variants to hold generic data types. The most common examples are Option<T> and Result<T, E>.
For example:
#![allow(unused)]
fn main() {
enum Option<T> {
Some(T),
None,
}
enum Result<T, E> {
Ok(T),
Err(E),
}
}- In the
Optionenum,Some(T)is the variant that holds a value of typeT, while theNonevariant means it holds no value. Because theOptionenum uses generics,Option<T>can represent a possible value no matter what type that value is - Likewise, an enum can use multiple generic type parameters. For example, the
Resultenum usesTandE: theOkvariant storesT, and theErrvariant storesE
10.2.5 Generics in Method Definitions
Methods can be attached to enums or structs. Since enums and structs can use generic parameters, methods can too, as shown here:
#![allow(unused)]
fn main() {
struct Point<T> {
x: T,
y: T,
}
impl<T> Point<T> {
fn x(&self) -> &T {
&self.x
}
}
}The x method is essentially a getter. When implementing methods for Point<T>, you need to add <T> after the impl keyword. This indicates that the implementation is for generic T, not for some concrete type.
Of course, if you are implementing a method for a specific type, you do not need that:
#![allow(unused)]
fn main() {
impl Point<i32> {
fn x1(&self) -> &i32 {
&self.x
}
}
}The x1 method exists only on the concrete type Point<i32>, and other Point<T> types do not have this method, similar to specialization and partial specialization in C++.
Another important point is that the generic type parameters in the struct can differ from the generic type parameters in the method. For example:
struct Point<T, U> {
x: T,
y: U,
}
impl<T, U> Point<T, U> {
fn mixup<V, W>(self, other: Point<V, W>) -> Point<T, W> {
Point {
x: self.x,
y: other.y,
}
}
}
fn main() {
let p1 = Point { x: 5, y: 10.4 };
let p2 = Point { x: "Hello", y: 'c' };
let p3 = p1.mixup(p2);
println!("p3.x = {}, p3.y = {}", p3.x, p3.y);
}The method mixup is implemented for Point<T, U>. It has two generic type parameters, V and W. The two type parameters in the method are different from the two type parameters in Point, although the actual types may also end up being the same. The second parameter of mixup is other, whose type is also Point, but that Point does not necessarily use the same data types as the Point referred to by self, so two new generic type parameters are needed. Looking at the return type, it is Point<T, W>: T comes from Point<T, U>, and W comes from Point<V, W>.
Now look at main: first p1 is declared, and both of its fields are i32; then p2 is declared, and its two fields are &str (string slice) and char (a single character, represented with ''). Then mixup is used. p1 corresponds to Point<T, U>, and p2 corresponds to Point<V, W>. From their field types, we can infer that T is i32, U is i32, V is &str, and W is char. The return type of mixup is Point<T, W>, which in this example becomes Point<i32, char>.
Output:
p3.x = 5, p3.y = c
10.2.6 Performance of Generic Code
Code written with generics runs just as fast as code written with concrete types. Rust performs monomorphization at compile time, replacing generic types with concrete types, so there is no type-substitution process during execution.
For example:
fn main() {
let integer = Some(5);
let float = Some(5.0);
}Here integer is Option<i32>, and float is Option<f64>. During compilation, the compiler expands Option<T> into Option_i32 and Option_f64:
#![allow(unused)]
fn main() {
enum Option_i32 {
Some(i32),
None,
}
enum Option_f64 {
Some(f64),
None,
}
}In other words, the generic definition Option<T> is replaced by two concrete type definitions.
The monomorphized main function also becomes this:
enum Option_i32 {
Some(i32),
None,
}
enum Option_f64 {
Some(f64),
None,
}
fn main(){
let integer = Option_i32::Some(5);
let float = Option_f64::Some(5.0);
}10.3 Trait Pt.1 - Trait Definitions, Bounds, and Implementation
10.3.1 What Is a Trait
Trait means feature or characteristic. Traits are used to describe to the Rust compiler what capabilities a type has and which behaviors it can share with other types. Traits define shared behavior in an abstract way.
There is also the concept of trait bounds, which can constrain a generic type parameter to a type that implements a specific behavior. In other words, it requires the generic type parameter to implement certain traits.
Traits in Rust are somewhat similar to interfaces in other languages, but there are still differences.
10.3.2 Defining a Trait
The behavior of a type is made up of the methods that the type itself can call. Sometimes different types have the same methods, and in that case we say those types share the same behavior. Traits provide a way to group methods together, thereby defining the behavior required to achieve a certain purpose.
- Use the
traitkeyword to define a trait. Inside the trait definition, there are only method signatures, no concrete implementations - A trait can have multiple methods, and each method is written on its own line and ends with
; - The type implementing that trait must provide concrete method implementations, which means method bodies are required
For example:
#![allow(unused)]
fn main() {
pub trait Summary {
fn summarize(&self) -> String;
}
}Adding pub before trait makes it public. The trait is named Summary, and it contains a method signature called summarize. Aside from &self, it has no other parameters, the return type is String, and the signature ends with ;. There is no method body, so there is no concrete implementation. Of course, a trait can contain many method signatures:
#![allow(unused)]
fn main() {
pub trait Summary {
fn summarize(&self) -> String;
fn summarize1(&self) -> String;
fn summarize2(&self) -> String;
//......
}
}10.3.3 Implementing a Trait for a Type
Implementing a trait for a type is very similar to implementing methods for a type, but there are also differences.
The syntax for implementing methods for a type is to follow the impl keyword with the type:
#![allow(unused)]
fn main() {
impl Yyyy {....}
}Implementing a trait for a type looks like this:
#![allow(unused)]
fn main() {
impl Xxxx for Yyyy {....}
}Xxxxrefers to the trait nameYyyyrefers to the type name- Inside the braces, you need to write the concrete implementations for the trait’s method signatures
For example (lib.rs):
#![allow(unused)]
fn main() {
pub trait Summary {
fn summarize(&self) -> String;
}
pub struct NewsArticle {
pub headline: String,
pub location: String,
pub author: String,
pub content: String,
}
impl Summary for NewsArticle {
fn summarize(&self) -> String {
format!("{}, by {} ({})", self.headline, self.author, self.location)
}
}
pub struct Tweet {
pub username: String,
pub content: String,
pub reply: bool,
pub retweet: bool,
}
impl Summary for Tweet {
fn summarize(&self) -> String {
format!("{}: {}", self.username, self.content)
}
}
}- The struct
NewsArticlerepresents a news article. It has four fields:headlinefor the title,locationfor the location,authorfor the author, andcontentfor the content - The struct
Tweetrepresents a tweet on X (formerly Twitter). It has four fields:username,content,reply, andretweet
These two struct types are certainly different, and most of their fields are different too. But they can both have the same behavior—providing a Summary—so Summary is implemented separately for both types.
#![allow(unused)]
fn main() {
impl Summary for NewsArticle {
fn summarize(&self) -> String {
format!("{}, by {} ({})", self.headline, self.author, self.location)
}
}
}This block implements the trait for NewsArticle. Because the trait definition includes the summarize method signature, a concrete implementation must be written here: use the format! macro to combine self.headline, self.author, and self.location into a string and return it.
#![allow(unused)]
fn main() {
impl Summary for Tweet {
fn summarize(&self) -> String {
format!("{}: {}", self.username, self.content)
}
}
}This block implements the trait for Tweet as well, again providing the concrete implementation of summarize: use the format! macro to combine self.username and self.content into a string and return it.
Now let’s move to main.rs and look at how the instances are called:
use RustStudy::{Summary, Tweet};
fn main() {
let tweet = Tweet {
username: String::from("horse_ebooks"),
content: String::from(
"of course, as you probably already know, people",
),
reply: false,
retweet: false,
};
println!("1 new tweet: {}", tweet.summarize());
}Remember that our code is written in lib.rs, before using something in main.rs, you need to bring it into scope first. The syntax is:
#![allow(unused)]
fn main() {
use your_package_name::...::the_module_you_need;
}Your package name is the project name in Cargo.toml; just copy it from there.
Summary is imported because the summarize method under the Summary trait is used. Tweet is imported because the Tweet struct is used.
Look at the output:
1 new tweet: horse_ebooks: of course, as you probably already know, people
10.3.4 Trait Constraints
The prerequisites for implementing a trait for a type are:
- The type itself (for example
Tweet) or the trait itself (for example lettingVectorimplement a localSummary) must be defined in the local crate - You cannot implement an external trait for an external type. For example, in a local crate implementing the standard library’s
Displaytrait for the standard library’sVectorThis restriction is part of the language’s coherence rules. More specifically, it is the orphan rule, so named because the parent type is not defined in the current crate. This rule ensures that other people’s code cannot arbitrarily break your code, and vice versa. Without this rule, two crates could implement the same trait for the same type, and Rust would not know which implementation to use.
10.3.5 Default Implementations
Sometimes it is very useful to provide default behavior for some or all methods in a trait. This lets us avoid writing custom behavior for every single type implementation. We can still implement trait methods for specific types.
When implementing a trait for certain types, we can choose whether to keep or override each method’s default implementation.
The previous version was:
#![allow(unused)]
fn main() {
pub trait Summary {
fn summarize(&self) -> String;
}
}The previous version only wrote the method signature and did not provide an implementation, but in fact a default implementation can be added:
Default implementation:
#![allow(unused)]
fn main() {
pub trait Summary {
fn summarize(&self) -> String {
String::from("(Read more...)")
}
}
}The default implementation here simply returns the string "(Read more...)".
Because this method already has a default implementation in the trait, a concrete type can use that default implementation directly instead of providing its own.
Using NewsArticle as an example, it originally had its own implementation (also called an override of the default implementation):
#![allow(unused)]
fn main() {
impl Summary for NewsArticle {
fn summarize(&self) -> String {
format!("{}, by {} ({})", self.headline, self.author, self.location)
}
}
}If you delete this concrete implementation, NewsArticle will use the default implementation:
#![allow(unused)]
fn main() {
impl Summary for NewsArticle {}
}There is one more thing to know: a method with a default implementation can call other methods in the trait, even if those methods do not have default implementations:
#![allow(unused)]
fn main() {
pub trait Summary {
fn summarize_author(&self) -> String;
fn summarize(&self) -> String {
format!("(Read more from {}...)", self.summarize_author())
}
}
}The default implementation of summarize calls summarize_author, even though summarize_author is only a signature and has no concrete implementation. But if you want to implement summarize for a type, you first need to implement summarize_author:
#![allow(unused)]
fn main() {
impl Summary for NewsArticle {
fn summarize_author(&self) -> String {
format!("@{}", self.author)
}
}
}PS: Since NewsArticle uses the default implementation of summarize, there is no need to write a default implementation of summarize here.
One thing to note about this style: you cannot call the default implementation from within an overridden method implementation.
10.4 Trait Pt.2 - Traits as Parameters and Return Types, Trait Bounds
By the way, writing this article took even longer than writing the ownership chapter. Traits are truly a concept that is hard to understand.
10.4.1 Using Traits as Parameters
Let’s continue using the content from the previous article as the example:
#![allow(unused)]
fn main() {
pub trait Summary {
fn summarize(&self) -> String;
}
pub struct NewsArticle {
pub headline: String,
pub location: String,
pub author: String,
pub content: String,
}
impl Summary for NewsArticle {
fn summarize(&self) -> String {
format!("{}, by {} ({})", self.headline, self.author, self.location)
}
}
pub struct Tweet {
pub username: String,
pub content: String,
pub reply: bool,
pub retweet: bool,
}
impl Summary for Tweet {
fn summarize(&self) -> String {
format!("{}: {}", self.username, self.content)
}
}
}If we define a new function notify, which takes NewsArticle and Tweet as the two types and prints Breaking news!, followed by the return value of calling the summarize method from Summary on the parameter, there is a problem:
the function accepts two different struct types. How can we make the parameter work for two types?
Let’s think about it: what do these two structs have in common? Exactly—they both implement the Summary trait. Rust provides a solution for this situation:
#![allow(unused)]
fn main() {
pub fn notify(item: &impl Summary) {
println!("Breaking news! {}", item.summarize());
}
}Just write the parameter type as impl some_trait. Since both of these structs implement the Summary trait, we write impl Summary. And because this function does not need ownership of the data, we write it as a reference: &impl Summary. If some other data type also implements Summary, it can be passed in as well.
The impl trait syntax is suitable for simple cases. For more complex cases, trait bound syntax is usually used.
Using the same code, but written with trait bounds:
#![allow(unused)]
fn main() {
pub fn notify<T: Summary>(item: &T) {
println!("Breaking news! {}", item.summarize());
}
}These two forms are equivalent.
However, this simple example does not show the advantages of trait bounds very well. Let’s look at another example. Suppose I want to design a new notify1 function. It takes two parameters, and the content after Breaking news! is the return value of calling summarize on each parameter.
Trait-bound version:
#![allow(unused)]
fn main() {
pub fn notify1<T: Summary>(item1: &T, item2: &T) {
println!("Breaking news! {} {}", item1.summarize(), item2.summarize());
}
}impl trait version:
#![allow(unused)]
fn main() {
pub fn notify1(item1: &impl Summary, item2: &impl Summary) {
println!("Breaking news! {} {}", item1.summarize(), item2.summarize());
}
}Clearly, the former function signature is easier to write and more intuitive than the latter.
In fact, impl trait is just syntax sugar for trait bounds, so it is understandable that it is not suitable for complex cases.
So what if the notify function needs its parameter to implement both the Display trait and the Summary trait? In other words, how do you write two or more trait bounds?
Example:
#![allow(unused)]
fn main() {
pub fn notify_with_display<T: Summary + std::fmt::Display>(item: &T) {
println!("Breaking news! {}", item);
}
}Use + to connect each trait bound.
Another point: because Display is not in the prelude, when writing it you need to spell out its path. You can also import Display at the top of the code first, like this: use std::fmt::Display. Then you can write Display directly in the trait bounds:
#![allow(unused)]
fn main() {
use std::fmt::Display;
pub fn notify_with_display<T: Summary + Display>(item: &T) {
println!("Breaking news! {}", item);
}
}Don’t forget that impl trait is also syntax sugar, and in that syntax sugar you also connect trait bounds with +:
#![allow(unused)]
fn main() {
use std::fmt::Display;
pub fn notify_with_display(item: &(impl Summary + Display)) {
println!("Breaking news! {}", item);
}
}This form has one drawback: if there are too many trait bounds, the large amount of constraint information will reduce the readability of the function signature. To solve this, Rust provides an alternative syntax: write the trait bounds after the function signature using a where clause.
Here is the ordinary syntax for multiple trait bounds:
#![allow(unused)]
fn main() {
use std::fmt::Display;
use std::fmt::Debug;
pub fn special_notify<T: Summary + Display, U: Summary + Debug>(item1: &T, item2: &U) {
println!("Breaking news! {} and {}", item1.summarize(), item2.summarize());
}
}The same code rewritten with a where clause:
#![allow(unused)]
fn main() {
use std::fmt::Display;
use std::fmt::Debug;
pub fn special_notify<T, U>(item1: &T, item2: &U)
where
T: Summary + Display,
U: Summary + Debug,
{
println!("Breaking news! {} and {}", item1.summarize(), item2.summarize());
}
}This syntax is very similar to C#.
10.4.2 Using Traits as Return Types
Just like using traits as parameters, using traits as return values can also use impl trait. For example:
#![allow(unused)]
fn main() {
fn returns_summarizable() -> impl Summary {
Tweet {
username: String::from("horse_ebooks"),
content: String::from(
"of course, as you probably already know, people",
),
reply: false,
retweet: false,
}
}
}This syntax has a drawback: if the return type implements a certain trait, then you must ensure that all possible return values of this function/method are only one type. That is because the impl form has some limitations in how it works, which is why Rust does not support it in every case. But Rust does support dynamic dispatch, which will be covered later.
For example:
#![allow(unused)]
fn main() {
fn returns_summarizable(flag:bool) -> impl Summary {
if flag {
Tweet {
username: String::from("horse_ebooks"),
content: String::from(
"of course, as you probably already know, people",
),
reply: false,
retweet: false,
}
} else {
NewsArticle {
headline: String::from("Penguins win the Stanley Cup Championship!"),
location: String::from("Pittsburgh, PA, USA"),
author: String::from("Iceburgh, Scotland"),
content: String::from(
"The Pittsburgh Penguins once again are the best \
hockey team in the NHL.",
),
}
}
}
}There are two possible return types depending on the value of flag: Tweet and NewsArticle. At that point, the compiler will report an error:
error[E0308]: `if` and `else` have incompatible types
--> src/lib.rs:42:9
|
32 | / if flag {
33 | | / Tweet {
34 | | | username: String::from("horse_ebooks"),
35 | | | content: String::from(
36 | | | "of course, as you probably already know, people",
... | |
39 | | | retweet: false,
40 | | | }
| | |_________- expected because of this
41 | | } else {
42 | | / NewsArticle {
43 | | | headline: String::from("Penguins win the Stanley Cup Championship!"),
44 | | | location: String::from("Pittsburgh, PA, USA"),
45 | | | author: String::from("Iceburgh, Scotland"),
... | |
49 | | | ),
50 | | | }
| | |_________^ expected `Tweet`, found `NewsArticle`
51 | | }
| |_______- `if` and `else` have incompatible types
|
help: you could change the return type to be a boxed trait object
|
31 | fn returns_summarizable(flag:bool) -> Box<dyn Summary> {
| ~~~~~~~ +
help: if you change the return type to expect trait objects, box the returned expressions
|
33 ~ Box::new(Tweet {
34 | username: String::from("horse_ebooks"),
...
39 | retweet: false,
40 ~ })
41 | } else {
42 ~ Box::new(NewsArticle {
43 | headline: String::from("Penguins win the Stanley Cup Championship!"),
...
49 | ),
50 ~ })
|
The error message says that the return types of if and else are incompatible, meaning they are not the same type.
Trait Bound Example
Do you still remember the code for comparing numbers that was mentioned in 10.2. Generics? I’ll paste it here:
#![allow(unused)]
fn main() {
fn largest<T>(list: &[T]) -> T{
let mut largest = list[0];
for &item in list{
if item > largest{
largest = item;
}
}
largest
}
}I’ll also paste the error that occurred at that time:
error[E0369]: binary operation `>` cannot be applied to type `T`
--> src/main.rs:4:17
|
4 | if item > largest{
| ---- ^ ------- T
| |
| T
|
help: consider restricting type parameter `T`
|
1 | fn largest<T: std::cmp::PartialOrd>(list: &[T]) -> T{
| ++++++++++++++++++++++
Now that we have learned traits, does your understanding of this code and its error message feel different?
Let’s start by analyzing the error message. The error says that the comparison operator > cannot be applied to type T. The help line below says to consider restricting type parameter T, and further down it gives the concrete approach: add std::cmp::PartialOrd after T (in the trait bound, you only need to write PartialOrd because it is in the prelude, so the full path is not needed). This is actually the trait used for comparisons. Try modifying it according to the hint:
#![allow(unused)]
fn main() {
fn largest<T: PartialOrd>(list: &[T]) -> T{
let mut largest = list[0];
for &item in list{
if item > largest{
largest = item;
}
}
largest
}
}It still reports an error:
error[E0508]: cannot move out of type `[T]`, a non-copy slice
--> src/main.rs:2:23
|
2 | let mut largest = list[0];
| ^^^^^^^
| |
| cannot move out of here
| move occurs because `list[_]` has type `T`, which does not implement the `Copy` trait
|
help: if `T` implemented `Clone`, you could clone the value
--> src/main.rs:1:12
|
1 | fn largest<T: std::cmp::PartialOrd>(list: &[T]) -> T{
| ^ consider constraining this type parameter with `Clone`
2 | let mut largest = list[0];
| ------- you could clone this value
help: consider borrowing here
|
2 | let mut largest = &list[0];
| +
But the error is different this time: the element cannot be moved out of list, because T in list does not implement the Copy trait. The help below says that if T implements the Clone trait, consider cloning the value. There is also another help below that suggests borrowing.
Based on the above information, there are three solutions:
- Add the
Copytrait to the generic type - Use cloning, which means adding the
Clonetrait to the generic type - Use borrowing
Which solution should we choose? It depends on your needs. I want this function to handle collections of numbers and characters. Since numbers and characters are stored on the stack, they both implement the Copy trait, so it is enough to add Copy to the generic type:
fn largest<T: PartialOrd + Copy>(list: &[T]) -> T{
let mut largest = list[0];
for &item in list{
if item > largest{
largest = item;
}
}
largest
}
fn main() {
let number_list = vec![34, 50, 25, 100, 65];
let result = largest(&number_list);
println!("The largest number is {}", result);
let char_list = vec!['y', 'm', 'a', 'q'];
let result = largest(&char_list);
println!("The largest char is {}", result);
}Output:
The largest number is 100
The largest char is y
What if I want this function to compare a String collection? Since String is stored on the heap, it does not implement the Copy trait, so the idea of adding Copy to the generic type does not work.
Then try cloning, which means adding the Clone trait to the generic type:
fn largest<T: PartialOrd + Clone>(list: &[T]) -> T{
let mut largest = list[0].clone();
for &item in list.iter() {
if item > largest{
largest = item;
}
}
largest
}
fn main() {
let string_list = vec![String::from("dev1ce"), String::from("Zywoo")];
let result = largest(&string_list);
println!("The largest string is {}", result);
}Output:
error[E0507]: cannot move out of a shared reference
--> src/main.rs:3:18
|
3 | for &item in list.iter() {
| ---- ^^^^^^^^^^^
| |
| data moved here
| move occurs because `item` has type `T`, which does not implement the `Copy` trait
|
help: consider removing the borrow
|
3 - for &item in list.iter() {
3 + for item in list.iter() {
|
The error says that data cannot be moved because this form requires Copy, which String does not provide. What should we do?
Then do not move the data; do not use pattern matching. Remove the & in front of item, so item changes from T to an immutable reference &T. Then use the dereference operator * during comparison to dereference &T back to T and compare it with largest (the code below uses this approach), or add & in front of largest to make it &T. In short, the two values being compared must have the same type:
fn largest<T: PartialOrd + Clone>(list: &[T]) -> T{
let mut largest = list[0].clone();
for item in list.iter() {
if *item > largest{
largest = item.clone();
}
}
largest
}
fn main() {
let string_list = vec![String::from("dev1ce"), String::from("Zywoo")];
let result = largest(&string_list);
println!("The largest string is {}", result);
}Remember that T does not implement the Copy trait, so when assigning to largest, you need to use the clone method.
Output:
The largest string is dev1ce
This form is written this way because the return value is T. If you change the return value to &T, then cloning is no longer needed:
fn largest<T: PartialOrd>(list: &[T]) -> &T{
let mut largest = &list[0];
for item in list.iter() {
if item > largest{
largest = item;
}
}
largest
}
fn main() {
let string_list = vec![String::from("dev1ce"), String::from("Zywoo")];
let result = largest(&string_list);
println!("The largest string is {}", result);
}But remember that when initializing largest, you must set it to &T, so you need to add & in front of list[0] to make it a reference. Also, when comparing, you cannot use the method of dereferencing item; instead, you need to add & in front of largest.
10.4.3 Conditionally Implementing Methods with Trait Bounds
If you use trait bounds on an impl block with generic type parameters, you can conditionally implement methods for types that implement specific traits.
For example:
#![allow(unused)]
fn main() {
use std::fmt::Display;
struct Pair<T> {
x: T,
y: T,
}
impl<T> Pair<T> {
fn new(x: T, y: T) -> Self {
Self { x, y }
}
}
impl<T: Display + PartialOrd> Pair<T> {
fn cmp_display(&self) {
if self.x >= self.y {
println!("The largest member is x = {}", self.x);
} else {
println!("The largest member is y = {}", self.y);
}
}
}
}No matter what the concrete type of T is, the new function will always exist on Pair. But the cmp_display method exists only when T implements both Display and PartialOrd.
You can also conditionally implement one trait for any type that implements another trait. Implementing a trait for all types that satisfy a trait bound is called a blanket implementation.
Take the standard library’s to_string function as an example:
#![allow(unused)]
fn main() {
impl<T: Display> ToString for T {
// ......
}
}This means that ToString is implemented for all types that satisfy the Display trait, which is what a blanket implementation is: any type that implements Display can call methods on ToString.
Using an integer as an example:
#![allow(unused)]
fn main() {
let s = 3.to_string();
}This works because i32 implements the Display trait, so it can call the to_string method from ToString.
10.5 Lifetime Definition and Significance, Borrow Checker, and Generic Lifetimes
10.5.1 What Is a Lifetime
Every reference in Rust has its own lifetime. The purpose of a lifetime is to keep a reference valid; in other words, it is the scope during which a reference remains valid.
In most cases, lifetimes are implicit and can be inferred. If the lifetimes of references may be related in different ways, you must annotate lifetimes manually.
Lifetimes are probably the most distinctive feature of Rust compared with other languages, so they are very hard to learn.
10.5.2 Why Lifetimes Exist
The main purpose of lifetimes is to avoid dangling references. This concept was already discussed in 4.4. Reference and Borrowing, and I’ll repeat the earlier explanation here:
When using pointers, it is very easy to trigger an error called a Dangling Pointer. It is defined as follows: a pointer references an address in memory, but that memory may already have been freed and reallocated for someone else to use. If you reference some data, the Rust compiler guarantees that the data will not go out of scope before the reference does. This is how Rust ensures that dangling references never appear.
Take this example:
fn main() {
let r;
{ // small braces
let x = 5;
r = &x;
}
println!("{}", r);
}- In this example,
ris declared first but not initialized. The purpose is to letrexist in the scope outside the small braces (as shown by the comment position). Of course, Rust has noNullvalue, sorcannot be used before it is initialized. - Inside the small braces, the variable
xis declared and assigned the value5. The next line assigns a reference toxtor. - After that small braces scope ends,
ris printed outside it.
This code is invalid because when r is printed, x has already gone out of scope and been destroyed. So the value of r—that is, the memory address referenced by x—now points to memory that has already been freed, and the data it points to is no longer x. That creates a dangling reference, so the compiler reports an error.
Output:
error[E0597]: `x` does not live long enough
--> src/main.rs:5:7
|
4 | let x = 5;
| - binding `x` declared here
5 | r = &x;
| ^^ borrowed value does not live long enough
6 | }
| - `x` dropped here while still borrowed
7 | println!("{}", r);
| - borrow later used here
The error says that the borrowed value does not live long enough. That is because when the inner-braces scope ends, x goes out of scope, but r has a larger scope and can continue to be used. To ensure program safety, any operation based on r cannot run correctly at that point.
Rust checks whether code is valid through the borrow checker.
10.5.3 The Borrow Checker
The borrow checker compares scopes to determine whether all borrows are valid. In the example above, the borrow checker sees that r is a reference to x, but r lives longer than x, so it reports an error.
How do we solve this problem? Easy: make x live at least as long as r.
fn main() {
let x = 5;
let r = &x;
println!("{}", r);
}In this case, x lives from line 2 to line 5, and r lives from line 3 to line 5. So x’s lifetime fully covers r’s lifetime, and the program does not report an error.
10.5.4 Generic Lifetimes in Functions
Take this example:
fn main() {
let string1 = String::from("abcd");
let string2 = "xyz";
let result = longest(string1.as_str(), string2);
println!("The longest string is {result}");
}
fn longest(x: &str, y: &str) -> &str {
if x.len() > y.len() {
x
} else {
y
}
}-
string1is aString, whilestring2is a string slice&str. These two values are passed into thelongestfunction (string1first needs to be converted to&str), and the returned value is printed. -
The logic of
longestis to compare the two input parameters and return the longer one.
Output:
error[E0106]: missing lifetime specifier
--> src/main.rs:9:33
|
9 | fn longest(x: &str, y: &str) -> &str {
| ---- ---- ^ expected named lifetime parameter
|
= help: this function's return type contains a borrowed value, but the signature does not say whether it is borrowed from `x` or `y`
help: consider introducing a named lifetime parameter
|
9 | fn longest<'a>(x: &'a str, y: &'a str) -> &'a str {
| ++++ ++ ++ ++
The error says that a lifetime annotation is missing, more specifically that the return type is missing a lifetime parameter. As the help text says, the function’s return type contains a borrowed value, but the function signature does not say whether that borrowed value comes from x or from y. Consider introducing a named lifetime parameter.
Look at this function again:
#![allow(unused)]
fn main() {
fn longest(x: &str, y: &str) -> &str {
if x.len() > y.len() {
x
} else {
y
}
}
}Clearly, the return value of this function is either x or y, but which one it is cannot be known in advance. The specific lifetimes of the two input parameters x and y are also unknown here, if we look at the function on its own. So, unlike the earlier example, we cannot compare scopes to determine whether the returned reference will remain valid. The borrow checker cannot do that either, because it does not know whether the lifetime of the return type is tied to x or to y.
In fact, even if the return value is fixed, writing it this way still causes an error:
#![allow(unused)]
fn main() {
fn longest(x: &str, y: &str) -> &str {
x
}
}Output:
error[E0106]: missing lifetime specifier
--> src/main.rs:9:33
|
9 | fn longest(x: &str, y: &str) -> &str {
| ---- ---- ^ expected named lifetime parameter
|
= help: this function's return type contains a borrowed value, but the signature does not say whether it is borrowed from `x` or `y`
help: consider introducing a named lifetime parameter
|
9 | fn longest<'a>(x: &'a str, y: &'a str) -> &'a str {
| ++++ ++ ++ ++
The compiler still cannot tell, because the function signature does not express where the borrowed value in the return type comes from.
So this has nothing to do with the logic inside the function body; it is entirely about the function signature. How should we change it? We can follow the suggestion in the error message:
= help: this function's return type contains a borrowed value, but the signature does not say whether it is borrowed from `x` or `y`
help: consider introducing a named lifetime parameter
|
9 | fn longest<'a>(x: &'a str, y: &'a str) -> &'a str {
| ++++ ++ ++ ++
Since it tells us to add a generic lifetime parameter, we will add one:
#![allow(unused)]
fn main() {
fn longest<'a>(x: &'a str, y: &'a str) -> &'a str {
if x.len() > y.len() {
x
} else {
y
}
}
}'a represents a lifetime named a. x, y, and the return type all use lifetime a, which means the lifetimes of x, y, and the return value are the same.
The phrase “the same” is not entirely precise, because the actual lifetimes of the x and y values in main differ a little. We will talk about that in the next article.
Now let’s look at the full code:
fn main() {
let string1 = String::from("abcd");
let string2 = "xyz";
let result = longest(string1.as_str(), string2);
println!("The longest string is {result}");
}
fn longest<'a>(x: &'a str, y: &'a str) -> &'a str {
if x.len() > y.len() {
x
} else {
y
}
}Output:
The longest string is abcd
Lifetime Syntax and Examples
10.6.1 Lifetime Annotation Syntax
- Annotating lifetimes does not change how long a reference lives.
- If a function specifies generic lifetime parameters, it can accept references with any lifetime.
- Lifetime annotations are mainly used to describe relationships between the lifetimes of multiple references, but they do not affect lifetimes themselves.
Lifetime parameter names must start with ', are usually all lowercase, and are very short. Many developers use 'a as the lifetime parameter name.
Lifetime annotations go after the & symbol, and a space separates the annotation from the reference type.
10.6.2 Lifetime Annotation Examples
&i32: a plain reference&'a i32: a reference with an explicit lifetime, where the referenced type isi32&'a mut i32: a mutable reference with an explicit lifetime
A single lifetime annotation by itself is meaningless. The purpose of lifetime annotations is to describe the relationships between multiple generic lifetimes to Rust.
Take the code from the previous article as an example:
fn main() {
let string1 = String::from("abcd");
let string2 = "xyz";
let result = longest(string1.as_str(), string2);
println!("The longest string is {result}");
}
fn longest<'a>(x: &'a str, y: &'a str) -> &'a str {
if x.len() > y.len() {
x
} else {
y
}
}The lifetimes of the parameter x, the parameter y, and the return value in longest are all 'a, which means that x, y, and the return value must have the “same” lifetime.
From the example above, you can also see that when using lifetime annotations in a function signature, generic lifetime parameters must be declared inside <>. This signature tells Rust that there is a lifetime 'a, and that x, y, and the return value must live at least as long as 'a.
Because lifetime annotations are mainly used to describe relationships between the lifetimes of multiple references, but they do not affect lifetimes themselves, this writing does not change the lifetimes of the arguments. It only gives the borrow checker constraints that can be used to detect invalid calls. So the longest function does not need to know exactly how long x and y live; it only needs some scope that can stand in for 'a while satisfying the function signature’s constraints.
When a function references code outside itself, or when it is referenced by outside code, it is almost impossible to determine the lifetimes of the parameters and return values using Rust compiler alone. The lifetimes used by such a function may change from call to call. That is exactly why lifetimes sometimes need to be annotated manually.
In the example code, when we pass concrete references into the longest function, which scope is used to replace 'a? It is the overlapping part of the scopes of x and y, in other words, the shorter of the two lifetimes. And because the return value also has lifetime 'a, the returned reference remains valid in the overlap between the scopes of x and y.
That is why in the previous article and earlier in this article, the word “same” was placed in quotes: it does not mean literally identical lifetimes, but rather the overlapping part.
Next, let’s see how lifetime annotations constrain calls to longest. If we change the example above so that string1 has a different scope and string2 becomes a String, what happens?
fn main() {
let string1 = String::from("abcd");
{
let string2 = String::from("xyz");
let result = longest(string1.as_str(), string2.as_str());
println!("The longest string is {result}");
}
}
fn longest<'a>(x: &'a str, y: &'a str) -> &'a str {
if x.len() > y.len() {
x
} else {
y
}
}Here, the scope of string1 is from line 2 to line 8, and the scope of string2 is from line 4 to line 7. When these are passed into longest, the function looks for the overlapping part—or, in other words, the shorter lifetime—which is the scope of string2, from line 4 to line 7. So the scope represented by 'a is from line 4 to line 7. result is valid inside the inner scope, that is, until the closing brace on line 7, so the code is still valid within 'a.
What if I change the scope of result instead?
fn main() {
let string1 = String::from("abcd");
let result;
{
let string2 = String::from("xyz");
result = longest(string1.as_str(), string2.as_str());
}
println!("The longest string is {result}");
}
fn longest<'a>(x: &'a str, y: &'a str) -> &'a str {
if x.len() > y.len() {
x
} else {
y
}
}In this case, the scope of string1 is from line 2 to line 9, and the scope of string2 is from line 5 to line 7. When these are passed into longest, the function looks for the overlapping part—or, in other words, the shorter lifetime—which is the scope of string2, from line 5 to line 7. So the generic lifetime parameter 'a of the function refers to the scope from line 5 to line 7, and the return value should also have that same scope. However, the result variable that receives the return value actually lives from line 3 to line 9, which exceeds the scope represented by 'a, so the program reports an error:
error[E0597]: `string2` does not live long enough
--> src/main.rs:6:44
|
5 | let string2 = String::from("xyz");
| ------- binding `string2` declared here
6 | result = longest(string1.as_str(), string2.as_str());
| ^^^^^^^ borrowed value does not live long enough
7 | }
| - `string2` dropped here while still borrowed
8 | println!("The longest string is {result}");
| -------- borrow later used here
The compiler says that string2 does not live long enough. To ensure that the result printed on line 8 is valid, string2 must remain valid until the outer scope ends. Because the function parameters and return value use the same lifetime, Rust can point out this problem.
Let’s repeat the most important point from this article one more time: the actual lifetime represented by 'a is the shorter one of the two lifetimes of x and y.
10.7. Input and Output Lifetimes and the 3 Rules
10.7.1 A Deeper Understanding of Lifetimes
1. The Way Lifetime Parameters Are Specified Depends on What the Function Does
Take the code from the previous article as an example:
#![allow(unused)]
fn main() {
fn longest<'a>(x: &'a str, y: &'a str) -> &'a str {
if x.len() > y.len() {
x
} else {
y
}
}
}The reason this function signature is written this way is that it is not known whether the return value will be x or y. If I modify the code so that the return value is fixed as x, then there is no need to give y an explicit lifetime:
#![allow(unused)]
fn main() {
fn longest<'a>(x: &'a str, y: &str) -> &'a str {
x
}
}So this function signature does not constrain y’s lifetime.
2. When a Function Returns a Reference, the Lifetime Parameter of the Return Type Must Match One of the Input Lifetimes
If the returned reference does not point to any parameter, the returned content becomes a dangling reference, because a value created inside the function leaves scope when the function ends, and the returned reference points to memory that has been freed.
Take this example:
#![allow(unused)]
fn main() {
fn longest<'a>(x: &'a str, y: &str) -> &'a str {
let result = String::from("Something");
result.as_str()
}
}In this function, a String value named result is created, and then the as_str method is called on result to return a string slice (&str), which is really just a reference. That then causes an error:
error[E0515]: cannot return value referencing local variable `result`
--> src/main.rs:13:5
|
13 | result.as_str()
| ------^^^^^^^^^
| |
| returns a value referencing data owned by the current function
| `result` is borrowed here
The error message says that a value referencing the local variable result cannot be returned, because the returned value is data owned by the function itself. This is the same reason mentioned just now: once the internal data goes out of scope, it is cleaned up.
What if I want to return a value created inside the function? Then I do not return a reference; I return the value directly:
#![allow(unused)]
fn main() {
fn longest(x: &str, y: &str) -> String {
let result = String::from("Something");
result
}
}This is equivalent to transferring ownership of the function’s value to the caller, and the caller is responsible for cleaning up that memory. This version also does not need an explicit lifetime, because the return value has nothing to do with the parameters, and only references have lifetime problems.
From this example, you can see that lifetime syntax is fundamentally used to relate the lifetimes of a function’s different parameters and return values. Once those relationships are established, Rust has enough information to support operations that preserve memory safety and to reject operations that could lead to dangling pointers or other violations of memory safety.
10.7.2 Lifetime Annotations in Structs
In earlier articles, we only defined self-owned types in structs, such as i32 and String. In fact, struct fields can also be reference types, and if they are references, you need to add lifetime annotations to each reference.
Take this example:
struct ImportantExcerpt<'a> {
part: &'a str,
}
fn main() {
let novel = String::from("Call me Ishmael. Some years ago...");
let first_sentence = novel.split('.').next().unwrap();
let i = ImportantExcerpt {
part: first_sentence,
};
}ImportantExcerpt has only one field, part, and its type is a string slice, which is a reference type. Because it is a reference type, a lifetime annotation is required.
The way to annotate a lifetime is the same as with generics: add <> after the struct name and write the lifetime generic parameter inside it. Here that is 'a. The part reference must live longer than the struct instance itself. As long as the instance exists, the part reference must also exist; if part disappears first, the instance will definitely be invalid.
Look at main: it first creates a String named novel, then uses split and next to extract the first sentence from the string (unwrap is used to unwrap the Option type, which was introduced in 9.2. Result Enum and Recoverable Errors Pt.1). The type of this sentence is &str, which is a reference. Then it creates an instance i of ImportantExcerpt and uses that reference as the value of the part field.
This is valid because the scope of first_sentence is from line 7 to line 11, while the scope of i is from line 8 to line 11. So the part field lives longer than the instance and fully covers i’s lifetime.
10.7.3 Lifetime Elision
Every reference has a lifetime, and functions or structs that use lifetimes need lifetime parameters.
Then why does this code, taken from 4.5. Slice, compile without any lifetime annotations?
fn main() {
let s = String::from("Hello world");
let word = first_word(&s);
println!("{}", word);
}
fn first_word(s:&str) -> &str {
let bytes = s.as_bytes();
for (i, &item) in bytes.iter().enumerate() {
if item == b' ' {
return &s[..i];
}
}
&s[..]
}The reason this function compiles without lifetime annotations has historical roots: in early versions of Rust (before 1.0), this code would not compile, because every reference was required to have an explicit lifetime. The function signature would have had to look like this:
#![allow(unused)]
fn main() {
fn first_word<'a>(s: &'a str) -> &'a str {
}Later, the Rust team found that in certain situations Rust programmers kept writing the same lifetime annotations over and over, and those situations were predictable. They had clear patterns, so the Rust team encoded those patterns directly into the compiler, allowing the borrow checker to infer lifetimes automatically in those cases without explicit annotations from the programmer.
The significance of knowing this history is that more deterministic patterns may be discovered in the future and added to the compiler. In the future, there may be fewer lifetime annotations to write. Thank goodness.
The patterns built into Rust’s reference analysis are called the lifetime elision rules. Programmers do not need to follow them manually; they are special cases handled by the compiler. If your code matches these cases, explicit lifetime annotations are unnecessary.
However, lifetime elision does not provide complete inference. If a reference is still ambiguous after the rule is applied, a compilation error will still occur. The solution is to add lifetimes manually to show the relationships between references.
10.7.4 Input and Output Lifetimes
If a lifetime appears in a function or method parameter, it is called an input lifetime.
If it appears in a function or method return value, it is called an output lifetime.
10.7.5 The Three Rules of Lifetime Elision
The compiler uses three rules to determine lifetimes when they are not explicitly annotated:
- Rule 1 is used for input lifetimes
- Rules 2 and 3 are used for output lifetimes
- If the compiler still cannot determine the lifetime after applying all three rules, it reports an error
- These three rules apply not only to function or method definitions, but also to
implblocks
Rule 1: Each reference parameter gets its own lifetime. A single-parameter function has one lifetime, a two-parameter function has two lifetimes, and so on.
Rule 2: If there is exactly one input lifetime parameter, that lifetime is assigned to all output lifetime parameters. In other words, if there is only one input lifetime, that lifetime is the lifetime of every possible return value of the function.
Rule 3: If there are multiple input lifetime parameters, but one of them is &self or &mut self (that is, the function is a method), then the lifetime of self is assigned to all output lifetime parameters.
1. Successful Example
Now that the rules are clear, let’s look at an example:
#![allow(unused)]
fn main() {
fn first_word(s:&str) -> &str {
//...
}
}Put yourself in the compiler’s place and think about how to use the three rules to find the omitted lifetime in this function signature.
First, apply Rule 1—each reference parameter gets its own lifetime. There is only one parameter here, so there is only one lifetime. At this point, the compiler infers:
#![allow(unused)]
fn main() {
fn first_word<'a>(s:&'a str) -> &str {
//...
}
}Because there is only one input lifetime, Rule 2 also applies here—if there is exactly one input lifetime parameter, that lifetime is assigned to all output lifetime parameters. So the input lifetime is assigned to the output lifetime. At this point, the compiler infers:
#![allow(unused)]
fn main() {
fn first_word<'a>(s:&'a str) -> &'a str {
//...
}
}Because there is only one input lifetime, and this function is not a method, Rule 3 does not apply.
Now every reference in the function has a lifetime, so the compiler can continue analyzing the code without the programmer manually annotating the lifetimes in the function signature.
2. Failure Example
Look at the second example:
#![allow(unused)]
fn main() {
fn longest(x:&str, y:&str) -> &str {
//...
}
}This function signature has two reference inputs, and the return type is also a reference. Try these three rules:
First, apply Rule 1—each reference parameter gets its own lifetime. There are two parameters here, so there are two lifetimes:
#![allow(unused)]
fn main() {
fn longest<'a, 'b>(x:&'a str, y:&'b str) -> &str {
//...
}
}Because there are two reference parameters, Rule 2 does not apply.
Because this function is not a method, Rule 3 does not apply.
After applying all three rules, the return value’s lifetime is still undetermined, so the compiler reports an error. In other words, you must declare the lifetime explicitly.
10.8. Lifetime Annotations in Method Definitions and Static Lifetime
10.8.1 Lifetime Annotations in Method Definitions
Do you still remember the three lifetime elision rules mentioned in the previous article, 10.7. Input and Output Lifetimes and the 3 Rules?
Rule 1: Each reference parameter gets its own lifetime. A single-parameter function has one lifetime, a two-parameter function has two lifetimes, and so on.
Rule 2: If there is exactly one input lifetime parameter, that lifetime is assigned to all output lifetime parameters. In other words, if there is only one input lifetime, that lifetime is the lifetime of every possible return value of the function.
Rule 3: If there are multiple input lifetime parameters, but one of them is &self or &mut self (that is, the function is a method), then the lifetime of self is assigned to all output lifetime parameters.
In the example from the previous article, we applied Rules 1 and 2, but not Rule 3, because Rule 3 applies only to methods. So here we will talk about Rule 3, which is lifetime annotations in method definitions.
A method needs a struct, and using lifetimes on a struct when defining methods works the same way as generic parameters do (see 10.7. Input and Output Lifetimes and the 3 Rules).
Where a lifetime parameter is declared and used depends on whether the lifetime parameter is related to fields, method parameters, or return values.
Lifetime names for struct fields are always declared after the impl keyword and then used after the struct name, because these lifetimes are part of the struct type itself.
Inside method signatures in an impl block, references must be tied to the lifetime of the struct field reference, or they can also be independent. In addition, lifetime elision rules often make lifetime annotations unnecessary in methods.
Enough talk—let’s look at an example:
struct ImportantExcerpt<'a> {
part: &'a str,
}
impl<'a> ImportantExcerpt<'a> {
fn level(&self) -> i32 {
3
}
}
fn main() {
let novel = String::from("Call me Ishmael. Some years ago...");
let first_sentence = novel.split('.').next().unwrap();
let i = ImportantExcerpt {
part: first_sentence,
};
}First, the ImportantExcerpt struct is defined, and then the level method is defined for it. The level method takes only &self as a parameter, and its return value is i32, so it does not reference anything.
The phrase “lifetime names for struct fields are always declared after the impl keyword and then used after the struct name” refers to the fact that line 4 writes <'a> after impl, and <'a> is also written after the struct name ImportantExcerpt.
Note that neither of the two <'a> annotations on line 4 can be omitted, but the level function does not need a lifetime annotation on &self because lifetime elision Rules 1 and 2 apply.
Now add another method:
#![allow(unused)]
fn main() {
impl<'a> ImportantExcerpt<'a> {
fn announce_and_return_part(&self, announcement: &str) -> &str {
println!("Attention please: {announcement}");
self.part
}
}
}According to lifetime elision Rule 1, the &self and announcement parameters each receive a lifetime:
#![allow(unused)]
fn main() {
impl<'a> ImportantExcerpt<'a> {
fn announce_and_return_part<'a, 'b>(&'a self, announcement: &'b str) -> &str {
println!("Attention please: {announcement}");
self.part
}
}
}According to lifetime elision Rule 3, the return value is assigned the same lifetime as &self:
#![allow(unused)]
fn main() {
impl<'a> ImportantExcerpt<'a> {
fn announce_and_return_part<'a, 'b>(&'a self, announcement: &'b str) -> &'a str {
println!("Attention please: {announcement}");
self.part
}
}
}At this point, all lifetimes have been inferred, so the compiler can compile the code successfully.
10.8.2 The 'static Lifetime
Rust has a special lifetime called 'static, which means the entire duration of the program, or the whole execution time of the program.
For example, all string literals have the 'static lifetime, such as:
#![allow(unused)]
fn main() {
let s: &'static str = "I have a static lifetime.";
}This is a string literal, so it can be annotated with 'static.
The reason string literals have the 'static lifetime is that they are stored directly in the binary file and placed in static memory at runtime, so they are always available.
Before assigning 'static to an ordinary reference—which the compiler often suggests when it reports an error—you must think carefully: do you really need this reference to live for the entire duration of the program? Most likely, the compiler error appears because of a dangling reference or a lifetime mismatch. At that point, you should try to solve those problems instead of simply slapping a 'static lifetime on it.
10.8.3 Generic Type Parameters, Trait Bounds, and Lifetimes
Finally, let’s look at an example that uses generic type parameters, trait bounds, and lifetimes at the same time:
#![allow(unused)]
fn main() {
use std::fmt::Display;
fn longest_with_an_announcement<'a, T>(
x: &'a str,
y: &'a str,
ann: T,
) -> &'a str
where
T: Display,
{
println!("Announcement! {ann}");
if x.len() > y.len() {
x
} else {
y
}
}
}The purpose of this function is to return the longer of the two string slices x and y, but it now has one more parameter, ann, which stands for announcement. Its type is the generic type T, and according to the constraint in where, T can be replaced by any type that implements the Display trait.
11.1 Writing and Running Tests
11.1.1 What Is Testing
In Rust, a test is a function used to verify whether non-test code behaves as expected.
A test function usually performs three actions:
- Arrange data/state
- Act on the code under test
- Assert the result
In some languages, these three actions are called the 3A steps.
11.1.2 Anatomy of a Test Function
A test function is still just a function; the difference is that it must be annotated with the test attribute.
An attribute is metadata for Rust code. It does not change the logic of the code it decorates; it only adds decoration, or annotation. In fact, we already used this in 5.2. Struct Usage Example - Printing Debug Information.
Adding #[test] to a function turns it into a test function.
11.1.3 Running Tests
Putting aside what is inside the test function for now, how do we run it after writing it? We use the cargo test command to run all tests.
This command builds a test runner executable. It runs the functions annotated with test one by one and reports whether they succeeded.
When you create a library project with Cargo, it generates a test module with a ready-made test function that you can use as a reference when writing other test functions. In fact, you can add any number of test modules or test functions.
For example:
Create a new library project named adder:
$ cargo new adder --lib
Created library `adder` project
$ cd adder
Open the project (lib.rs):
#![allow(unused)]
fn main() {
pub fn add(left: usize, right: usize) -> usize {
left + right
}
#[cfg(test)]
mod tests {
use super::*;
#[test]
fn it_works() {
let result = add(2, 2);
assert_eq!(result, 4);
}
}
}This is a test function because it is annotated with #[test], not because it is inside a test module. A test module can also contain ordinary functions.
Use cargo test to run the tests:
$ cargo test
Compiling adder v0.1.0 (file:///projects/adder)
Finished `test` profile [unoptimized + debuginfo] target(s) in 0.57s
Running unittests src/lib.rs (target/debug/deps/adder-92948b65e88960b4)
running 1 test
test tests::it_works ... ok
test result: ok. 1 passed; 0 failed; 0 ignored; 0 measured; 0 filtered out; finished in 0.00s
Doc-tests adder
running 0 tests
test result: ok. 0 passed; 0 failed; 0 ignored; 0 measured; 0 filtered out; finished in 0.00s
Let’s analyze this output:
- First come compiling, finishing, and running.
- Next is
running 1 test, which means one test is being executed. The next line shows that the test istests::it_works. Its result isok. This project has only one test, but if there were multiple tests,cargo testwould run all of them. - Then comes
test result: ok., which means all tests in the project passed. Specifically,1 passed; 0 failed; 0 ignored; 0 measured; 0 filtered outmeans one test passed, zero failed, zero were ignored, zero were benchmark tests, and zero were filtered out. Doc-tests adderrefers to the results of documentation tests. Rust can compile code that appears in API documentation, which helps ensure that documentation always stays in sync with the actual code.
If we rename the function, where will the output change?
#![allow(unused)]
fn main() {
pub fn add(left: usize, right: usize) -> usize {
left + right
}
#[cfg(test)]
mod tests {
use super::*;
#[test]
fn exploration() { // renamed to exploration
let result = add(2, 2);
assert_eq!(result, 4);
}
}
}Output:
$ cargo test
Compiling adder v0.1.0 (file:///projects/adder)
Finished `test` profile [unoptimized + debuginfo] target(s) in 0.59s
Running unittests src/lib.rs (target/debug/deps/adder-92948b65e88960b4)
running 1 test
test tests::exploration ... ok
test result: ok. 1 passed; 0 failed; 0 ignored; 0 measured; 0 filtered out; finished in 0.00s
Doc-tests adder
running 0 tests
test result: ok. 0 passed; 0 failed; 0 ignored; 0 measured; 0 filtered out; finished in 0.00s
You can see that the test name changed from tests::it_works to tests::exploration.
11.1.4 Test Failures
If a test function triggers panic!, the test fails. Since each test runs in its own thread, the main thread monitors those threads. When the main thread sees that a test has crashed by triggering panic!, that test is marked as failed.
For example:
#![allow(unused)]
fn main() {
pub fn add(left: usize, right: usize) -> usize {
left + right
}
#[cfg(test)]
mod tests {
use super::*;
#[test]
fn exploration() {
let result = add(2, 2);
assert_eq!(result, 4);
}
#[test]
fn another() {
panic!("Make this test fail");
}
}
}The another function calls panic! directly. Run it and see the result:
$ cargo test
Compiling adder v0.1.0 (file:///projects/adder)
Finished `test` profile [unoptimized + debuginfo] target(s) in 0.72s
Running unittests src/lib.rs (target/debug/deps/adder-92948b65e88960b4)
running 2 tests
test tests::another ... FAILED
test tests::exploration ... ok
failures:
---- tests::another stdout ----
thread 'tests::another' panicked at src/lib.rs:17:9:
Make this test fail
note: run with `RUST_BACKTRACE=1` environment variable to display a backtrace
failures:
tests::another
test result: FAILED. 1 passed; 1 failed; 0 ignored; 0 measured; 0 filtered out; finished in 0.00s
error: test failed, to rerun pass `--lib`
tests::another failed, while tests::exploration is still ok. The reason is thread 'tests::another' panicked at src/lib.rs:17:9, which means panic! was triggered at line 17, column 9 of src/lib.rs, that is, where the macro appears in the source code.
To summarize, test result: FAILED means the overall test run failed. More specifically, 1 passed; 1 failed; 0 ignored; 0 measured; 0 filtered out.
11.2 Assertions
11.2.1 Using the assert! Macro to Check Test Results
The assert! macro comes from the standard library and is used to determine whether a condition is true. It accepts an expression whose return type is boolean:
- When the value inside
assert!istrue, the test passes andassert!does nothing extra. - When the value inside
assert!isfalse,assert!callspanic!, and the test fails.
For example:
#![allow(unused)]
fn main() {
#[derive(Debug)]
struct Rectangle {
width: u32,
height: u32,
}
impl Rectangle {
fn can_hold(&self, other: &Rectangle) -> bool {
self.width > other.width && self.height > other.height
}
}
}The Rectangle struct stores the width and height of a rectangle. It defines a can_hold method to determine whether one rectangle can fit inside another rectangle, ignoring diagonal placement. The logic is easy to understand: just check whether both the width and height of the current rectangle are greater than those of the other rectangle.
How should we test this method? Since its return type is exactly bool, assert! is a perfect fit:
#![allow(unused)]
fn main() {
#[derive(Debug)]
struct Rectangle {
width: u32,
height: u32,
}
impl Rectangle {
fn can_hold(&self, other: &Rectangle) -> bool {
self.width > other.width && self.height > other.height
}
}
#[cfg(test)]
mod tests {
use super::*;
#[test]
fn larger_can_hold_smaller() {
let larger = Rectangle {
width: 8,
height: 7,
};
let smaller = Rectangle {
width: 5,
height: 1,
};
assert!(larger.can_hold(&smaller));
}
}
}Since test is a module, if code inside the test module wants to use items from outside, it must first import them into the current scope. Here, we write use super::*;, and * imports everything from the outer module into the test module. For more details on this part, see 7.2. Path Pt. 1 and 7.3. Path Pt. 2.
Then look at the test function below. First, it declares two rectangles, larger and smaller, which store the width and height of the large rectangle and the small rectangle respectively. That is the Arrange step.
The assert! macro below calls can_hold, which is the Act step.
Finally, assert! is used to determine whether the test succeeds.
In this example, the width and height stored in larger can definitely contain smaller, so the result must be true, and the test passes.
Run cargo test:
$ cargo test
Compiling rectangle v0.1.0 (file:///projects/rectangle)
Finished `test` profile [unoptimized + debuginfo] target(s) in 0.66s
Running unittests src/lib.rs (target/debug/deps/rectangle-6584c4561e48942e)
running 1 test
test tests::larger_can_hold_smaller ... ok
test result: ok. 1 passed; 0 failed; 0 ignored; 0 measured; 0 filtered out; finished in 0.00s
Doc-tests rectangle
running 0 tests
test result: ok. 0 passed; 0 failed; 0 ignored; 0 measured; 0 filtered out; finished in 0.00s
What if the smaller rectangle cannot hold the larger one?
#![allow(unused)]
fn main() {
#[cfg(test)]
mod tests {
use super::*;
#[test]
fn larger_can_hold_smaller() {
//...
}
#[test]
fn smaller_cannot_hold_larger() {
let larger = Rectangle {
width: 8,
height: 7,
};
let smaller = Rectangle {
width: 5,
height: 1,
};
assert!(!smaller.can_hold(&larger));
}
}
}Another test function, smaller_cannot_hold_larger, is declared. smaller.can_hold(&larger) must return false, but a negation operator ! is placed in front of it, so the final value received by assert! is still true, and the test passes:
$ cargo test
Compiling rectangle v0.1.0 (file:///projects/rectangle)
Finished `test` profile [unoptimized + debuginfo] target(s) in 0.66s
Running unittests src/lib.rs (target/debug/deps/rectangle-6584c4561e48942e)
running 2 tests
test tests::larger_can_hold_smaller ... ok
test tests::smaller_cannot_hold_larger ... ok
test result: ok. 2 passed; 0 failed; 0 ignored; 0 measured; 0 filtered out; finished in 0.00s
Doc-tests rectangle
running 0 tests
test result: ok. 0 passed; 0 failed; 0 ignored; 0 measured; 0 filtered out; finished in 0.00s
Both tests pass, which means the can_hold method is probably fine.
Now change the method so that the width comparison in can_hold uses < instead of >:
#![allow(unused)]
fn main() {
#[derive(Debug)]
struct Rectangle {
width: u32,
height: u32,
}
impl Rectangle {
fn can_hold(&self, other: &Rectangle) -> bool {
self.width < other.width && self.height > other.height
}
}
}The logic is now wrong. Run the same test functions:
$ cargo test
Compiling rectangle v0.1.0 (file:///projects/rectangle)
Finished `test` profile [unoptimized + debuginfo] target(s) in 0.66s
Running unittests src/lib.rs (target/debug/deps/rectangle-6584c4561e48942e)
running 2 tests
test tests::larger_can_hold_smaller ... FAILED
test tests::smaller_cannot_hold_larger ... ok
failures:
---- tests::larger_can_hold_smaller stdout ----
thread 'tests::larger_can_hold_smaller' panicked at src/lib.rs:28:9:
assertion failed: larger.can_hold(&smaller)
note: run with `RUST_BACKTRACE=1` environment variable to display a backtrace
failures:
tests::larger_can_hold_smaller
test result: FAILED. 1 passed; 1 failed; 0 ignored; 0 measured; 0 filtered out; finished in 0.00s
error: test failed, to rerun pass `--lib`
One test failed, which means the error was successfully caught. That is also the purpose of writing tests: to discover problems as early as possible.
11.2.2 Testing Equality with assert_eq! and assert_ne!
The eq in assert_eq! stands for equal, and the ne in assert_ne! stands for not equal. Both come from the standard library.
These two macros take two arguments and determine whether the two values are equal. Usually, you pass the result of the code under test as one argument and the expected result as the other argument, and then the macros check whether the two results are equal.
In practice, these macros work a lot like the == and != operators. The difference is that if they fail, they automatically print the values of both arguments, which helps the developer understand why the test failed.
There are some requirements for using these macros. They print values in debug format, so the arguments must implement the PartialEq and Debug traits. All primitive types and most standard library types already do, but custom structs and enums must implement these traits themselves.
An example of implementing the Display trait:
use std::fmt;
// Define a struct
struct Point {
x: i32,
y: i32,
}
// Implement Display for Point
impl fmt::Display for Point {
fn fmt(&self, f: &mut fmt::Formatter) -> fmt::Result {
// Define the formatted output
write!(f, "Point(x: {}, y: {})", self.x, self.y)
}
}
fn main() {
let p = Point { x: 10, y: 20 };
println!("{}", p); // Format output using Display
}Here is an example using assert_eq!:
#![allow(unused)]
fn main() {
pub fn add_two(a: usize) -> usize {
a + 2
}
#[cfg(test)]
mod tests {
use super::*;
#[test]
fn it_adds_two() {
let result = add_two(2);
assert_eq!(result, 4);
}
}
}Now 4 and 5 are not equal, so changing the assert_eq! in the test function to assert_ne! will make the test pass.
The add_two function adds 2 to its argument. The test function it_adds_two calls add_two; since 2 + 2 = 4, the expected value of add_two(2) is 4, so you just put 4 and the function call into the macro. In Rust, the expected value and the function call can actually be swapped. Some languages require a specific order, but Rust does not. The value on the left side (the first argument) is simply called the left value, and the other is called the right value.
Output:
$ cargo test
Compiling adder v0.1.0 (file:///projects/adder)
Finished `test` profile [unoptimized + debuginfo] target(s) in 0.58s
Running unittests src/lib.rs (target/debug/deps/adder-92948b65e88960b4)
running 1 test
test tests::it_adds_two ... ok
test result: ok. 1 passed; 0 failed; 0 ignored; 0 measured; 0 filtered out; finished in 0.00s
Doc-tests adder
running 0 tests
test result: ok. 0 passed; 0 failed; 0 ignored; 0 measured; 0 filtered out; finished in 0.00s
Next we introduce a logic bug by changing add_two from a + 2 to a + 3, leaving everything else unchanged, and see what happens:
#![allow(unused)]
fn main() {
pub fn add_two(a: usize) -> usize {
a + 3
}
#[cfg(test)]
mod tests {
use super::*;
#[test]
fn it_adds_two() {
let result = add_two(2);
assert_eq!(result, 4);
}
}
}Now 4 and 5 are not equal, so changing the assert_eq! in the test function to assert_ne! will make the test pass.
11.3 Custom Error Messages
11.3.1 Adding Error Messages
In 11.2. Assertions (Assert), we learned about the assert!, assert_eq!, and assert_ne! macros, and this article covers their advanced usage.
These three macros can accept custom error messages, but that is optional. If you add a custom message, it will be printed together with the standard failure message:
- For
assert!, the first argument is required and the custom message is the second argument. - For
assert_eq!andassert_ne!, the first two arguments are required and the custom message is the third argument.
After you pass in the custom message, it will be sent to the format! macro to build a string. Since format! can use {} placeholders, the message you pass in can also use placeholders.
For example:
#![allow(unused)]
fn main() {
pub fn greeting(name: &str) -> String {
format!("Hello {name}!")
}
#[cfg(test)]
mod tests {
use super::*;
#[test]
fn greeting_contains_name() {
let result = greeting("Carol");
assert!(result.contains("Carol"));
}
}
}greetingtakes a string slice parameter namedname, and returns a string formed by concatenatingHello,name, and!.- The
greeting_contains_nametest function first assigns the value returned bygreeting("Carol")toresult, and then calls thecontainsmethod onresultto check whetherresultcontains"Carol".
This code passes the test as is.
Now let’s manually introduce a bug by modifying the greeting function:
#![allow(unused)]
fn main() {
pub fn greeting(name: &str) -> String {
format!("Hello!")
}
#[cfg(test)]
mod tests {
use super::*;
#[test]
fn greeting_contains_name() {
let result = greeting("Carol");
assert!(result.contains("Carol"));
}
}
}This test will fail:
$ cargo test
Compiling greeter v0.1.0 (file:///projects/greeter)
Finished `test` profile [unoptimized + debuginfo] target(s) in 0.91s
Running unittests src/lib.rs (target/debug/deps/greeter-170b942eb5bf5e3a)
running 1 test
test tests::greeting_contains_name ... FAILED
failures:
---- tests::greeting_contains_name stdout ----
thread 'tests::greeting_contains_name' panicked at src/lib.rs:12:9:
assertion failed: result.contains("Carol")
note: run with `RUST_BACKTRACE=1` environment variable to display a backtrace
failures:
tests::greeting_contains_name
test result: FAILED. 0 passed; 1 failed; 0 ignored; 0 measured; 0 filtered out; finished in 0.00s
error: test failed, to rerun pass `--lib`
However, the failure message only says that a panic occurred at line 12, column 9. It does not provide friendlier or more useful information. What should we do? Add a custom message:
#![allow(unused)]
fn main() {
pub fn greeting(name: &str) -> String {
format!("Hello!")
}
#[cfg(test)]
mod tests {
use super::*;
#[test]
fn greeting_contains_name() {
let result = greeting("Carol");
assert!(
result.contains("Carol"),
"Greeting did not contain name, value was `{result}`"
);
}
}
}Output:
$ cargo test
Compiling greeter v0.1.0 (file:///projects/greeter)
Finished `test` profile [unoptimized + debuginfo] target(s) in 0.93s
Running unittests src/lib.rs (target/debug/deps/greeter-170b942eb5bf5e3a)
running 1 test
test tests::greeting_contains_name ... FAILED
failures:
---- tests::greeting_contains_name stdout ----
thread 'tests::greeting_contains_name' panicked at src/lib.rs:12:9:
Greeting did not contain name, value was `Hello!`
note: run with `RUST_BACKTRACE=1` environment variable to display a backtrace
failures:
tests::greeting_contains_name
test result: FAILED. 0 passed; 1 failed; 0 ignored; 0 measured; 0 filtered out; finished in 0.00s
error: test failed, to rerun pass `--lib`
You can see that the custom message appears in the error output. Such messages are more meaningful in practice, which makes it easier to find the cause of the error.
11.4 Using should_panic to Check Panics
11.4.1 Verifying Error-Handling Cases
In addition to verifying whether code returns the correct value, tests also need to verify whether code handles error cases as expected. For example, you can write a test to verify whether code panics under a specific condition.
Such tests need the extra should_panic attribute. For functions marked with it, if a panic occurs inside the function, the test passes; otherwise it fails.
For example:
#![allow(unused)]
fn main() {
pub struct Guess {
value: i32,
}
impl Guess {
pub fn new(value: i32) -> Guess {
if value < 1 || value > 100 {
panic!("Guess value must be between 1 and 100, got {value}.");
}
Guess { value }
}
}
#[cfg(test)]
mod tests {
use super::*;
#[test]
#[should_panic]
fn greater_than_100() {
Guess::new(200);
}
}
}- The
Guessstruct has a field namedvalueof typei32. It provides an associated functionnewfor creating aGuessinstance, but only if the argument passed tonewis between 1 and 100; otherwise it panics. - The
greater_than_100test function passes a value greater than 100 tonew. A panic should occur, so the test function is marked with theshould_panicattribute, written as#[should_panic].
Test result:
$ cargo test
Compiling guessing_game v0.1.0 (file:///projects/guessing_game)
Finished `test` profile [unoptimized + debuginfo] target(s) in 0.58s
Running unittests src/lib.rs (target/debug/deps/guessing_game-57d70c3acb738f4d)
running 1 test
test tests::greater_than_100 - should panic ... ok
test result: ok. 1 passed; 0 failed; 0 ignored; 0 measured; 0 filtered out; finished in 0.00s
Doc-tests guessing_game
running 0 tests
test result: ok. 0 passed; 0 failed; 0 ignored; 0 measured; 0 filtered out; finished in 0.00s
Now let’s intentionally introduce a bug by removing the value > 100 check from new:
#![allow(unused)]
fn main() {
pub struct Guess {
value: i32,
}
impl Guess {
pub fn new(value: i32) -> Guess {
if value < 1 || value > 100 {
panic!("Guess value must be between 1 and 100, got {value}.");
}
Guess { value }
}
}
#[cfg(test)]
mod tests {
use super::*;
#[test]
#[should_panic]
fn greater_than_100() {
Guess::new(200);
}
}
}Now Guess::new(200); inside the test function will not panic. But because the function is marked with should_panic, a test that should have panicked but did not will fail:
$ cargo test
Compiling guessing_game v0.1.0 (file:///projects/guessing_game)
Finished `test` profile [unoptimized + debuginfo] target(s) in 0.62s
Running unittests src/lib.rs (target/debug/deps/guessing_game-57d70c3acb738f4d)
running 1 test
test tests::greater_than_100 - should panic ... FAILED
failures:
---- tests::greater_than_100 stdout ----
note: test did not panic as expected
failures:
tests::greater_than_100
test result: FAILED. 0 passed; 1 failed; 0 ignored; 0 measured; 0 filtered out; finished in 0.00s
error: test failed, to rerun pass `--lib`
11.4.2 Making should_panic More Precise
Sometimes tests that use should_panic can be a bit vague, because they only tell you whether the code panicked, even if the panic was not the one the programmer expected.
To make the test more precise, you can add an optional expected argument to should_panic. Then the program checks whether the failure message contains the specified text.
For example:
#![allow(unused)]
fn main() {
pub struct Guess {
value: i32,
}
impl Guess {
pub fn new(value: i32) -> Guess {
if value < 1 {
panic!(
"Guess value must be greater than or equal to 1, got {value}."
);
} else if value > 100 {
panic!(
"Guess value must be less than or equal to 100, got {value}."
);
}
Guess { value }
}
}
#[cfg(test)]
mod tests {
use super::*;
#[test]
#[should_panic(expected = "less than or equal to 100")]
fn greater_than_100() {
Guess::new(200);
}
}
}- The struct above has been slightly changed: the
value < 1andvalue > 100cases innewnow use two different panic messages. - An
expectedargument is added toshould_panic, and the text after=is the expected error message. The test passes only if the function panics and the panic message contains the expected text; otherwise it fails.
This program will definitely pass.
Using the same pattern, let’s manually introduce an error. For example, swap the panic messages for values less than 1 and greater than 100 in new:
#![allow(unused)]
fn main() {
pub struct Guess {
value: i32,
}
impl Guess {
pub fn new(value: i32) -> Guess {
if value < 1 {
panic!(
"Guess value must be less than or equal to 100, got {value}."
);
} else if value > 100 {
panic!(
"Guess value must be greater than or equal to 1, got {value}."
);
}
Guess { value }
}
}
#[cfg(test)]
mod tests {
use super::*;
#[test]
#[should_panic(expected = "less than or equal to 100")]
fn greater_than_100() {
Guess::new(200);
}
}
}Test result:
$ cargo test
Compiling guessing_game v0.1.0 (file:///projects/guessing_game)
Finished `test` profile [unoptimized + debuginfo] target(s) in 0.66s
Running unittests src/lib.rs (target/debug/deps/guessing_game-57d70c3acb738f4d)
running 1 test
test tests::greater_than_100 - should panic ... FAILED
failures:
---- tests::greater_than_100 stdout ----
thread 'tests::greater_than_100' panicked at src/lib.rs:12:13:
Guess value must be greater than or equal to 1, got 200.
note: run with `RUST_BACKTRACE=1` environment variable to display a backtrace
note: panic did not contain expected string
panic message: `"Guess value must be greater than or equal to 1, got 200."`,
expected substring: `"less than or equal to 100"`
failures:
tests::greater_than_100
test result: FAILED. 0 passed; 1 failed; 0 ignored; 0 measured; 0 filtered out; finished in 0.00s
error: test failed, to rerun pass `--lib`
The failure message shows that the test did panic, but the panic message did not contain the expected string less than or equal to 100. In this case, the panic message we actually received was Guess value must be greater than or equal to 1, got 200.. That gives us enough information to fix the bug.
11.5 Using Result<T, E> in Tests
11.5.1 Test Functions That Return the Result Enum
So far, the reason tests have failed has always been a panic!, but that is not the only way a test can fail.
Tests that use the Result enum are also easy to write. You only need to accept the value returned by the code under test. If it matches expectations, return the Ok variant; otherwise return the Err variant. Since enum variants can carry data, you can also attach error information to Err to help with debugging.
If it is Ok, the test passes; otherwise it fails.
For example:
#![allow(unused)]
fn main() {
#[test]
fn it_works() -> Result<(), String> {
let result = add(2, 2);
if result == 4 {
Ok(())
} else {
Err(String::from("two plus two does not equal four"))
}
}
}The it_works function has the return type Result<(), String>. When the test passes, it returns Ok(()); when the test fails, it returns Err containing a String with an error message.
This test will definitely pass.
One thing to keep in mind when using Result for tests: do not use the should_panic attribute on tests written with Result<T, E> (as discussed in the previous article), because tests written with Result<T, E> return Err instead of panicking directly.
11.6 Controlling Test Execution - Parallel and Sequential Tests
11.6.1 Controlling How Tests Run
Like cargo run, cargo test compiles the code and produces a binary used for testing, except that cargo test runs in test mode.
You can change cargo test’s behavior by passing arguments. If you pass no arguments, the default behavior is:
- Run all tests in parallel
- Capture all output when tests pass, so it is easier to read test-related output. If a test fails, the output is shown so the programmer can debug.
Command-line arguments come in two categories:
- Arguments for
cargo testitself, placed immediately aftercargo test - Arguments for the generated executable, placed after
--. For example,cargo test -- --helpshows all arguments available after--, that is, all arguments for the executable.
11.6.2 Running Tests in Parallel
When running multiple tests, Rust uses multiple threads by default so tests run in parallel. This is faster, but the tests must not depend on one another, and they must not depend on shared state such as the environment, working directory, or environment variables.
If two tests depend on shared state, and one test changes that state before the other finishes, the other tests that share the same state will be affected.
If you do not want tests to run in parallel, or if you want to control exactly how many threads are used, you can use the --test-threads argument, which is passed to the binary. Put the thread count right after this argument.
For example, cargo test -- --test-threads=1 uses one thread, which means multiple tests take longer than they would in parallel. But it has an advantage: because the tests run sequentially, they are less likely to interfere with one another through shared state.
11.6.3 Showing Function Output
By default, if a test passes, Rust’s test library captures output written to standard output, such as println! output. If a test fails, the printed output is shown together with the failure message.
For example:
#![allow(unused)]
fn main() {
fn prints_and_returns_10(a: i32) -> i32 {
println!("I got the value {a}");
10
}
#[cfg(test)]
mod tests {
use super::*;
#[test]
fn this_test_will_pass() {
let value = prints_and_returns_10(4);
assert_eq!(value, 10);
}
#[test]
fn this_test_will_fail() {
let value = prints_and_returns_10(8);
assert_eq!(value, 5);
}
}
}- The function under test,
prints_and_returns_10, prints the value it receives and then returns 10. - The
this_test_will_passtest passes 4 to the function, so the function prints 4 and then compares the fixed return value with 10. This test succeeds. - The
this_test_will_failtest passes 8 to the function, so the function prints 8 and then compares the fixed return value with 5. This test fails.
Test result:
$ cargo test
Compiling silly-function v0.1.0 (file:///projects/silly-function)
Finished `test` profile [unoptimized + debuginfo] target(s) in 0.58s
Running unittests src/lib.rs (target/debug/deps/silly_function-160869f38cff9166)
running 2 tests
test tests::this_test_will_fail ... FAILED
test tests::this_test_will_pass ... ok
failures:
---- tests::this_test_will_fail stdout ----
I got the value 8
thread 'tests::this_test_will_fail' panicked at src/lib.rs:19:9:
assertion `left == right` failed
left: 10
right: 5
note: run with `RUST_BACKTRACE=1` environment variable to display a backtrace
failures:
tests::this_test_will_fail
test result: FAILED. 1 passed; 1 failed; 0 ignored; 0 measured; 0 filtered out; finished in 0.00s
error: test failed, to rerun pass `--lib`
The success case does not appear in the test output, but the failure case does: I got the value 8.
If you want successful tests to print their output too, add the flag cargo test -- --show-output. The output then looks like this:
$ cargo test -- --show-output
Compiling silly-function v0.1.0 (file:///projects/silly-function)
Finished `test` profile [unoptimized + debuginfo] target(s) in 0.60s
Running unittests src/lib.rs (target/debug/deps/silly_function-160869f38cff9166)
running 2 tests
test tests::this_test_will_fail ... FAILED
test tests::this_test_will_pass ... ok
successes:
---- tests::this_test_will_pass stdout ----
I got the value 4
successes:
tests::this_test_will_pass
failures:
---- tests::this_test_will_fail stdout ----
I got the value 8
thread 'tests::this_test_will_fail' panicked at src/lib.rs:19:9:
assertion `left == right` failed
left: 10
right: 5
note: run with `RUST_BACKTRACE=1` environment variable to display a backtrace
failures:
tests::this_test_will_fail
test result: FAILED. 1 passed; 1 failed; 0 ignored; 0 measured; 0 filtered out; finished in 0.00s
error: test failed, to rerun pass `--lib`
11.7 Running Tests by Name
11.7.1 Running a Subset of Tests by Name
If you want to choose which tests to run, pass the test name or names as arguments to cargo test.
For example:
#![allow(unused)]
fn main() {
pub fn add_two(a: usize) -> usize {
a + 2
}
#[cfg(test)]
mod tests {
use super::*;
#[test]
fn add_two_and_two() {
let result = add_two(2);
assert_eq!(result, 4);
}
#[test]
fn add_three_and_two() {
let result = add_two(3);
assert_eq!(result, 5);
}
#[test]
fn one_hundred() {
let result = add_two(100);
assert_eq!(result, 102);
}
}
}If you only want to run the one_hundred test, write cargo test one_hundred:
$ cargo test one_hundred
Compiling adder v0.1.0 (file:///projects/adder)
Finished `test` profile [unoptimized +debuginfo] target(s) in 0.69s
Running unittests src/lib.rs (target/debug/deps/adder-92948b65e88960b4)
running 1 test
test tests::one_hundred ... ok
test result: ok. 1 passed; 0 failed; 0 ignored; 0 measured; 2 filtered out; finished in 0.00s
To run a single test, just specify its exact name. To run multiple tests, specify part of the test name (module names work too) as the argument, and all tests that match that name will run.
For example, if I want to run add_two_and_two() and add_three_and_two, both of which contain add in their names, I can write cargo test add:
$ cargo test add
Compiling adder v0.1.0 (file:///projects/adder)
Finished `test` profile [unoptimized +debuginfo] target(s) in 0.61s
Running unittests src/lib.rs (target/debug/deps/adder-92948b65e88960b4)
running 2 tests
test tests::add_three_and_two ... ok
test tests::add_two_and_two ... ok
test result: ok. 2 passed; 0 failed; 0 ignored; 0 measured; 1 filtered out; finished in 0.00s
11.8 Ignoring Tests
11.8.1 Ignore Some Tests and Run the Rest
Some tests take a long time to run, so in most cases you may want to ignore them when running cargo test unless you explicitly run them.
For these tests, Rust provides the ignore attribute, which marks them as not run by default.
For example:
#![allow(unused)]
fn main() {
#[cfg(test)]
mod tests {
use super::*;
#[test]
fn it_works() {
let result = add(2, 2);
assert_eq!(result, 4);
}
#[test]
#[ignore]
fn expensive_test() {
assert_eq!(5, 1 + 1 + 1 + 1 + 1)
}
}
}Because expensive_test is marked with the ignore attribute, it will not run under cargo test unless you explicitly ask for it.
Here is the test output:
$ cargo test
Compiling adder v0.1.0 (file:///projects/adder)
Finished `test` profile [unoptimized +debuginfo] target(s) in 0.60s
Running unittests src/lib.rs (target/debug/deps/adder-92948b65e88960b4)
running 2 tests
test tests::expensive_test ... ignored
test tests::it_works ... ok
test result: ok. 1 passed; 0 failed; 1 ignored; 0 measured; 0 filtered out; finished in 0.00s
Doc-tests adder
running 0 tests
test result: ok. 0 passed; 0 failed; 0 ignored; 0 measured; 0 filtered out; finished in 0.00s
11.8.2 Run Only Ignored Tests
How do you run only the ignored tests? Add the argument cargo test -- --ignored:
$ cargo test -- --ignored
Compiling adder v0.1.0 (file:///projects/adder)
Finished `test` profile [unoptimized +debuginfo] target(s) in 0.61s
Running unittests src/lib.rs (target/debug/deps/adder-92948b65e88960b4)
running 1 test
test expensive_test ... ok
test result: ok. 1 passed; 0 failed; 0 ignored; 0 measured; 1 filtered out; finished in 0.00s
Doc-tests adder
running 0 tests
test result: ok. 0 passed; 0 failed; 0 ignored; 0 measured; 0 filtered out; finished in 0.00s
Controlling which tests the program runs ensures that cargo test returns quickly. If you have plenty of time and want to run all tests, including both ignored and non-ignored ones, use cargo test -- --include-ignored.
11.9 Unit Tests
11.9.1 Test Categories
Rust divides tests into two categories: unit tests and integration tests.
- Unit tests are smaller and more focused. Each one tests a single module in isolation, and they can also test private interfaces.
- Integration tests live completely outside the codebase. They use your code the same way external code does. Integration tests can only access public interfaces, and each test may use multiple modules.
11.9.2 The #[cfg(test)] Annotation
The purpose of unit tests is to isolate a small piece of code so we can quickly determine whether it behaves as expected. We usually keep unit tests and the code under test in the same file under src.
By convention, each source file should also have a test module to hold these functions, and #[cfg(test)] is used to annotate the test module. Code marked with this annotation is compiled and run only when cargo test is executed; it is not compiled when you run cargo build.
Those are the rules for unit tests. Integration tests live in a different directory, so they do not need the #[cfg(test)] annotation.
cfg in #[cfg(test)] is short for configuration. Using it tells Rust that the annotated item is included only under the specified configuration option.
For example:
#![allow(unused)]
fn main() {
pub fn add(left: usize, right: usize) -> usize {
left + right
}
#[cfg(test)]
mod tests {
use super::*;
#[test]
fn it_works() {
let result = add(2, 2);
assert_eq!(result, 4);
}
}
}The configuration option in #[cfg(test)] is test. This configuration option is provided by Rust for compiling and running tests, and items under #[cfg(test)] are compiled and run only when you execute cargo test.
11.9.3 Testing Private Functions
Rust allows you to test private functions, which is not always the case in other languages.
For example:
#![allow(unused)]
fn main() {
pub fn add_two(a: usize) -> usize {
internal_adder(a, 2)
}
fn internal_adder(left: usize, right: usize) -> usize {
left + right
}
#[cfg(test)]
mod tests {
use super::*;
#[test]
fn internal() {
let result = internal_adder(2, 2);
assert_eq!(result, 4);
}
}
}Even though internal_adder is not declared public with pub, it can still be called inside the test module.
11.10 Integration Tests
11.10.1 What Are Integration Tests
In Rust, integration tests live completely outside the library being tested. Integration tests call the library the same way other code does, which also means they can only call public APIs.
The purpose of integration tests is to verify that multiple parts of the library work together correctly. This differs from unit tests, which are smaller and more focused. Unit tests test a single module in isolation and can also test private interfaces.
Sometimes code that works fine on its own can still fail when used together. Integration tests exist to find and solve such problems as early as possible. Therefore, integration test coverage is important.
11.10.2 The tests Directory
To create integration tests, first create a tests directory.
This directory sits alongside src, and cargo automatically looks for integration test files there. You can create any number of integration test files in this directory. During compilation, cargo treats each test file as a separate package, that is, a separate crate.
Here is a demonstration of creating integration test files:
1. Create the tests Directory
Create a folder named tests next to src:
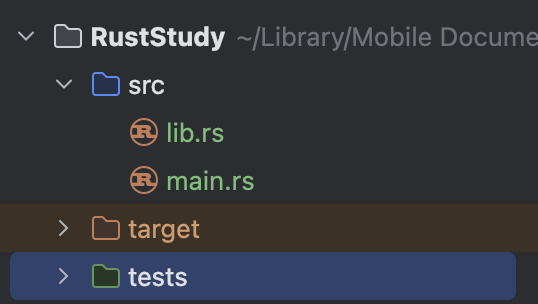
2. Create a Test File
Create a .rs test file inside tests and give it a name. Here I used integration_test.rs:
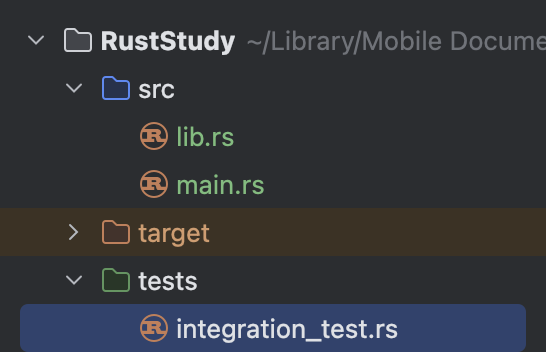
3. Move the Test Code Into the Test File
Using the code from the previous article (lib.rs) as an example:
#![allow(unused)]
fn main() {
pub fn add_two(a: usize) -> usize {
internal_adder(a, 2)
}
fn internal_adder(left: usize, right: usize) -> usize {
left + right
}
#[cfg(test)]
mod tests {
use super::*;
#[test]
fn internal() {
let result = internal_adder(2, 2);
assert_eq!(result, 4);
}
}
}Because every integration test file is a separate crate, the file (integration_test.rs) must first import the contents of lib.rs into scope if it wants to test that crate.
In this example, since I named the project RustStudy, the package name is RustStudy as well. If you are unsure, check the name field in your Cargo.toml. In this example, you can write use RustStudy; to import it, and you can also import a specific function if you want.
After importing, you can write the test function directly. There is no need to write #[cfg(test)], because code under the tests directory is only run when you execute cargo test. You only need to annotate the test function with #[test].
The full code looks like this (integration_test.rs):
#![allow(unused)]
fn main() {
use RustStudy;
#[test]
fn it_adds_two() {
let result = RustStudy::add_two(2);
assert_eq!(result, 4);
}
}Output:
$ cargo test
Compiling adder v0.1.0 (file:///projects/adder)
Finished `test` profile [unoptimized +debuginfo] target(s) in 1.31s
Running unittests src/lib.rs (target/debug/deps/adder-1082c4b063a8fbe6)
running 1 test
test tests::internal ... ok
test result: ok. 1 passed; 0 failed; 0 ignored; 0 measured; 0 filtered out; finished in 0.00s
Running tests/integration_test.rs (target/debug/deps/integration_test-1082c4b063a8fbe6)
running 1 test
test it_adds_two ... ok
test result: ok. 1 passed; 0 failed; 0 ignored; 0 measured; 0 filtered out; finished in 0.00s
Doc-tests adder
running 0 tests
test result: ok. 0 passed; 0 failed; 0 ignored; 0 measured; 0 filtered out; finished in 0.00s
You can see that this output shows two tests being run: one from lib.rs (a unit test) and one from integration_test.rs (an integration test).
11.10.3 Running a Specific Integration Test
To run a specific integration test function, use cargo test <test_name>. To run all test functions in a specific test file, use cargo test --test <file_name>.
For example:
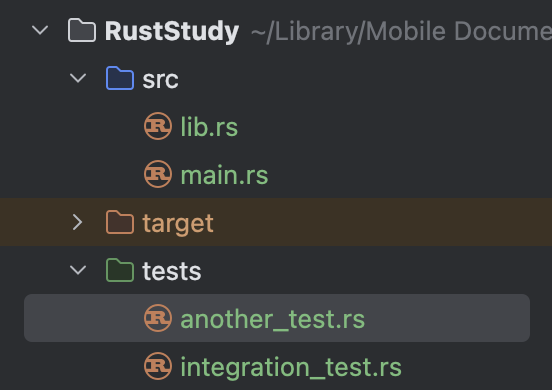
Now there are two files under tests. If I only want to run the test functions in integration_test.rs, I can run:
cargo test --test integration_test
11.10.4 Submodules in Integration Tests
Because each file under tests is compiled as a separate crate, these files do not share behavior with one another, unlike the files under src.
So if I want to extract repeated logic in test functions into a helper function to avoid duplication, how should I write it?
For example, I create a common.rs file under tests to store helper functions:
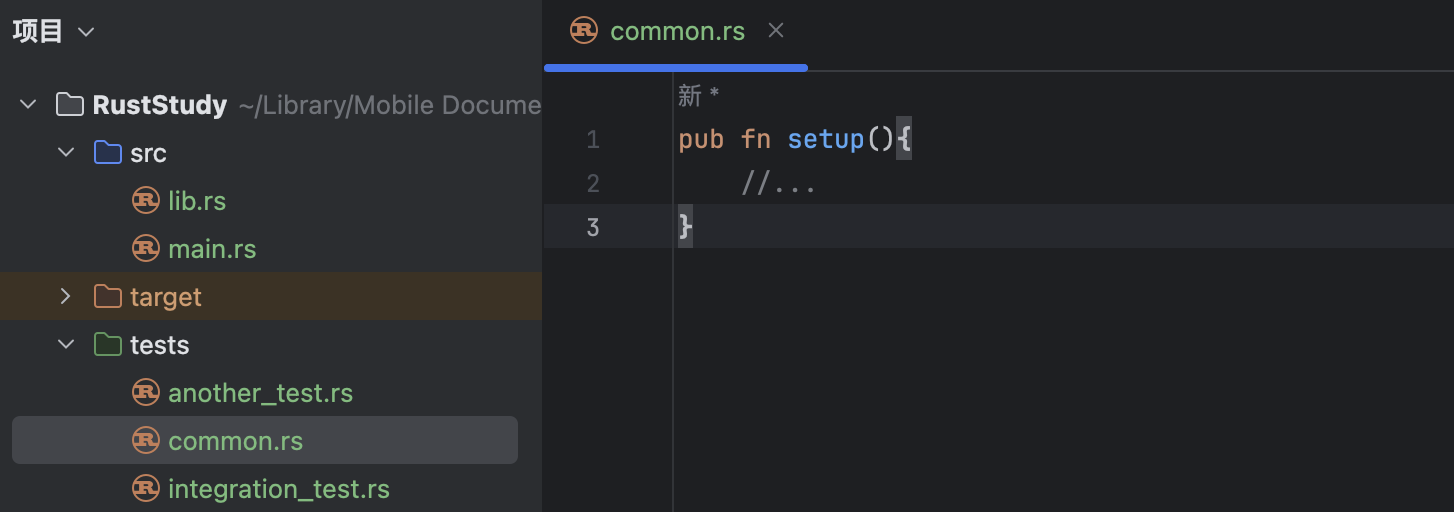
Try running the tests:
$ cargo test
Compiling adder v0.1.0 (file:///projects/adder)
Finished `test` profile [unoptimized +debuginfo] target(s) in 0.89s
Running unittests src/lib.rs (target/debug/deps/adder-1082c4b063a8fbe6)
running 1 test
test tests::internal ... ok
test result: ok. 1 passed; 0 failed; 0 ignored; 0 measured; 0 filtered out; finished in 0.00s
Running tests/common.rs (target/debug/deps/common-92948b65e88960b4)
running 0 tests
test result: ok. 0 passed; 0 failed; 0 ignored; 0 measured; 0 filtered out; finished in 0.00s
Running tests/integration_test.rs (target/debug/deps/integration_test-92948b65e88960b4)
running 1 test
test it_adds_two ... ok
test result: ok. 1 passed; 0 failed; 0 ignored; 0 measured; 0 filtered out; finished in 0.00s
Doc-tests adder
running 0 tests
test result: ok. 0 passed; 0 failed; 0 ignored; 0 measured; 0 filtered out; finished in 0.00s
You can see that common.rs appears in the test output. But since common.rs is only meant to store helper functions, it does not need to be tested itself. That is the wrong way to do it.
The correct approach is to create a common directory under tests, place a mod.rs file inside it, and move the helper functions there. Then delete the old common.rs:
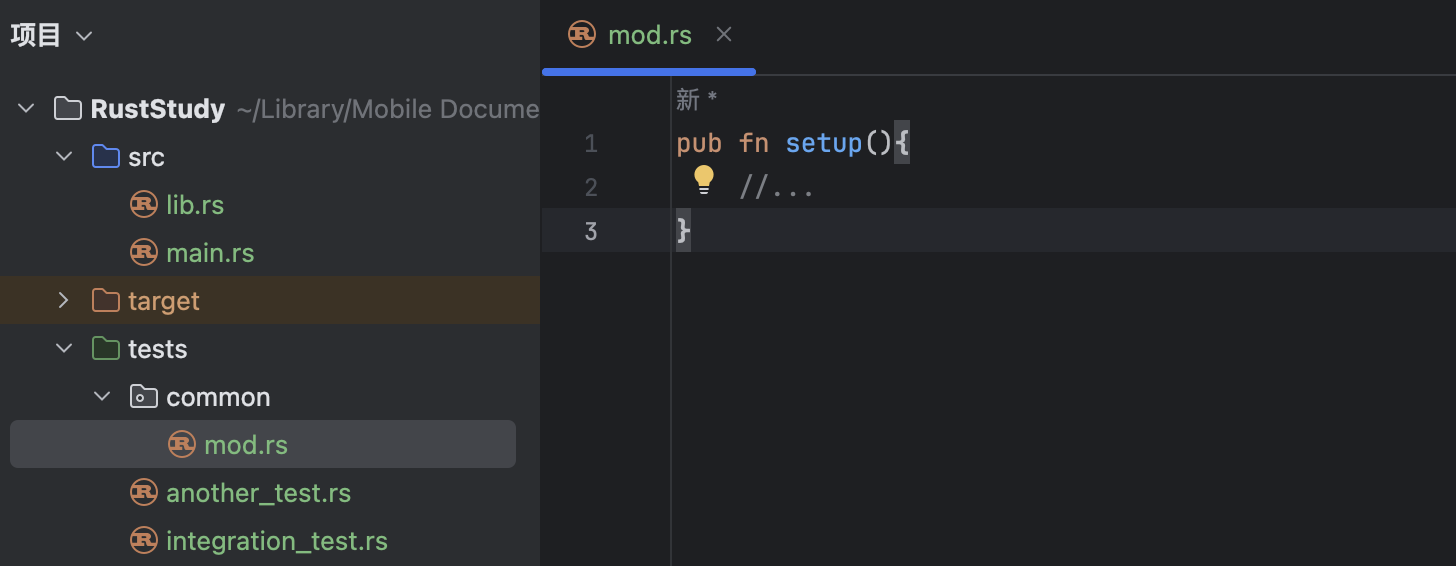
This is another naming convention that Rust understands. Rust will not treat the common module as an integration test file, and common will no longer appear in the test output, because subdirectories under tests are not compiled as separate crates.
If you want to use the contents there in an integration test file, just write mod <folder_name>; at the top of the file. In this example, that would be mod common;. When using it, write common::your_function. In this example, that would be common::setup().
11.10.5 Integration Tests for Binary Crates
If a project is a binary crate, meaning it only has src/main.rs and no src/lib.rs, you cannot create integration tests under tests, even if you do, you cannot import functions from main.rs into scope. That is because only a library crate, meaning one with lib.rs, can expose functions for other crates to use.
A binary crate means it runs independently. Therefore, Rust binary projects usually put this logic in lib.rs and keep only a simple call in main.rs. In that way, the project is treated as a library crate and can use integration tests to check the code.
12.1 Receiving Command-Line Arguments
12.1.0 Before We Begin
In Chapter 12, we will build a real project: a command-line program. This program is a grep (Global Regular Expression Print), a tool for global regular-expression search and output. Its job is to search for the specified text in the specified file.
This project has several steps:
- Receive command-line arguments (this article)
- Read files
- Refactor: improve modules and error handling
- Use TDD (test-driven development) to develop library functionality
- Use environment variables
- Write error messages to standard error instead of standard output
12.1.1 Standardizing the Input Format
First we need to define a standard input format for passing arguments. I use the following convention:
cargo run text filename.txt
12.1.2 Reading Command-Line Arguments
After standardizing the input, the next problem is reading command-line arguments.
We need a function from Rust’s standard library: std::env::args(). This function returns an iterator (covered in Chapter 13) that yields a series of values. For an iterator, you can use the collect method to turn that series of values into a collection, such as a Vector.
As discussed in 7.4. Use Pt. 1, when a function is nested inside more than one module, we usually bring its parent module into scope.
Here is the code:
use std::env;
fn main() {
let args:Vec<String> = env::args().collect();
}Because collect produces a collection, but Rust cannot infer the element type of that collection, we must explicitly declare args as Vec<String>.
Let’s use println! to see what happens:
use std::env;
fn main() {
let args:Vec<String> = env::args().collect();
println!("{:#?}", args);
}Output 1, with no arguments:
$ cargo run
Compiling minigrep v0.1.0 (file:///projects/minigrep)
Finished `dev` profile [unoptimized + debuginfo] target(s) in 0.61s
Running `target/debug/minigrep`
[src/main.rs:5:5] args = [
"target/debug/minigrep",
]
Output 2, with arguments:
$ cargo run -- needle haystack
Compiling minigrep v0.1.0 (file:///projects/minigrep)
Finished `dev` profile [unoptimized + debuginfo] target(s) in 1.57s
Running `target/debug/minigrep needle haystack`
[src/main.rs:5:5] args = [
"target/debug/minigrep",
"needle",
"haystack",
]
The -- in the second example is used to separate the arguments for the Cargo command from the arguments passed to the program. It tells Cargo that what follows is not a Cargo option or argument, but arguments that should be passed to the program when it runs. env::args does not read or store it.
You can see that even without arguments, this Vector still has one element: the currently executing binary itself, which in this example is "target/debug/minigrep". So the arguments we actually need begin at the second element of args, that is, at index 1.
Once we know where the needed arguments are stored, we can declare variables to hold them. Declare query to store the text to search for, and filename to store the file name:
#![allow(unused)]
fn main() {
let query = &args[1];
let filename = &args[2];
}This works, but if the user enters too few arguments and the index is out of bounds, Rust will panic and stop the program. Of course, you can also combine match with get:
#![allow(unused)]
fn main() {
let query = match args.get(1) {
Some(arg) => arg,
None => panic!("No query provided"),
};
let filename = match args.get(2) {
Some(arg) => arg,
None => panic!("No file name provided"),
};
}We will use the first approach here.
Then print the two variables so the user can confirm the input:
#![allow(unused)]
fn main() {
println!("search for {}", query);
println!("In file {}", filename);
}12.1.3 The Full Code
Here is all the code written up to this article:
use std::env;
fn main() {
let args:Vec<String> = env::args().collect();
let query = &args[1];
let filename = &args[2];
println!("search for {}", query);
println!("In file {}", filename);
}12.1 Read Files
12.2.0 Before We Begin
In Chapter 12, we will build a real project: a command-line program. This program is a grep (Global Regular Expression Print), a tool for global regular-expression search and output. Its job is to search for the specified text in the specified file.
This project has several steps:
- Receive command-line arguments
- Read files (this article)
- Refactor: improve modules and error handling
- Use TDD (test-driven development) to develop library functionality
- Use environment variables
- Write error messages to standard error instead of standard output
12.2.2 Review
Here is all the code written up to the previous article:
use std::env;
fn main() {
let args:Vec<String> = env::args().collect();
let query = &args[1];
let filename = &args[2];
println!("search for {}", query);
println!("In file {}", filename);
}At this point, the code handles reading the user’s command-line input. Next we need to read the file based on that input.
12.2.3 Reading a File
To read a file, we need to import std::fs, which handles file-related operations:
#![allow(unused)]
fn main() {
use std::fs;
}Next, read the file using filename:
#![allow(unused)]
fn main() {
let contents = fs::read_to_string(filename);
}Reading can fail, so the return value is not the contents directly but a Result enum. For that enum, you can use expect to unwrap it. The argument to expect is the error message to print if something goes wrong (expect is covered in detail in 9.2. Result Enum and Recoverable Errors Pt. 1).
#![allow(unused)]
fn main() {
let contents = fs::read_to_string(filename)
.expect("Something went wrong while reading the file");// line break here is only to keep the line short
}If the file is read successfully, print the contents:
#![allow(unused)]
fn main() {
println!("With text:\n{}", contents);
}12.2.4 Testing the Code
At this point, we can test the code.
Here is all the code written so far:
use std::env;
use std::fs;
fn main() {
let args:Vec<String> = env::args().collect();
let query = &args[1];
let filename = &args[2];
println!("search for {}", query);
println!("In file {}", filename);
let contents = fs::read_to_string(filename)
.expect("Something went wrong while reading the file");// line break here is only to keep the line short
println!("With text:\n{}", contents);
}First, create a .txt file in the project directory. You can name it whatever you like; I used poem.txt. Put some text in it, for example:
I'm nobody! Who are you?
Are you nobody, too?
Then there's a pair of us - don't tell!
They'd banish us, you know.
How dreary to be somebody!
How public, like a frog
To tell your name the livelong day
To an admiring bog!
Then run the command:
cargo run -- the poem.txt
- The
--separates Cargo command arguments from program arguments. It tells Cargo that what follows is not a Cargo option or argument, but an argument passed to the program. It is not read or stored. theis the text to search for and is stored inquerypoem.txtis the file name and is stored infilename
Output:
$ cargo run -- the poem.txt
Compiling minigrep v0.1.0 (file:///projects/minigrep)
Finished `dev` profile [unoptimized +debuginfo] target(s) in 0.0s
Running `target/debug/minigrep the poem.txt`
Searching for the
In file poem.txt
With text:
I'm nobody! Who are you?
Are you nobody, too?
Then there's a pair of us - don't tell!
They'd banish us, you know.
How dreary to be somebody!
How public, like a frog
To tell your name the livelong day
To an admiring bog!
No problems.
12.3 Refactoring Pt.1 - Improving Modularity
12.3.0 Before We Begin
In Chapter 12, we will build a real project: a command-line program. This program is a grep (Global Regular Expression Print), a tool for global regular-expression search and output. Its job is to search for the specified text in the specified file.
This project has several steps:
- Receive command-line arguments
- Read files
- Refactor: improve modules and error handling (this article)
- Use TDD (test-driven development) to develop library functionality
- Use environment variables
- Write error messages to standard error instead of standard output
12.3.1 Why Refactor
The purpose of refactoring is to improve modularity and error handling.
Here is all the code written up to the previous article:
use std::env;
use std::fs;
fn main() {
let args:Vec<String> = env::args().collect();
let query = &args[1];
let filename = &args[2];
println!("search for {}", query);
println!("In file {}", filename);
let contents = fs::read_to_string(filename)
.expect("Something went wrong while reading the file");
println!("With text:\n{}", contents);
}This code has four problems:
-
The
mainfunction is doing too much. It handles command-line parsing and file reading. The guiding principle of program design is that each function should handle only one responsibility, so the function should be split up. -
The variables
queryandfilenamestore program configuration, whilecontentsstores file contents. As code and variables accumulate, it becomes harder to track what each variable actually means. These values should be stored in a struct. -
File-reading errors are handled with
expect, which always prints an error message and panics no matter what went wrong. That is not ideal, because a file read failure might mean the file does not exist, or it might be a permissions problem. The panic message"Something went wrong while reading the file"does not help the user diagnose the issue. -
If
expectis used throughout the program, users will see error messages coming from Rust internals, such as"Index out of bounds", which makes it hard to understand what actually caused the problem. It is better to centralize error handling so future maintainers only need to consider one place when changing the logic, and so the error messages shown to users are understandable.
12.3.2 A Guiding Principle for Separating Concerns in Binary Programs
Many Rust binary projects run into the same organizational problem: they put too much functionality and too many responsibilities into main. The Rust community has a guiding principle for separating concerns in binary programs:
- Split the program into
main.rsandlib.rs, and put business logic inlib.rs - If the logic is small, keeping it in
main.rsis fine - As the logic becomes more complex, extract it from
main.rsintolib.rs
After this split, the responsibilities that should remain in main in this example are:
- Call the command-line parsing logic using the argument values
- Perform other configuration
- Call the
runfunction inlib.rs - Handle any problems that
runmay return
12.3.3 Separating Logic
Take another look at the code:
use std::env;
use std::fs;
fn main() {
let args:Vec<String> = env::args().collect();
let query = &args[1];
let filename = &args[2];
println!("search for {}", query);
println!("In file {}", filename);
let contents = fs::read_to_string(filename)
.expect("Something went wrong while reading the file");
println!("With text:\n{}", contents);
}First, extract the command-line argument handling:
#![allow(unused)]
fn main() {
fn parse_config(args: &[String]) -> (&str, &str) {
let query = &args[1];
let filename = &args[2];
(query, filename)
}
}&[String]means a slice of aVectorwhose elements areString- There is no need to print
queryandfilenamehere, so that part is removed
Then change main to call parse_config:
fn main() {
let args:Vec<String> = env::args().collect();
let (query, filename) = parse_config(&args);
let contents = fs::read_to_string(filename)
.expect("Something went wrong while reading the file");
println!("With text:\n{}", contents);
}12.3.4 Using a Struct
parse_config returns query and filename together as a tuple, and then main splits those two tuple values back into two variables. This back-and-forth splitting and combining shows that the abstraction in the program is not ideal.
query and filename are both part of the configuration and are related to each other, so putting them in a tuple does not express that relationship well enough. A struct is a better fit:
struct Config {
query: String,
filename: String,
}
fn main() {
let args:Vec<String> = env::args().collect();
let config = parse_config(&args);
let contents = fs::read_to_string(config.filename)
.expect("Something went wrong while reading the file");
println!("With text:\n{}", contents);
}
fn parse_config(args: &[String]) -> Config {
let query = args[1].clone();
let filename = args[2].clone();
Config {
query,
filename,
}
}In parse_config, pay attention to the types of query and filename: the parameter args has type &[String], which is a reference and therefore does not own the data, so query and filename are also references. But Config expects String, not &String, so we need to clone to gain ownership and convert &String into String.
Cloning uses more time and memory than storing references directly, but it saves us from dealing with lifetimes and makes the code more direct and simpler. In some scenarios, giving up a bit of performance in exchange for simplicity is well worth considering.
Of course, using String::from to wrap the values also works:
#![allow(unused)]
fn main() {
fn parse_config(args: &[String]) -> Config {
let query = &args[1];
let filename = &args[2];
Config {
query: String::from(query),
filename: String::from(filename),
}
}
}There are other valid ways to write this code too, but here I will use the cloning approach.
12.3.5 Turning a Function Into a Struct Method
Since parse_config creates a Config instance, it is effectively a constructor. A constructor can be written like this:
#![allow(unused)]
fn main() {
impl Config {
fn new(args: &[String]) -> Config {
let query = args[1].clone();
let filename = args[2].clone();
Config {
query,
filename,
}
}
}
}Just place this function on the Config implementation block (for details on methods, see 5.3. Methods on Structs). I also renamed parse_config to new, because I am treating it as a constructor (constructors are usually named new).
After this change, main also needs to be updated:
#![allow(unused)]
fn main() {
let config = Config::new(&args);
}12.3.5 The Full Code
Here is all the code written up to this article:
use std::env;
use std::fs;
struct Config {
query: String,
filename: String,
}
fn main() {
let args:Vec<String> = env::args().collect();
let config = Config::new(&args);
let contents = fs::read_to_string(config.filename)
.expect("Something went wrong while reading the file");
println!("With text:\n{}", contents);
}
impl Config {
fn new(args: &[String]) -> Config {
let query = args[1].clone();
let filename = args[2].clone();
Config {
query,
filename,
}
}
}12.4 Refactoring Pt.2 - Error Handling
12.4.0 Before We Begin
In Chapter 12, we will build a real project: a command-line program. This program is a grep (Global Regular Expression Print), a tool for global regular-expression search and output. Its job is to search for the specified text in the specified file.
This project has several steps:
- Receive command-line arguments
- Read files
- Refactor: improve modules and error handling (this article)
- Use TDD (test-driven development) to develop library functionality
- Use environment variables
- Write error messages to standard error instead of standard output
12.4.1 Review
In the previous section, to improve modularity, we created a struct for the variables and moved the argument-parsing function into a method on that struct. Here is all the code written up to the previous article:
use std::env;
use std::fs;
struct Config {
query: String,
filename: String,
}
fn main() {
let args:Vec<String> = env::args().collect();
let config = Config::new(&args);
let contents = fs::read_to_string(config.filename)
.expect("Something went wrong while reading the file");
println!("With text:\n{}", contents);
}
impl Config {
fn new(args: &[String]) -> Config {
let query = args[1].clone();
let filename = args[2].clone();
Config {
query,
filename,
}
}
}12.4.2 Unexpected Input
The program works correctly only when the user provides valid input. Let’s try running it without arguments:
$ cargo run
Compiling minigrep v0.1.0 (file:///projects/minigrep)
Finished `dev` profile [unoptimized + debuginfo] target(s) in 0.0s
Running `target/debug/minigrep`
thread 'main' panicked at src/main.rs:27:21:
index out of bounds: the len is 1 but the index is 1
note: run with `RUST_BACKTRACE=1` environment variable to display a backtrace
It reports Index out of bounds. As the programmer, we know this is because there were not enough arguments, so the program went out of bounds when using an index to fetch them. But a user cannot understand this error message, so they cannot correct the mistake.
What this article will do is make the program’s error messages easier to understand.
12.4.3 Specifying Error Messages
The way to help users understand the error is to provide our own error message. In the previous example, the panic happened when Config::new tried to access an out-of-bounds index, so let’s modify that part:
#![allow(unused)]
fn main() {
impl Config {
fn new(args: &[String]) -> Config {
if args.len() < 3 {
panic!("Not enough arguments");
}
let query = args[1].clone();
let filename = args[2].clone();
Config {
query,
filename,
}
}
}
}If args contains fewer than three elements, panic and print "Not enough arguments" to tell the user that too few arguments were provided.
Try running it without arguments again:
$ cargo run
Compiling minigrep v0.1.0 (file:///projects/minigrep)
Finished `dev` profile [unoptimized +debuginfo] target(s) in 0.0s
Running `target/debug/minigrep`
thread 'main' panicked at src/main.rs:26:13:
not enough arguments
note: run with `RUST_BACKTRACE=1` environment variable to display a backtrace
This error message is much better than the previous one.
However, some extra information is still shown, such as thread 'main' panicked at src/main.rs:26:13: and note: run with RUST_BACKTRACE=1 environment variable to display a backtrace. Those are for programmers, not for users, so they should be removed too.
12.4.4 Using the Result Type
panic! is appropriate when the program itself has a bug. But here, the problem is that the program was used incorrectly because there were too few arguments. For this kind of problem, using Result to propagate the error is the best choice (see 9.2. Result Enum and Recoverable Errors Pt. 1 and Pt. 2 for details):
#![allow(unused)]
fn main() {
impl Config {
fn new(args: &[String]) -> Result<Config, &'static str> {
if args.len() < 3 {
return Err("Not enough arguments");
}
let query = args[1].clone();
let filename = args[2].clone();
Ok(Config { query, filename})
}
}
}- Error information must be wrapped in
Err, and successful return values must be wrapped inOk. - The
Okvariant ofResultreturns aConfiginstance, whileErrreturns an&strstring literal. However, the compiler does not know where that&strcomes from or how long its lifetime is, so we need a lifetime annotation. We want it to remain valid for the entire program run, so we write it as&'static str, the static lifetime.
Since the return type of new has changed, the code in main that receives its value must also change:
#![allow(unused)]
fn main() {
let config = Config::new(&args).unwrap_or_else(|err| {
println!("Problem parsing arguments: {}", err);
process::exit(1);
});
}The unwrap_or_else method accepts a Result. If it is Ok, it returns the value inside Ok, similar to unwrap. If it is Err, the method calls a closure.
A closure is an anonymous function that we define and pass as an argument to unwrap_or_else. Its syntax uses two pipes ||, with a variable name in the middle as the parameter. Here it is err, which can be used inside the closure body, such as when printing the error.
Then we use process::exit from the standard library. Remember to import it first with use std::process;. Calling exit terminates the program immediately, and its argument, 1 in the example, becomes the program’s exit status code. This means that after println!("Problem parsing arguments: {}", err);, the program stops, so there is no thread 'main' panicked at src/main.rs:26:13: or backtrace note.
Try it:
$ cargo run
Compiling minigrep v0.1.0 (file:///projects/minigrep)
Finished `dev` profile [unoptimized +debuginfo] target(s) in 0.48s
Running `target/debug/minigrep`
Problem parsing arguments: not enough arguments
The concept of closures will be covered in the next chapter, so it is fine if this does not make complete sense yet; a rough understanding is enough here.
12.4.5 The Full Code
Here is all the code written up to this article:
use std::env;
use std::fs;
use std::process;
struct Config {
query: String,
filename: String,
}
fn main() {
let args:Vec<String> = env::args().collect();
let config = Config::new(&args).unwrap_or_else(|err| {
println!("Problem parsing arguments: {}", err);
process::exit(1);
});
let contents = fs::read_to_string(config.filename)
.expect("Something went wrong while reading the file");
println!("With text:\n{}", contents);
}
impl Config {
fn new(args: &[String]) -> Result<Config, &'static str> {
if args.len() < 3 {
return Err("Not enough arguments");
}
let query = args[1].clone();
let filename = args[2].clone();
Ok(Config { query, filename})
}
}12.5 Refactoring Pt.3 - Moving Business Logic
12.5.0 Before We Begin
In Chapter 12, we will build a real project: a command-line program. This program is a grep (Global Regular Expression Print), a tool for global regular-expression search and output. Its job is to search for the specified text in the specified file.
This project has several steps:
- Receive command-line arguments
- Read files
- Refactor: improve modules and error handling (this article)
- Use TDD (test-driven development) to develop library functionality
- Use environment variables
- Write error messages to standard error instead of standard output
12.5.1 Review
The previous two articles completed modularization optimization and error handling. In this article, we will do further optimization on that basis.
Here is all the code written up to the previous article:
use std::env;
use std::fs;
use std::process;
struct Config {
query: String,
filename: String,
}
fn main() {
let args:Vec<String> = env::args().collect();
let config = Config::new(&args).unwrap_or_else(|err| {
println!("Problem parsing arguments: {}", err);
process::exit(1);
});
let contents = fs::read_to_string(config.filename)
.expect("Something went wrong while reading the file");
println!("With text:\n{}", contents);
}
impl Config {
fn new(args: &[String]) -> Result<Config, &'static str> {
if args.len() < 3 {
return Err("Not enough arguments");
}
let query = args[1].clone();
let filename = args[2].clone();
Ok(Config { query, filename})
}
}12.5.2 Extracting Logic from main
As discussed in 12.3. Refactoring Pt. 1, we follow the guiding principle for separating concerns in binary programs:
- Split the program into
main.rsandlib.rs, and put business logic inlib.rs - If the logic is small, keeping it in
main.rsis fine - As the logic becomes more complex, extract it from
main.rsintolib.rs
According to that principle, everything in main except configuration parsing and error handling should be extracted into a run function. That keeps main small enough that we can verify correctness just by reading it, while the rest of the logic can be verified through tests (see Chapter 11 for tests).
For the code we have so far, the run function should be:
#![allow(unused)]
fn main() {
fn run(config: Config) {
let contents = fs::read_to_string(config.filename)
.expect("Something went wrong while reading the file");
println!("With text:\n{}", contents);
}
}main should also call run:
fn main() {
let args:Vec<String> = env::args().collect();
let config = Config::new(&args).unwrap_or_else(|err| {
println!("Problem parsing arguments: {}", err);
process::exit(1);
});
run(config);
}12.5.3 Improving Error Handling in run
Right now, run uses expect for file-reading errors. That kind of error handling calls panic!. What we want instead is to propagate errors with Result, just like Config::new:
#![allow(unused)]
fn main() {
fn run(config: Config) -> Result<(), Box<dyn Error>> {
let contents = fs::read_to_string(config.filename)?;
println!("With text:\n{}", contents);
Ok(())
}
}-
The
Okvariant ofResultcorresponds to(), the unit type. This type means “nothing is returned” or “there is nothing here,” which is fine becauserundoes not need to return anything on success. The final lineOk(())returnsOkwith a unit value. -
The
Errvariant ofResultisBox<dyn Error>. You do not need to understand it in depth yet; just know that it represents any type that implements thestd::error::Errortrait (here I wrote justErrorbecause I imported it withuse std::error::Error;). This means different error types can be returned in different situations.dynis short for dynamic. -
The
?symbol was explained in detail in 9.3. Result Enum and Recoverable Errors Pt. 2. Briefly,read_to_stringreturns aResult. Adding?means that ifread_to_stringreturnsOk, the value insideOkis returned and assigned to the variable; if it returnsErr, the function terminates immediately and returns theErrand its attached error information. In other words,?is equivalent to:
#![allow(unused)]
fn main() {
let contents = match fs::read_to_string(config.filename){
Ok(contents) => contents,
Err(e) => return Err(e),
};
}With this change, the error is propagated to the caller, which is main, so main must handle the error:
fn main() {
let args:Vec<String> = env::args().collect();
let config = Config::new(&args).unwrap_or_else(|err| {
println!("Problem parsing arguments: {}", err);
process::exit(1);
});
if let Err(e) = run(config) {
println!("Application error: {}", e);
process::exit(1);
}
}The if let used here is syntactic sugar for match; think of it as a match that handles only one branch. See 6.4. Simple Control Flow - If Let for details. Note that if let and if are not the same thing, so do not confuse them.
12.5.4 Moving the Business Logic
Now that all the functions and error handling are separated, the next step is to move them into lib.rs.
The things to move are these functions, structs, and related imports.
The result after moving them (lib.rs) is:
#![allow(unused)]
fn main() {
use std::error::Error;
use std::fs;
pub struct Config {
pub query: String,
pub filename: String,
}
impl Config {
pub fn new(args: &[String]) -> Result<Config, &'static str> {
if args.len() < 3 {
return Err("Not enough arguments");
}
let query = args[1].clone();
let filename = args[2].clone();
Ok(Config { query, filename})
}
}
pub fn run(config: Config) -> Result<(), Box<dyn Error>> {
let contents = fs::read_to_string(config.filename)?;
println!("With text:\n{}", contents);
Ok(())
}
}Note: all structs, methods on structs, and functions used by main.rs must be marked pub so they can be called.
Now look at main.rs:
use std::env;
use std::process;
use minigrep::Config;
fn main() {
let args:Vec<String> = env::args().collect();
let config = Config::new(&args).unwrap_or_else(|err| {
println!("Problem parsing arguments: {}", err);
process::exit(1);
});
if let Err(e) = minigrep::run(config) {
println!("Application error: {}", e);
process::exit(1);
}
}All refactoring tasks are complete. The next step is to write tests (the next article).
12.6 Developing Library Functionality with TDD
12.6.0 Before We Begin
In Chapter 12, we will build a real project: a command-line program. This program is a grep (Global Regular Expression Print), a tool for global regular-expression search and output. Its job is to search for the specified text in the specified file.
This project has several steps:
- Receive command-line arguments
- Read files
- Refactor: improve modules and error handling
- Use TDD (test-driven development) to develop library functionality (this article)
- Use environment variables
- Write error messages to standard error instead of standard output
12.6.1 Review
Here is all the code written up to the previous article.
lib.rs:
#![allow(unused)]
fn main() {
use std::error::Error;
use std::fs;
pub struct Config {
pub query: String,
pub filename: String,
}
impl Config {
pub fn new(args: &[String]) -> Result<Config, &'static str> {
if args.len() < 3 {
return Err("Not enough arguments");
}
let query = args[1].clone();
let filename = args[2].clone();
Ok(Config { query, filename})
}
}
pub fn run(config: Config) -> Result<(), Box<dyn Error>> {
let contents = fs::read_to_string(config.filename)?;
println!("With text:\n{}", contents);
Ok(())
}
}main.rs:
use std::env;
use std::process;
use minigrep::Config;
fn main() {
let args:Vec<String> = env::args().collect();
let config = Config::new(&args).unwrap_or_else(|err| {
println!("Problem parsing arguments: {}", err);
process::exit(1);
});
if let Err(e) = minigrep::run(config) {
println!("Application error: {}", e);
process::exit(1);
}
}In the previous sections, we moved the business logic into lib.rs. That helps a lot with writing tests, because the logic in lib.rs can be called directly with different parameters without running the program from the command line, and we can verify its return values. In other words, we can test the business logic directly.
12.6.2 What Is Test-Driven Development?
TDD stands for Test-Driven Development. It usually follows these steps:
- Write a failing test, run it, and make sure it fails for the expected reason
- Write or modify just enough code to make the new test pass
- Refactor the code you just added or changed to make sure the tests still pass
- Return to step 1 and continue
TDD is just one of many software development methods, but it can guide and help code design. Writing tests first and then writing code to pass those tests also helps maintain a high level of test coverage during development.
In this article, we will use TDD to implement the search logic: search for the specified string in the file contents and put the matching lines into a list. This function will be named search.
12.6.3 Modifying the Code
Follow the TDD steps:
1. Write a Failing Test
First, write a test module in lib.rs:
#![allow(unused)]
fn main() {
#[cfg(test)]
mod tests {
use super::*;
#[test]
fn one_result() {
let query = "duct";
let contents = "\
Rust:
safe, fast, productive.
Pick three.";
assert_eq!(vec!["safe, fast, productive."],search(query, contents));
}
}
}That is, because "duct" stored in query appears in the line "safe, fast, productive.", the return value should be a Vector whose element type is String, and it should contain only one element: "safe, fast, productive.".
The return value is a Vector because search is expected to handle multiple matching results. Of course, this particular test can only have one result, which is why the test is named one_result.
After writing the test module, write the search function:
#![allow(unused)]
fn main() {
pub fn search<'a>(query: &str, contents: &'a str) -> Vec<&'a str> {
vec![]
}
}- To make the function callable from outside, it must be declared
pub. - The function needs lifetime annotations because it has more than one non-
selfparameter, so Rust cannot tell which parameter’s lifetime matches the return value. - The elements in the returned
Vectorare string slices taken fromcontents, so the return value should have the same lifetime ascontents. That is why both are annotated with the same lifetime'a, whilequerydoes not need a lifetime annotation. - The function body only needs to compile, because the first step of TDD is to write a failing test. Failure is the desired outcome right now.
The test will fail, and that is exactly what we want in the first step of TDD.
2. Write Just Enough Code for the New Test to Pass
The code for search_case_insensitive is very similar to search; we only need a few changes. The logic is simple: convert both the query and the text to lowercase.
#![allow(unused)]
fn main() {
pub fn search_case_insensitive<'a>(query: &str, contents: &'a str) -> Vec<&'a str> {
let mut results = Vec::new();
let query = query.to_lowercase();
for line in contents.to_lowercase().lines() {
if line.contains(&query) {
results.push(line);
}
}
results
}
}- The
to_lowercasemethod converts a string to lowercase. - The result of
to_lowercaseis aString, which owns its data. That means the newqueryis aString, not a&str. In theifinside the loop, we use&querybecausecontainsdoes not acceptString, so we must pass a reference.
Run the tests again:
$ cargo test
Compiling minigrep v0.1.0 (file:///projects/minigrep)
Finished `test` profile [unoptimized +debuginfo] target(s) in 1.33s
Running unittests src/lib.rs (target/debug/deps/minigrep-9cd200e5fac0fc94)
running 2 tests
test tests::case_insensitive ... ok
test tests::case_sensitive ... ok
test result: ok. 2 passed; 0 failed; 0 ignored; 0 measured; 0 filtered out; finished in 0.00s
Running unittests src/main.rs (target/debug/deps/minigrep-9cd200e5fac0fc94)
running 0 tests
test result: ok. 0 passed; 0 failed; 0 ignored; 0 measured; 0 filtered out; finished in 0.00s
Doc-tests minigrep
running 0 tests
test result: ok. 0 passed; 0 failed; 0 ignored; 0 measured; 0 filtered out; finished in 0.00s
Both tests pass.
3. Use This Function in run
Now that the function works, we can call it from run.
But first, we need to add a field to the Config struct to decide whether to use the normal search or the case-insensitive search_case_insensitive:
#![allow(unused)]
fn main() {
pub struct Config {
pub query: String,
pub filename: String,
pub case_sensitive: bool,
}
}Update run so it checks the configuration:
#![allow(unused)]
fn main() {
pub fn run(config: Config) -> Result<(), Box<dyn Error>> {
let contents = fs::read_to_string(config.filename)?;
let results = if config.case_sensitive {
search(&config.query, &contents)
} else {
search_case_insensitive(&config.query, &contents)
};
for line in results {
println!("{}", line);
}
Ok(())
}
}The new constructor on Config also needs to change, and it should set case_sensitive based on an environment variable:
#![allow(unused)]
fn main() {
impl Config {
pub fn new(args: &[String]) -> Result<Config, &'static str> {
if args.len() < 3 {
return Err("Not enough arguments");
}
let query = args[1].clone();
let filename = args[2].clone();
let case_sensitive = std::env::var("CASE_INSENSITIVE").is_err();
Ok(Config { query, filename, case_sensitive})
}
}
}This uses std::env::var (you can also import std::env first and then use env::var). Its argument is the name of the environment variable, usually written in all caps. Here I use CASE_INSENSITIVE, which means “case-insensitive.” If this environment variable exists, we treat the search as case-insensitive; if it does not exist, we treat it as case-sensitive.
std::env::var returns a Result. If CASE_INSENSITIVE is set, it returns Ok(String) containing the variable’s value; otherwise it returns Err(std::env::VarError).
The is_err method is chained after std::env::var. If the result is Err, it returns true and assigns true to case_sensitive; otherwise it assigns false.
12.6.3 The Full Code and a Trial Run
Here is all the code written so far.
lib.rs:
#![allow(unused)]
fn main() {
use std::error::Error;
use std::fs;
pub struct Config {
pub query: String,
pub filename: String,
pub case_sensitive: bool,
}
impl Config {
}12.7 Using Environment Variables
12.7.0 Before We Begin
Chapter 12 builds a sample project: a command-line program. The program is grep (Global Regular Expression Print), a tool for global regular-expression searching and output. Its function is to search for specified text in a specified file.
This project is divided into these steps:
- Receiving command-line arguments
- Reading files
- Refactoring: improving modules and error handling
- Using TDD (test-driven development) to develop library functionality
- Using environment variables (this article)
- Writing error messages to standard error instead of standard output
12.7.1 Review
Here is all the code written up to the previous article.
lib.rs:
#![allow(unused)]
fn main() {
use std::error::Error;
use std::fs;
pub struct Config {
pub query: String,
pub filename: String,
}
impl Config {
pub fn new(args: &[String]) -> Result<Config, &'static str> {
if args.len() < 3 {
return Err("Not enough arguments");
}
let query = args[1].clone();
let filename = args[2].clone();
Ok(Config {
query,
filename,
})
}
}
pub fn run(config: Config) -> Result<(), Box<dyn Error>> {
let contents = fs::read_to_string(config.filename)?;
for line in search(&config.query, &contents) {
println!("{}", line);
}
Ok(())
}
pub fn search<'a>(query: &str, contents: &'a str) -> Vec<&'a str> {
let mut results = Vec::new();
for line in contents.lines() {
if line.contains(query) {
results.push(line);
}
}
results
}
#[cfg(test)]
mod tests {
use super::*;
#[test]
fn one_result() {
let query = "duct";
let contents = "\
Rust:
safe, fast, productive.
Pick three.";
assert_eq!(vec!["safe, fast, productive."], search(query, contents));
}
}
}main.rs:
use std::env;
use std::process;
use minigrep::Config;
fn main() {
let args: Vec<String> = env::args().collect();
let config = Config::new(&args).unwrap_or_else(|err| {
println!("Problem parsing arguments: {}", err);
process::exit(1);
});
if let Err(e) = minigrep::run(config) {
println!("Application error: {}", e);
process::exit(1);
}
}In these earlier sections, we completed the move of the business logic into lib.rs. That is very helpful for writing tests, because the logic in lib.rs can be called directly with different arguments without running the program from the command line, and its return values can be checked. In other words, we can test the business logic directly.
12.7.2 What Is TDD?
TDD is short for Test-Driven Development, and it usually follows these steps:
- Write a failing test, run it, and make sure it fails for the expected reason
- Write or modify just enough code to make the new test pass
- Refactor the code you just added or changed, and make sure the tests still pass
- Return to step 1 and continue
TDD is only one of many software development methods, but it can guide and support code design. Writing tests first and then writing code that passes them also helps maintain a high level of test coverage during development.
In this article, we will use TDD to implement the search logic for the program: search for a specified string in the file contents and put the matching lines into a list. This function will be called search_case_insensitive.
12.7.3 Write a Failing Test
Let’s start by naming the case-insensitive function search_case_insensitive.
First, modify the test module so that it contains a case-sensitive test and a case-insensitive test:
#![allow(unused)]
fn main() {
#[cfg(test)]
mod tests {
use super::*;
#[test]
fn case_sensitive() {
let query = "duct";
let contents = "\
Rust:
safe, fast, productive.
Pick three.
Duct tape.";
assert_eq!(vec!["safe, fast, productive."], search(query, contents));
}
#[test]
fn case_insensitive() {
let query = "rUsT";
let contents = "\
Rust:
safe, fast, productive.
Pick three.
Trust me.";
assert_eq!(
vec!["Rust:", "Trust me."],
search_case_insensitive(query, contents)
);
}
}
}Then write the body of search_case_insensitive:
#![allow(unused)]
fn main() {
pub fn search_case_insensitive<'a>(query: &str, contents: &'a str) -> Vec<&'a str> {
vec![]
}
}- To make this function callable from outside, it must be declared public with
pub - The function needs a lifetime annotation because it has multiple non-
selfparameters, and Rust cannot determine which parameter’s lifetime should match the lifetime of the return value - The elements in the returned
Vectorare string slices taken fromcontents, so the return value should have the same lifetime ascontents; that is why both are annotated with the same lifetime'a, whilequerydoes not need a lifetime annotation - The function body only needs to compile, because the first step of TDD is to write a test that fails, so failure is the desired outcome
At this point, running the tests will definitely fail, but that is fine. This is exactly what the first TDD step is supposed to produce.
12.7.4 Write or Modify Just Enough Code for the New Test to Pass
The code for search_case_insensitive is very similar to search, so only a few small changes are needed. The logic is simple: lowercase the query and compare it against lowercase versions of the text:
#![allow(unused)]
fn main() {
pub fn search_case_insensitive<'a>(query: &str, contents: &'a str) -> Vec<&'a str> {
let mut results = Vec::new();
let query = query.to_lowercase();
for line in contents.lines() {
if line.to_lowercase().contains(&query) {
results.push(line);
}
}
results
}
}- The
to_lowercasemethod converts a string to all lowercase - The result of
to_lowercaseis aString, so the newqueryis ownedStringrather than&str. Inside the loop, we use&querybecausecontainsdoes not acceptStringdirectly, so we pass a reference
Run the tests again:
$ cargo test
Compiling minigrep v0.1.0 (file:///projects/minigrep)
Finished `test` profile [unoptimized + debuginfo] target(s) in 1.33s
Running unittests src/lib.rs (target/debug/deps/minigrep-9cd200e5fac0fc94)
running 2 tests
test tests::case_insensitive ... ok
test tests::case_sensitive ... ok
test result: ok. 2 passed; 0 failed; 0 ignored; 0 measured; 0 filtered out; finished in 0.00s
Running unittests src/main.rs (target/debug/deps/minigrep-9cd200e5fac0fc94)
running 0 tests
test result: ok. 0 passed; 0 failed; 0 ignored; 0 measured; 0 filtered out; finished in 0.00s
Doc-tests minigrep
running 0 tests
test result: ok. 0 passed; 0 failed; 0 ignored; 0 measured; 0 filtered out; finished in 0.00s
Both tests pass.
12.7.5 Use This Function in run
Now that the function works, we can call it in run.
First, add a field to the Config struct so it can decide whether to use the normal search or the case-insensitive search_case_insensitive:
#![allow(unused)]
fn main() {
pub struct Config {
pub query: String,
pub filename: String,
pub case_sensitive: bool,
}
}Modify run so it checks the configuration:
#![allow(unused)]
fn main() {
pub fn run(config: Config) -> Result<(), Box<dyn Error>> {
let contents = fs::read_to_string(config.filename)?;
let results = if config.case_sensitive {
search(&config.query, &contents)
} else {
search_case_insensitive(&config.query, &contents)
};
for line in results {
println!("{}", line);
}
Ok(())
}
}The new constructor on Config also needs to change so it assigns case_sensitive based on the environment variable:
#![allow(unused)]
fn main() {
impl Config {
pub fn new(args: &[String]) -> Result<Config, &'static str> {
if args.len() < 3 {
return Err("Not enough arguments");
}
let query = args[1].clone();
let filename = args[2].clone();
let case_sensitive = std::env::var("IGNORE_CASE").is_err();
Ok(Config {
query,
filename,
case_sensitive,
})
}
}
}Here we use std::env::var (of course, you could also bring std::env into scope first and then use env::var). Its argument is the name of the environment variable, which conventionally is all uppercase. Here I use IGNORE_CASE, which means case-insensitive. If this environment variable is present, the search is treated as case-insensitive; if it is absent, the search is case-sensitive.
std::env::var returns a Result. If the IGNORE_CASE environment variable is set, it returns Ok(String) containing the variable’s value; otherwise it returns Err(std::env::VarError).
After std::env::var, we call is_err. If is_err sees the Err variant, it returns true, which is assigned to case_sensitive; otherwise it assigns false.
PS: honestly, writing this little program in such a rigid way is also a teaching necessity. Halfway through, I was already laughing at how much code there was. When you actually write it, there is no need to be this formal.
12.7.6 The Full Code and a Trial Run
After writing all that, here is the full code up to this point.
lib.rs:
#![allow(unused)]
fn main() {
use std::error::Error;
use std::fs;
pub struct Config {
pub query: String,
pub filename: String,
pub case_sensitive: bool,
}
impl Config {
pub fn new(args: &[String]) -> Result<Config, &'static str> {
if args.len() < 3 {
return Err("Not enough arguments");
}
let query = args[1].clone();
let filename = args[2].clone();
let case_sensitive = std::env::var("IGNORE_CASE").is_err();
Ok(Config {
query,
filename,
case_sensitive,
})
}
}
pub fn run(config: Config) -> Result<(), Box<dyn Error>> {
let contents = fs::read_to_string(config.filename)?;
let results = if config.case_sensitive {
search(&config.query, &contents)
} else {
search_case_insensitive(&config.query, &contents)
};
for line in results {
println!("{}", line);
}
Ok(())
}
pub fn search<'a>(query: &str, contents: &'a str) -> Vec<&'a str> {
let mut results = Vec::new();
for line in contents.lines() {
if line.contains(query) {
results.push(line);
}
}
results
}
pub fn search_case_insensitive<'a>(query: &str, contents: &'a str) -> Vec<&'a str> {
let mut results = Vec::new();
let query = query.to_lowercase();
for line in contents.lines() {
if line.to_lowercase().contains(&query) {
results.push(line);
}
}
results
}
#[cfg(test)]
mod tests {
use super::*;
#[test]
fn case_sensitive() {
let query = "duct";
let contents = "\
Rust:
safe, fast, productive.
Pick three.
Duct tape.";
assert_eq!(vec!["safe, fast, productive."], search(query, contents));
}
#[test]
fn case_insensitive() {
let query = "rUsT";
let contents = "\
Rust:
safe, fast, productive.
Pick three.
Trust me.";
assert_eq!(
vec!["Rust:", "Trust me."],
search_case_insensitive(query, contents)
);
}
}
}main.rs:
use std::env;
use std::process;
use minigrep::Config;
fn main() {
let args: Vec<String> = env::args().collect();
let config = Config::new(&args).unwrap_or_else(|err| {
println!("Problem parsing arguments: {}", err);
process::exit(1);
});
if let Err(e) = minigrep::run(config) {
println!("Application error: {}", e);
process::exit(1);
}
}Let’s try running it:
First, run the program without setting the environment variable and use the query to, which should match any line containing the lowercase word to:
$ cargo run -- to poem.txt
Compiling minigrep v0.1.0 (file:///projects/minigrep)
Finished `dev` profile [unoptimized + debuginfo] target(s) in 0.0s
Running `target/debug/minigrep to poem.txt`
Are you nobody, too?
How dreary to be somebody!
Now set IGNORE_CASE to 1 and keep everything else the same:
$ IGNORE_CASE=1 cargo run -- to poem.txt
You will get:
Are you nobody, too?
How dreary to be somebody!
To tell your name the livelong day
To an admiring bog!
There are no problems.
Note that if you are using powershell, you set an environment variable like this:
PS> $Env:IGNORE_CASE=1; cargo run -- to poem.txt
This keeps the environment variable available for the entire session. If you want to remove it, write:
PS> Remove-Item Env:IGNORE_CASE
12.8 Writing Error Messages to Standard Error
12.8.0 Before We Begin
Chapter 12 builds a sample project: a command-line program. The program is grep (Global Regular Expression Print), a tool for global regular-expression searching and output. Its function is to search for specified text in a specified file.
This project is divided into these steps:
- Receiving command-line arguments
- Reading files
- Refactoring: improving modules and error handling
- Using TDD (test-driven development) to develop library functionality
- Using environment variables
- Writing error messages to standard error instead of standard output (this article)
12.8.1 Review
Here is all the code written up to the previous article.
lib.rs:
#![allow(unused)]
fn main() {
use std::error::Error;
use std::fs;
pub struct Config {
pub query: String,
pub filename: String,
pub case_sensitive: bool,
}
impl Config {
pub fn new(args: &[String]) -> Result<Config, &'static str> {
if args.len() < 3 {
return Err("Not enough arguments");
}
let query = args[1].clone();
let filename = args[2].clone();
let case_sensitive = std::env::var("IGNORE_CASE").is_err();
Ok(Config {
query,
filename,
case_sensitive,
})
}
}
pub fn run(config: Config) -> Result<(), Box<dyn Error>> {
let contents = fs::read_to_string(config.filename)?;
let results = if config.case_sensitive {
search(&config.query, &contents)
} else {
search_case_insensitive(&config.query, &contents)
};
for line in results {
println!("{}", line);
}
Ok(())
}
pub fn search<'a>(query: &str, contents: &'a str) -> Vec<&'a str> {
let mut results = Vec::new();
for line in contents.lines() {
if line.contains(query) {
results.push(line);
}
}
results
}
pub fn search_case_insensitive<'a>(query: &str, contents: &'a str) -> Vec<&'a str> {
let mut results = Vec::new();
let query = query.to_lowercase();
for line in contents.lines() {
if line.to_lowercase().contains(&query) {
results.push(line);
}
}
results
}
#[cfg(test)]
mod tests {
use super::*;
#[test]
fn case_sensitive() {
let query = "duct";
let contents = "\
Rust:
safe, fast, productive.
Pick three.
Duct tape.";
assert_eq!(vec!["safe, fast, productive."], search(query, contents));
}
#[test]
fn case_insensitive() {
let query = "rUsT";
let contents = "\
Rust:
safe, fast, productive.
Pick three.
Trust me.";
assert_eq!(
vec!["Rust:", "Trust me."],
search_case_insensitive(query, contents)
);
}
}
}main.rs:
use std::env;
use std::process;
use minigrep::Config;
fn main() {
let args: Vec<String> = env::args().collect();
let config = Config::new(&args).unwrap_or_else(|err| {
println!("Problem parsing arguments: {}", err);
process::exit(1);
});
if let Err(e) = minigrep::run(config) {
println!("Application error: {}", e);
process::exit(1);
}
}12.8.2 Standard Output vs. Standard Error
The current code prints all information, including error messages, to the terminal. Most terminals provide two output streams: standard output (stdout) and standard error (stderr).
General information should go to standard output, while error messages should go to standard error. The advantage of this separation is that normal output can be redirected into a file while error messages still appear on the screen.
The println! macro can only print to standard output. The eprintln! macro can print to standard error.
Using the current code, run this command in the terminal:
cargo run > output.txt
This redirects output to output.txt, but the command does not include any arguments, so the program should error. Because the error messages are also written to standard output, they end up in output.txt.
A better approach is to print error messages to standard error, which keeps standard output clean and separate from errors.
12.8.3 Modifying the Code
Changing the code so that error messages go to standard error is quite simple. We only need to change all error printing from println! to eprintln!. Because all error handling is in main.rs, we only need a small change there, and lib.rs does not need to be modified at all:
use std::env;
use std::process;
use minigrep::Config;
fn main() {
let args: Vec<String> = env::args().collect();
let config = Config::new(&args).unwrap_or_else(|err| {
eprintln!("Problem parsing arguments: {}", err);
process::exit(1);
});
if let Err(e) = minigrep::run(config) {
eprintln!("Application error: {}", e);
process::exit(1);
}
}Now run the previous command again. It still has no arguments, so the program errors, but this time it will not put the error message into output.txt; instead, it will print directly in the terminal:
$ cargo run > output.txt
Problem parsing arguments: not enough arguments
Then try a normal run with arguments:
$ cargo run -- to poem.txt > output.txt
The output is redirected to output.txt. Open it:
Are you nobody, too?
How dreary to be somebody!
That is the result we want: errors are printed directly in the terminal, while normal output is redirected into the file.
13.1 What Is a Closure and How to Use Closures
13.1.0 Before We Begin
During its design, Rust drew inspiration from many languages, and functional programming had a particularly strong influence on Rust. Functional programming often includes passing functions as values to parameters, returning them from other functions, assigning them to variables for later execution, and so on.
In this chapter, we will discuss some Rust features that are similar to what many languages call functional features:
- Closures (this article)
- Iterators
- Improving the I/O Project with Closures and Iterators
- Performance of Closures and Iterators
13.1.1 What Is a Closure
In one sentence: a closure is an anonymous function that can capture values from its surrounding environment.
A closure has four characteristics:
- A closure is an anonymous function
- This anonymous function can be stored in a variable, passed as an argument to another function, or returned from another function
- You can create a closure in one place and call it in another context to do the work
- A closure can capture values from the scope in which it is defined
13.1.2 An Example of a Closure
To better demonstrate what closures can do, here is an example:
Build a program that generates a personalized workout plan based on factors such as a person’s body metrics. The algorithm itself is not the point; the important part is that it takes a few seconds to run. Our goal is to avoid unnecessary waiting for the user. More specifically, we want to call the algorithm only when necessary, and only once.
Take a look at the code:
use std::thread;
use std::time::Duration;
fn main() {
let simulated_user_specified_value = 10;
let simulated_random_number = 7;
generate_workout(
simulated_user_specified_value,
simulated_random_number,
);
}
fn simulated_expensive_calculation(intensity: u32) -> u32 {
println!("calculating slowly...");
thread::sleep(Duration::from_secs(2));
intensity
}
fn generate_workout(intensity: u32, random_number: u32) {
if intensity < 25 {
println!("Today, do {} pushups!", simulated_expensive_calculation(intensity));
println!("Next, do {} situps!", simulated_expensive_calculation(intensity));
} else {
if random_number == 3 {
println!("Take a break today! Remember to stay hydrated!");
} else {
println!("Today, run for {} minutes!", simulated_expensive_calculation(intensity));
}
}
}-
The
simulated_expensive_calculationfunction simulates that expensive algorithm, andthread::sleepsimulates the time required for the algorithm to finish. Since this is only a demo, the function simply returns theintensityparameter, which represents the user’s requested intensity. -
generate_workouthas two parameters:intensity, which represents the user’s requested workout intensity, andrandom_number, which represents a random number. The logic is: ifintensityis less than 25, printToday, do {} pushups!andNext, do {} situps!. The problem is that both lines call the relatively expensivesimulated_expensive_calculation. Ifintensityis greater than or equal to 25 and the random number is 3, printTake a break today! Remember to stay hydrated!and do not call the expensive function. If the random number is not 3, printToday, run for {} minutes!, which does callsimulated_expensive_calculation.
This function is correct as written, but it is too slow. Our goal is to avoid unnecessary waiting for the user. More specifically, we want to call the algorithm only when necessary, and only once.
First, look at the case in generate_workout where intensity is less than 25:
#![allow(unused)]
fn main() {
if intensity < 25 {
println!("Today, do {} pushups!", simulated_expensive_calculation(intensity));
println!("Next, do {} situps!", simulated_expensive_calculation(intensity));
}This prints Today, do {} pushups! and Next, do {} situps!. The problem is that both lines call the slow simulated_expensive_calculation. In fact, we only need to calculate the result once and reuse it in both outputs.
Let’s optimize this part. We only need to run the calculation once, store the result in a variable, and use that variable in the output, which avoids calling simulated_expensive_calculation twice:
#![allow(unused)]
fn main() {
fn generate_workout(intensity: u32, random_number: u32) {
let expensive_result = simulated_expensive_calculation(intensity);
if intensity < 25 {
println!("Today, do {} pushups!", expensive_result);
println!("Next, do {} situps!", expensive_result);
} else {
if random_number == 3 {
println!("Take a break today! Remember to stay hydrated!");
} else {
println!("Today, run for {} minutes!", expensive_result);
}
}
}
}Here I also replaced the intensity > 25 and random_number != 3 case with the variable expensive_result that stores the calculation result.
But this creates another problem:
#![allow(unused)]
fn main() {
if random_number == 3 {
println!("Take a break today! Remember to stay hydrated!");
}
}Here we do not need to call the expensive function, but because
#![allow(unused)]
fn main() {
let expensive_result = simulated_expensive_calculation(intensity);
}is executed at the start of the function, the calculation still runs even when the random number is 3. That is an unnecessary call.
This is where closures come in. Let’s rewrite this code with a closure:
#![allow(unused)]
fn main() {
fn generate_workout(intensity: u32, random_number: u32) {
let expensive_closure = |num| {
println!("calculating slowly...");
thread::sleep(Duration::from_secs(2));
num
};
if intensity < 25 {
println!("Today, do {} pushups!", expensive_closure(intensity));
println!("Next, do {} situps!", expensive_closure(intensity));
} else {
if random_number == 3 {
println!("Take a break today! Remember to stay hydrated!");
} else {
println!("Today, run for {} minutes!", expensive_closure(intensity));
}
}
}
}The closure is this part:
#![allow(unused)]
fn main() {
let expensive_closure = |num| {
println!("calculating slowly...");
thread::sleep(Duration::from_secs(2));
num
};
}-
The closure is assigned to the variable
expensive_closure. -
The closure needs parameters, and parameters are placed between the two pipe symbols
||. Here there is only one parameter,num, so we write|num|. If there are two parameters, separate them with a comma, such as|num1, num2|. If no parameters are needed, just write||. -
The parameter
numdoes not need an explicit type annotation because the argument passed in the later call isintensity, whose type isu32, so Rust infers thatnumis alsou32. -
The closure body is written inside
{}, just like any other function. Here we want this closure to do the same work as the expensive calculation function, so the body can be the same. At that point, thesimulated_expensive_calculationfunction can be removed. -
This closure definition only defines a function; it does not execute it. A function only runs when it sees
(), such asexpensive_closure(intensity).
With this version, when intensity is greater than 25 and random_number is not 3, the expensive calculation will not be called, so there is no unnecessary work. However, this still does not solve the problem of repeated closure calls. We will address that in the next article.
13.2 Closure Type Inference and Annotations
13.2.0 Before We Begin
During its design, Rust drew inspiration from many languages, and functional programming had a particularly strong influence on Rust. Functional programming often includes passing functions as values to parameters, returning them from other functions, assigning them to variables for later execution, and so on.
In this chapter, we will discuss some Rust features that are similar to what many languages call functional features:
- Closures (this article)
- Iterators
- Improving the I/O Project with Closures and Iterators
- Performance of Closures and Iterators
13.2.1 Type Inference for Closures
Unlike functions defined with fn, closures do not require explicit type annotations for parameters or return values.
Functions must be explicit because they are part of a public interface exposed to users, and a clearly defined interface helps everyone agree on the parameter and return types.
Closures are not used as exposed interfaces. They are usually stored in variables, they do not need names when used, and they are not exposed to users of our codebase. Therefore, closures do not require explicit type annotations for parameters and return values.
Closures are also usually short and work only in a narrow context, so the compiler can often infer the types. Of course, you can still write the annotations manually if you want to.
Take a look at an example: This is the version using a function definition:
#![allow(unused)]
fn main() {
fn simulated_expensive_calculation(intensity: u32) -> u32 {
println!("calculating slowly...");
thread::sleep(Duration::from_secs(2));
intensity
}
}This is the version using a closure:
#![allow(unused)]
fn main() {
let expensive_closure = |num:u32| -> u32 {
println!("calculating slowly...");
thread::sleep(Duration::from_secs(2));
num
};
}Explicit annotations are used here because there is no surrounding context for Rust to infer the types. If there is context, then they are not needed:
#![allow(unused)]
fn main() {
fn generate_workout(intensity: u32, random_number: u32) {
let expensive_closure = |num| {
println!("calculating slowly...");
thread::sleep(Duration::from_secs(2));
num
};
if intensity < 25 {
println!("Today, do {} pushups!", expensive_closure(intensity));
println!("Next, do {} situps!", expensive_closure(intensity));
} else {
if random_number == 3 {
println!("Take a break today! Remember to stay hydrated!");
} else {
println!("Today, run for {} minutes!", expensive_closure(intensity));
}
}
}
}The parameter num does not need an explicit type annotation because the argument passed in the later call is intensity, whose type is u32, so Rust infers that num is also u32.
13.2.2 Syntax for Function and Closure Definitions
Here are four examples:
#![allow(unused)]
fn main() {
fn add_one_v1 (x: u32) -> u32 { x + 1 }
let add_one_v2 = |x: u32| -> u32 { x + 1 };
let add_one_v3 = |x| { x + 1 };
let add_one_v4 = |x| x + 1 ;
}- The first is a function definition, with a function name, parameter names and types, and a return type
- The second is a closure definition, with parameter and return types. This closure looks very similar to a function definition.
- The third is also a closure, but its parameter and return types are not annotated, so the compiler has to infer them.
- The fourth closure differs from the third in that it does not use curly braces
{}. Because it contains only one expression, the braces can be omitted.
13.2.3 Type Inference for Closures
A closure’s definition will ultimately infer only one specific concrete type for its parameters and return value.
Take a look at an example:
#![allow(unused)]
fn main() {
let example_closure = |x| x;
let s = example_closure(String::from("hello"));
let n = example_closure(5);
}Output:
$ cargo run
Compiling closure-example v0.1.0 (file:///projects/closure-example)
error[E0308]: mismatched types
--> src/main.rs:5:29
|
5 | let n = example_closure(5);
| --------------- ^- help: try using a conversion method: `.to_string()`
| | |
| | expected `String`, found integer
| arguments to this function are incorrect
|
note: expected because the closure was earlier called with an argument of type `String`
--> src/main.rs:4:29
|
4 | let s = example_closure(String::from("hello"));
| --------------- ^^^^^^^^^^^^^^^^^^^^^ expected because this argument is of type `String`
| |
| in this closure call
note: closure parameter defined here
--> src/main.rs:2:28
|
2 | let example_closure = |x| x;
| ^
For more information about this error, try `rustc --explain E0308`.
error: could not compile `closure-example` (bin "closure-example") due to 1 previous error
When the compiler sees the first call to the closure, it determines that both the input and output values are String, so it locks in String as the parameter and return type for this closure. That is why a later call with an integer causes an error.
13.3 Storing Closures with Generic Parameters and Fn Traits
13.3.0 Before We Begin
During its design, Rust drew inspiration from many languages, and functional programming had a particularly strong influence on Rust. Functional programming often includes passing functions as values to parameters, returning them from other functions, assigning them to variables for later execution, and so on.
In this chapter, we will discuss some Rust features that are similar to what many languages call functional features:
- Closures (this article)
- Iterators
- Improving the I/O Project with Closures and Iterators
- Performance of Closures and Iterators
13.3.1 Review
Do you remember the example from 13.1?
Build a program that generates a personalized workout plan based on factors such as a person’s body metrics. The algorithm itself is not the point; the important part is that it takes a few seconds to run. Our goal is to avoid unnecessary waiting for the user. More specifically, we want to call the algorithm only when necessary, and only once.
At that time, we rewrote the code as:
use std::thread;
use std::time::Duration;
fn main() {
let simulated_user_specified_value = 10;
let simulated_random_number = 7;
generate_workout(
simulated_user_specified_value,
simulated_random_number,
);
}
fn generate_workout(intensity: u32, random_number: u32) {
let expensive_closure = |num| {
println!("calculating slowly...");
thread::sleep(Duration::from_secs(2));
num
};
if intensity < 25 {
println!("Today, do {} pushups!", expensive_closure(intensity));
println!("Next, do {} situps!", expensive_closure(intensity));
} else {
if random_number == 3 {
println!("Take a break today! Remember to stay hydrated!");
} else {
println!("Today, run for {} minutes!", expensive_closure(intensity));
}
}
}But there is still a problem: this does not solve the repeated-closure-call problem. When intensity is less than 25, the closure is called twice.
One possible solution is to assign the closure’s value to a local variable and let that local variable be reused by the output statements. The problem with that approach is that it introduces some code duplication.
So a better solution here is: create a struct that holds the closure and its call result. In other words, after the closure is called for the first time, store the result inside the closure holder; if the closure needs to be called again later, just use the cached result. The effect is that the closure runs only when the result is needed, and the result can be cached.
This pattern is usually called memoization or lazy evaluation.
13.3.2 Having a Struct Hold a Closure
Based on the solution above, the current problem is how to make a struct hold a closure.
A struct definition needs to know the type of every field, so if you want to store a closure inside a struct, you must specify the closure’s type.
Each closure instance has its own unique anonymous type. Even if two closures have exactly the same signature, they are still two different types. So storing closures requires generics and trait bounds. The content on generics and trait bounds is covered in 10.4. Trait Pt.2, which is worth a look.
13.3.3 Fn Trait
The Fn trait is provided by the standard library. Every closure implements at least one of the following Fn traits:
FnFnMutFnOnce
The differences among these three Fn traits will be covered in the next article. In this example, Fn is enough.
With that in mind, we can rewrite the example. First, create a struct:
#![allow(unused)]
fn main() {
struct Cache<T: Fn(u32) -> u32>
{
calculation: T,
value: Option<u32>,
}
}- This struct has a generic parameter
T. Since it represents the closure type, its bound is theFntrait (Fnis enough in this example), and because the parameter and return types areu32, we writeFn(u32) -> u32. - The field that stores the closure is
calculation, and its type isT. - The cached value is stored in the
valuefield. Its type isu32, but we do not yet know whether the value has been calculated and cached, so we wrap it inOption, which meansOption<u32>.
First, write a constructor on the struct to create instances:
#![allow(unused)]
fn main() {
impl<T: Fn(u32) -> u32> Cache<T> {
fn new(calculation: T) -> Cache<T> {
Cache {
calculation,
value: None,
}
}
}
}This looks a little messy, so we can rewrite it with a where clause:
#![allow(unused)]
fn main() {
impl<T> Cache<T>
where
T: Fn(u32) -> u32
{
fn new(calculation: T) -> Cache<T> {
Cache {
calculation,
value: None,
}
}
}
}Then, to make value return the cached value if it exists, or calculate it if it does not, write another method:
#![allow(unused)]
fn main() {
fn value(&mut self, arg: u32) -> u32 {
match self.value {
Some(v) => v,
None => {
let v = (self.calculation)(arg);
self.value = Some(v);
v
}
}
}
}If the instance’s value field already has a value, return it. Otherwise calculate the value, store it in the value field, and return it.
Once that is done, we should update generate_workout to use the Cache struct:
#![allow(unused)]
fn main() {
fn generate_workout(intensity: u32, random_number: u32) {
let mut expensive_closure = Cache::new(|num|{
println!("calculating slowly...");
thread::sleep(Duration::from_secs(2));
num
});
if intensity < 25 {
println!("Today, do {} pushups!", expensive_closure.value(intensity));
println!("Next, do {} situps!", expensive_closure.value(intensity));
} else {
if random_number == 3 {
println!("Take a break today! Remember to stay hydrated!");
} else {
println!("Today, run for {} minutes!", expensive_closure.value(intensity));
}
}
}
}expensive_closureis created as an instance ofCache, and we pass the closure intonew. We addmuttoexpensive_closurebecause later calls may change the value stored in thevaluefield.- All later uses of the result go through the
valuemethod.
13.3.4 Limitations of the Cache Implementation
The Cache field here is a cache, used to store a value, but this implementation has limitations.
Here is the Cache definition and its methods:
#![allow(unused)]
fn main() {
struct Cache<T: Fn(u32) -> u32>
{
calculation: T,
value: Option<u32>,
}
impl<T> Cache<T>
where
T: Fn(u32) -> u32
{
fn new(calculation: T) -> Cache<T> {
Cache {
calculation,
value: None,
}
}
fn value(&mut self, arg: u32) -> u32 {
match self.value {
Some(v) => v,
None => {
let v = (self.calculation)(arg);
self.value = Some(v);
v
}
}
}
}
}The value method always ends up with the same value: if the value field has no value, it calculates one and stores it in the field. After that, any later use of value gets the originally calculated value, no matter what argument is passed in.
That may sound a little vague, so let’s look at an example:
#![allow(unused)]
fn main() {
fn call_with_different_values(){
let mut c = Cache::new(|a| a);
let v1 = c.value(1);
let v2 = c.value(2);
}
}-
cis an instance ofCache, and a closure is passed in. -
In the line
let v1 = c.value(1);, the originalvaluefield incis empty. At that point, passing in1makes thevaluefield becomeSome(1)(valueis anOptiontype). -
In the line
let v2 = c.value(2);, because thevaluefield already has a value, it directly takes the1stored invalueand assigns it tov2, even though the argument tovaluein this line is different from the previous one.
If you do not want that behavior, you should use a HashMap instead of a single value, using the HashMap key as the args passed to the value method, and the value as the result of executing the closure. For example:
#![allow(unused)]
fn main() {
struct ForFun<T: Fn(u32) -> u32>
{
calculation: T,
value: HashMap<u32, Option<u32>>,
}
impl<T> ForFun<T>
where
T: Fn(u32) -> u32
{
fn new(calculation: T) -> ForFun<T> {
ForFun {
calculation,
value: HashMap::new(),
}
}
fn value(&mut self, arg: u32) -> u32 {
match self.value.get(&arg) {
Some(v) => v.unwrap(),
None => {
let v = (self.calculation)(arg);
self.value.insert(arg, Some(v));
v
}
}
}
}
}This cache example can only accept the same parameter type and return type. If you want the closure’s parameter type and return type to be different, you can introduce two or more generic parameters. For example:
#![allow(unused)]
fn main() {
struct ForFun<T, R>
where
T: Fn(u32) -> R,
{
calculation: T,
value: Option<R>,
}
}13.4 Capturing the Environment with Closures
13.4.0 Before We Begin
During its design, Rust drew inspiration from many languages, and functional programming had a particularly strong influence on Rust. Functional programming often includes passing functions as values to parameters, returning them from other functions, assigning them to variables for later execution, and so on.
In this chapter, we will discuss some Rust features that are similar to what many languages call functional features:
- Closures (this article)
- Iterators
- Improving the I/O Project with Closures and Iterators
- Performance of Closures and Iterators
13.4.1 Closures Can Capture Their Environment
Closures have a capability that functions do not: a closure can access variables in the scope where it is defined.
Take a look at an example:
fn main() {
let x = 4;
let equal_to_x = |z| z == x;
let y = 4;
assert!(equal_to_x(y));
}The closure part is:
#![allow(unused)]
fn main() {
let equal_to_x = |z| z == x;
}Some people may find it hard to distinguish the roles of = and == here, so let’s rewrite it another way:
#![allow(unused)]
fn main() {
let equal_to_x = |z| {
z == x;
}
}In other words, the closure takes z as its parameter, compares it with x (which is 4, because x = 4 was defined above), and returns a boolean. If they are equal, the result is true; otherwise it is false.
Here the closure directly accesses the variable x in the same scope, which functions cannot do.
But this feature has a cost: it introduces memory overhead. In most cases we do not need a closure to capture its environment, and we do not want the extra overhead either. That is why functions are not allowed to capture variables from the environment, and defining and using a function never introduces this kind of overhead.
13.4.2 How Closures Capture Values From Their Environment
Closures capture values from the environment in three ways, just like functions receive parameters in three ways:
- Taking ownership, whose trait is
FnOnce.Oncemeans once, because a closure cannot take and consume the same variable more than once, so it can only be called once. - Mutable borrowing, whose trait is
FnMut - Immutable borrowing, whose trait is
Fn
When a programmer creates a closure, Rust infers which trait should be used based on how the closure uses values from the environment:
- All closures implement
FnOnce, because every closure can be called at least once - Closures that do not move captured variables implement
FnMut - Closures that do not need mutable access to captured variables implement
Fn
In fact, these three have an inclusion relationship: every Fn also implements FnMut, and every FnMut also implements FnOnce.
13.4.3 The move Keyword
Using the move keyword before the parameter list forces a closure to take ownership of the environment values it uses. This is most useful when passing a closure to a new thread and moving data so that it belongs to that new thread.
Take a look at an example:
fn main() {
let x = vec![1, 2, 3];
let equal_to_x = move |z| z == x;
println!("can't use x here {:?}", x);
let y = vec![1, 2, 3];
assert!(equal_to_x(y));
}After using move, ownership of x moves into the closure, so x can no longer be used afterward.
13.4.4 Best Practice
When you specify one of the Fn trait bounds, start with Fn. Depending on what happens inside the closure, the compiler will tell you if FnOnce or FnMut is needed instead.