1.1 Pointer Overview (Part 1) - What Is a Pointer, and the Difference Between Pointers and References
1.1.1. What Is a Pointer
A pointer is a way for a computer to reach data that cannot be accessed directly right away.
A very intuitive analogy is a book’s table of contents. The table of contents is like a pointer, and what it stores is the page number where the corresponding content lives. In a computer, a pointer stores an address. In a book, we can use the page number in the table of contents to find the content we want; in a computer, we use the address stored in the pointer to find the data we want to access. The figure below gives a vivid description of pointers:
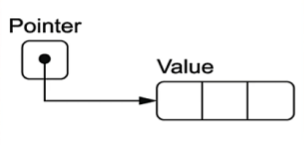
Data in physical memory (Random Access Memory, or RAM) is stored in a scattered way. To find specific data, we need a lookup system, called an address space.
Pointers are encoded as memory addresses and represented as integers of type usize (the reason for using usize will be explained when we talk about virtual memory; see 1.7.3. Virtual Memory). An address points to a certain location within the address space.
The range of the address space is a facade provided by the system and the CPU: it is a simplified outward-facing interface that hides the complex internal details. A program only knows about an ordered sequence of bytes and does not consider the actual amount of RAM in the system.
1.1.2. Terminology
- A memory address (also called an address) is a number that refers to a single byte in memory. A memory address is an abstraction provided by assembly language.
- A pointer (also called a raw pointer) is a memory address to a certain type. A pointer is an abstraction provided by a high-level language.
- A reference: here, this refers to a Rust reference (see Rust Guide 4.4. Reference and Borrowing). It is a pointer, but if it points to dynamically sized data, such as
stror[T], the reference also carries enough information to know where the data ends so that out-of-bounds access can be prevented. A reference is an abstraction provided by the Rust language.
1.1.3. References in Rust
Compared with raw pointers, Rust references have many advantages:
-
A reference always refers to valid data.
-
A reference is aligned to the alignment requirement of the type it points to; if it is not aligned, CPU operations will be slower. Rust uses padding bytes to ensure references are properly aligned in memory. Alignment means that the storage address of data in memory must be a multiple of a certain value to satisfy hardware access requirements and improve efficiency. In Rust, a reference such as
&Tor&mut Tis aligned according to the alignment ofT, not necessarilyusize. For example, on a 64-bit system,usizeis 8 bytes, but a reference to au8only needs 1-byte alignment. If a value’s address is0x1001, whether it can be used as a reference depends on the alignment requirement of the referenced type, not on whether it is a multiple ofusize. -
References can provide the same guarantees for dynamically sized types. For types without a fixed length in memory, Rust ensures that enough metadata is stored with the pointer so that the boundary of the data is known and out-of-bounds access is prevented.
1.1.4. Rust References and Pointers
Let’s look at an example:
static B: [u8; 10] = [99, 97, 114, 114, 121, 116, 111, 119, 101, 108];
static C: [u8; 11] = [116, 104, 97, 110, 107, 115, 102, 105, 115, 104, 0];

fn main() {
    let a:i32 = 42;
    let b:&[u8;10] = &B;
    let c:&[u8;11] = &C;
    println!("a = {}, b = {:p}, c = {:p}", a, b, c);
}bis a reference toB, andcis a reference toC.{:p}means printing the variable’s memory address.
Output:
a = 42, b = 0x1021d97e0, c = 0x1021d97ea
The local memory layout of a, b, and c looks like this:
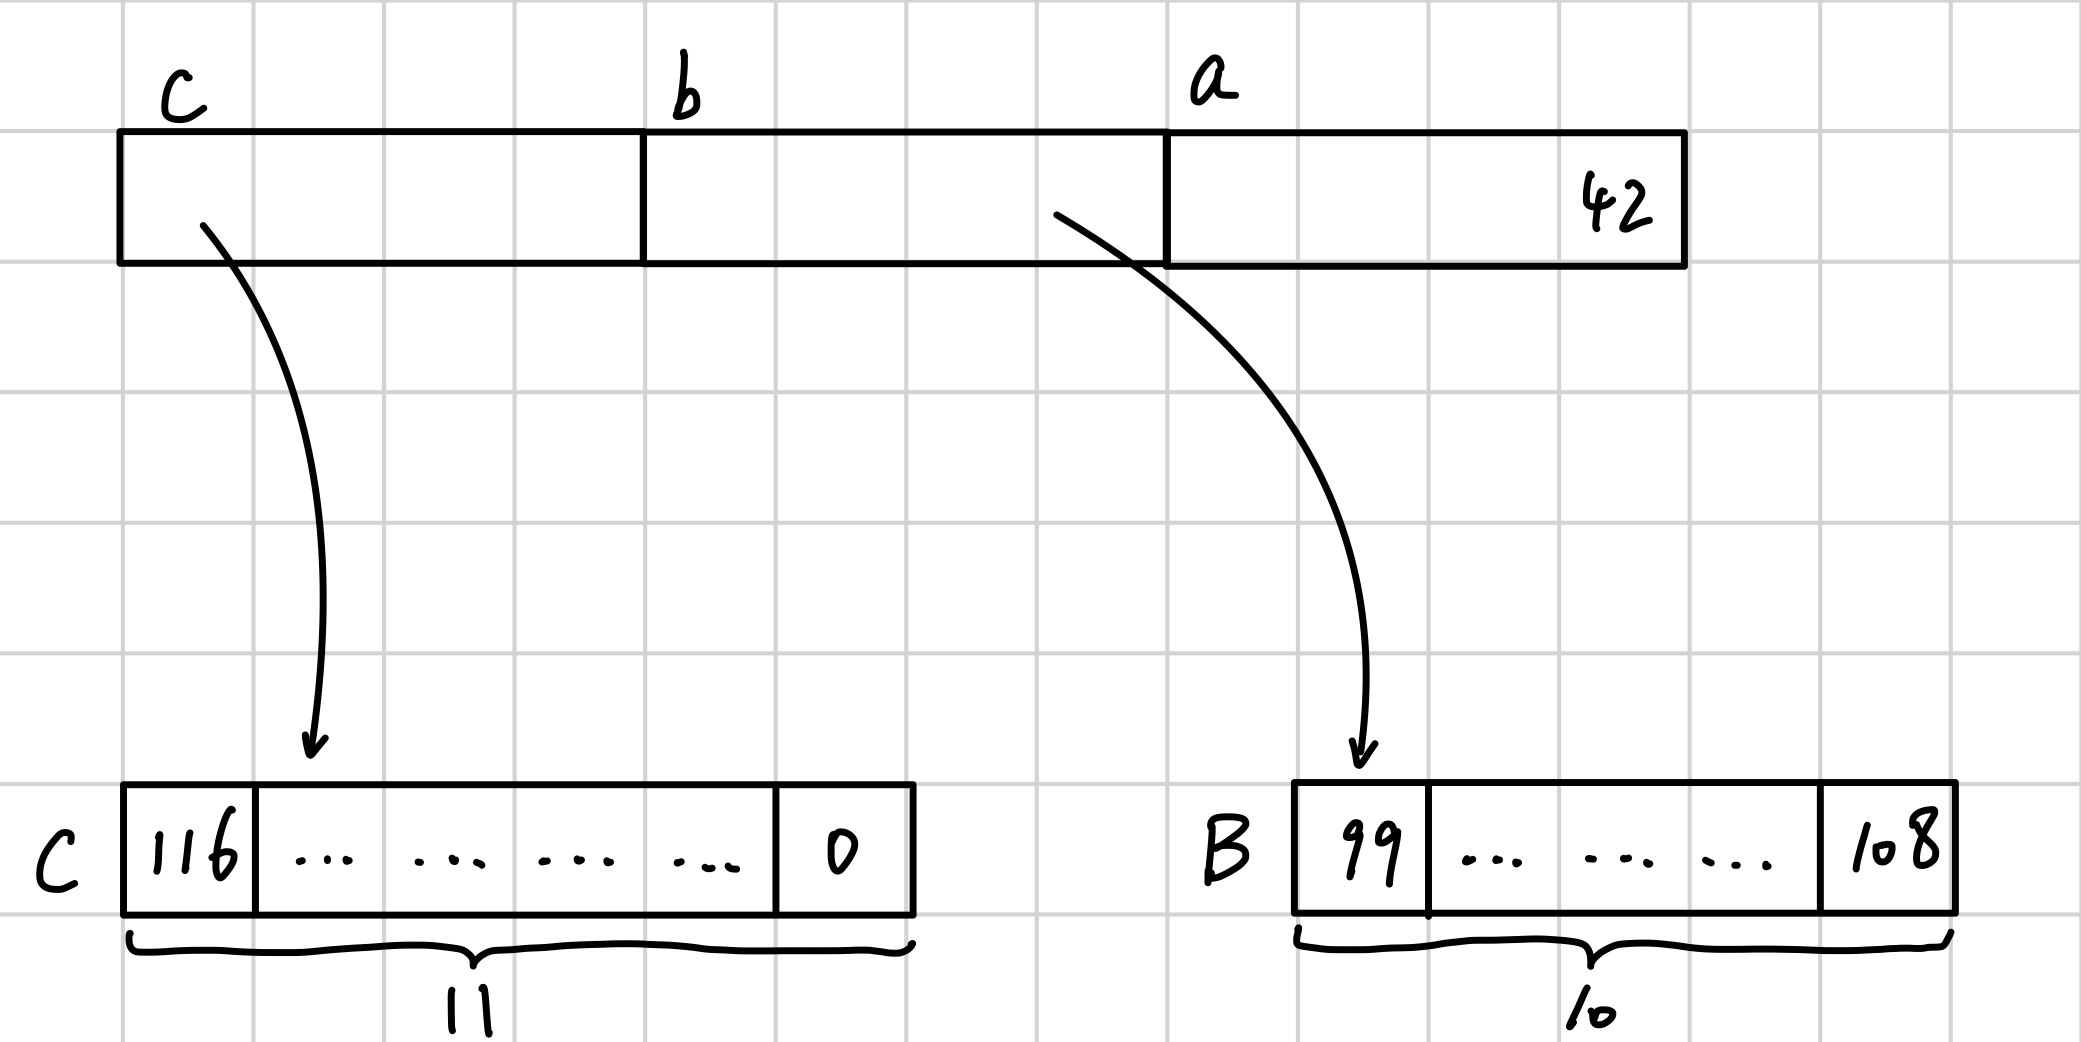
- Variables
bandcare references. On a 32-bit CPU they occupy 4 bytes, and on a 64-bit CPU they occupy 8 bytes (here they are 4 bytes). ais of typei32, so it occupies 4 bytes in memory.- The static variables
BandCare arrays, and their elements areu8, so each element occupies 1 byte.
What this code is trying to do is make b resemble a smart pointer and c resemble a raw pointer. The example is still not close enough, and we’ll have a more realistic one later. For now, let’s work with this.
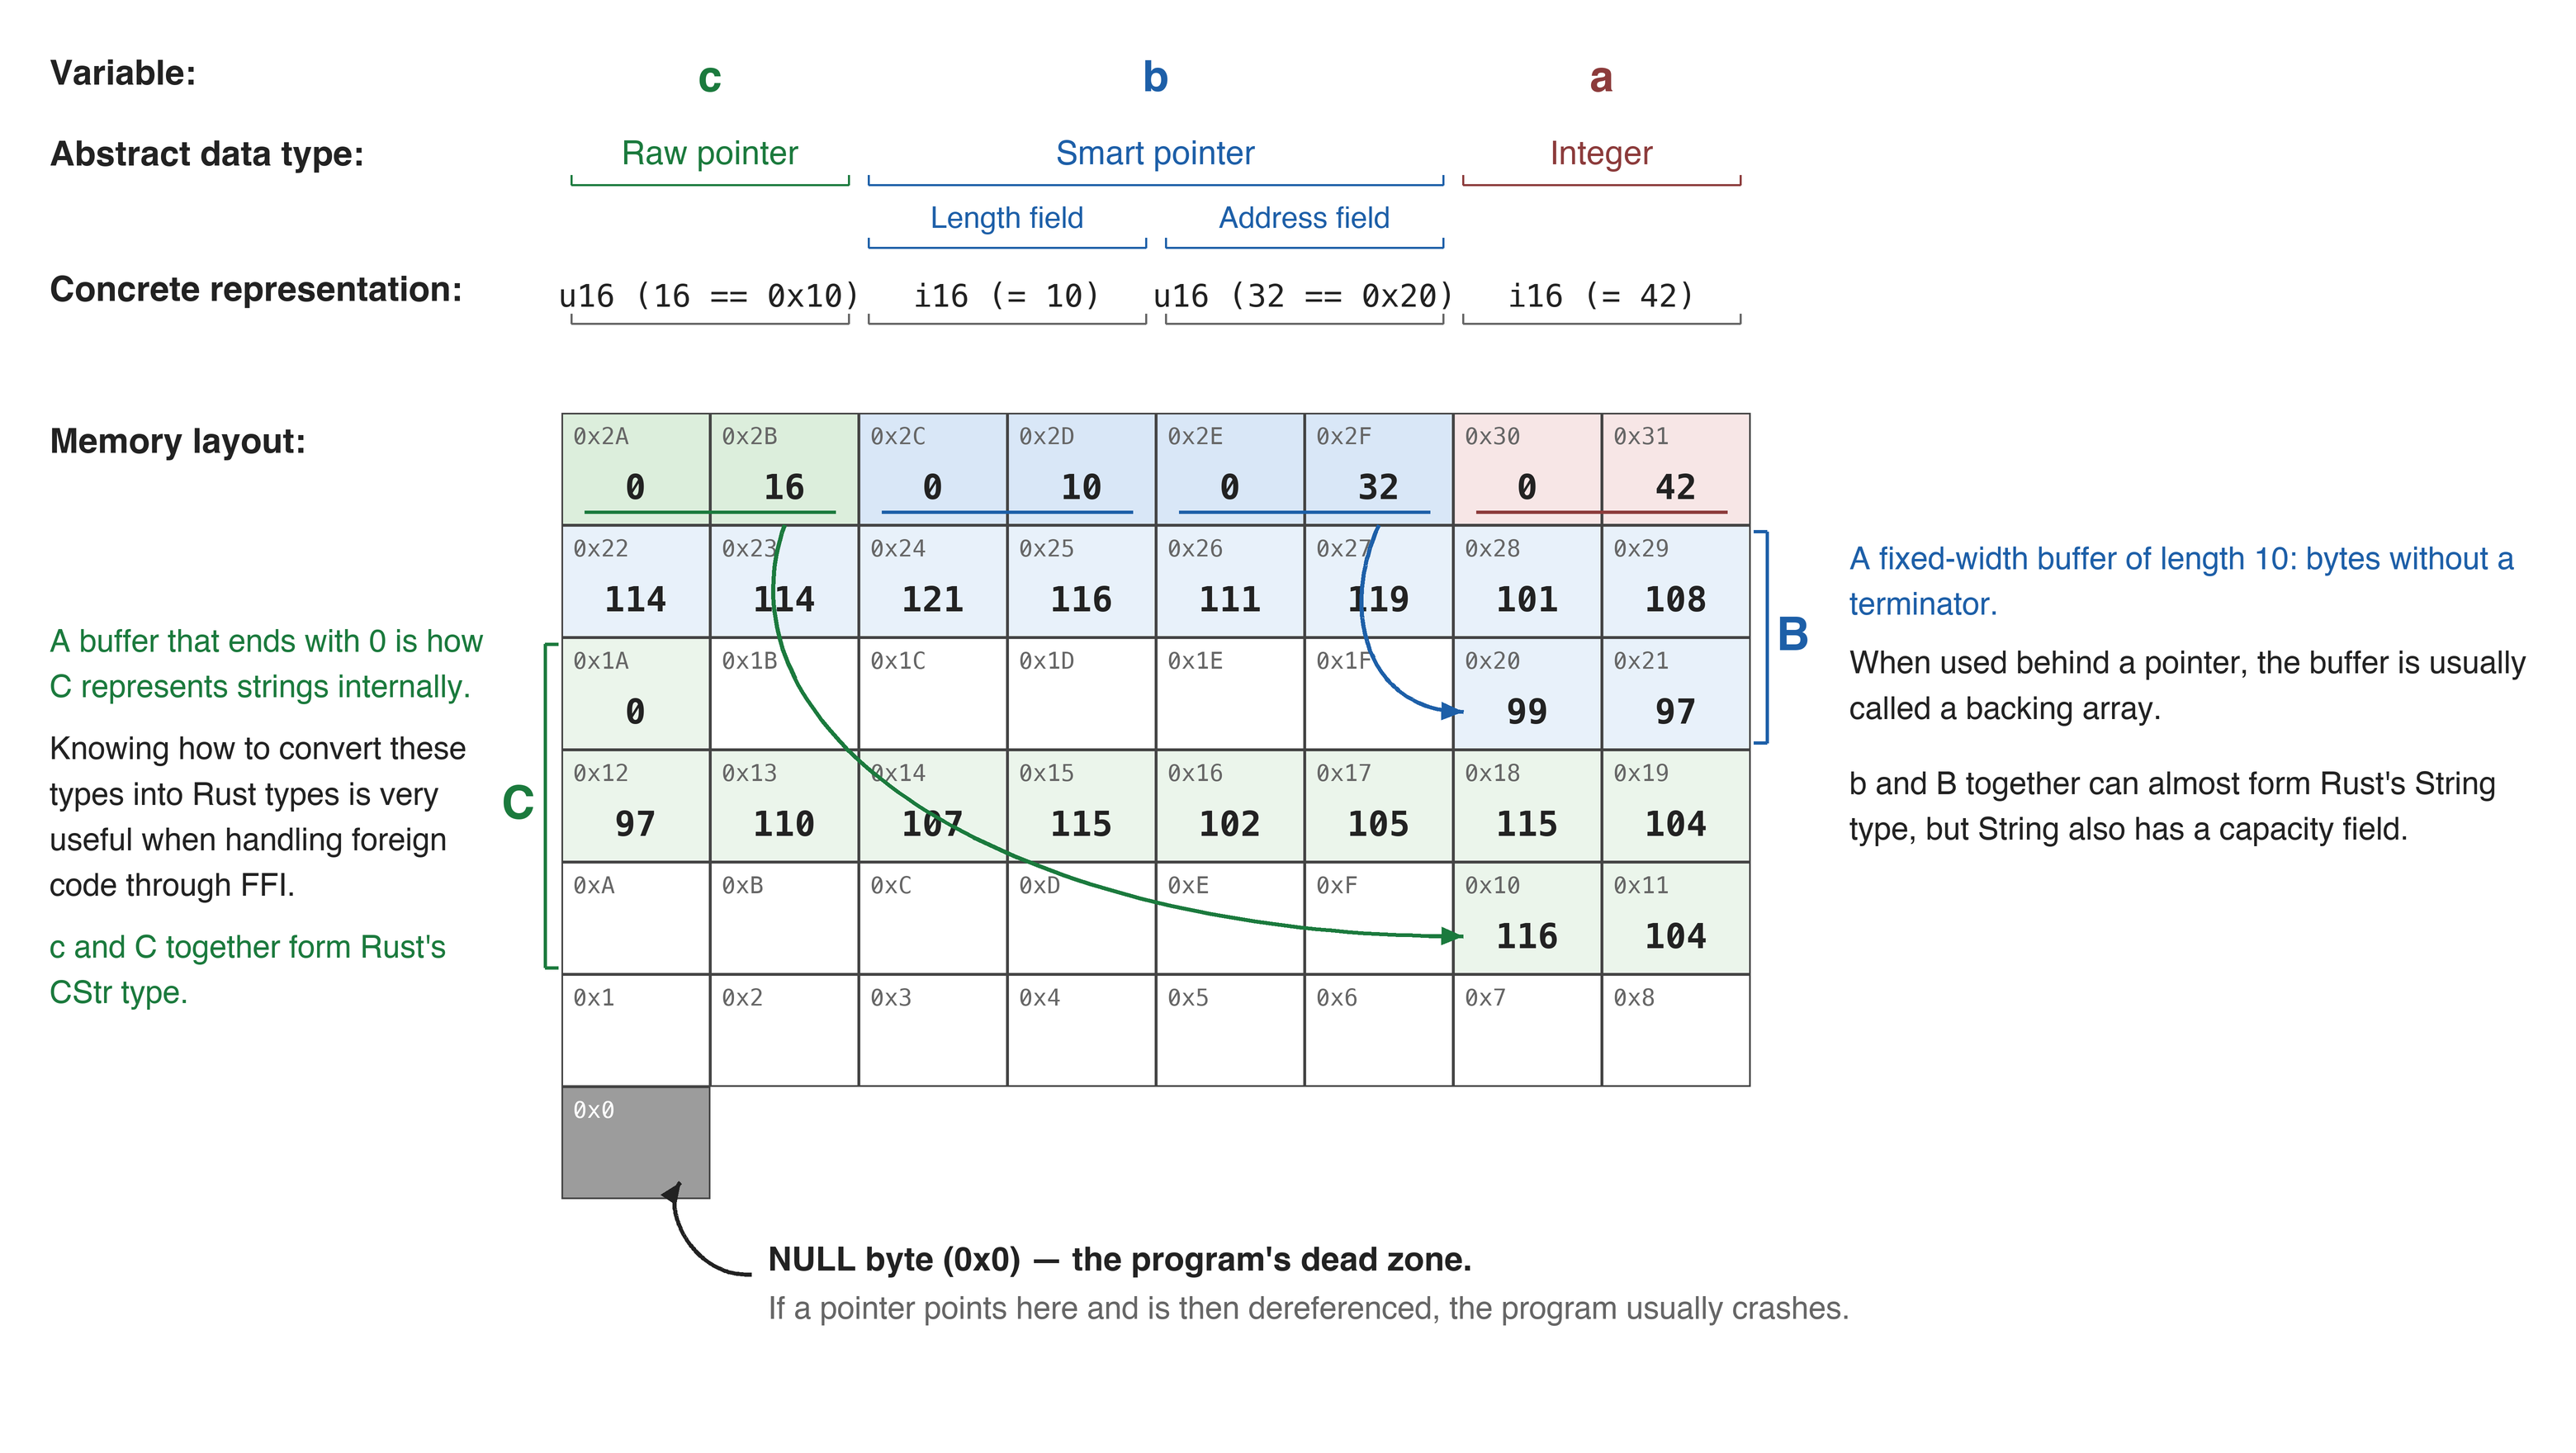
This is a fictional 49-byte address space that represents the ideal effect we want to achieve, so it differs from the code above. Let’s go through it step by step:
ais an integer, but because the diagram shows the idealized case, the type in the diagram isi16(2 bytes), not the originali32.bis a smart pointer with a total length of 4 bytes. Its address field only takes 2 bytes, that is,u16. The length field also takes 2 bytes. BecauseBis an array with 10 elements, the value stored in the length field is 10. The address field stores 32, which is the starting position of the data, namely0x20(32 in hexadecimal is0x20). Since the length is 10, the data range is from0x20to0x29.cis a raw pointer and takes 2 bytes. The bytes store only the address. Here it stores 16, which is0x10in hexadecimal, socpoints to data starting at0x10. Since it contains 11 elements, it points to the block from0x10to0x1A.0x0is the null byte. It is a dead zone for the program. If a pointer points here and is dereferenced, the program will crash.
Other notes:
- Variable
cis a null-terminated buffer. In fact, this is the internal representation of strings in C (C strings are arrays terminated by0). Knowing how to convert these types to Rust types is very useful when handling external code through the Foreign Function Interface (FFI, which will be discussed in detail later). - Variable
ctogether withCis what Rust calls aCStr. - Variable
bis actually a fixed-length buffer of 10 bytes, but it has no terminator (it does not end in0). When this buffer appears after a pointer type, it is called a backing array. - Variable
btogether withBcan almost form Rust’s string type, but Rust strings also include a capacity field. In other words, a Rust string type needs three fields: length, address, and capacity.
1.2 Pointer Overview (Part 2) - Raw Pointers and the Different Kinds of Pointers in Rust
1.2.1. A Quick Review
In the previous section, we used references to simulate pointers, but the result was much less accurate than we wanted. What we want is to distinguish the internal differences between raw pointers and smart pointers, specifically as follows:
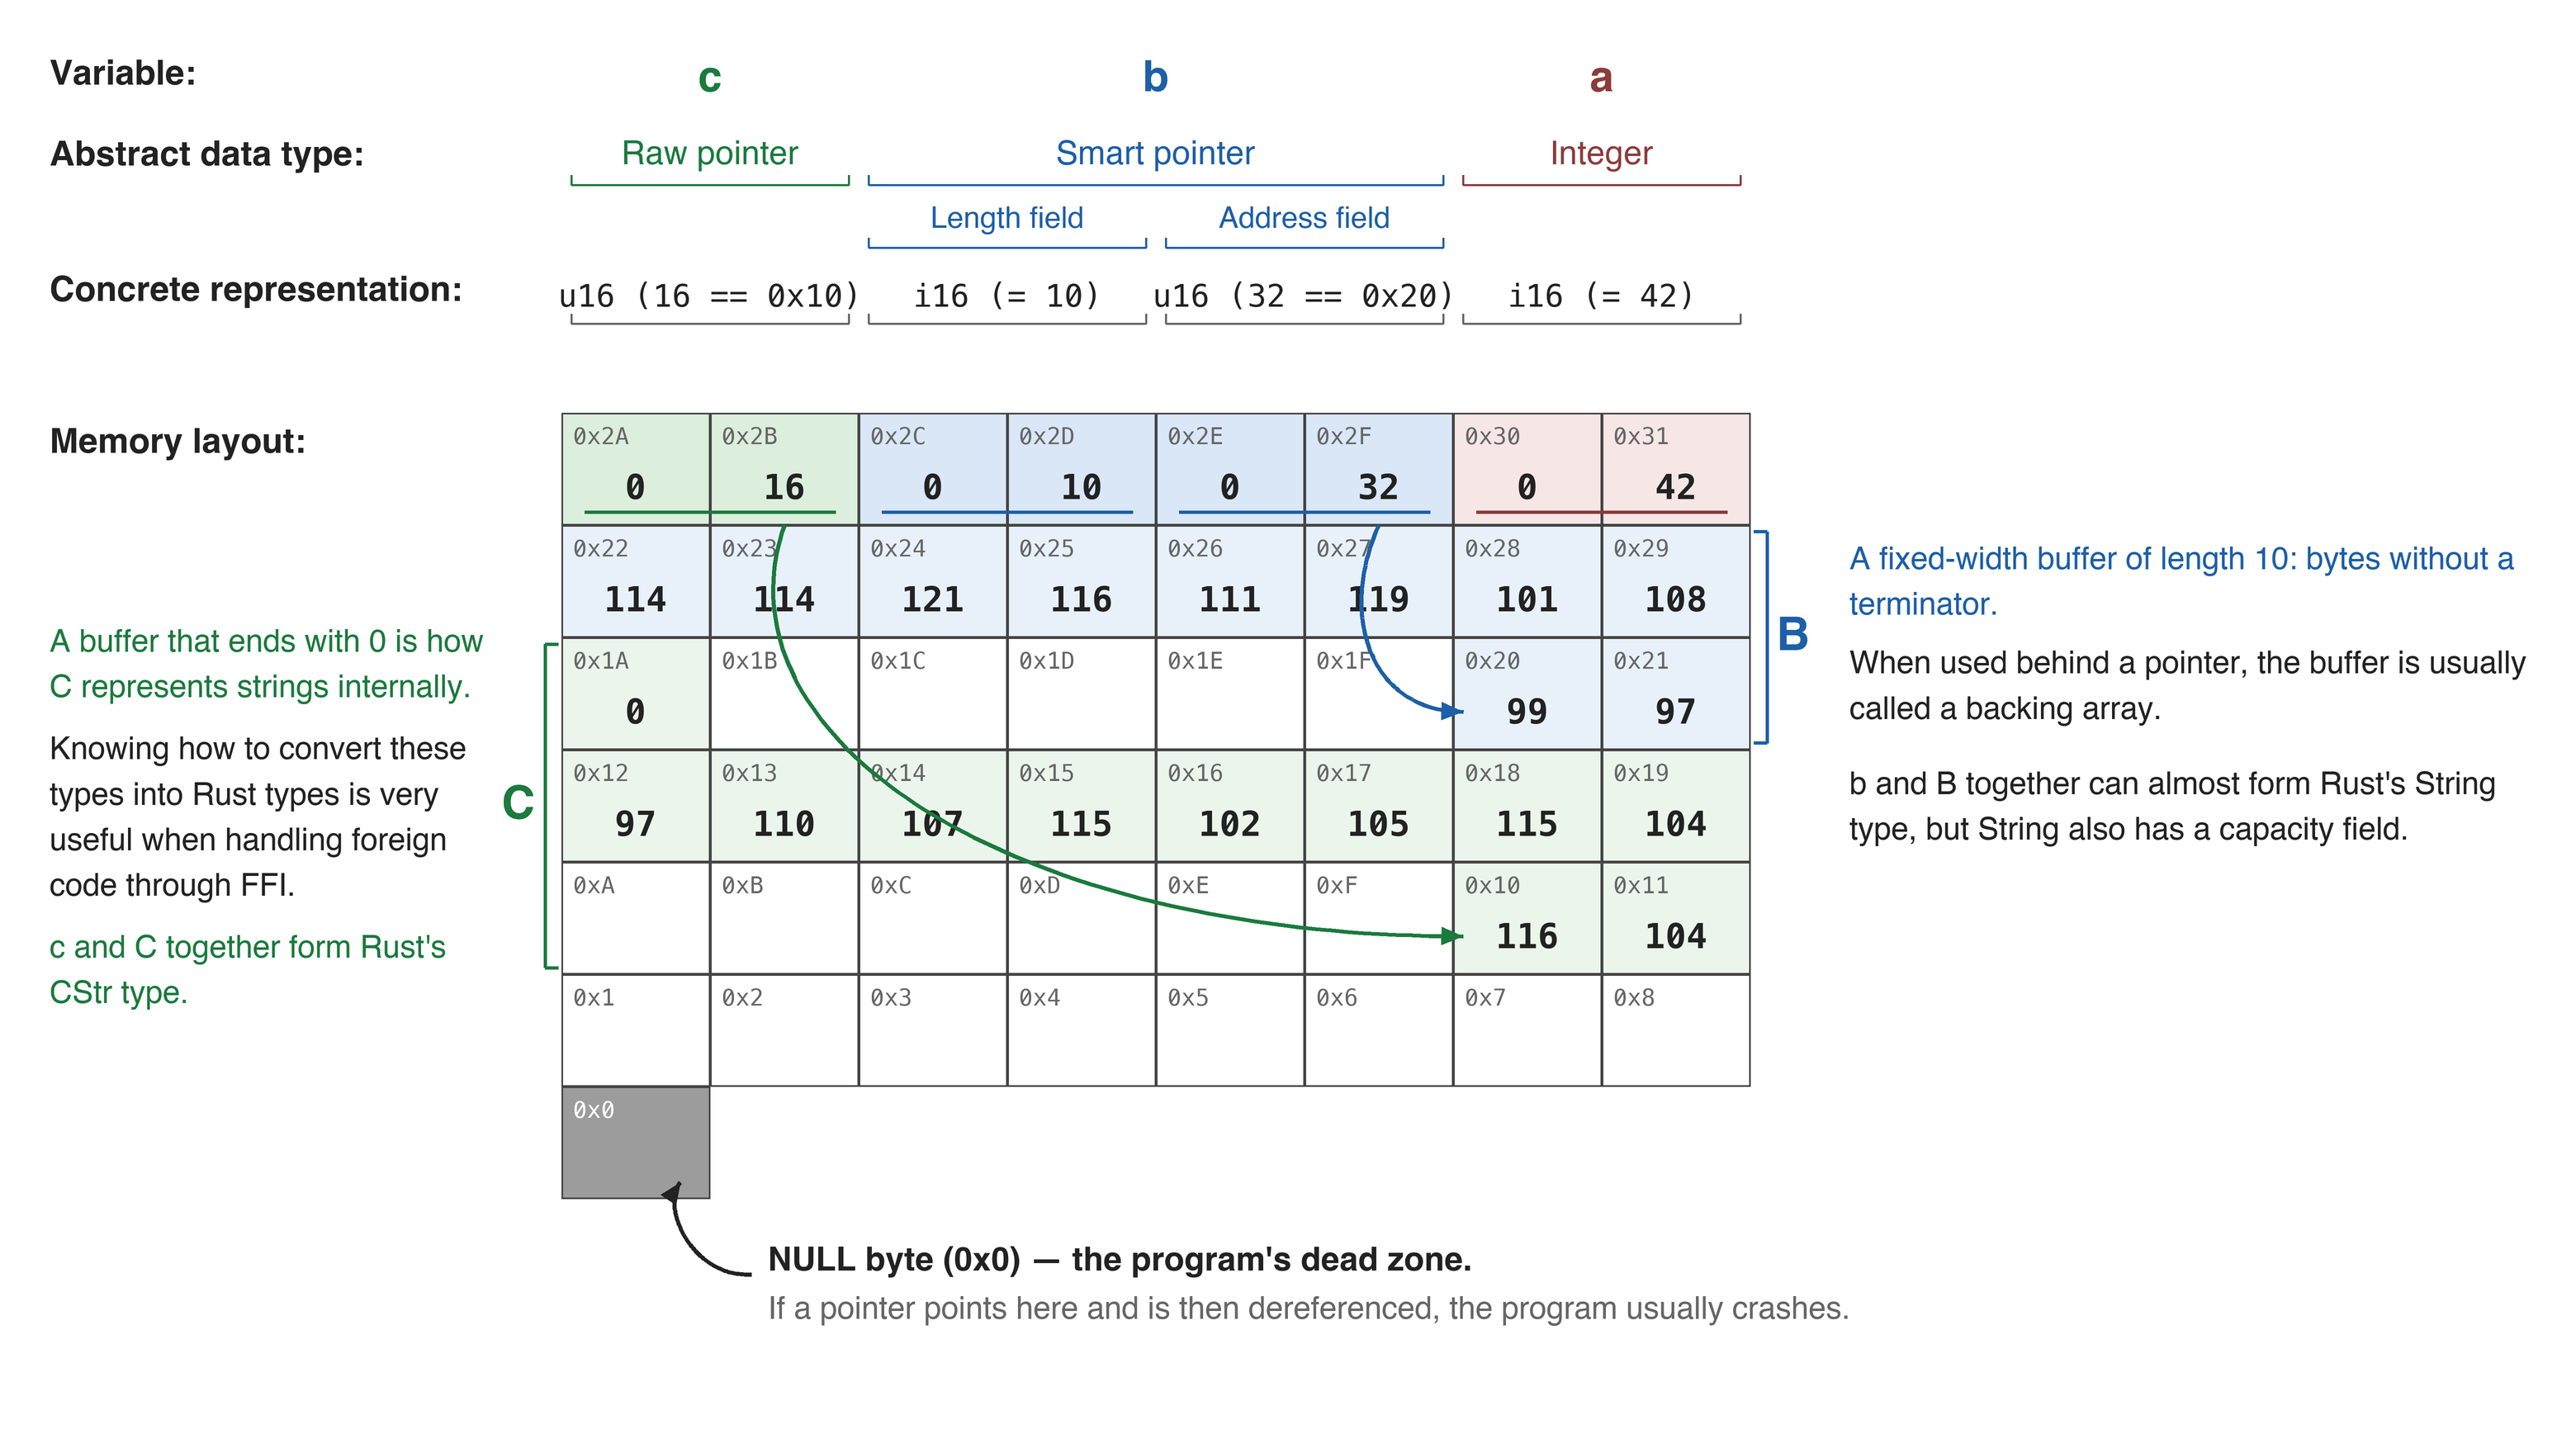
I explained this diagram in detail in the previous article, 1.1. Pointer Overview (Part 1), so I will not repeat it here.
1.2.2. References and Pointers in Rust
In this article, we will use a more realistic example with more complex types to show the differences inside pointers:
use std::mem::size_of;

static B: [u8; 10] = [99, 97, 114, 114, 121, 116, 111, 119, 101, 108];
static C: [u8; 11] = [116, 104, 97, 110, 107, 115, 102, 105, 115, 104, 0];

fn main() {
    let a: usize = 42;
    let b: Box<[u8]> = Box::new(B);
    let c: &[u8; 11] = &C;

    println!("a (unsigned integer)");
    println!("address: {}", &a);
    println!("size: {:?} bytes", size_of::<usize>());
    println!("value: {:?}\n", a);

    println!("b (inside a Box)");
    println!("address: {:p}", &b);
    println!("size: {:?} bytes", size_of::<Box<[u8]>>());
    println!("points to: {:p}\n", b.as_ptr());

    println!("c (reference to C)");
    println!("address: {:p}", &c);
    println!("size: {:?} bytes", size_of::<&[u8; 11]>());
    println!("points to: {:p}\n", c);

    println!("B (10-byte array):");
    println!("address: {:p}", &B);
    println!("size: {:?} bytes", size_of::<[u8; 10]>());
    println!("value: {:?}\n", B);

    println!("C (11-byte array):");
    println!("address: {:p}", &C);
    println!("size: {:?} bytes", size_of::<[u8; 11]>());
    println!("value: {:?}\n", C);
}- The
std::mem::size_offunction is used to obtain the memory size occupied by each type, measured in bytes. - The static variables
BandChave the same sizes and contents as in the previous article. ais of typeusizeand has the value 42.bwrapsBin the smart pointerBox<T>, and ownership of the value insideBox<T>is transferred toBox<T>.cis a normal reference.- Each variable’s address is printed using the address-of operator
&; each variable’s size in bytes is also printed usingstd::mem::size_of. - We printed
a,b,c,B, andC, but because their types differ, the meaning of their printed representations also differs:a,B, andCprint the actual stored value, while thepoints to:lines forbandcprint the address of the data they refer to (b.as_ptr()and{:p}onc). - The
address:label forain the code is misleading as written;println!("address: {}", &a);displays the value ofathroughDisplay, not its address. To print the address itself, use{:p}.
Output:
a (unsigned integer)
address: 42
size: 8 bytes
value: 42

b (inside a Box)
address: 0x16d1aa5f0
size: 16 bytes
points to: 0x1031f1c10

c (reference to C)
address: 0x16d1aa600
size: 8 bytes
points to: 0x102c8aeba

B (10-byte array):
address: 0x102c8aeb0
size: 10 bytes
value: [99, 97, 114, 114, 121, 116, 111, 119, 101, 108]

C (11-byte array):
address: 0x102c8aeba
size: 11 bytes
value: [116, 104, 97, 110, 107, 115, 102, 105, 115, 104, 0]
- My computer is 64-bit, so
a, which is ausize, occupies 8 bytes of memory. bis of typeBox<T>, a smart pointer, so it occupies 16 bytes — the size of twousizevalues (oneusizefield stores the pointer, and the other stores the length/capacity metadata needed for a slice-backed box).cis a normal reference, i.e. a pointer, so it occupies 8 bytes — the size of oneusizevalue (used to store the pointer).Bis an array with 10 elements of typeu8; since oneu8occupies one byte, the array occupies 10 bytes.Cis an array with 11 elements of typeu8; since oneu8occupies one byte, the array occupies 11 bytes.
What we really need to pay attention to are the pointers stored in c and b:
cstores a pointer toC. In the output, we can see that the pointer stored incis0x102c8aeba, and the address whereCresides is exactly0x102c8aeba, so they match.bstores a pointer to the heap copy ofB’s bytes (created byBox::new(B)). The pointer stored inbis0x1031f1c10, but the address where the staticBresides is0x102c8aeb0, so they do not match. Why is that? BecauseBis stored in static memory, whileBox<[u8]>allocates a separate buffer on the heap and copies the array there. Sobdoes not point at the staticB; it points at the heap allocation.
Let’s look at another example. We will still use the same static variables B and C. In the previous article, we explained that B and C are actually textual content, but they have not been decoded, so they are stored as u8 values. Here, we will implement the decoding operation. This also allows us to create a memory layout that is even closer to the ideal state (the one shown in the diagram in 1.2.1. A Quick Review):
use std::borrow::Cow;
use std::ffi::CStr;
use std::os::raw::c_char;

static B: [u8; 10] = [99, 97, 114, 114, 121, 116, 111, 119, 101, 108];
static C: [u8; 11] = [116, 104, 97, 110, 107, 115, 102, 105, 115, 104, 0];

fn main() {
    let a = 42;
    let b: String;
    let c: Cow<str>;

    unsafe {
        let b_ptr = &B as *const u8 as *mut u8;
        b = String::from_raw_parts(b_ptr, 10, 10);

        let c_ptr = &C as *const u8 as *const c_char;
        c = CStr::from_ptr(c_ptr).to_string_lossy();
    }

    println!("a: {}, b: {}, c: {}", a, b, c);
}-
std::borrow::Cowis a smart pointer.Cowstands for Clone on Write, which means cloning only happens when a write is needed; if you only need to read, cloning is unnecessary. -
std::ffi::CStris similar to a C string type; it allows Rust to read strings terminated by0. -
std::os::raw::c_charis an alias for the platform’s Cchartype (ofteni8, sometimesu8). Preferstd::ffi::c_charin modern code. -
The variables
a,b, andcinmainare of typesi32,String, andCow<str>, respectively. -
Because the operations below need raw pointers — such as mutable raw pointers
*mut Tand immutable raw pointers*const T— they must be placed inside anunsafeblock:-
The first step is to obtain a mutable raw pointer to
B, that is, convert it to*mut u8. But we obviously cannot get that directly, so we first write&Bto obtain a reference toB, then useas *const u8to convert it to an immutable raw pointer tou8, and finally useas *mut u8to convert it to a mutable raw pointer. -
Why do we need a mutable raw pointer? Because we need to use
String::from_raw_partsto decode the numbers into text. It takes three parameters:buf,length, andcapacity(corresponding to the three fields of the smart pointerString). Forbuf, we pass the raw pointerb_ptr; forlengthandcapacity, we pass10, because we know there are 10 elements. After this step, the string corresponding toBhas been decoded. -
We perform a similar operation on
C, but with one difference:Cends with element0, which is how C stores strings, so the code for decodingCis slightly different. We need an immutable raw pointer toC, and the type must also be changed fromu8toc_char(platform-dependent, ofteni8). So we first write&Cto obtain a reference, thenas *const u8to obtain a raw pointer, and finallyas *const c_charto change the type toc_char. -
Using
CStr::from_ptr, we pass inc_ptr, the immutable raw pointer toCof typei8, and then use theto_string_lossymethod to get the decoded string.
-
-
Finally, we print
a,b, andc.
Output:
a: 42, b: carrytowel, c: thanksfish
-
The printed line is:
aprints as 42 directly.bdecodes tocarrytowel.cdecodes tothanksfish.
-
After printing, the process still aborts when
bis dropped. On some platforms you may also see allocator diagnostics (for example macOSmalloc: *** error for object ...: pointer being freed was not allocated); on this run the abort produced no extra stderr text.
This happens because String::from_raw_parts takes ownership of memory that must have been allocated by the allocator; here we are pointing it at static data, so the allocator tries to free memory it does not own.
1.2.3. Raw Pointer
What Is a Raw Pointer
Unsafe Rust provides two pointer-like types similar to references, called raw pointers. In English, they are called raw pointers. Only using raw pointers needs to be placed inside an unsafe block, because problems may occur. Creating a raw pointer by itself does not cause problems, so it does not need to be inside unsafe.
Like references, raw pointers can be mutable or immutable:
- Mutable:
*mut T - Immutable:
*const T, which means you cannot mutate the pointed-to value through this pointer (without first casting it to*mut T). Note: the*here is part of the type and does not mean dereference. The three tokens*const Ttogether form a type, such as*const String.
*const T and *mut T differ very little and can be freely converted into one another. Rust references (whether &mut T or &T) are converted into raw pointers by the compiler at compile time, which means you can get the performance of raw pointers without entering an unsafe block.
The differences between references and raw pointers are:
- Raw pointers can ignore the borrow rules by allowing both mutable and immutable pointers at the same time or multiple mutable pointers to the same location (see Rust Guide 4.4. Reference and Borrowing for the borrow rules).
- Raw pointers cannot guarantee that they point to valid memory, while references can.
- Raw pointers may be
null. - Raw pointers do not implement any automatic cleanup.
Let’s look at a simple example of converting to a raw pointer (the previous example was a bit more complicated):
fn main(){
    let a: i64 = 42;
    let a_ptr: *const i64 = &a as *const i64;

    println!("a: {}({:p})", a, a_ptr);
}
Output:
a: 42(0x16f30a620)
Dereference
Dereferencing refers to the process by which a pointer extracts data from RAM; this is called dereferencing a pointer.
Let’s look at another example that converts a reference into a raw pointer:
fn main() {
    let a: i64 = 42;
    let a_ptr: *const i64 = &a as *const i64;
    let a_addr: usize = unsafe { std::mem::transmute(a_ptr) };

    println!("a: {}({:p}..0x{:x})", a, a_ptr, a_addr + 7);
}ais of typei64, and its value is 42.a_ptris the immutable raw pointer toa.- Inside the
unsafeblock,a_addrusesstd::mem::transmuteto converta_ptrintousize(code involving raw pointers must be placed inside anunsafeblock). - When printing, we first print the value of
a, then the raw pointer toa, and finally the value ofaddr + 7.
Output:
a: 42(0x16d9ea608..0x16d9ea60f)
A Few Reminders About Raw Pointers
- At the lowest level, references (
&mut Tand&T) are ultimately implemented as raw pointers. But references carry extra guarantees and should always be your first choice. - Accessing the value of a raw pointer is always unsafe.
- Raw pointers do not own the value they point to, and the compiler does not check whether the data is valid when you access it.
- Rust allows multiple raw pointers to point to the same data, but it cannot guarantee the validity of the shared data.
When Raw Pointers Are Used
Sometimes raw pointers have to be used, for example:
- Some system or third-party libraries require them, such as when interoperating with C.
- When shared access to certain data is essential and runtime performance requirements are high.
1.2.4. The Rust Pointer Ecosystem
- Raw pointers are unsafe.
- Smart pointers tend to wrap raw pointers and add more capabilities (semantics). In other words, they do more than just dereference memory addresses; they also provide other capabilities, as follows:
| Name | Summary | Strengths | Weaknesses |
|---|---|---|---|
| Raw Pointer | *mut T and *const T; the most basic building block, lightning fast, extremely unsafe | Speed, interoperability | Unsafe |
Box<T> | Can put anything inside a Box. Suitable for long-term storage of almost any type. A main force in the new era of safe programming. | Stores values on the heap in a centralized way | Increased size |
Rc<T> | Rust’s capable and wise bookkeeper. It knows who borrowed what and when. | Shared access to values | Increased size; runtime cost; not thread-safe |
Arc<T> | Rust’s ambassador. It can share values across threads and ensure they do not interfere with one another. | Shared access to values; thread-safe | Increased size; runtime cost |
Cell<T> | An expert in “changing state,” with the ability to change an immutable value | Interior mutability; same size as T | Not thread-safe; no direct references to the inner value |
RefCell<T> | Allows mutation through immutable references, but at a cost | Interior mutability; can be nested with Rc and Arc | Increased size; runtime cost; not thread-safe; lacks compile-time guarantees |
Cow<T> | Encapsulates borrowed data and provides immutable access, while cloning lazily when modification or ownership is needed | Avoids writes during read-only access | Size may grow |
String | Handles variable-length text and shows how to build safe abstractions | Grows dynamically on demand; runtime guarantees correct encoding | Over-allocates memory |
Vec<T> | The most commonly used storage structure in programs; it preserves ownership when values are created and destroyed | Grows dynamically on demand | Over-allocates memory |
RawVec<T> | The foundation of Vec<T> and its dynamically sized types; knows how to provide a home for data on demand | Grows dynamically on demand; works with the allocator to find space | Not directly intended for your code |
Unique<T> | The sole owner of a value, guaranteeing full control | The basis for types that need exclusive ownership, such as String | Not intended for direct use in application code |
NonNull<T> | A non-null raw pointer wrapper used inside many standard smart pointers | Covariance over T; niche optimization with Option<NonNull<T>> | Still unsafe to dereference; usually not used directly in application code |
1.3 Memory Part 1 - Definitions of Concepts and the High-Level and Low-Level Models of Variables
1.3.1. Value
Before talking about memory, we need to define three concepts. The first is value. A value means type + one element from that type’s value space.
For example, true has the type bool, and its value space contains two values: true and false. A value means type + one element from that type’s value space. The value of true is the bool type + the value-space element true.
A value can be represented as a byte sequence through its type representation:
- For example, the value
6of typeu8is represented in memory as0x06. - Another example is the string
"Hello World"of typestr. It is one value in the value space of strings, and its representation is UTF-8 encoded. Note: the meaning of a value is independent of the location of the bytes that store it. In other words, a value and the place where it is stored are not directly related; they are two separate concepts.
1.3.2. Variable
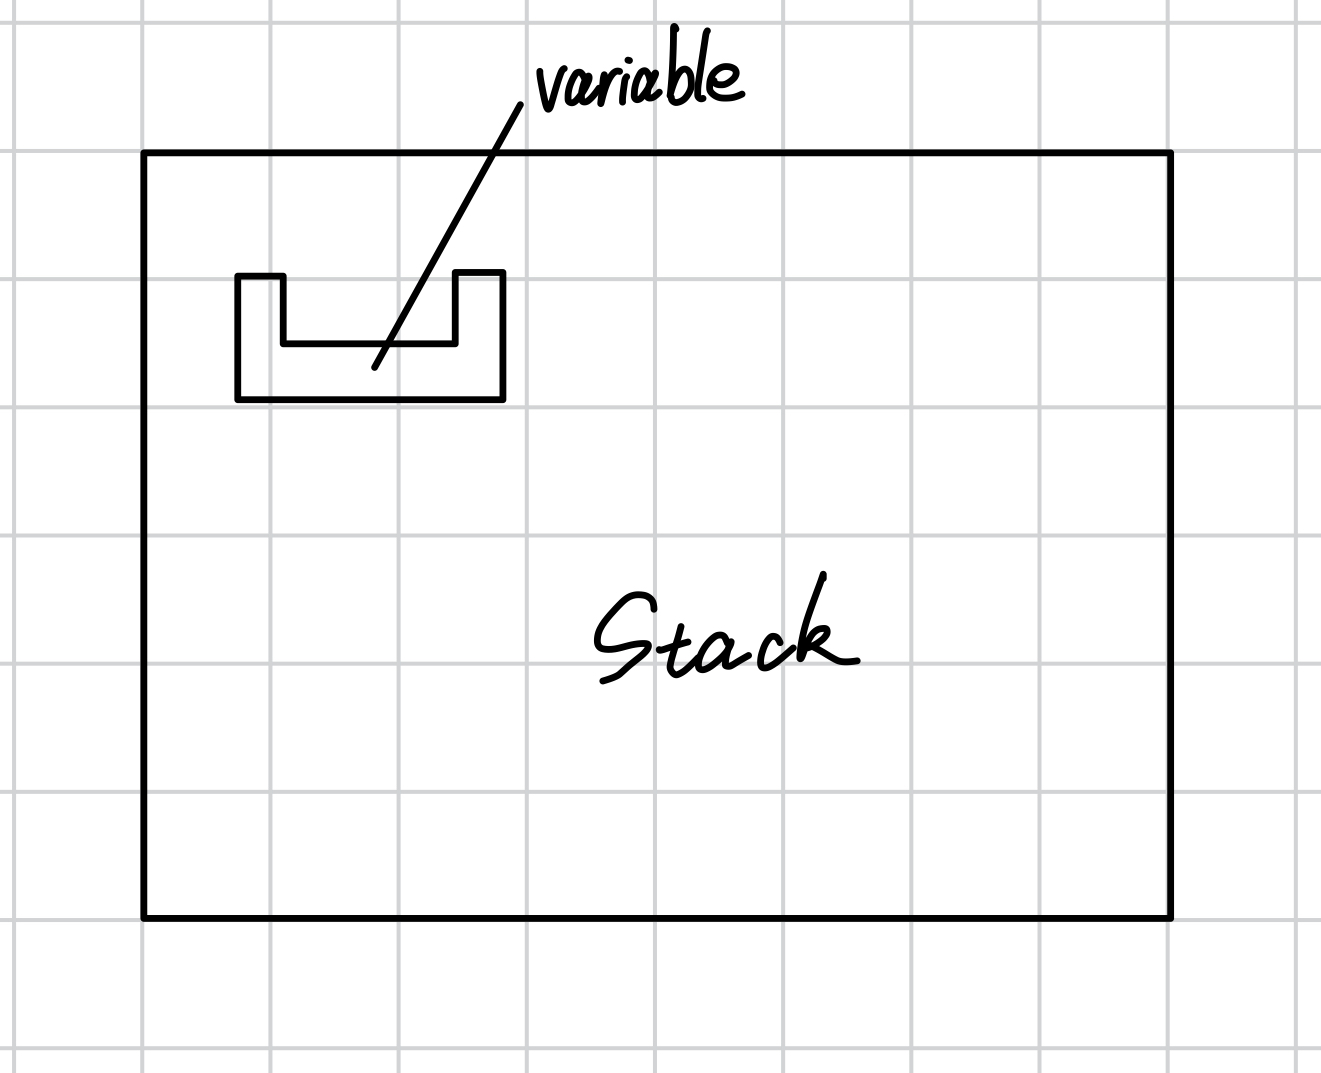
A value is stored somewhere — or more precisely, somewhere that can hold a value. The most common place to store a value is a variable, which is a named slot on the stack used to store values.
1.3.3. Pointer
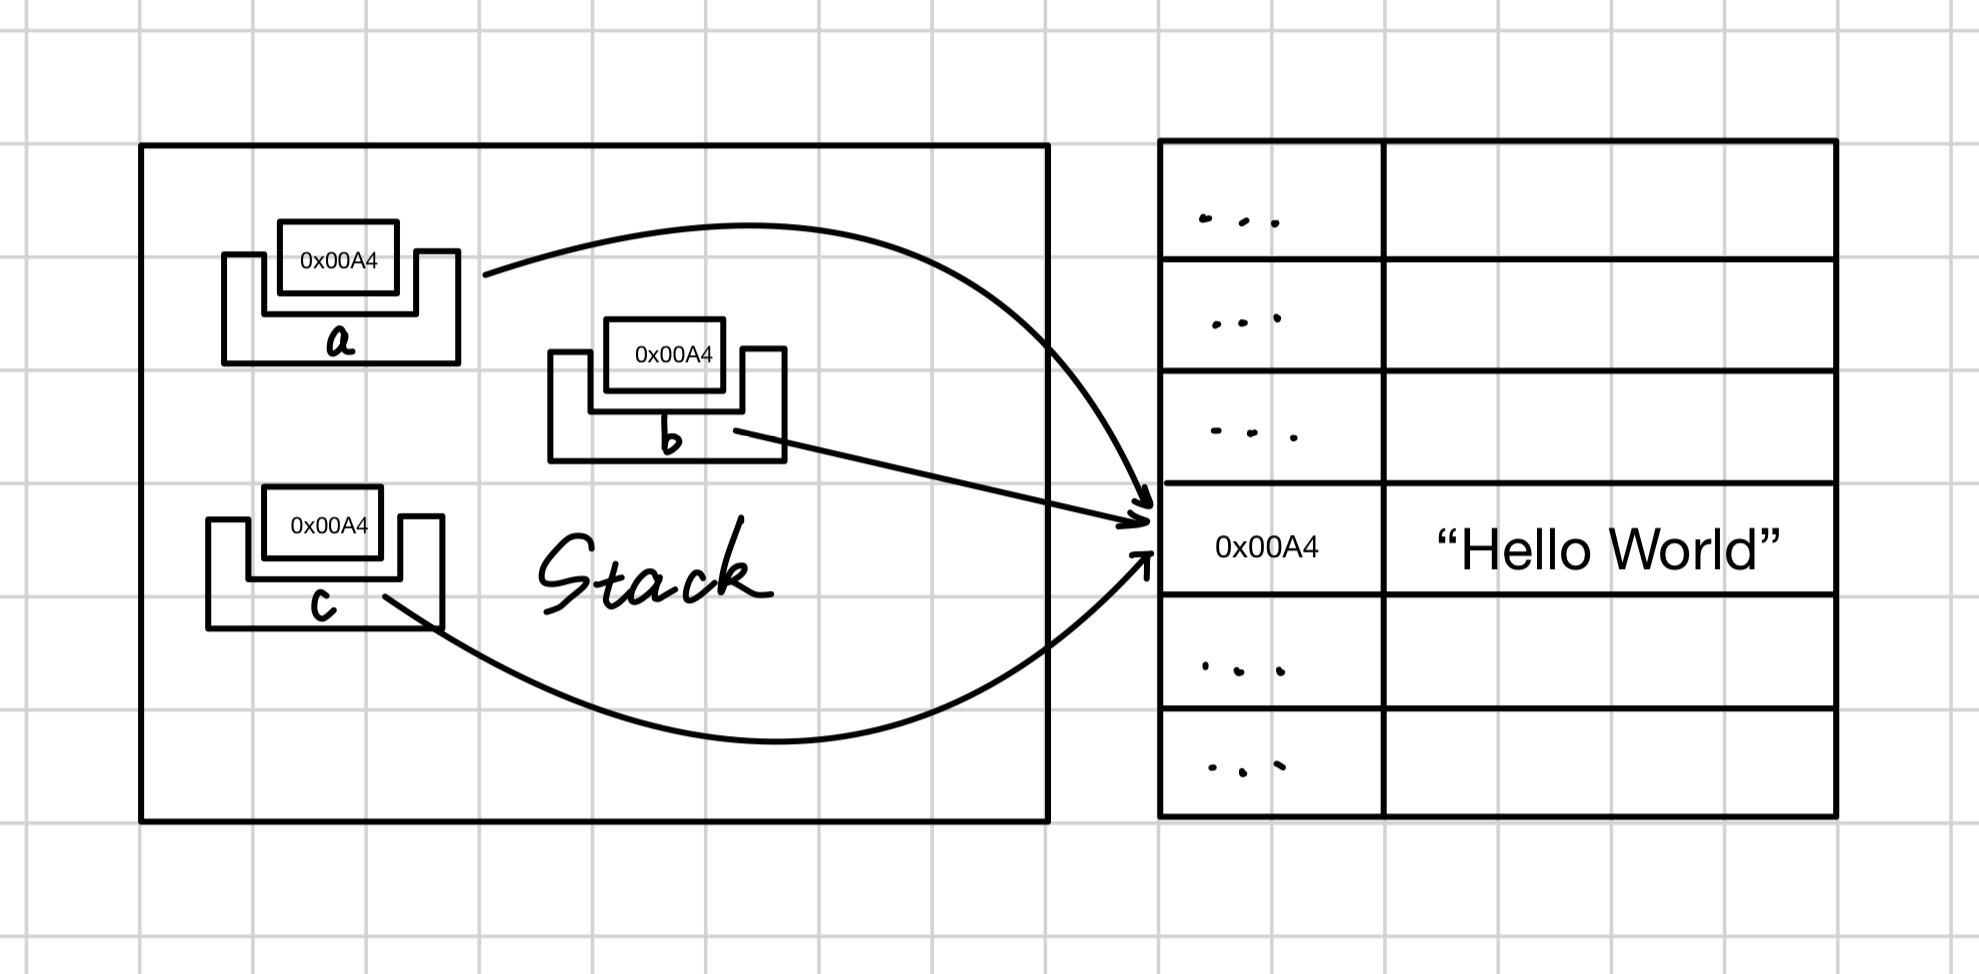
A pointer is a value whose contents store the address of a piece of memory. A pointer points to a certain place, namely the memory corresponding to that address.
A pointer can be dereferenced to access the value stored in the memory it points to.
The same pointer can be placed in different variables. In other words, multiple variables can indirectly refer to the same region of memory, that is, the same underlying value.
1.3.4. Going Deeper Into Variables
Variables can be divided into two models:
- High-level model: lifetimes, borrowing, …
- Low-level model: unsafe code, raw pointers, …
The High-Level Model of Variables
A variable is essentially a name given to a value. When a value is assigned to a variable, that value is named by that variable from then on.
For example:
#![allow(unused)]
fn main() {
let variable = 1234;
}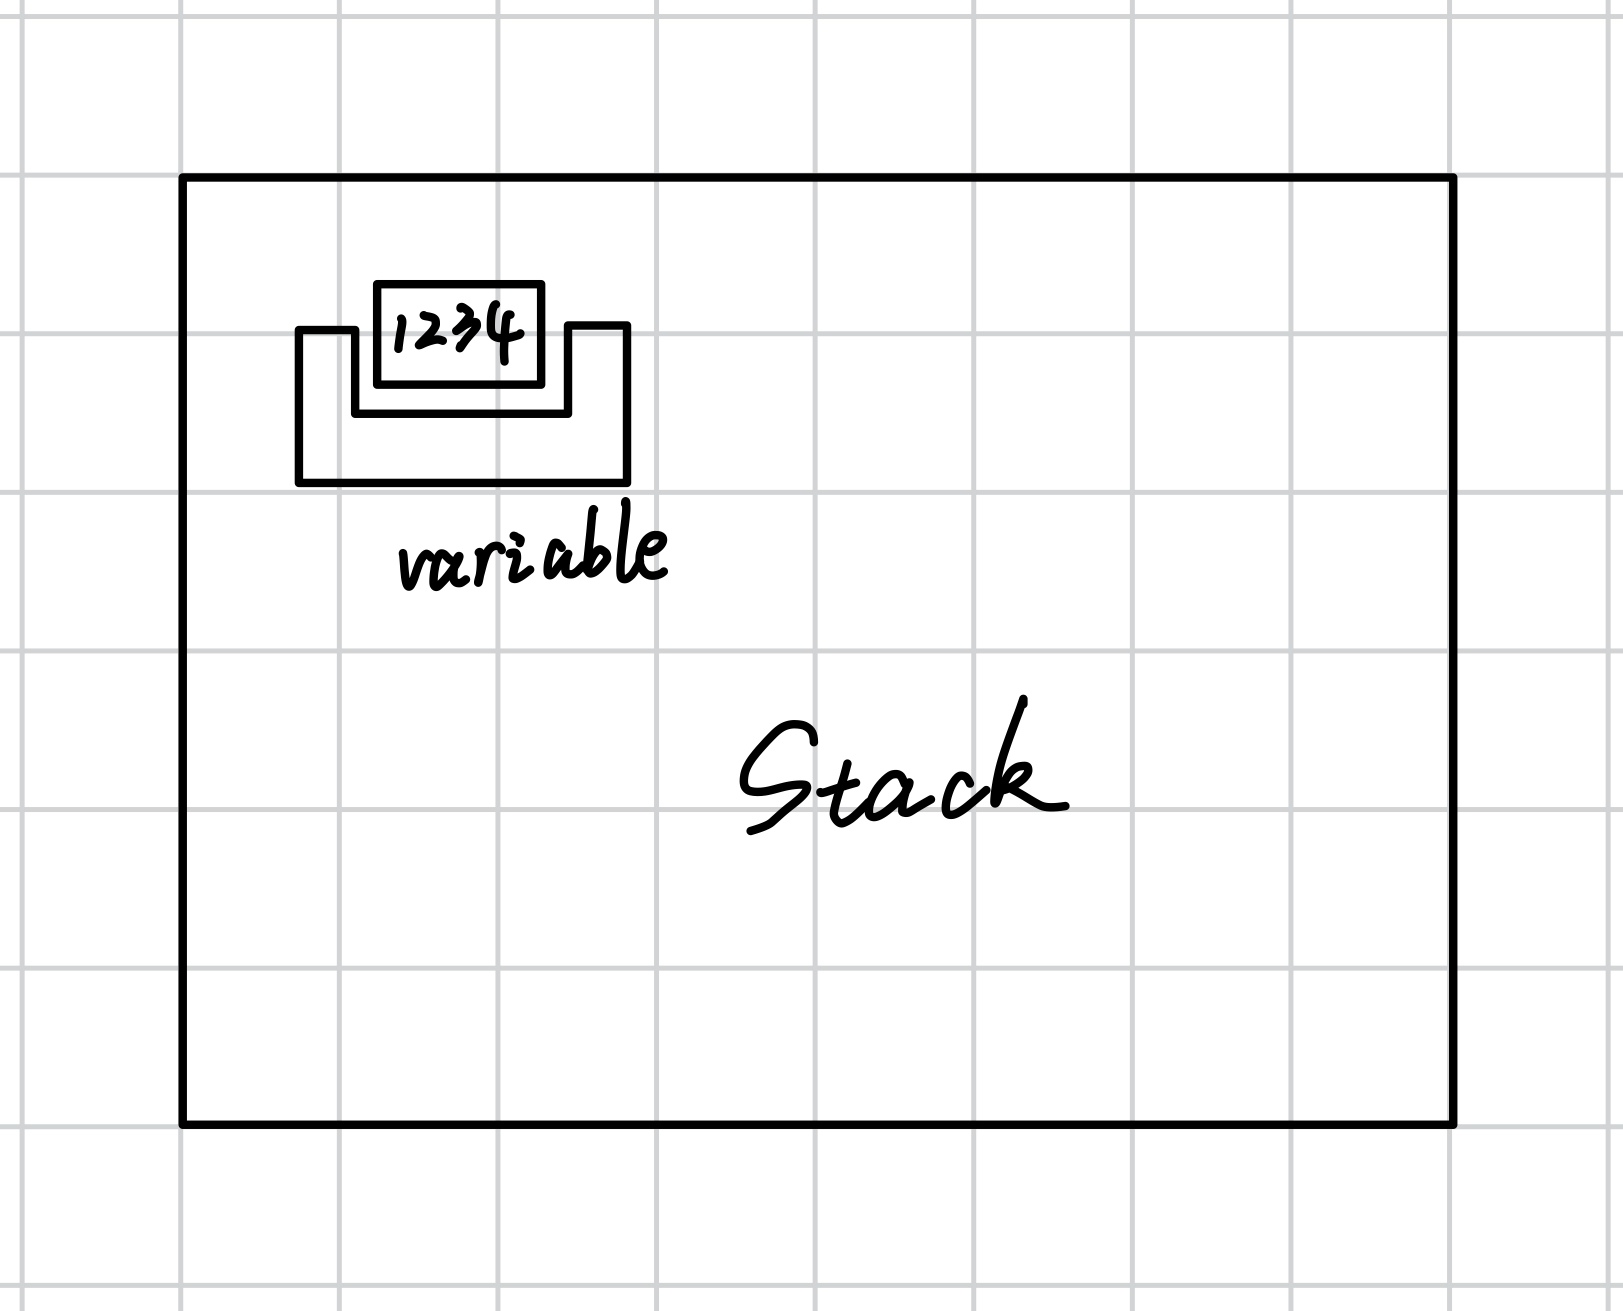
As shown in the diagram, the data 1234 is now named by the variable variable.
When a variable is accessed, you can draw a line from the last access to the current access to establish a dependency between the two accesses. If a variable has been moved, then you can no longer draw such a line from it.
That may sound unclear, so let’s look at a diagram:
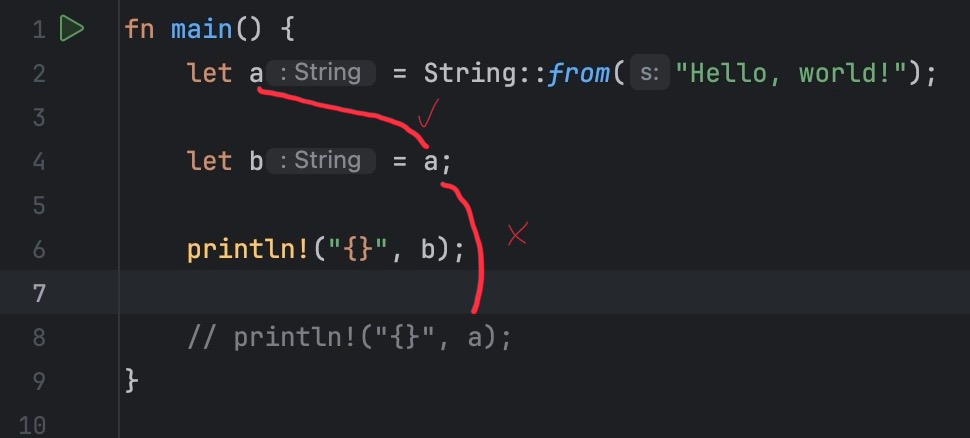
Declaring a (line 2) counts as one access, assigning a to b (line 4) counts as another, but you cannot draw a line between that and printing a (line 8), because the variable has already been moved before that (line 4).
In the high-level model of variables, a variable exists only while it holds a valid value. If a variable’s value has not been initialized, or has already been moved, then the line-drawing method cannot be used.
Using this model, the whole program consists of many dependency lines. These lines are called flows. Each flow tracks the lifetime of a specific instance of a value. When branches exist, flows can split or merge, and each branch tracks a different lifetime of that value.
At any given point in the program, the compiler can check whether all flows are mutually compatible and can coexist in parallel. For example:
- A value cannot have two parallel flows with mutable access.
- A flow borrows a value without any flow owning that value.
The Low-Level Model of Variables
Variables name memory addresses that may or may not store valid values.
You can think of a variable as a slot for a value: when you assign to it, the slot becomes filled, and the old value inside it, if any, is discarded or replaced. When you access it, the compiler checks whether the slot is empty. If it is, then the variable is said to be uninitialized or its value has been moved.
A pointer to a variable is actually a pointer to the underlying memory of that variable. By dereferencing it, you can obtain its value.
Note: in this example, we ignore CPU registers and treat them as an optimization detail. In reality, if a variable does not need a memory address, the compiler may use registers instead of memory to store it.
1.4 Memory Part 2 - Stack Memory, Stack Frames, and Stack Pointer
1.4.1. Memory Regions
Programs have many memory regions; not all of them are on DRAM. Three especially important regions are stack memory, heap memory, and static memory.
Compared with heap memory, stack memory is faster, while heap memory is slower.
1.4.2. Stack Memory
There is an axiom: “When in doubt, prefer the stack.” But if you want to put data on the stack, the compiler must know the size of the type. In other words: “When in doubt, prefer a type that implements Sized.” (For details on the Sized trait, see Rust Guide 19.5.4. Dynamically Sized Types and the Sized Trait.)
The stack is a region of memory that the program uses as temporary storage for function calls.
Why is it called a stack? Because entries on the stack are LIFO (Last In, First Out).
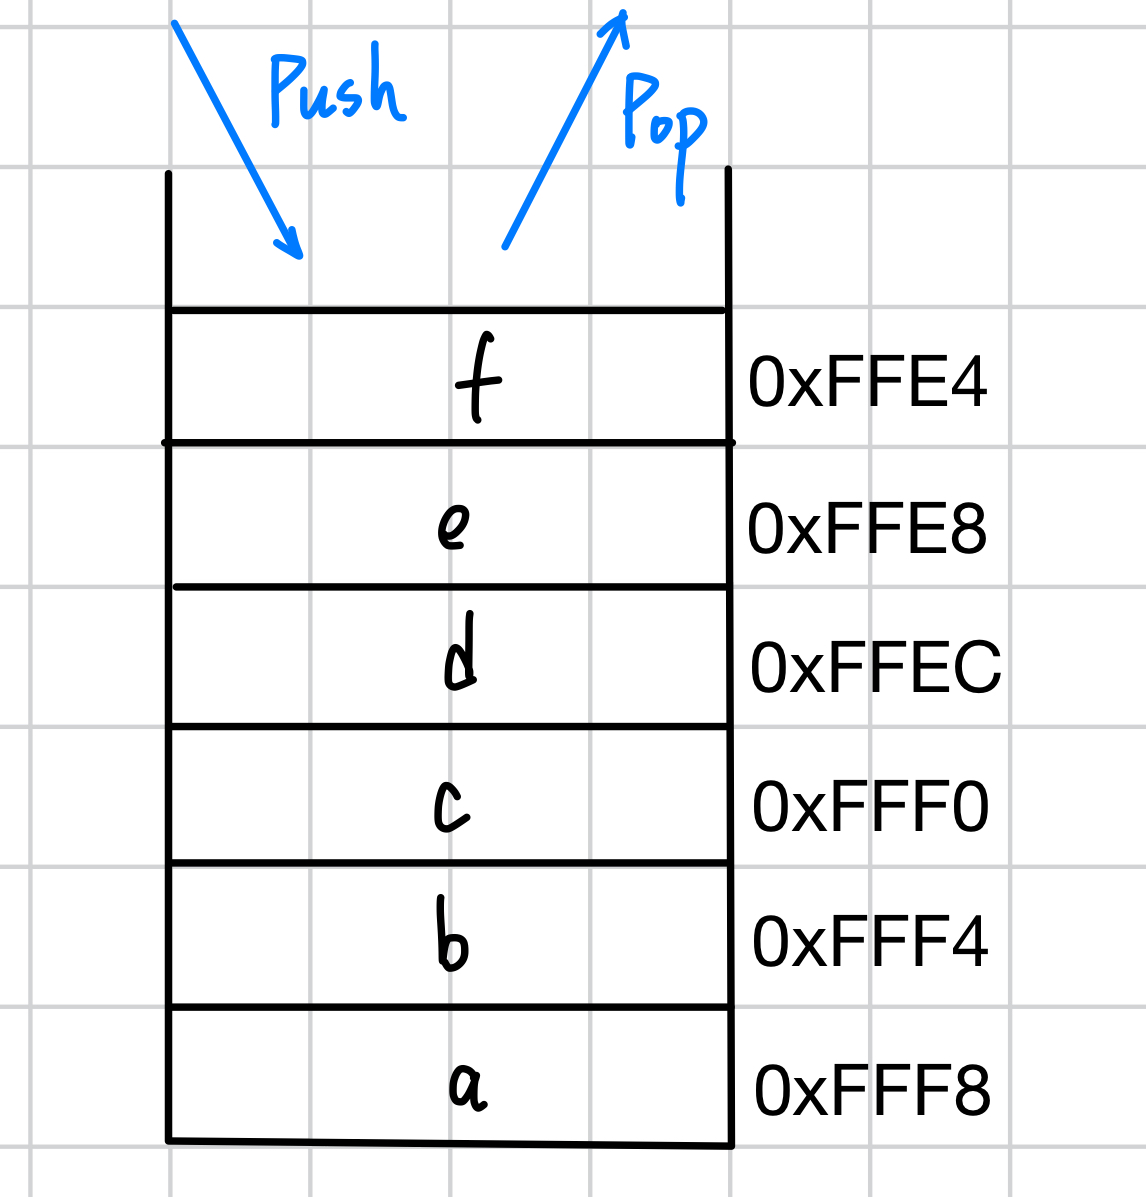
Stack Frame
Each time a function is called, a contiguous block of memory is allocated at the top of the stack. This is called a stack frame.
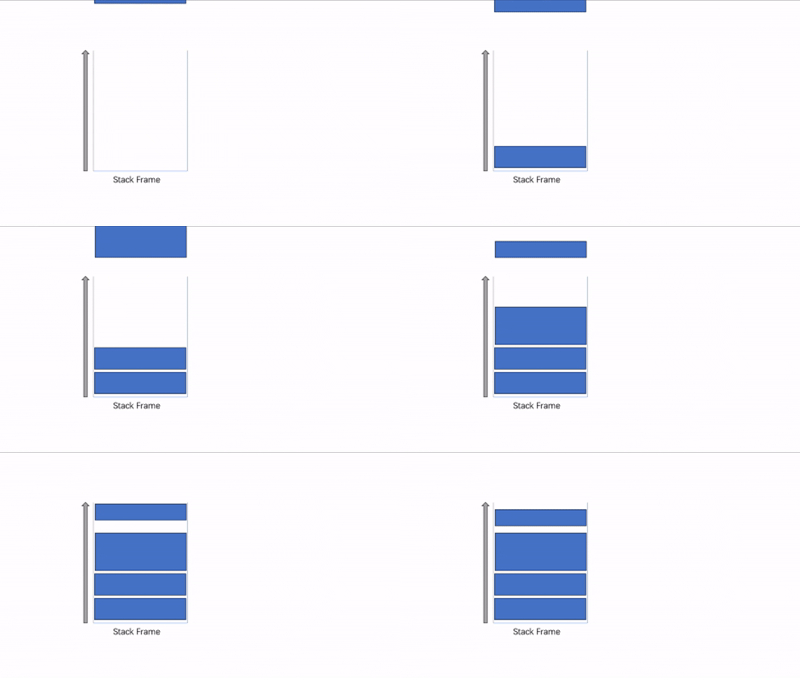
Near the bottom of the stack is the frame for main, and as functions are called, the remaining frames are pushed onto the stack.
A function’s frame contains all the variables inside that function, as well as the parameters passed to it. When the function returns, its frame is reclaimed.
The bytes that make up the values of a function’s local variables are not immediately erased, but accessing them is unsafe because they may be overwritten by later function calls if the later call’s frame overlaps the reclaimed one. Even if they are not overwritten, they may still contain values that can no longer be used, such as values that were moved out when the function returned.
Stack frames are also called activation frames or allocation records. Only when activation frames are allocated on the stack do we call them stack frames.
Each stack frame has a different size. During a function call, the stack frame contains the function’s state. When one function is called inside another, the original function’s state is frozen for the moment.
Stack frames provide space for function parameters, pointers to the original call stack, and local variables (excluding data allocated on the heap).
The main task of the stack is to create space for local variables, because all variables on the stack are adjacent to one another, which makes them faster to find.
Let’s look at an example:
fn main() {
    let pw = "justok";
    let is_string = is_strong(pw);
}

fn is_strong(password: String) -> bool {
    password.len() > 5
}
Output:
error[E0308]: mismatched types
 --> src/main.rs:3:31
  |
3 |     let is_string = is_strong(pw);
  |                     --------- ^^ expected `String`, found `&str`
  |                     |
  |                     arguments to this function are incorrect
  |
note: function defined here
 --> src/main.rs:6:4
  |
6 | fn is_strong(password: String) -> bool {
  |    ^^^^^^^^^ ----------------
help: try using a conversion method
  |
3 |     let is_string = is_strong(pw.to_string());
  |                                 ++++++++++++
The problem is obvious: pw is of type &str, while the parameter of is_strong is of type String.
Our goal is to make is_strong compatible with both &str and String. That sounds simple, but it is actually a little tricky: a String owns a heap buffer, while an &str is only a fat pointer to some UTF-8 bytes that may live in static memory, on the heap, or elsewhere. Converting between these two types is not trivial.
Consider the revised code:
#![allow(unused)]
fn main() {
fn is_strong<T: AsRef<str>>(password: T) -> bool {
    password.as_ref().len() > 5
}
}
This treats the incoming parameter as a reference to str.
We could also write it like this:
#![allow(unused)]
fn main() {
fn is_strong<T: Into<String>>(password: T) -> bool {
    password.into().len() > 5
}
}
This converts the incoming parameter into a String. But these versions involve quite a bit of conversion.
We could also write:
#![allow(unused)]
fn main() {
use std::fmt::Display;

fn is_strong<T: Display>(password: T) -> bool {
    password.to_string().len() > 5
}
}
This converts the parameter to a String using to_string and then operates on it. This is even slower than the previous approach.
Stack Pointer
As the program executes, the CPU maintains a cursor that keeps updating and reflects the current address of the current stack frame. This cursor is called the stack pointer.
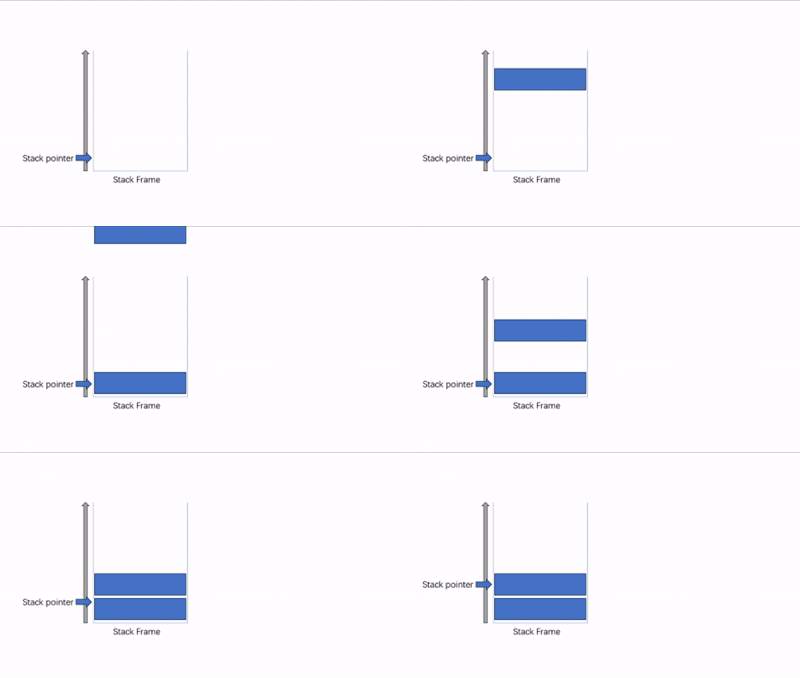
As functions keep calling other functions, the stack grows (the stack pointer starts at the stack frame), and the stack pointer value decreases (because memory addresses get larger the closer you are to the stack frame); when a function returns, the stack pointer value increases (when the function returns, its frame is reclaimed, and the cursor moves toward the stack frame, so the value becomes larger).
When the Stack Frame Disappears
The fact that stack frames eventually disappear is closely related to Rust’s notion of lifetimes. Any variable stored on the stack becomes inaccessible after its frame disappears.
So, the lifetime of any variable on the stack can be at most as long as the lifetime of its frame.
1.5 Memory Part 3 - A Deep Dive Into Rust Heap Memory Implementation
1.5.1. Heap Memory
- Heap means chaos, while the stack is relatively orderly.
- The heap is a memory pool and is not tied to the current program’s call stack, while the stack is tied to the current program’s call stack.
- The heap is intended for types whose size is not known at compile time, while data on the stack must have a known size at compile time.
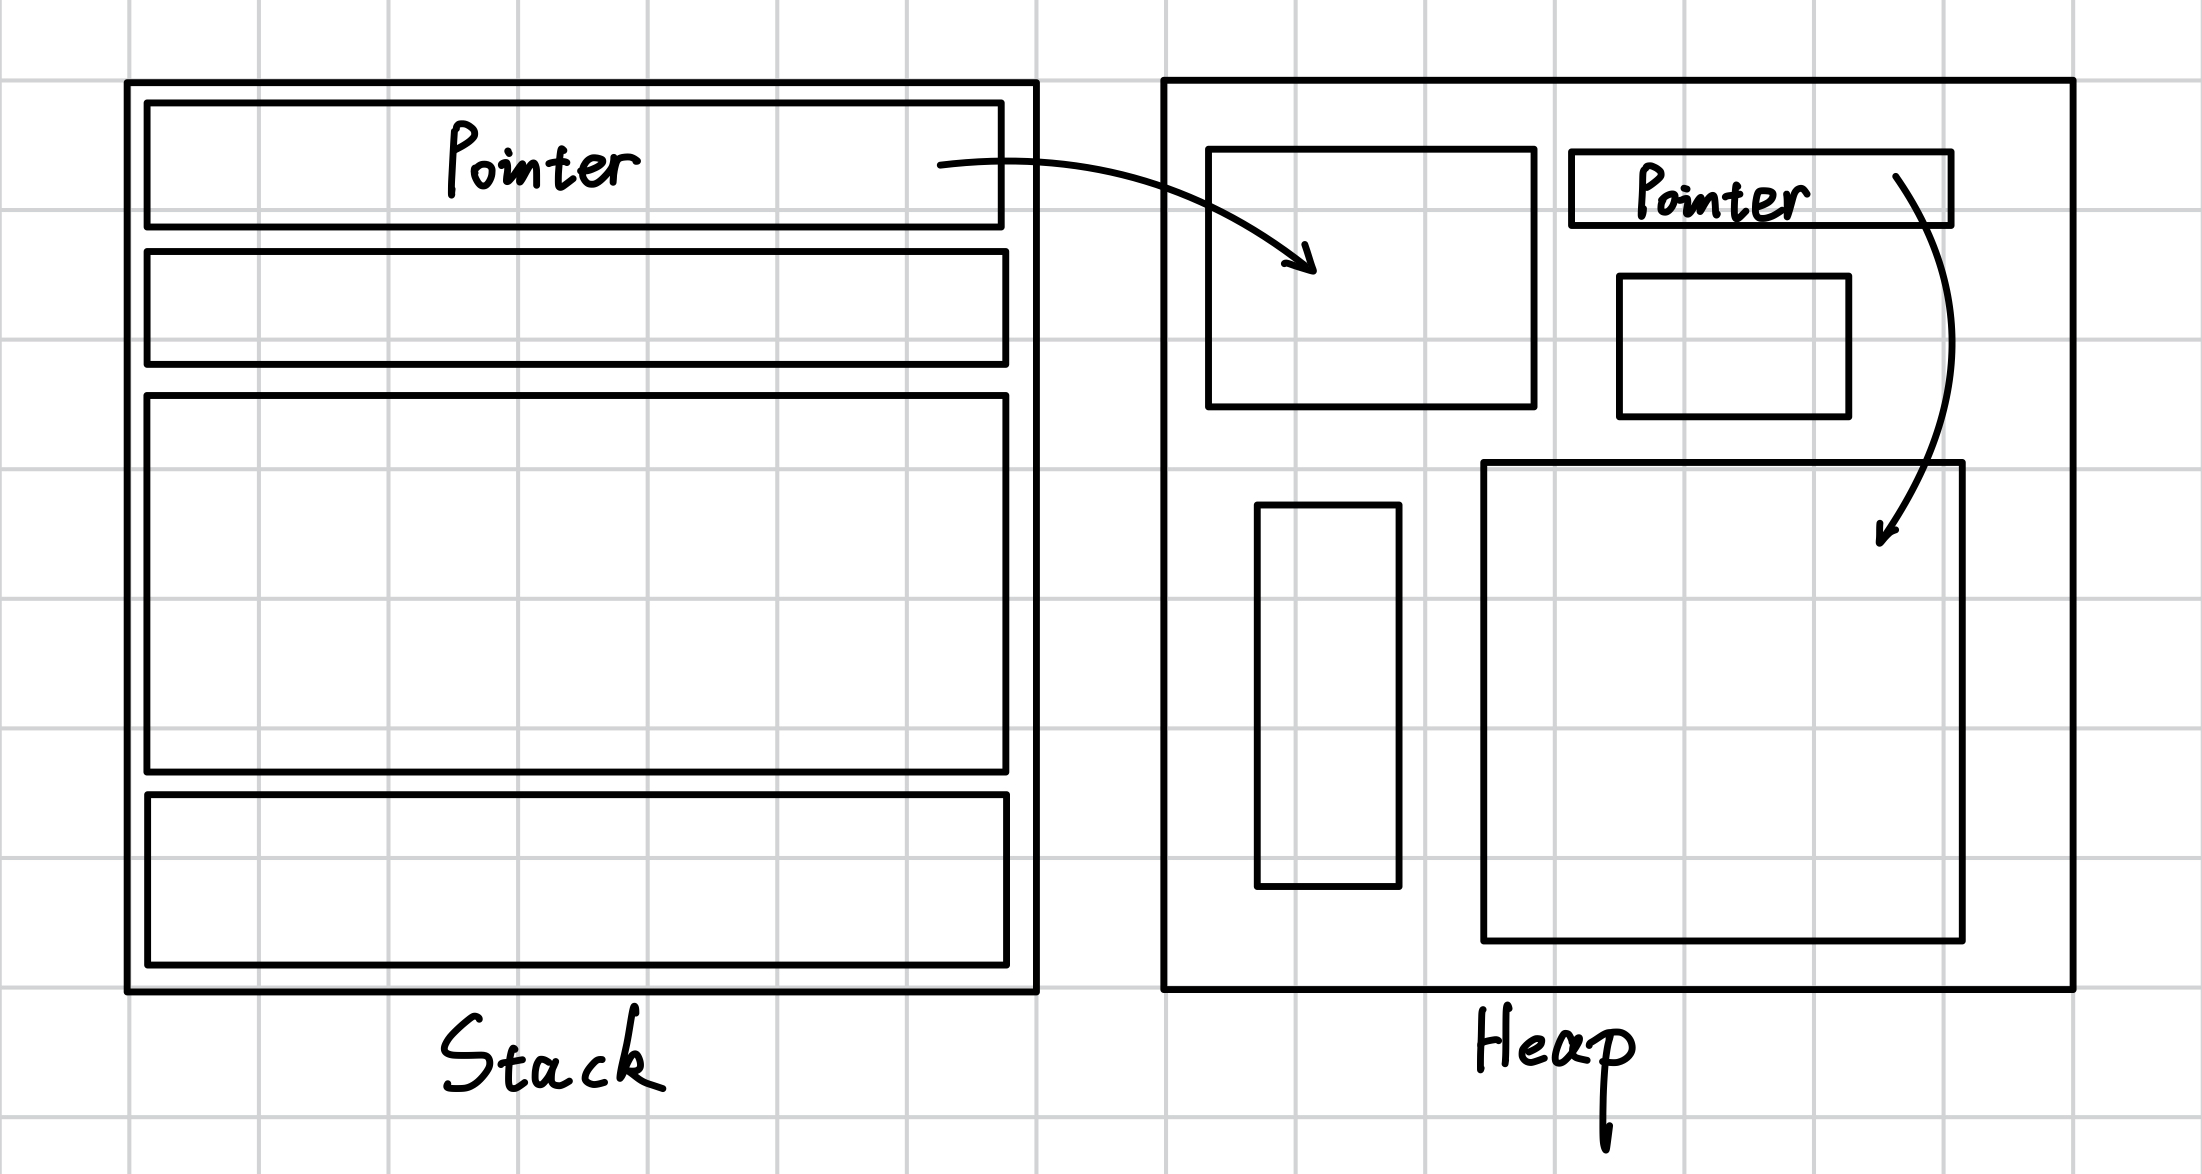
As shown in the figure, the location of data on the heap and its size are both uncertain. A common pattern is that the stack holds a pointer to heap data.
What does it mean for size to be unknown at compile time?
- Some types can grow or shrink over time, such as
StringandVec<T>. These types themselves areSized(they are fixed-size structs on the stack), but the buffers they own live on the heap and can change size. - Some other types do not change size, but the compiler cannot be told how much memory needs to be allocated for them.
- Another example is trait objects (see Rust Guide 19.5.4. Dynamically Sized Types and the
SizedTrait), which allow programmers to simulate some dynamic-language features — putting multiple types into one container. - True dynamically sized types (DSTs) — also called unsized types — include slices such as
strand[T], as well as trait objects such asdyn Trait.StringandVec<T>are not DSTs; they manage dynamically sized heap data behind aSizedhandle.
The heap allows you to explicitly allocate a contiguous block of memory. When you do that, you get a pointer to the beginning of that memory.
Values on the heap remain valid until you explicitly free them. This is useful when you want a value to outlive the current function frame (see 1.4. Memory Part 2). If a value is a function’s return value, the calling function can leave some space on its stack for the callee to write the value into before returning.
1.5.2. Heap Memory and Thread Safety
If you want to send a value to another thread, the current thread may not be able to share stack frames with that thread at all. In that case, you can store the value on the heap. Because heap allocations do not disappear when a function returns, you can allocate memory for a value in one place and pass a pointer to it to another thread, allowing that thread to operate on the value safely.
In other words: when you allocate heap memory, the resulting pointer has an unconstrained lifetime, and your program can keep the data alive for as long as it wants.
1.5.3. How Heap Memory Is Used
Variables on the heap must be accessed through pointers. Let’s look at an example:
fn main(){
    let a: i32 = 40; // Stack
    let b: Box<i32> = Box::new(60); // Heap
    let result = a + b;
    let result = a + *b;

    println!("{} + {} = {}", a, b, result);
}
Output:
error[E0277]: cannot add `Box<i32>` to `i32`
 --> src/main.rs:4:20
  |
4 |     let result = a + b;
  |                    ^ no implementation for `i32 + Box<i32>`
  |
  = help: the trait `Add<Box<i32>>` is not implemented for `i32`
help: consider dereferencing here
  |
4 |     let result = a + *b;
  |                      +
ais of typei32and is stored on the stack.bis of typeBox<i32>and is stored on the heap.
But this code definitely has a problem. The problem is let result = a + b;: heap data must be accessed through a pointer, and b is a pointer while a is a number, so their types are different and they cannot be added.
So we delete that line and change the original code to:
fn main(){
    let a: i32 = 40; // Stack
    let b: Box<i32> = Box::new(60); // Heap

    let result = a + *b;

    println!("{} + {} = {}", a, b, result);
}
let result = a + *b; uses * to dereference b and extract the value 60 pointed to by the pointer.
Output:
40 + 60 = 100
How Rust Interacts With Heap Memory
In Rust, the main way to interact with heap memory is through the Box<T> type.
When we use Box::new to create an instance of type Box<T>, the value (the argument passed to Box::new) is placed on the heap, and the returned Box<T> is the pointer to that heap allocation. When the Box is dropped, the memory is freed.
If you forget to free heap memory, you will cause a memory leak. But sometimes programmers intentionally leak memory, for example when there is a read-only configuration that the whole program needs to access. In that case, Box::leak can be used to obtain a 'static reference and deliberately leak the allocation.
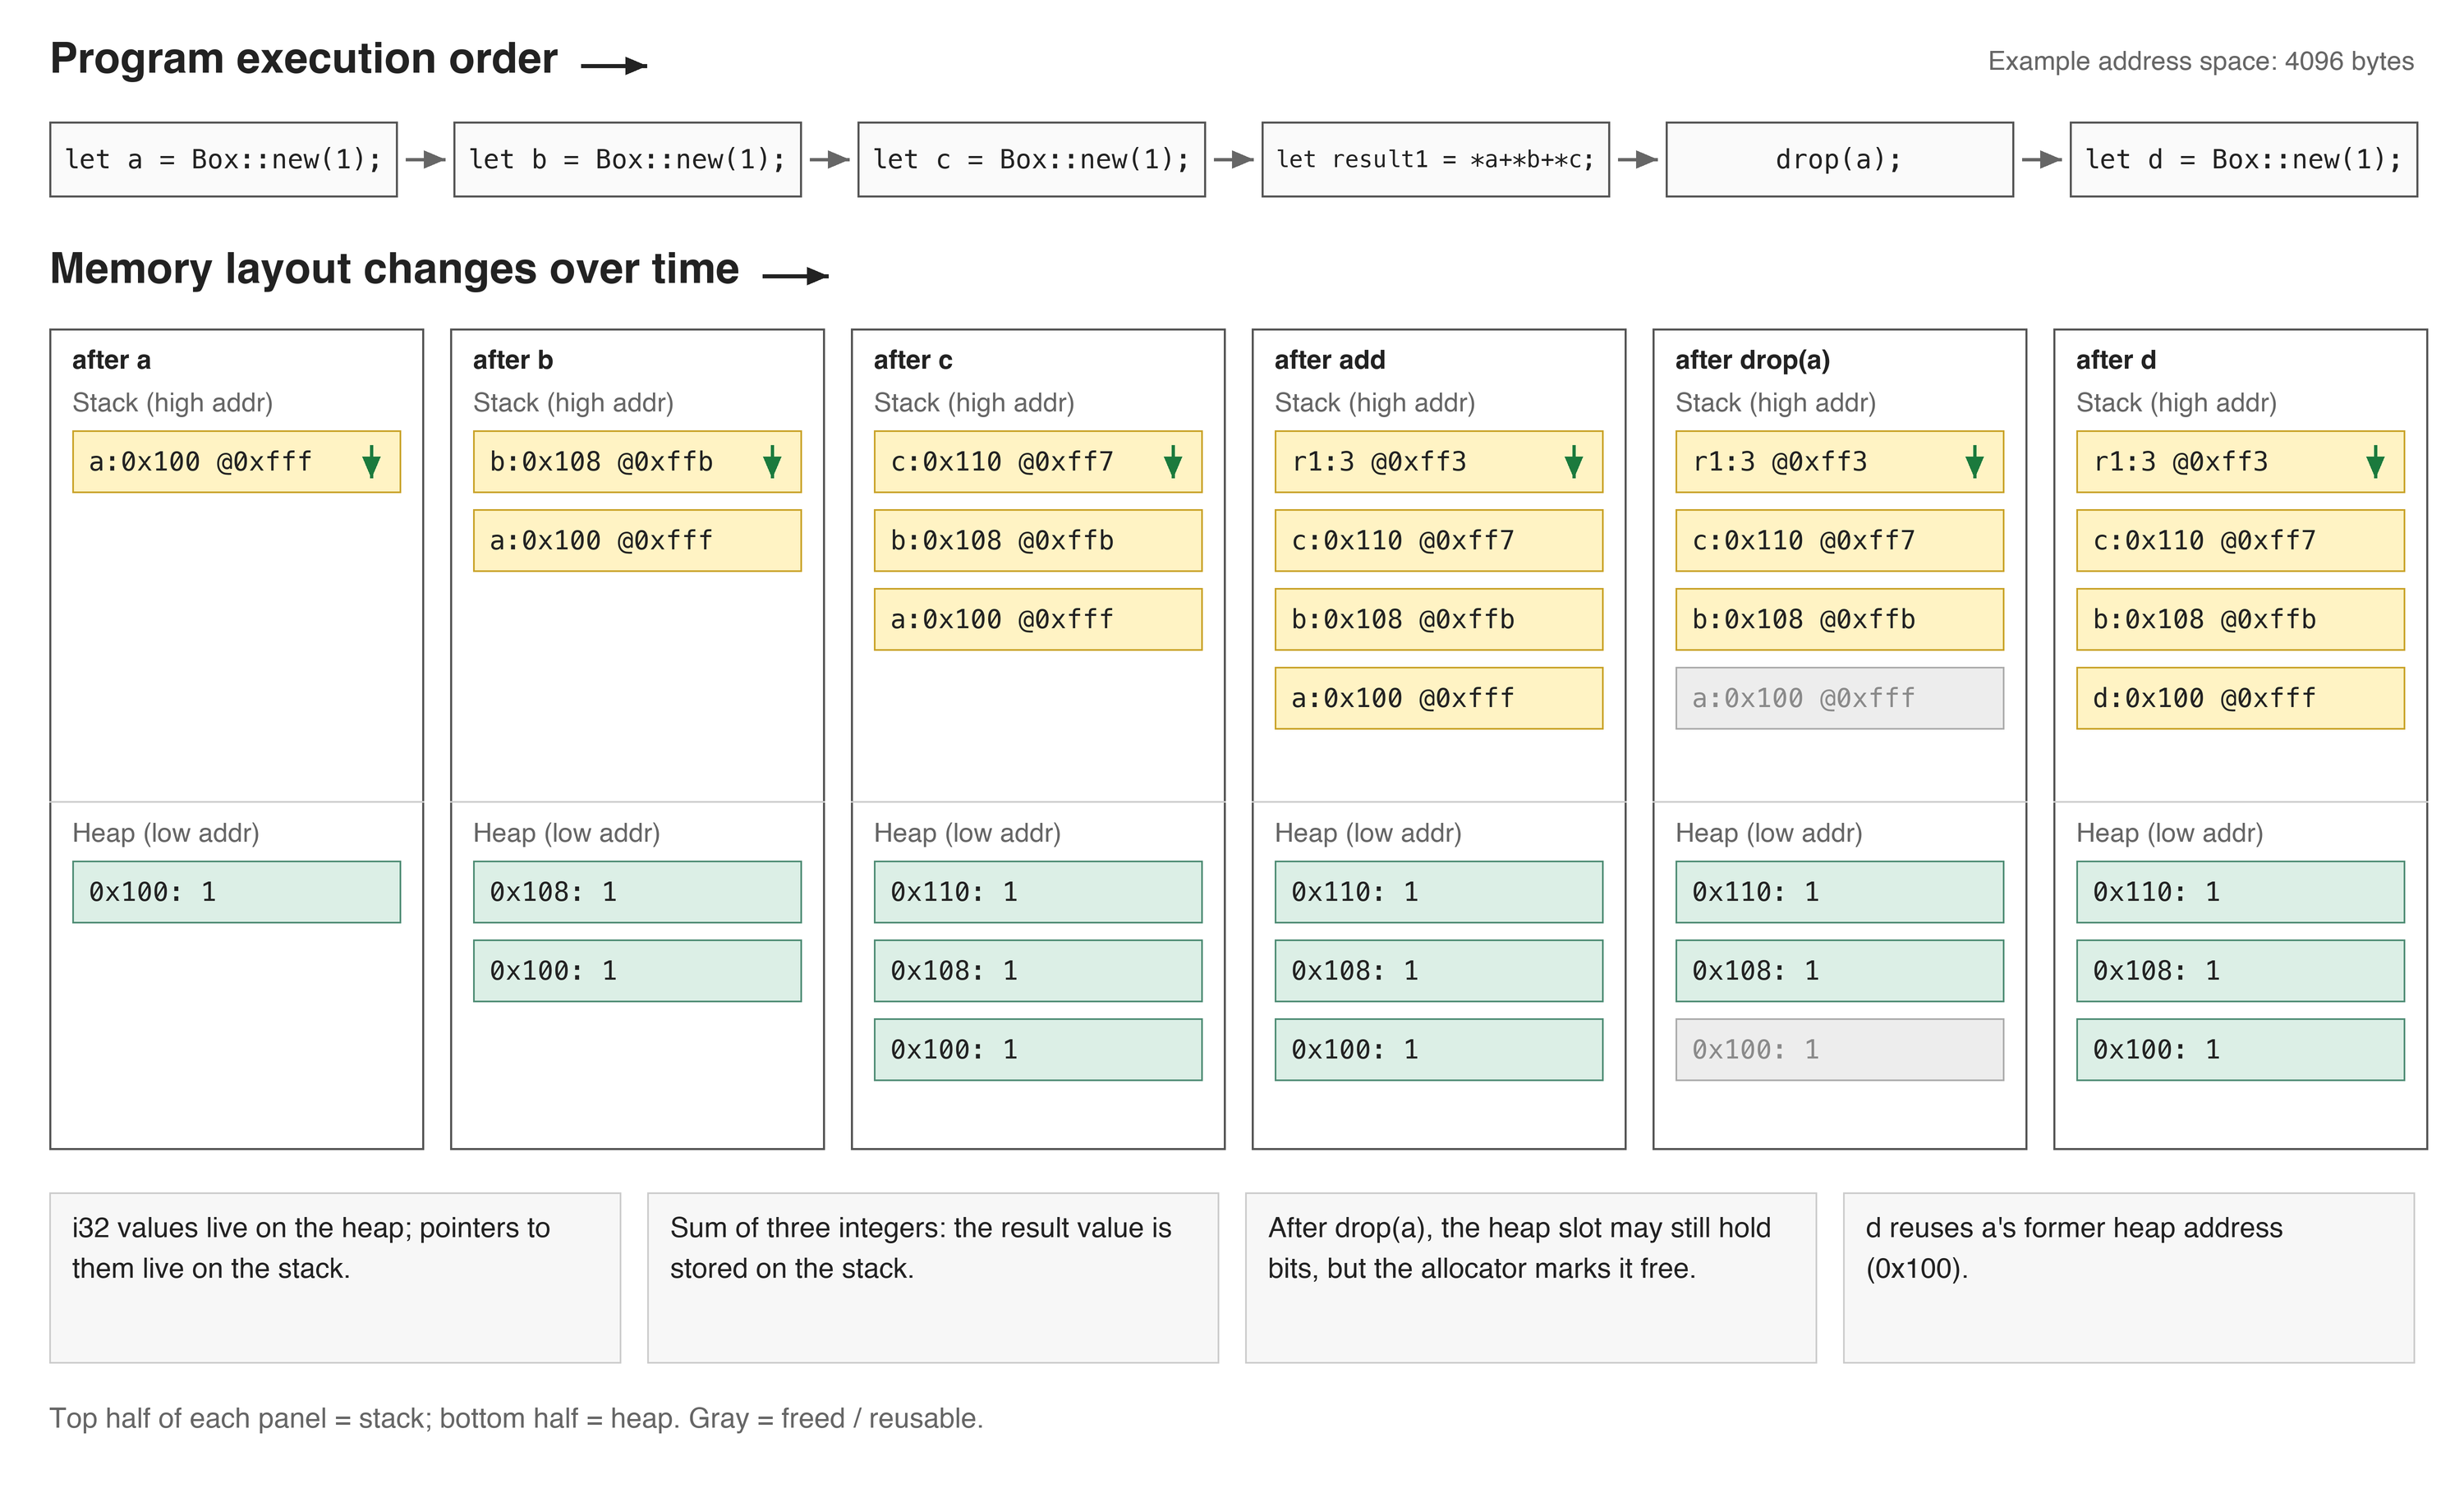
Let’s look at an example:
use std::mem::drop;

fn main(){
    let a = Box::new(1);
    let b = Box::new(1);
    let c = Box::new(1);

    let result1 = *a + *b + *c;

    drop(a);

    let d = Box::new(1);

    let result2 = *b + *c + *d;

    println!("{} {}", result1, result2);
}- You can manually free memory using the
std::mem::dropfunction.
Let’s walk through the logic of this program:
- First, variables
a,b, andcare declared, and their values are all1stored on the heap (Box<i32>). - We dereference all three variables with
*and add them together to getresult1. - After
result1is obtained, thedropfunction is used to discarda. - Then variable
dis declared, and its value is also1stored on the heap (Box<i32>). - We dereference
b,c, andd, add them together, and getresult2. - Finally,
result1andresult2are printed.
Let’s use a diagram to see how memory changes while the program runs:
1.6 Memory Part 4 - Static Memory and the ’static Lifetime Annotation
1.6.1. Static Memory
Static memory is actually a collective term. It refers to several closely related regions in the compiled program file. When the program runs, these regions are automatically loaded into memory.
Values in static memory live for the entire duration of the program.
The program’s static memory contains the binary code of the program itself, which is usually mapped as read-only. As the program executes, it walks through the binary instructions in the text segment one by one, and jumps when a function is called.
Static memory holds the memory for variables declared with static, as well as some constant values, such as strings.
1.6.2. The 'static Lifetime Annotation
'static is a special lifetime, and its name comes from static memory. It marks a reference as valid for as long as static memory exists — that is, until the program exits.
The memory for a static variable is allocated when the program starts. By definition, a reference to a value stored in static memory is 'static, because it will not be freed until the program ends. However, a reference with the 'static lifetime annotation does not have to point to static memory.
If a reference with the 'static lifetime annotation does not have to point to static memory, why is this lifetime called 'static? Isn’t it misleading if something has 'static but is not stored in static memory?
- The name
'staticstill makes sense because: once you create a reference with the'staticlifetime, for the rest of the program it may as well point to static memory, because the program is allowed to use it for as long as it wants.
In other words, the name 'static may make people think that all references with the 'static lifetime point to static memory — that is, global variables or constants that live for the entire duration of the program. In reality, 'static only means that the reference is valid for the entire lifetime of the program; it does not require the referenced data to be stored in the static section. Put differently, a reference with 'static means “this reference can live forever, and the program can use it at any time”, but it does not force the underlying data to be statically allocated.
When writing Rust code, you will encounter the 'static lifetime annotation more often than static memory itself. 'static often appears in trait bounds for type parameters.
For example, T: 'static means that type T can live for as long as we want — until the program exits — and it also means that T must be owned and self-sufficient. In other words, the type must either not borrow any other (non-static) values or only borrow values that are static. That guarantees the type can live until the end of the program.
1.6.3. The Difference Between const and static
The const keyword declares what follows it as a constant, for example:
#![allow(unused)]
fn main() {
const X: i32 = 123;
}Xis declared as a constant.
Constants can be fully evaluated at compile time. During that process, any code that refers to the constant is replaced with the constant’s computed value.
For example:
#![allow(unused)]
fn main() {
const X: i32 = 123;
println!("{}", X);
}
The print operation in this line will be rewritten at compile time as:
#![allow(unused)]
fn main() {
println!("{}", 123);
}
So a constant has no memory or associated storage (because it is not a place; the definitions of value, variable, and place are given in 1.3. Memory Part 1). You can think of a constant as a convenient name for a specific value.
1.7 Memory Part 5 - Heap vs. Stack Memory, Virtual Memory, and Guidelines for Displaying Data in RAM
1.7.1. Dynamic Memory Allocation
At any given moment, a running program occupies part of memory. Sometimes the program needs more memory, so it must request it from the operating system; this is called dynamic allocation.
The following diagram shows the steps of dynamic memory allocation:
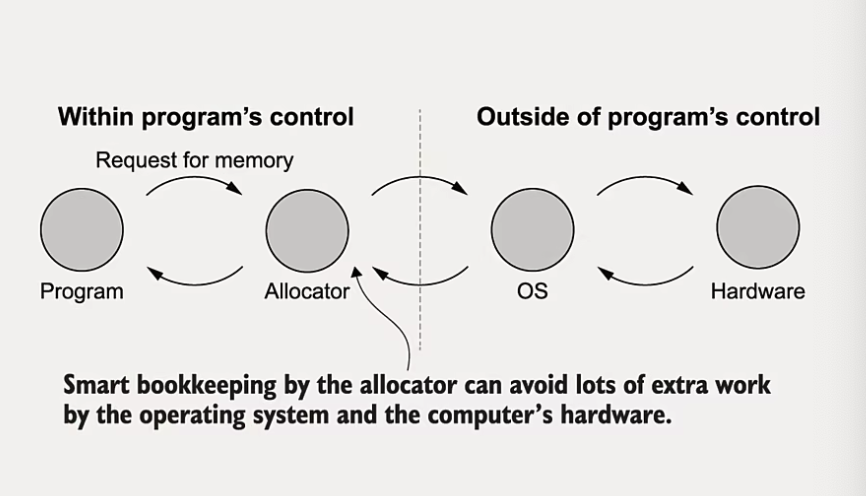
- The program requests memory from the system through the allocator interface. On Unix-like systems this is typically done with
malloc()/free(), and on Windows withHeapAlloc()/HeapFree(). - The program uses the allocated memory.
- If the memory is no longer needed after use, the program releases it back to the operating system.
PS: there is an allocator between the program and the system when memory is requested. It is a specialized subroutine hidden behind the scenes of the program, and it performs some optimizations to avoid a large amount of work for the CPU and the operating system.
1.7.2. Why Is There a Performance Difference Between Stack Memory and Heap Memory?
First of all, it should be made clear that stack memory and heap memory are only concepts; physically, memory does not contain these two separate regions.
The reason stack memory is fast is that:
- Local variables of functions (all allocated on the stack) are adjacent to one another in RAM (contiguous layout). A contiguous layout is very cache-friendly.
The reason heap memory is slower is that:
- Data allocated on the heap is unlikely to be adjacent to one another.
- Accessing data on the heap requires dereferencing a pointer (which involves page-table lookups and then accessing main memory).
A Simple Comparison Between Stack and Heap
| Stack | Heap | Notes |
|---|---|---|
| Simple | Complex | |
| Safe | Dangerous | Dangerous here means Unsafe Rust |
| Fast | Slow | |
| Rigid | Flexible |
- Data structures on the stack cannot change size during their lifetime.
- Data structures on the heap are more flexible because the pointer can change.
1.7.3. Virtual Memory
Virtual memory is the memory view seen by a program. All data that a program can access is provided by the operating system within its address space.
Intuitively, a program’s memory is a sequence of bytes, from a starting position 0 to an ending position n. For example, if a program reports that it uses 100 KB of RAM, then n would be around 100000.
Let’s look at an example:
fn main() {
    let mut n_nonzero = 0;

    for i in 0..10000 {
        let ptr = i as *const u8;
        let byte_at_addr = unsafe { *ptr };
        if byte_at_addr != 0 {
            n_nonzero += 1;
        }
    }

    println!("{}", n_nonzero);
}- This example scans the memory of the running program byte by byte, starting at position
0and ending at9999. let ptr = i as *const u8;convertsiinto an immutable raw pointer of type*const u8(au8occupies one byte) so that the memory address can be checked (for raw pointers, see 1.2.3. Raw Pointer). Here, we treat each address as one unit. In reality, many values occupy more than one byte and span multiple bytes, but we will ignore that here.- The next line,
let byte_at_addr = unsafe { *ptr };, dereferences the pointer (operations on raw pointers must be placed inside anunsafeblock) and reads the value intobyte_at_addr. - If
byte_at_addris not0, thenn_nonzeroincreases by 1. - Finally, the value of
n_nonzerois printed.
Output:
segmentation fault
segmentation fault means an error that occurs when the CPU or operating system detects that a program is trying to access an illegal (unauthorized) memory address.
A segment refers to a block in virtual memory. Virtual memory is divided into blocks to minimize the space needed for translating between virtual and physical addresses.
So which memory access is illegal? Address 0. When i equals 0, it is effectively a null pointer, and a null pointer cannot be dereferenced. This also partly explains why raw pointer operations must be placed inside an unsafe block.
Let’s start the loop from 1 instead:
fn main() {
    let mut n_nonzero = 1;

    for i in 1..10000 {
        let ptr = i as *const u8;
        let byte_at_addr = unsafe { *ptr };
        if byte_at_addr != 0 {
            n_nonzero += 1;
        }
    }

    println!("{}", n_nonzero);
}
Output:
segmentation fault
The same error.
This example does not work, so let’s switch to another one:
static GLOBAL: i32 = 1000;

fn noop() -> *const i32 {
    let noop_local = 12345;
    &noop_local as *const i32
}

fn main() {
    let local_str = "a";
    let local_int = 123;
    let boxed_str = Box::new("b");
    let boxed_int = Box::new(789);
    let fn_int = noop();

    println!("GLOBAL:    {:p}", &GLOBAL as *const i32);
    println!("local_str: {:p}", local_str.as_ptr());
    println!("local_int: {:p}", &local_int as *const i32);
    println!("boxed_int: {:p}", Box::into_raw(boxed_int));
    println!("boxed_str: {:p}", Box::into_raw(boxed_str));
    println!("fn_int:    {:p}", fn_int);
}- We declare variables such as
GLOBAL,local_str, andlocal_int(static variables also count as variables). Some are stored on the heap, and some are stored on the stack. - We print their memory addresses.
local_str.as_ptr()prints the address of the string data. Prefer that overlocal_str as *const strwith{:p}: a*const stris a wide pointer (see 1.14.6. Wide Pointers), and current Rust formats it asPointer { addr: ..., metadata: ... }rather than a bare hex address.
Output:
GLOBAL:    0x102572ae4
local_str: 0x102572ae0
local_int: 0x16d8c260c
boxed_int: 0x102d89b10
boxed_str: 0x102d89c10
fn_int:    0x16d8c2620
Although our program is very small, the distribution of variables in virtual memory is quite scattered. Still, there is some pattern:
- The addresses of
GLOBALandlocal_strare relatively close. - The addresses of
boxed_intandboxed_strare relatively close. - The addresses of
local_intandfn_intare relatively close.
The size of virtual memory is roughly 2^48, but physical memory is certainly not that large. In addition, part of the virtual address space is reserved by the system for itself, and those reserved addresses cannot be used.
Through the Example
From these examples, we can learn a few things:
- Some memory addresses are illegal. If you access out-of-bounds memory, the program will be terminated.
- Memory addresses are not random. Although values of different types appear to be widely distributed in memory, there is actually a pattern.
1.7.4. Translating Virtual Addresses to Physical Addresses
Accessing data in a program requires virtual addresses (a program can only access virtual addresses). Virtual addresses are translated into physical addresses, which involves the program, the operating system, the CPU, and RAM hardware (and sometimes hard disks and other devices as well):
- The CPU is responsible for the translation; more specifically, the Memory Management Unit (MMU) inside the CPU performs this work.
- The operating system is responsible for storing instructions.
- These instructions also exist at predefined addresses in memory.
In the worst case, every memory access triggers two memory lookups: one for the memory being accessed and one for the instructions.
The CPU maintains a cache of recently translated addresses. It has its own fast memory to accelerate memory access. For historical reasons, this memory is called the Translation Lookaside Buffer (TLB).
To improve performance, programmers need to keep data structures compact and avoid deep nesting. This becomes especially important once the TLB capacity is reached (for x86 processors, roughly 100 pages).
Let’s define the terms:
- Page: a fixed-size block of bytes in physical memory; on 64-bit systems it is usually 4 KB.
- Word: any value whose size is the size of a pointer, i.e. the width of a CPU register. In Rust,
usizeandisizeare word-length types.
Virtual addresses are divided into many blocks called pages, usually 4 KB each. Dividing memory into blocks helps avoid storing a translation mapping for every variable. In addition, pages have a uniform size, which helps avoid memory fragmentation (empty, unusable spaces appearing in available RAM).
Note: the above is only a general guideline; situations such as microcontrollers are different.
1.7.5. Practical Guidelines for Displaying Data in RAM
Keep the hot part of your program within 4 KB so that lookups stay fast and performance remains good. Many programs cannot keep their hot working set within 4 KB, and for such programs the 4 KB target is unrealistic. In that case, the next target should be 4 KB × 100. This means the CPU’s translation cache (TLB) can still support your program.
Avoid deeply nested data structures. If a pointer points to another page, performance will be affected.
When traversing arrays, the access order affects cache utilization (because the CPU reads small blocks of bytes from RAM, called a cache line), which in turn affects program performance. Two-dimensional arrays in C/C++, Rust, Python (NumPy), and similar languages are stored in row-major order. For example:
int matrix[3][3] = {
    {1, 2, 3},
    {4, 5, 6},
    {7, 8, 9}
};
The layout in memory is:
1 2 3 | 4 5 6 | 7 8 9
If you use row-major traversal:
for (int i = 0; i < 3; i++) {
    for (int j = 0; j < 3; j++) {
        process(matrix[i][j]);
    }
}
matrix[i][j] is contiguous in memory, which makes good use of cache lines, reduces RAM access, and improves speed.
If you use column-major traversal:
for (int j = 0; j < 3; j++) {
    for (int i = 0; i < 3; i++) {
        process(matrix[i][j]);
    }
}
Because columns are scattered in memory, accessing matrix[i][j] may cross multiple cache lines. The CPU may frequently load new cache lines from RAM, causing cache misses and hurting performance.
To summarize:
- In languages such as C/C++, Rust, and Python (NumPy) that use row-major order by default, try to traverse arrays by row.
- In languages such as MATLAB and Fortran that use column-major order, traversing by column is more efficient.
Note:
Virtualization makes things even worse. If you run an application inside a virtual machine, the hypervisor must also translate addresses for the guest operating system. That is why many CPUs include hardware virtualization support — to reduce overhead by reducing the amount of translation work.
If you run containers inside a virtual machine, you add yet another layer of indirection, which also increases latency.
So, if you want bare-metal performance, you have to run the program on bare metal.
1.8 Memory Part 6 - Scanning Address Space Through the Operating System
1.8.1. Scan the Address Space Through the Operating System (Example)
Operating systems provide interfaces that let programs make requests — system calls. On Windows, KERNEL32.DLL provides functions for inspecting and manipulating the memory of running processes.
This example is performed on Windows. Why use Windows as the example?
- The function names are easy to understand
- No knowledge of the POSIX API is required
1.8.2. Dependencies
This example uses the windows-sys crate, which provides low-level bindings to the Windows API. Add the following dependency to Cargo.toml:
[dependencies]
windows-sys = { version = "0.59.0", features = [
    "Win32_Foundation",
    "Win32_System_Memory",
    "Win32_System_ProcessStatus",
    "Win32_System_Threading",
] }
- Here we use
windows-systo call Windows APIs such asGetCurrentProcess,K32GetProcessMemoryInfo, andVirtualQueryEx. Those modules are feature-gated, so the features above must be enabled.
1.8.3. Main Program
Then bring the required items into scope in main.rs:
#![allow(unused)]
fn main() {
use std::ffi::c_void;
use std::mem;
use windows_sys::Win32::System::Memory::{VirtualQueryEx, MEMORY_BASIC_INFORMATION};
use windows_sys::Win32::System::ProcessStatus::{PROCESS_MEMORY_COUNTERS, K32GetProcessMemoryInfo};
use windows_sys::Win32::System::Threading::{GetCurrentProcess, GetCurrentProcessId};

/// Windows `PVOID` / `SIZE_T` as used by the Win32 APIs.
/// In `windows-sys` 0.59+, these are expressed as raw Rust types rather than
/// named aliases under `Win32::Foundation`.
type PVOID = *mut c_void;
type SIZE_T = usize;
}PVOID: Represents avoid*pointer, used to describe an opaque memory address. Here it is a local alias for*mut c_void.SIZE_T: Corresponds to an unsigned integer type used to represent the size of a memory region. Here it is a local alias forusize(matching thewindows-sys0.59+ signatures).MEMORY_BASIC_INFORMATION: A built-in system structure used to describe the basic information of a memory region.PROCESS_MEMORY_COUNTERS: A structure used to record a process’s memory usage.K32GetProcessMemoryInfo: This function retrieves memory information for the current process.GetCurrentProcessandGetCurrentProcessId: Retrieve the current process handle and process ID, respectively.
For convenient Debug output, we wrap the PROCESS_MEMORY_COUNTERS returned by the Windows API in a custom ProcessInfo structure:
#![allow(unused)]
fn main() {
#[derive(Debug)]
struct ProcessInfo {
    cb: u32,
    page_fault_count: u32,
    peak_working_set_size: usize,
    working_set_size: usize,
    quota_peak_paged_pool_usage: usize,
    quota_paged_pool_usage: usize,
    quota_peak_non_paged_pool_usage: usize,
    quota_non_paged_pool_usage: usize,
    pagefile_usage: usize,
    peak_pagefile_usage: usize,
}
}-
cb(u32):- Description: The size of the structure in bytes.
- Purpose: Identifies the size of the structure for compatibility.
-
page_fault_count(u32):- Description: The total number of page faults since the process started.
- Purpose: A page fault is the handling process triggered when a memory access misses physical memory. It includes soft faults (data obtained from the file cache) and hard faults (data loaded from disk).
-
peak_working_set_size(usize):- Description: The peak size of the working set used by the process, meaning the memory currently resident in physical memory.
- Purpose: Used to monitor the process’s peak memory usage.
-
working_set_size(usize):- Description: The current size of the process’s working set.
- Purpose: Shows how much physical memory the process is currently using.
-
quota_peak_paged_pool_usage(usize):- Description: The peak size of the process’s paged-pool quota usage.
- Purpose: The paged pool is kernel-mode memory that can be paged out to disk.
-
quota_paged_pool_usage(usize)- Description: The current size of the process’s paged-pool quota usage.
- Purpose: Used to monitor the amount of pageable kernel memory currently in use.
-
quota_peak_non_paged_pool_usage(usize):- Description: The peak size of the process’s non-paged-pool quota usage.
- Purpose: The non-paged pool is kernel-mode memory that remains permanently resident in physical memory.
-
quota_non_paged_pool_usage(usize):- Description: The current size of the process’s non-paged-pool quota usage.
- Purpose: Used to monitor the amount of non-pageable kernel memory currently in use.
-
pagefile_usage(usize):- Description: The current amount of space used by the process in the page file.
- Purpose: Indicates how much of the process’s data has been paged to disk.
-
peak_pagefile_usage(usize)- Description: The peak amount of page-file space used by the process.
- Purpose: Used to monitor the process’s page-file high-water mark.
MEMORY_BASIC_INFORMATION from windows-sys does not implement Debug, so we also wrap its fields for printing:
#![allow(unused)]
fn main() {
#[derive(Debug)]
struct MemoryBasicInfo {
    base_address: *mut c_void,
    allocation_base: *mut c_void,
    allocation_protect: u32,
    region_size: usize,
    state: u32,
    protect: u32,
    type_: u32,
}
}
Get the current process handle and process ID (these must go inside an unsafe block):
#![allow(unused)]
fn main() {
let this_proc = GetCurrentProcess();
let this_pid = GetCurrentProcessId();
}
Retrieve process memory information:
#![allow(unused)]
fn main() {
let mut mem_counters: PROCESS_MEMORY_COUNTERS = mem::zeroed();
let mem_counters_size = mem::size_of::<PROCESS_MEMORY_COUNTERS>() as u32;
K32GetProcessMemoryInfo(this_proc, &mut mem_counters, mem_counters_size);
}-
let mut mem_counters: PROCESS_MEMORY_COUNTERS = mem::zeroed();- Use
mem::zeroed()to create and initialize aPROCESS_MEMORY_COUNTERSstructure so that all of its fields are zero. PROCESS_MEMORY_COUNTERSis a predefined Windows structure used to store process memory statistics.
- Use
-
let mem_counters_size = mem::size_of::<PROCESS_MEMORY_COUNTERS>() as u32;- Use
mem::size_ofto compute the size of thePROCESS_MEMORY_COUNTERSstructure in bytes. - Convert that size to
u32, which is then used as a parameter in the API call below.
- Use
-
K32GetProcessMemoryInfo(this_proc, &mut mem_counters, mem_counters_size);- Parameter explanation:
this_proc: The current process handle, indicating which process’s memory data you want to query.&mut mem_counters: A mutable reference to thePROCESS_MEMORY_COUNTERSstructure, used to receive the memory statistics returned by the API.mem_counters_size: The size of the structure, ensuring the API can correctly read and populate the structure data.
- Purpose:
CallK32GetProcessMemoryInfoto fillmem_counterswith the current process’s memory state, such as the page-fault count, working-set size, and page-file usage.
- Parameter explanation:
Wrap the memory information in our custom ProcessInfo:
#![allow(unused)]
fn main() {
let proc_info = ProcessInfo {
    cb: mem_counters.cb,
    page_fault_count: mem_counters.PageFaultCount,
    peak_working_set_size: mem_counters.PeakWorkingSetSize,
    working_set_size: mem_counters.WorkingSetSize,
    quota_peak_paged_pool_usage: mem_counters.QuotaPeakPagedPoolUsage,
    quota_paged_pool_usage: mem_counters.QuotaPagedPoolUsage,
    quota_peak_non_paged_pool_usage: mem_counters.QuotaPeakNonPagedPoolUsage,
    quota_non_paged_pool_usage: mem_counters.QuotaNonPagedPoolUsage,
    pagefile_usage: mem_counters.PagefileUsage,
    peak_pagefile_usage: mem_counters.PeakPagefileUsage,
};
}
Define the starting and ending addresses for the scan:
#![allow(unused)]
fn main() {
let min_addr: PVOID = 0 as PVOID;
}
Set a typical upper bound for a 64-bit user-mode address space:
#![allow(unused)]
fn main() {
let max_addr: PVOID = 0x00007FFF_FFFF_FFFF as PVOID;
}
Print the process information and the address range:
#![allow(unused)]
fn main() {
println!("{:p} @ {:p}", this_pid as *const (), this_proc as *const ());
println!("{:?}", proc_info);
println!("min: {:p}, max: {:p}", min_addr, max_addr);
}
Initialize the parameters required by VirtualQueryEx:
#![allow(unused)]
fn main() {
let MEMINFO_SIZE = mem::size_of::<MEMORY_BASIC_INFORMATION>();
let mut base_addr: PVOID = min_addr;
let mut mem_info: MEMORY_BASIC_INFORMATION = mem::zeroed();
}-
let MEMINFO_SIZE = mem::size_of::<MEMORY_BASIC_INFORMATION>();- Purpose: Compute the size of
MEMORY_BASIC_INFORMATIONin bytes and store it inMEMINFO_SIZE. - Reason: The
VirtualQueryExfunction requires the size of this structure buffer so it can write the query result correctly.
- Purpose: Compute the size of
-
let mut base_addr: PVOID = min_addr;- Purpose: Initialize the starting address for the virtual-memory scan by setting the first scan address to
min_addr. base_addr: Represents the starting address of the current query and will be incremented in the loop below to traverse the entire virtual address space.
- Purpose: Initialize the starting address for the virtual-memory scan by setting the first scan address to
-
let mut mem_info: MEMORY_BASIC_INFORMATION = mem::zeroed();- Purpose: Use
mem::zeroed()to create and initialize aMEMORY_BASIC_INFORMATIONstructure, setting all fields to zero. - Reason: This structure will store the result of
VirtualQueryEx, namely the detailed information of the memory region corresponding to the current query address.
- Purpose: Use
Scan the entire address space by calling VirtualQueryEx in a loop:
#![allow(unused)]
fn main() {
loop {
    let rc: SIZE_T = VirtualQueryEx(this_proc, base_addr, &mut mem_info, MEMINFO_SIZE as SIZE_T);

    if rc == 0 {
        break;
    }

    // `MEMORY_BASIC_INFORMATION` from `windows-sys` does not implement `Debug`,
    // so wrap the fields we care about for printing.
    let printable = MemoryBasicInfo {
        base_address: mem_info.BaseAddress,
        allocation_base: mem_info.AllocationBase,
        allocation_protect: mem_info.AllocationProtect,
        region_size: mem_info.RegionSize,
        state: mem_info.State,
        protect: mem_info.Protect,
        type_: mem_info.Type,
    };
    println!("{:#?}", printable);
    // Add the size of the current region to get the next query address
    base_addr = ((base_addr as usize) + mem_info.RegionSize) as PVOID;
    if (base_addr as usize) >= (max_addr as usize) {
        break;
    }
}
}
1.8.4. Full Code
main.rs:
use std::ffi::c_void;
use std::mem;
use windows_sys::Win32::System::Memory::{VirtualQueryEx, MEMORY_BASIC_INFORMATION};
use windows_sys::Win32::System::ProcessStatus::{PROCESS_MEMORY_COUNTERS, K32GetProcessMemoryInfo};
use windows_sys::Win32::System::Threading::{GetCurrentProcess, GetCurrentProcessId};

/// Windows `PVOID` / `SIZE_T` as used by the Win32 APIs.
/// In `windows-sys` 0.59+, these are expressed as raw Rust types rather than
/// named aliases under `Win32::Foundation`.
type PVOID = *mut c_void;
type SIZE_T = usize;

/// To allow Debug-formatted output, we wrap PROCESS_MEMORY_COUNTERS ourselves.
#[derive(Debug)]
struct ProcessInfo {
    cb: u32,
    page_fault_count: u32,
    peak_working_set_size: usize,
    working_set_size: usize,
    quota_peak_paged_pool_usage: usize,
    quota_paged_pool_usage: usize,
    quota_peak_non_paged_pool_usage: usize,
    quota_non_paged_pool_usage: usize,
    pagefile_usage: usize,
    peak_pagefile_usage: usize,
}

/// `MEMORY_BASIC_INFORMATION` from `windows-sys` does not implement `Debug`.
#[derive(Debug)]
struct MemoryBasicInfo {
    base_address: *mut c_void,
    allocation_base: *mut c_void,
    allocation_protect: u32,
    region_size: usize,
    state: u32,
    protect: u32,
    type_: u32,
}

fn main() {
    unsafe {
        // Get the current process handle and process ID
        let this_proc = GetCurrentProcess();
        let this_pid = GetCurrentProcessId();

        // Get process memory information
        let mut mem_counters: PROCESS_MEMORY_COUNTERS = mem::zeroed();
        let mem_counters_size = mem::size_of::<PROCESS_MEMORY_COUNTERS>() as u32;
        K32GetProcessMemoryInfo(this_proc, &mut mem_counters, mem_counters_size);

        // Wrap the memory information in our custom ProcessInfo
        let proc_info = ProcessInfo {
            cb: mem_counters.cb,
            page_fault_count: mem_counters.PageFaultCount,
            peak_working_set_size: mem_counters.PeakWorkingSetSize,
            working_set_size: mem_counters.WorkingSetSize,
            quota_peak_paged_pool_usage: mem_counters.QuotaPeakPagedPoolUsage,
            quota_paged_pool_usage: mem_counters.QuotaPagedPoolUsage,
            quota_peak_non_paged_pool_usage: mem_counters.QuotaPeakNonPagedPoolUsage,
            quota_non_paged_pool_usage: mem_counters.QuotaNonPagedPoolUsage,
            pagefile_usage: mem_counters.PagefileUsage,
            peak_pagefile_usage: mem_counters.PeakPagefileUsage,
        };

        // Define the start and end addresses of the scan
        let min_addr: PVOID = 0 as PVOID;
        // Set a typical upper bound for a 64-bit user-mode address space
        let max_addr: PVOID = 0x00007FFF_FFFF_FFFF as PVOID;

        // Print
        println!("{:p} @ {:p}", this_pid as *const (), this_proc as *const ());
        println!("{:?}", proc_info);
        println!("min: {:p}, max: {:p}", min_addr, max_addr);

        // Initialize the parameters required by VirtualQueryEx
        let MEMINFO_SIZE = mem::size_of::<MEMORY_BASIC_INFORMATION>();
        let mut base_addr: PVOID = min_addr;
        let mut mem_info: MEMORY_BASIC_INFORMATION = mem::zeroed();

        // Loop over VirtualQueryEx to scan the entire address space
        loop {
            let rc: SIZE_T =
                VirtualQueryEx(this_proc, base_addr, &mut mem_info, MEMINFO_SIZE as SIZE_T);
            if rc == 0 {
                break;
            }

            let printable = MemoryBasicInfo {
                base_address: mem_info.BaseAddress,
                allocation_base: mem_info.AllocationBase,
                allocation_protect: mem_info.AllocationProtect,
                region_size: mem_info.RegionSize,
                state: mem_info.State,
                protect: mem_info.Protect,
                type_: mem_info.Type,
            };
            println!("{:#?}", printable);
            // Add the size of the current region to get the next query address
            base_addr = ((base_addr as usize) + mem_info.RegionSize) as PVOID;
            if (base_addr as usize) >= (max_addr as usize) {
                break;
            }
        }
    }
}Cargo.toml:
[package]
name = "RustStudy"
version = "0.1.0"
edition = "2021"

[dependencies]
windows-sys = { version = "0.59.0", features = [
    "Win32_Foundation",
    "Win32_System_Memory",
    "Win32_System_ProcessStatus",
    "Win32_System_Threading",
] }
1.8.5. Steps for Reading and Writing Process Memory
The logic for reading and writing process memory is fairly simple. Pseudocode:
let pid = some_process_id;
OpenProcess(pid);

loop over the address space {
    call VirtualQueryEx() to reach the next memory block

    use ReadProcessMemory() to access the memory block
    search for a specific pattern

    call WriteProcessMemory() with the value you need
}
let pid = some_process_id;: Get the current process IDOpenProcess(pid);: Open this process
Linux provides simple APIs: process_vm_readv() and process_vm_writev(), which correspond to ReadProcessMemory() and WriteProcessMemory() on Windows.
1.9 Ownership (Quick Recap) - Core Ideas of Ownership, How to Implement Copy Trait, Value Drop, and Drop Order
1.9.1. The Core Idea of Ownership
The core idea of Rust’s memory model is that every value has exactly one owner. In other words, only one place — usually a scope — is responsible for freeing each value.
This behavior is enforced by the borrow checker (covered in detail in 1.11.2. Borrow Checker). If a value is moved — for example by assigning it to a new variable, pushing it into a Vec, placing it on the heap, and so on — then the owner becomes the new location.
The owner is really just a location in memory; the place where the data lives is the value’s owner. A move means the data is transferred from one location to another, and the new location becomes the owner.
However, some types do not follow this rule: if a value’s type implements the Copy trait, then reassignment performs a copy rather than a move. That is, a copy of the value is placed in the new location.
1.9.2. How to Implement the Copy Trait
Types that implement Copy must be able to duplicate their values bit by bit.
Types that cannot implement Copy naturally include:
- Types that contain non-
Copytypes - Types that must perform special resource-release work when their values are dropped
Why?
Imagine Box<T> implemented Copy. If you assigned box1 = box2, then both variables would believe they owned a heap allocation that belonged exclusively to them. When they went out of scope, both would try to free that memory, causing a double free. The dangers of a double free are covered in Rust Guide 4.2. Ownership Rules, Memory, and Allocation, so they are not repeated here.
1.9.3. Dropping Values
When a value is no longer needed, its owner deletes it.
Dropping — or discarding — a value happens when it goes out of scope. Types recursively drop the values they contain. For example, deleting a complex type can require deleting many values.
Rust does not drop the same value more than once because of ownership. If a variable contains references to other values that it does not own, then deleting that variable does not delete the other values.
That may be hard to understand, so let’s look at a simple example:
fn main() {
    let x1 = 42;
    let y1 = Box::new(x1);

    {
        let z = (x1, y1);
    }

    let x2 = x1;
}x1is ani32, andy1is aBox<i32>that owns a heap allocation containing a copy ofx1’s value (becausei32isCopy,Box::new(x1)does not borrowx1){}creates a new scope, andzis created inside that smaller scopezis a tuple whose value is(x1, y1).x1is ani32and implementsCopy, sox1copies its value intoz;y1is aBox<i32>and does not implementCopy, so it cannot be copied and instead transfers ownership toz- After leaving the inner scope,
x1is used again.x1is still valid because it copied its value intozand remains usable itself y1becomes invalid after being assigned tozbecause ownership moved toz
1.9.4. The Order of Dropping Values
- Variables, including function parameters, are dropped in reverse order of declaration.
- Nested values are dropped in source order. In the example above, when the inner scope ends,
zis dropped: it first drops its first element (the copiedi32), then its second element (theBox). Becausey1was moved intoz,y1itself is not dropped again afterward.
Note: Rust does not currently allow self-referential values inside a single value.
1.10 References and Interior Mutability (Quick Recap) - References, Interior Mutability, Cell Type, and Related Operations
This article is only a quick recap of references and interior mutability. For ownership, see 1.9. Ownership (Quick Recap).
1.10.1. References
Through references, Rust allows values to be borrowed without giving up ownership.
A reference is a pointer with an additional contract attached. Rust has two kinds of references. (For the difference between pointers and references, see 1.1. Pointer Overview (Part 1).)
1. Shared References
Shared references, also called immutable references, are written in Rust as &T, where T stands for a type.
Their characteristic is that any number of references can exist at the same time, or within the same scope, pointing to the same value. Every shared reference implements the Copy trait.
The value behind a shared reference is immutable. The compiler is allowed to assume that the value pointed to by a shared reference does not change while that reference is alive.
For example: if the value behind a shared reference is read multiple times inside a function, the compiler is allowed to read it once and then reuse the read value.
2. Mutable References
The counterpart to immutable references is the mutable reference, written in Rust as &mut T.
A mutable reference is exclusive, which means that within one scope there can be only one mutable reference; there cannot be a second mutable reference or any number of shared references. Therefore, mutable references do not implement the Copy trait (shared references do).
The compiler assumes that no other thread accesses the type pointed to by a mutable reference, whether through a shared reference or another mutable reference.
1.10.2. Owning a Value vs. Owning a Mutable Reference to a Value
The owner is responsible for deleting the value — or dropping it — and aside from that, the two behave mostly the same.
Note: if you move the value behind a mutable reference, you must leave another value in its place. If you do not, the owner will think it still needs to drop the value, but there is actually nothing left to drop, which leads to undefined behavior or a compilation error.
Take a look at this example:
fn main() {
    let mut s = String::from("Hello");
    let r = &mut s;

    let t = *r;  // Try to move the value pointed to by `r`
    println!("{}", r);  // `r` becomes a dangling reference
}
Output:
error[E0507]: cannot move out of `*r` which is behind a mutable reference
 --> src/main.rs:5:13
  |
5 |     let t = *r;  // Try to move the value pointed to by `r`
  |             ^^ move occurs because `*r` has type `String`, which does not implement the `Copy` trait
  |
help: consider removing the dereference here
  |
5 -     let t = *r;  // Try to move the value pointed to by `r`
5 +     let t = r;  // Try to move the value pointed to by `r`
  |
help: consider cloning the value if the performance cost is acceptable
  |
5 -     let t = *r;  // Try to move the value pointed to by `r`
5 +     let t = r.clone();  // Try to move the value pointed to by `r`
  |
Let’s walk through the process:
ris a mutable reference tos, and the*roperation tries to move the value (Stringdoes not implementCopy, soswould lose its data)- Since
sstill exists, Rust expects to be able to drop its memory normally whensgoes out of scope - But
shas already been moved away, so Rust no longer knows how to drop it correctly, which triggers a compilation error
The correct approach:
fn main() {
    let mut s = String::from("Hello");
    let r = &mut s;

    let t = std::mem::replace(r, String::new()); // Replace the original value with an empty string
    println!("{}", t);  // "Hello"
    println!("{}", s);  // ""
}
1.10.3. Interior Mutability
Some types provide interior mutability, which allows them to modify values through shared references.
These types usually rely on extra mechanisms — such as atomic CPU instructions — or on invariants to provide safe mutability without relying on the semantics of exclusive references.
Interior mutability falls into two categories:
-
Obtain a mutable reference through a shared reference:
Mutex,RefCellThese types provide a guarantee: if a value is exposed through a mutable reference, then only one mutable reference will exist at the same time, and no shared references will exist alongside it. This capability relies onUnsafeCell, the only correct way to modify a value through a shared reference. -
Replace a value through a shared reference:
std::sync::atomic,std::cell::CellThese types do not provide a mutable reference to the internal value, but they do provide methods for in-place operations on the value — for example, replacing or reading it. For instance, you cannot get a direct reference to ausizeori32, but you can read and replace the value.
1.10.4. The Cell Type
Cell comes from the standard library and provides interior mutability through invariants.
- A
Cellcannot be shared across threads, because its internal value is not meant to be modified concurrently, even when mutation happens through a shared reference - It does not provide references to the value inside the
Cell(so the value can always be moved)
Methods provided by Cell:
- Replace the value as a whole, which is the so-called in-place operation
- Return a copy of the value, which is reading
1. set(value): Replace the Value
use std::cell::Cell;

fn main() {
    let x = Cell::new(10);  // Create a `Cell` that stores 10

    x.set(20);  // Replace the internal value

    println!("Updated value: {}", x.get()); // Prints 20
}set(value)replaces the value inside theCellwith a new value
2. get(): Return a Copy of the Value
use std::cell::Cell;

fn main() {
    let x = Cell::new(5);
    let y = x.get(); // Get a copy of the value inside `x`
    println!("Value: {}", y); // Prints 5
}get()does not return a reference to the internal value; it returns a copy of the value (for types that implement theCopytrait).- It works for
i32,bool, and other types that implement theCopytrait.
1.11 Lifetimes (Advanced) Pt.1 - Review, Borrow Checker, Generic Lifetimes
1.11.1. Review
In the beginner tutorial, we mentioned that every reference in Rust has a lifetime. A lifetime is the scope in which the reference remains valid, and in most cases it is implicit and inferred by the compiler.
When you take a reference to a variable, the lifetime begins. When the variable is moved or goes out of scope, the lifetime ends. In other words, for a reference, a lifetime is the name of the code region in which it must remain valid.
Lifetimes usually overlap with scopes, but not always.
1.11.2. Borrow Checker
Whenever a reference with some lifetime 'a is used, the borrow checker checks whether 'a is still alive. The process is:
- Trace the path back to where
'abegan — that is, where the reference was obtained - From there, check whether there are conflicts along that path
- Ensure that the reference points to a value that can be accessed safely
This example uses the rand crate. Add the following dependency to Cargo.toml:
[dependencies]
rand = "0.8"
Consider this example:
use rand::random;

fn main() {
    let mut x = Box::new(42);
    let r = &x;
    if random::<f32>() > 0.5 {
        *x = 84;
    } else {
        println!("{}", r);
    }
}-
xis of typeBox<i32> -
Declaring
ras a reference toxmeans the reference’s lifetime begins on that line (line 5) -
On line 7, the value of
xis modified through dereferencing. That requires a mutable reference tox. At this point, the borrow checker looks for a mutable reference toxand checks whether its use conflicts with anything else. In this example there is no conflict, so the code is valid -
You may ask: line 7 is inside the scope of
r. Since*xneeds a mutable reference tox, shouldn’t having both the immutable referencerand the mutable reference*xin the same scope violate the borrowing rules and produce an error? In fact, Rust is smart enough to know that if theifbranch is taken, theelsebranch cannot be taken.ris never used in theifbranch at all, so using the mutable reference*xin theifbranch is fine. In other words, the lifetime ofrdoes not extend into theifbranch. This is an example of how lifetimes do not always exactly match scopes.
Let’s look at another example:
fn main() {
    let mut x = Box::new(42);

    let mut z = &x;
    for i in 0..100 {
        println!("{}", z);
        x = Box::new(i);
        z = &x;
    }
    println!("{}", z);
}xis of typeBox<i32>zis a reference tox, so the lifetime begins on this line (line 4)- On line 6,
zis printed inside the loop. Usingznaturally triggers a borrow-checker check. There is no problem here, so the borrow checker does not report an error - On line 7,
xis reassigned - On line 8,
zis reassigned. Rust treats the newly assigned reference as a different reference, so line 8 effectively starts a new lifetime, and the original lifetime ends at line 7 - Each subsequent loop iteration starts a new lifetime at
z = &x;. Therefore the borrow checker does not report an error
Features of the Borrow Checker
The borrow checker is conservative: if it is not sure whether a borrow is valid, it rejects that borrow.
Sometimes the borrow checker needs help understanding why a borrow is valid, which is one of the reasons Unsafe Rust exists.
1.11.3. Generic Lifetimes
Sometimes we need to store references inside our own types. Then we need to annotate those references with lifetimes so that the borrow checker can verify their validity. One example is returning a reference from a method where the returned reference lives longer than self.
Rust lets you make a type generic over one or more lifetimes.
Two Reminders
-
If a type implements the
Droptrait, then dropping the type counts as using the lifetimes or types that the type is generic over. If the type does not implementDrop, then dropping it does not count as using the lifetime, and the references inside the type can be ignored. For example, when an instance of some type is about to be dropped, the borrow checker checks whether it is still legal to use the lifetimes that the type is generic over, because the code in yourdropfunction might use those references. -
A type can be generic over multiple lifetimes, but usually there is no need to make the type signature more complex. You should use multiple lifetime parameters only when the type contains multiple references, and the returned reference should be tied only to one of those lifetimes.
Look at this example:
#![allow(unused)]
fn main() {
fn longest<'a>(x: &'a str, y: &'a str) -> &'a str {
    if x.len() > y.len() {
        x
    } else {
        y
    }
}
}
'a denotes a lifetime called a. x, y, and the return type all share this lifetime a, which means that x, y, and the return value all have the same lifetime.
1.12 Lifetimes (Advanced) Pt.2 - Lifetime Variance, Covariance, Invariance, Contravariance
This article builds on what we already covered about lifetimes. For Part 1, see 1.11. Lifetimes (Advanced) Pt.1.
1.12.1. Lifetime Variance
Variance is a concept in Rust’s type system. It describes how generic parameters — especially lifetime parameters — relate to one another in the type hierarchy.
We can think of it simply as variance describes which types are “subtypes” of other types, where “subtype” is somewhat similar to the concept used in Java and C#.
In addition, variance also cares about when a “subtype” can replace a “supertype” and vice versa.
In general, if A is a subtype of B, then A is at least as useful as B. Here is a Rust example: if a function takes &'a str, then &'static str can be passed in. Because 'static is a subtype of 'a, 'static lives at least as long as any 'a (and 'static can remain valid for the entire program). See 1.6.2. The 'static Lifetime Annotation for more about this lifetime.
1.12.2. Three Kinds of Lifetime Variance
All types have variance. The variance associated with each type defines which similar types can be used in that type’s position.
Note: the following content is fairly difficult. It is recommended that you first recall the ideas of sufficient conditions and necessary conditions from high school math.
1. Covariant
Covariant means that a type can be replaced only by a “subtype.”
Covariance means:
if A <: B (A is a subtype of B), then F<A> <: F<B> (F<A> is also a subtype of F<B>)
This is a transitive inheritance relationship from smaller to larger, similar to reasoning from a sufficient condition: if A holds, then B must also hold (A is a sufficient condition for B).
For example, &'static T can replace &'a T, because &T is covariant over the lifetime 'a, so 'a can be replaced by one of its subtypes, such as 'static.
2. Invariant
Invariant means that you must provide the exact specified type.
Invariance means:
A <: B cannot imply F<A> <: F<B>, and F<B> <: F<A> also cannot be inferred
This means there is not enough relationship between F<A> and F<B> to derive one from the other, so they are neither sufficient conditions nor necessary conditions; they are independent.
For example, the mutable reference &mut T is invariant over T.
3. Contravariant
Contravariance means:
if A <: B (A is a subtype of B), then F<B> <: F<A> (F<B> is instead a subtype of F<A>)
The logic here is: “To make F<A> hold, B must satisfy A’s condition,” which is more like a necessary condition: if B holds, then A must also hold (A is a necessary condition for B).
You can think of contravariance as “the relationship moves in the opposite direction”: the lower a function’s requirements for its parameters, the greater the range of cases it can handle.
Here are two examples:
-
Suppose there are two variables,
x1andx2, wherex1has the lifetime'staticandx2has the lifetime'a. Then clearlyx1is more useful thanx2, because it lives longer. -
Suppose there are two functions,
take_func1andtake_func2, wheretake_func1accepts&'static strandtake_func2accepts&'a str. Clearly,take_func1places stricter requirements on its argument, which meanstake_func1is not as broadly useful astake_func2.
From the two examples above, we can see that giving a variable a longer lifetime makes it more useful, but requiring a function parameter to have a longer lifetime makes the function less useful. That is contravariance.
So what is contravariant with what? It is the function’s contravariance over the types of its parameters.
1.12.3. The Role of Lifetime Variance
Let’s look at an example to see what lifetime variance does:
struct MutStr<'a, 'b> {
    s: &'a mut &'b str,
}

fn main() {
    let mut s = "hello";
    *MutStr { s: &mut s }.s = "world";
    println!("{}", s);
}
The confusing part of this code is the MutStr struct, so let’s break it down:
- The struct has only one field, but it has two lifetimes
&'a mutmeans a mutable reference, and the lifetime of that mutable reference is'a&'b strmeans a reference to a string slice, and the lifetime of that string slice is'b- In other words,
MutStrlets you store a mutable reference that points to a reference to a string slice. You can modifysitself, but you cannot modify the string content pointed to by&'b str
Next, let’s look at the logic in main:
-
let mut s = "hello";declares the variables, whose type is&str, and whose value is"hello" -
*MutStr { s: &mut s }.s = "world";is actually several steps combined into one line. Let’s separate them:MutStr { s: &mut s }passes a mutable reference tosinto theMutStrstruct. At this point, the value of thesfield insideMutStris"hello"- In
*MutStr { s: &mut s }.s = "world";, the.smeans access thesfield (at this point the field’s value is&mut s).*dereferencess, that is, it obtains the reference itself to the string slices.= "world"changes the pointed-to value —sused to point to"hello", and now it is changed to"world", that is,s = "world"
What if there were only one lifetime — could this still be written?
struct MutStr<'a> {
    s: &'a mut str,
}

fn main() {
    let mut s = "hello";
    *MutStr { s: &mut s }.s = "world";
    println!("{}", s);
}
Output:
error[E0308]: mismatched types
 --> src/main.rs:7:31
  |
7 |     *MutStr { s: &mut s }.s = "world";
  |     -----------------------   ^^^^^^^ expected `str`, found `&str`
  |     |
  |     expected due to the type of this binding

error[E0277]: the size for values of type `str` cannot be known at compilation time
 --> src/main.rs:7:5
  |
7 |     *MutStr { s: &mut s }.s = "world";
  |     ^^^^^^^^^^^^^^^^^^^^^^^ doesn't have a size known at compile-time
  |
  = help: the trait `Sized` is not implemented for `str`
  = note: the left-hand-side of an assignment must have a statically known size
On this one-liner, rustc reports the failure at the assignment (expected str, found &str, and str is unsized). The deeper type problem is that &mut s has type &mut &str, while the field expects &mut str.
More specifically:
- The variable
shas type&str(a reference to a string slice). - When you write
&mut s, its actual type is&mut &str, that is, a mutable reference to the variables. However, theMutStrdefinition requires the fieldsto have type&mut str. - If you isolate the construction as
MutStr { s: &mut s }, rustc instead reports that you cannot borrow the data behind an&reference as mutable — the same underlying mismatch, surfaced differently.
These are different referent types, not a lifetime-subtyping question. (Separately, note that &mut T does support unsizing coercions such as &mut [T; N] → &mut [T]; that mechanism still cannot turn &mut &str into &mut str.)
What invariance does matter for is the two-lifetime version: &'a mut &'b str is invariant in 'b, which prevents unsoundly shortening the inner borrow when you assign through the mutable reference.
You can also think about it this way:
- String literals (
"hello"and"world"are string literals) have type&strand an implicit'staticlifetime annotation, which means&stris actually&'static str. In the original struct, this corresponds to'b - The struct’s
'acorresponds to the lifetime of the mutable reference, which is the lifetime of the&mutmutable reference in the line*MutStr { s: &mut s }.s = "world" - After the change, the struct with only one lifetime parameter expects
&mut str, but&mut sstill has type&mut &str, so the types do not match
1.13 Memory Types Pt.1 - Alignment, Layout, and the Repr Attribute
1.13.1. The Basic Responsibility of Types
Every Rust value has a type, and the responsibility of that type is to tell you how to interpret the bits in memory.
For example, the bit pattern 0b10111101 has no meaning by itself, but:
- Interpreted as
u8, it becomes the number 189 - Interpreted as
i8, it becomes the number -67
When you define a custom type, the compiler decides where each part of that type is placed in memory.
1.13.2. Alignment
Alignment determines where a type’s bytes may be stored.
Once a type’s representation is determined, you might think it can be stored anywhere in memory. In theory that is possible, but in practice computer hardware places constraints on where a given type can live.
The most typical example is a pointer. A pointer points to bytes, not bits; one byte equals 8 bits. In other words, it does not point to an individual bit. So if a value of some type were placed at bit index 4 in memory, you would not be able to address it, because pointers address bytes rather than specific bits. That is why alignment is done at the byte level — that is, at 8-bit boundaries.
For this reason, all values, regardless of type, must begin on a byte boundary. All types must be at least byte-aligned. In other words, the storage address must be a multiple of 8 bits.
1.13.3. Stricter Alignment Rules
Some types have alignment requirements stricter than byte alignment. In CPU and memory systems, memory is often accessed in blocks larger than a single byte.
For example, on a 64-bit CPU, most values are accessed in 8-byte blocks, and each operation begins at an address that is 8-byte aligned. This is also called the CPU word size.
Of course, CPUs can also handle reads and writes of smaller values, as well as values that cross block boundaries. But as developers, we should try our best to ensure that hardware operates at its native alignment.
For example, if the i64 value you want to read begins in the middle of an 8-byte block, then reading it requires at least two reads. Because i64 is 8 bytes wide, beginning in the middle of two 8-byte blocks means it must span both blocks. So when reading it, the engine must read from both blocks: the first block provides the first part of the i64, the second block provides the remaining part, and then the pieces must be merged.
That is very inefficient and slows down program execution, so we should try to keep hardware operations aligned to their native boundaries whenever possible.
1.13.4. Misaligned Access
When a CPU accesses memory and the data address does not follow the alignment required by the architecture, it is called a “misaligned access”. This can lead to poor performance and concurrency issues.
Many CPUs require, or strongly recommend, that their parameters be naturally aligned. A naturally aligned value has alignment that matches its size.
For example, if you want to load 8 bytes, the provided address should be 8-byte aligned.
1.13.5. The Compiler Tries to Use Alignment as Much as Possible
Based on the contents a type includes, the compiler computes an alignment for that type (or, in other words, assigns it an alignment scheme):
-
For primitive values, alignment usually matches their size. For example,
u8is aligned to 1 byte,u16to 2 bytes,u32to 4 bytes, andu64to 8 bytes. -
For compound types (types that contain other types), the alignment is usually the maximum alignment of the contained types. For example, if a type contains fields of
u8,u16, andu32, then the type should be 4-byte aligned (u32has the largest alignment, which is 4 bytes).
1.13.6. Layout
The layout of a type is how the compiler decides to represent that type in memory.
The Rust compiler does not provide many guarantees about how types are laid out.
Rust provides the repr attribute: it can be added to a type definition to request a specific representation.
1.13.7. repr(C)
One of the most common repr attributes is repr(C). The C in the name indicates that it is related to C.
repr(C) layout is compatible with the layout used by C/C++ compilers for the same type. This is useful for Rust code that interacts with other languages through FFI (Foreign Function Interface).
When using FFI to interact with other languages, Rust generates a layout that matches what the other language’s compiler expects. Because C layout is predictable and unlikely to change, repr(C) is very useful in unsafe contexts (for unsafe Rust, see Rust Guide 19.1. Unsafe Rust).
For example, you can use it when working with raw pointers to that type or when converting between two types with the same fields.
1.13.8. repr(transparent)
The transparent in repr(transparent) means transparent. It is used on newtype-style wrappers and guarantees that the outer type has the same layout as its single non-zero-sized field. (Other fields are allowed only if they are zero-sized types, such as () or PhantomData.)
This is very useful when combined with the newtype pattern (see Rust Guide 19.5. Advanced Types).
Let’s briefly revisit the newtype pattern here: you use a tuple struct to create a new local type, which is essentially a thin wrapper.
For example, if you want to operate on the memory representation of struct A and struct NewA(A), then after using repr(transparent), the two memory representations should be the same. Without it, the Rust compiler cannot guarantee that.
1.13.9. An Example of Using repr
Let’s look at an example:
| Code | Field Type Size | Default Representation | Padding | Final Alignment |
|---|---|---|---|---|
#[repr(C)] | ||||
struct Foo { | ||||
tiny: bool, | 1 byte | 1-byte aligned | 3 bytes | |
normal: u32, | 4 bytes | 4-byte aligned | (tiny + normal) 8 bytes | |
small: u8, | 1 byte | 1-byte aligned | 7 bytes | 8 bytes |
long: u64, | 8 bytes | 8-byte aligned | 8 bytes | |
short: u16, | 2 bytes | 2-byte aligned | 6 bytes | 8 bytes |
} | ||||
| Total 32 bytes |
This table shows the memory alignment and padding of a Rust struct under #[repr(C)]:
-
The code is in the leftmost column and uses the
repr(C)annotation. The struct contains several fields -
The Rust compiler first sees that the
tinyfield is of typebool, which occupies 1 byte in memory, so it is aligned to 1 byte -
The compiler then sees that the
normalfield is of typeu32, which occupies 4 bytes, so it only needs 4-byte alignment. At this point Rust notices thattinyis aligned to 1 byte, so the compiler inserts 3 bytes of padding to maketinyoccupy 4 bytes -
Since this field now occupies exactly 8 bytes, which is a multiple of 4 bytes, it is already aligned
-
The
smallfield is of typeu8, which occupies 1 byte and is aligned to 1 byte. Because the previous two fields are already aligned, Rust will decide how much padding to add based on the following bytes. At this point the compiler still has to wait and see -
longis of typeu64, which occupies 8 bytes and is naturally 8-byte aligned. Since its field is 8 bytes or larger, we now see thattinyandnormaltogether form an 8-byte-aligned region, andlongis also 8-byte aligned. Rust understands that the structure should now be aligned to 8 bytes. Therefore the compiler has to add 7 bytes of padding tosmallto make it 8-byte aligned -
shortis of typeu16, which occupies 2 bytes. Since the structure should now be 8-byte aligned, the compiler adds 6 bytes so that it becomes 8-byte aligned
The process can be represented in a table like this:
| Field | Type Size | Required Alignment | Padding | Notes |
|---|---|---|---|---|
tiny: bool | 1 byte | 1 byte | 3 bytes | To align the next u32 |
normal: u32 | 4 bytes | 4 bytes | none | Aligned as u32 |
small: u8 | 1 byte | 1 byte | 7 bytes | To align the next u64 |
long: u64 | 8 bytes | 8 bytes | none | 8-byte aligned |
short: u16 | 2 bytes | 2 bytes | 6 bytes | Structure aligned to 8 bytes |
1.14 Memory Types Pt.2 - Dynamically Sized Types and Wide Pointers, Packed Layouts, Larger Alignment for Specific Fields or Types, Memory Representation of Complex Types, and Repr Rust
1.14.1. repr(Rust)
Remember the example in the previous article? That example used repr(C), and the limitation of the C representation is that all fields must be placed in the same order as they are defined in the original struct.
repr(Rust) is the default representation. It intentionally provides fewer layout guarantees than repr(C): the compiler may reorder fields, and two types with the same fields in the same order are still not guaranteed to share a layout.
Because the compiler may reorder fields (for example, placing larger fields first), padding can often be reduced. In the Foo example from the previous article, one possible optimized layout needs no padding.
With fewer guarantees about layout, the compiler has room to rearrange things and produce efficient code.
If repr(Rust) is used, then one possible memory layout of the Foo struct from above is:
| Code | Field Type Size | Default Representation | Padding | Final Alignment |
|---|---|---|---|---|
#[repr(Rust)] | ||||
struct Foo { | ||||
long: u64, | 8 bytes | 8-byte aligned | 8 bytes | |
normal: u32, | 4 bytes | 4-byte aligned | ||
short: u16, | 2 bytes | 2-byte aligned | ||
small: u8, | 1 byte | 1-byte aligned | ||
tiny: bool, | 1 byte | 1-byte aligned | ||
} | ||||
| Total 16 bytes |
- The compiler first orders the fields by size, putting the largest first so that it can determine what alignment the struct should use. In this example,
u64is the largest and takes 8 bytes, so the struct is aligned to 8 bytes - The compiler then looks at the remaining fields and sees that their total size is exactly 8 bytes, so it can place them together and avoid padding
- In the end, this struct only needs 16 bytes, which saves half the memory compared with
repr(C) - This is more efficient, but compilation time may be a little longer
1.14.2. Packed Layouts
You can tell the compiler that no padding is needed between fields, but then you must accept the performance cost of misaligned access.
When memory is limited or when there are many instances of a type, a packed layout can be useful. It is also useful when sending a memory representation over a low-bandwidth network connection.
To enable a packed layout, add the #[repr(packed)] annotation to the type.
Note that with a packed layout:
- Code may run more slowly
- In extreme cases, if the CPU supports only aligned access, the program may crash
1.14.3. Giving a Specific Field or Type a Larger Alignment
Using the #[repr(align(n))] annotation lets you give a specific field or type a larger alignment, where n is the argument.
For example, if you want to ensure that different values stored contiguously in memory (like in an array) end up on different CPU cache lines, you can avoid false sharing.
Here is a brief explanation of the related terms:
- Cache is composed of cache lines, and caches operate on cache lines as units. A cache line is the smallest data unit that can be mapped into the cache
- False sharing happens when two different CPUs access different variables that share the same cache line. In theory they could operate in parallel, but in the end they are both competing to update the same cache entry. This can cause a huge performance drop in concurrent programs
1.14.4. Memory Representation of Complex Types
- Tuples (see Rust Guide 3.3. Data Types - Compound Types): Their memory representation is like a struct; the field types and tuple element types are in the same order
- Arrays: A contiguous sequence of the contained type, with no padding between elements
- Unions: For each field, the layout choice is independent; the alignment is the maximum among all fields
- Enums: Like unions, but with an additional hidden shared field used to store the discriminant of the enum variant. The code uses the discriminant value to determine which variant a given value contains. The size of the discriminant depends on the number of variants
1.14.5. Dynamically Sized Types and Wide Pointers
Most types in Rust automatically implement the Sized trait; see Rust Guide 19.5.4. Dynamically Sized Types and the Sized Trait for a full introduction. Here is a quick recap.
Rust needs to know some details about its types, such as how much space to allocate for a value of a specific type. That is what makes the concept of dynamically sized types a little confusing. They are sometimes called DSTs or unsized types, and they let us write code that works with values whose size is only known at run time.
To use dynamically sized types, Rust provides the Sized trait to indicate whether the size of a type is known at compile time. Everything whose size is known at compile time automatically implements this trait. Rust also implicitly adds the Sized trait to every generic function. By default, generic functions apply only to types whose size is known at compile time. This restriction can be relaxed with ?Sized. ?Sized means “T may or may not implement Sized,” that is, T may or may not be a dynamically sized type. This notation does not require the default condition that generic types must have a known size at compile time. The ?Trait syntax with this meaning applies only to the Sized trait and no other trait.
What should we do when a function needs to accept a DST — such as a trait object or a slice — as a parameter? We can use a wide pointer (also called a fat pointer).
1.14.6. Wide Pointers
By placing a non-Sized type behind a wide pointer, we bridge the gap between Sized and non-Sized types.
So what exactly is a wide pointer? A wide pointer is an ordinary pointer with an additional “word-size” field attached. It provides the compiler with the extra information it needs about the pointer so that it can generate sensible code that uses that pointer.
When you reference a DST, the compiler automatically constructs a wide pointer for you. For example, the extra information for a slice is the slice’s length.
Wide pointers are Sized because they are pointers at heart, and their size is fixed (twice the size of a “sized” pointer — one field stores the pointer itself, and the other stores the attached metadata used to “complete” the type).
Note: Box<T> and Arc<T> both support storing wide pointers, so they both support ?Sized.
1.15 Trait Bounds - Compilation and Dispatch
1.15.1. Static Dispatch
What happens when we compile generic code?
The compiler copies part of the type or function for each T (for each concrete type), so that each type has its own function. This process is called monomorphization (see Rust Guide 10.2.6. Performance of Generic Code). (Calling methods on a dyn Trait is different: that uses dynamic dispatch, covered later in this article; see Rust Guide 17.2.3. Trait Objects Use Dynamic Dispatch.)
When you build Vec<i32> or HashMap<String, bool>, the compiler copies the generic type and all of its implementation blocks. For example, Vec<i32> replaces the T in Vec<T> with i32, effectively making a full copy of Vec, with every T replaced by i32.
In other words, the compiler replaces the generic parameters of an instance with concrete types. Note that the compiler does not literally duplicate and paste everything; it only copies the code you actually use.
Look at this example:
#![allow(unused)]
fn main() {
impl String {
    pub fn contains(&self, p: impl Pattern) -> bool {
        p.is_contained_in(self);
    }
}
}- This example implements a
containsmethod forString - The second parameter
pofcontainsis constrained byPattern.phas no concrete type of its own, only a trait bound, sopis effectively a generic parameter
When p is used in practice, it may be different types. The method is copied for each concrete type, because we need to know the address of is_contained_in so that it can be called. The CPU needs to know where to jump and continue execution.
For any given p, the compiler knows that the address belongs to a method implementation for the Pattern trait. There is no universal address that works for any type.
PS: I know you may be thinking of Python’s dynamic typing, but in Python a variable is fundamentally a reference to an object, not a value stored directly.
Because of this, the compiler needs to produce one copy of the method body for each type, and each copy has its own address for jumping to. That is called static dispatch, because for any given copy of the method, the address we “dispatch to” is known statically.
- Static in programming usually refers to things known at compile time, or things that can be treated as such
1.15.2. Monomorphization
Monomorphization means the process of turning one generic type into many non-generic types. Rust traits have this property.
After the compiler finishes optimizing the code, it is as if there were no generics at all. Each instance is optimized separately with all known types, so the is_contained_in call in the example above runs just as efficiently as if the trait did not exist at all — there is no performance loss.
The compiler fully understands the types involved, and in the appropriate cases, it can even inline them.
- “Fully understands the types involved” means Rust is a statically typed language, so the types of all variables and functions can be determined at compile time, without type inference at run time.
- “Inline them” means expanding the function body directly at the call site to avoid function-call overhead.
#[inline(always)]
fn add(a: i32, b: i32) -> i32 {
    a + b
}

fn main() {
    let x = add(2, 3);  // The compiler may optimize this into `let x = 2 + 3;`
}
1.15.3. The Cost of Monomorphization
- Every instance must be compiled separately, which increases compilation time if the compiler cannot optimize it away
- Each monomorphized function has its own machine code, which makes the program larger
- Instructions cannot be shared across different instances of a generic method, so CPU instruction-cache efficiency drops because it must hold multiple copies of the same instruction
1.15.4. Dynamic Dispatch
Dynamic dispatch allows code to call trait methods on a generic type without knowing the concrete type.
We can make a small change to the code above to achieve dynamic dispatch:
#![allow(unused)]
fn main() {
impl String {
    pub fn contains(&self, p: &dyn Pattern) -> bool {
        p.is_contained_in(self);
    }
}
}
In this example, dynamic dispatch requires the caller to provide two pieces of information:
- The data pointer for
Pattern - The address of
is_contained_in
Why does impl Pattern need & in front of it?
- Dynamic dispatch depends on a trait object, and a trait object is essentially a wide pointer (a fat pointer, as discussed in the previous article), so the data must be passed by reference (because Rust cannot know the memory size of the dynamic dispatch type, it can only use a reference)
1.15.5. Vtable
In practice, the caller provides a pointer to a block of memory called a virtual method table, or vtable for short.
In the example above, it holds the addresses of all trait-method implementations for that type, including the address of is_contained_in.
When the code wants to call a trait method on the provided type, it looks up the implementation address of is_contained_in in the vtable and calls it. This lets us use the same function body without caring which type the caller wants to use.
Each vtable also includes layout and alignment information for the concrete type, which is always needed together with the method information.
1.15.6. Object Safety
The combination of a type implementing a trait and its vtable forms a trait object.
Most traits can be turned into trait objects, but not all. For example, Clone cannot (clone returns Self), and Extend cannot either. These examples are not object-safe.
The specific requirements for object safety are:
- Trait methods must not be generic, and they must use a receiver that can be dispatched through a trait object
- The trait cannot have static methods, because there is no instance on which to call them
1.15.7. self: Sized
self: Sized means self cannot be used on a trait object, because trait objects are !Sized.
Using self: Sized on a trait means that dynamic dispatch should never be used.
We can also use self: Sized on a specific method. In that case, the method becomes unavailable when the trait is accessed through a trait object.
When checking whether a trait object is safe, methods marked with where Self: Sized are exempt.
1.15.8. Pros and Cons of Dynamic Dispatch
| Advantages | Disadvantages |
|---|---|
| Shorter compilation time | The compiler cannot optimize for a specific type |
| Better CPU instruction-cache efficiency | Functions can only be called through the vtable |
| Method calls have extra overhead | |
| Every method call on a trait object must look up the vtable |
1.15.9. How to Choose Between Static and Dynamic Dispatch
| Static Dispatch | Dynamic Dispatch |
|---|---|
| Use static dispatch in libraries | Use dynamic dispatch in binaries |
| You cannot know the user’s needs | A binary is the final code |
| If dynamic dispatch is used, the user is stuck with it | Dynamic dispatch keeps the code cleaner by removing generic parameters |
| If static dispatch is used, the user can choose for themselves | Compiles faster |
| At the cost of marginal performance |
1.16 Generic Traits - Generic (Type-Parameter) Traits and Associated-Type Traits
1.16.1. Two Ways to Make a Trait Generic
Traits can be generic in two ways:
- Generic type parameters. Example:
trait Foo<T> - Associated types. Example:
trait Foo { type Bar; }
The difference between the two is:
- With associated types, a given trait for a specific type has only one implementation
- With generic parameters, there can be multiple implementations
A simple suggestion: if possible, prefer associated types.
1.16.2. Generic (Type-Parameter) Traits
Generic traits require you to specify all generic type parameters and repeat their bounds.
This is somewhat harder to maintain. For example, if you add a generic type parameter to a trait, all implementers of that trait must update their code.
This form can also lead to the problem that a trait may have multiple implementations for a given type. Then the compiler has a harder time inferring which instance of the trait you actually want. Sometimes you must call an ambiguity-resolving function such as FromIterator::<u32>::from_iter.
In some cases this feature is also an advantage, for example:
impl PartialEq<BookFormat> for Book, whereBookFormatcan be different types- You can implement both
FromIterator<T>andFromIterator<&T> where T: Clone
1.16.3. Associated-Type Traits
Let’s use a piece of code as an example:
#![allow(unused)]
fn main() {
trait Contains {
	type A;
	type B;

	// Updates syntax to refer to these new types generically
	fn contains(&self, _: &Self::A, _: &Self::B) -> bool;
}
}
With associated types:
- The compiler only needs to know the type that implements the trait
- The bound can live entirely on the trait itself and does not need to be repeated
- Adding another associated type in the future does not affect users
- The concrete type determines the associated types inside the trait, so there is no need to use ambiguity-resolving functions. Look at this example:
#![allow(unused)]
fn main() {
impl Contains for Container {
    // Specify what types `A` and `B` are. If the `input` type
    // is `Container(i32, i32)`, the `output` types are determined
    // as `i32` and `i32`.
    type A = i32;
    type B = i32;

    // `&Self::A` and `&Self::B` are also valid here.
    fn contains(&self, number_1: &i32, number_2: &i32) -> bool {
        (&self.0 == number_1) && (&self.1 == number_2)
    }

    // Grab the first number.
    fn first(&self) -> i32 { self.0 }

    // Grab the last number.
    fn last(&self) -> i32 { self.1 }
}
}- This example implements the
Containstrait for theContainertype - The associated types in
Container’sContainsimplementation are determined bytype A = i32;andtype B = i32;
You Cannot Implement Deref for Multiple Target Types
Look at the source code of the Deref trait:
#![allow(unused)]
fn main() {
pub trait Deref {
	type Target: ?Sized;

	fn deref(&self) -> &Self::Target;
}
}Targetintype Target: ?Sized;is the target type we are talking about
Let’s write a Deref implementation to illustrate:
#![allow(unused)]
fn main() {
use std::ops::Deref;

struct Wrapper {
    value: String,
}

impl Deref for Wrapper {
    type Target = String;

    fn deref(&self) -> &Self::Target {
        &self.value
    }
}
}
In the code above, Wrapper can only be dereferenced as String. But if you want Wrapper to be dereferenced as both String and str at the same time, Rust does not allow you to implement Deref again, because Target can only have one concrete type.
In other words, this is illegal:
#![allow(unused)]
fn main() {
use std::ops::Deref;

struct Wrapper {
    value: String,
}

// First Deref implementation, Target = String
impl Deref for Wrapper {
    type Target = String;

    fn deref(&self) -> &Self::Target {
        &self.value
    }
}

// This is illegal: Rust does not allow a second `Deref` implementation
// for the same `Wrapper` type.
impl Deref for Wrapper {
    type Target = str;  // Conflict: Rust cannot infer which `Target` applies

    fn deref(&self) -> &Self::Target {
        &self.value
    }
}
}
You Cannot Use Multiple Items to Implement the Iterator Trait
The reason is the same as the reason you cannot implement Deref for multiple target types: it mainly involves the uniqueness of associated types and the inference rules of the Rust compiler.
1.17 Orphan Rules, Coherence, and Consistency - Blanket and Covered Implementations
1.17.1. Coherence
Coherence means that for a given type and method, there is only one correct choice for the implementation of that method on that type.
The orphan rule means that as long as either the trait or the type is in the local crate, you can implement that trait for that type. For example:
- A type you define locally can implement the
Debugtrait - You can implement a trait you define locally for
bool - You cannot implement
Debugforbool, because neither side is local
There are exceptions to the orphan rule, which we will discuss below.
1.17.2. Blanket Implementation
A blanket implementation, also called a general implementation, means that Rust allows a default implementation for every type that satisfies a trait bound.
Its template is:
#![allow(unused)]
fn main() {
impl<T> MyTrait for T where T: ...
}
This means implementing MyTrait for all types that implement some trait.
For example:
#![allow(unused)]
fn main() {
impl<T: Display> ToString for T {}
}
This means implementing ToString for all types that implement Display.
This example is not yet written in template form. In template form, it would be:
#![allow(unused)]
fn main() {
impl<T> ToString for T where T: Display {}
}
Note that only the crate that defines the trait is allowed to use blanket implementations. Adding a blanket implementation to an existing trait is a breaking change.
1.17.3. Fundamental Types
Some types are so fundamental that we need to allow anyone to implement traits for them, even if that would violate the orphan rule. These types are marked #[fundamental], and currently include &T, &mut T, Box<T>, and Pin<P>.
- One extra note: the main purpose of
Pin<P>is to ensure that a value cannot be moved, that is, to prevent operations such asstd::mem::replace,std::mem::swap, orstd::mem::takefrom changing the value’s physical address - For the purpose of the orphan rule, these types are actually erased before orphan-rule checking takes place
Note: using blanket implementations on fundamental types is also considered a breaking change.
1.17.4. Covered Implementation
Sometimes you need to implement an external trait for an external type, which is called a covered implementation. This uses one narrow exemption established by the orphan rule: it allows an external trait to be implemented for an external type in very specific cases.
Note: covered implementation can refer either to Covered Implementation or Override Implementation. Here it refers to Covered Implementation. Override implementation means that when a struct implements a trait and provides its own methods, it can override the default implementation.
The template for this form is:
#![allow(unused)]
fn main() {
impl<P1..=Pn> ForeignTrait<T1..=Tn> for T0
}P1..=PnandT1..=T0refer to a number of parameters
This form is allowed only if all of the following conditions are met:
- At least one of
T1..=Tnis a local type - No
T(whereTis one of the generic types inP1..=Pn) may appear before the first such local type - A generic type parameter
Pmay appear inT0..Tias long as it is wrapped by some intermediate type- If
Tappears as a type parameter of another type, such asVec<T>, thenTis considered wrapped - If
Tappears only by itself, or behind a fundamental type such as&T, then it is not wrapped
- If
For a simple example:
#![allow(unused)]
fn main() {
impl From<MyType> for Vec<i32>
}
This implements the external From<MyType> trait for the external Vec<i32> type.
Here are some more complex examples. You can use the rules above to understand them:
| Implementation | Valid? |
|---|---|
impl<T> From<T> for MyType | OK |
impl<T> From<T> for MyType<T> | OK |
impl<T> From<MyType> for Vec<T> | OK |
impl<T> ForeignTrait<MyType, T> for Vec<T> | OK |
-------------------------------------------- | ———— |
impl<T> ForeignTrait for T | Not OK |
impl<T> From<T> for T | Not OK |
impl<T> From<Vec<T>> for T | Not OK |
impl<T> From<MyType<T>> for T | Not OK |
impl<T> From<T> for Vec<T> | Not OK |
impl<T> ForeignTrait<T, MyType> for Vec<T> | Not OK |
Whether a covered implementation is a breaking change depends on the specific situation:
- Adding a new implementation to an existing trait, with at least one new local type that satisfies the conditions above, is a non-breaking change
- Adding an implementation for an existing trait that does not meet the conditions above is a breaking change
Note:
impl<T> ForeignTrait<MyType, T> for Vec<T>is validimpl<T> ForeignTrait<T, MyType> for Vec<T>is invalid
2.1. API Design Principles of Unsurprising Pt.1 - Naming Tips, Implementing Common Traits (Debug, Send, Sync, and Unpin)
2.1.1. What Is the Unsurprising Principle?
The unsurprising principle is also called the least-surprise principle. It means that the APIs you write should be as intuitive as possible.
Users should be able to guess what an interface does just by looking at it. At the very least, your interface should not surprise them. Its core idea is to stay close to what users already know, so they do not need to relearn concepts. For example, if an interface name contains error, users will probably guess that it is used for error handling.
In other words, we need our interfaces to be predictable, which requires attention to the following:
- Naming
- Implementing common traits
- Ergonomic traits
- Wrapper types
2.1.2. Naming Tips
Interface names should follow conventions so their behavior is easy to infer. Here, conventions means the conventions commonly used in the Rust standard library and Rust community.
Examples:
- A method named
iter(or ending withiter) will most likely take&selfas an argument and return an iterator - A method named
into_innerwill most likely takeselfas an argument and return the wrapped type - A type named
SomethingErrorshould implementstd::error::Errorand appear in variousResulttypes
Using the same common names for the same purposes helps users understand the API. This leads to another conclusion: things with the same name should behave in the same way, otherwise users will probably write incorrect code.
2.1.3. Implementing Common Traits
Users usually assume that everything in an interface works “as expected,” for example:
- You can print any type with
{:?} - You can send anything to another thread
- Every type is
Clone
So when writing code, actively implement most standard traits, even if you do not need them immediately.
From another angle, users cannot implement foreign traits for foreign types themselves because that would violate the orphan rule (see 1.17.1. Coherence). That makes it hard for them to add the traits they want to your types. So you should actively implement most standard traits, so your types can satisfy the traits most users expect.
2.1.4. It Is Recommended to Implement the Debug Trait
Almost all types can and should implement the Debug trait.
The simplest and best way is to use #[derive(Debug)]. Note that a derived trait will add the same bound to any generic parameter.
An example makes this clear:
use std::fmt::Debug;

#[derive(Debug)]
struct Pair<T> {
    a: T,
    b: T,
}

fn main() {
    let pair = Pair { a: 5, b: 10 };
    println!("{:?}", pair);
}- The
Pairstruct implements theDebugtrait through derive, so it automatically adds the boundT: Debugto the generic parameterT - The type of the
Pairfields inmainisi32, which implementsDebug, so it can be printed
Output:
Pair { a: 5, b: 10 }
What if I change the field type to something that does not implement Debug?
use std::fmt::Debug;

struct Person {
    name: String,
}

#[derive(Debug)]
struct Pair<T> {
    a: T,
    b: T,
}

fn main() {
    let pair = Pair {
        a: Person { name: "Dave".to_string() },
        b: Person { name: "Nick".to_string() },
    };
    println!("{:?}", pair);
}
Output:
error[E0277]: `Person` doesn't implement `Debug`
  --> src/main.rs:18:22
   |
18 |     println!("{:?}", pair);
   |               ----   ^^^^ `Person` cannot be formatted using `{:?}` because it doesn't implement `Debug`
   |               |
   |               required by this formatting parameter
   |
   = help: the trait `Debug` is not implemented for `Person`
   = note: add `#[derive(Debug)]` to `Person` or manually `impl Debug for Person`
help: the trait `Debug` is implemented for `Pair<T>`
  --> src/main.rs:7:10
   |
 7 | #[derive(Debug)]
   |          ^^^^^
note: required for `Pair<Person>` to implement `Debug`
  --> src/main.rs:8:8
   |
 7 | #[derive(Debug)]
   |          ----- in this derive macro expansion
 8 | struct Pair<T> {
   |        ^^^^ - type parameter would need to implement `Debug`
   = help: consider manually implementing `Debug` to avoid undesired bounds
help: consider annotating `Person` with `#[derive(Debug)]`
   |
 3 + #[derive(Debug)]
 4 | struct Person {
   |
We can also manually implement Debug by using the various debug_xxx helper methods provided by fmt::Formatter in the standard library:
debug_structdebug_tupledebug_listdebug_setdebug_map
Example:
use std::fmt;

struct Pair<T> {
    a: T,
    b: T,
}

impl<T: fmt::Debug> fmt::Debug for Pair<T> {
    fn fmt(&self, f: &mut fmt::Formatter<'_>) -> fmt::Result {
        f.debug_struct("Pair")
            .field("a", &self.a)
            .field("b", &self.b)
            .finish()
    }
}

fn main() {
    let pair = Pair { a: 1, b: 2 };
    println!("{:?}", pair);
}- We manually implement the
Debugtrait instead of using#[derive(Debug)] fmtis the method that must be defined when implementingfmt::Debugf: &mut fmt::Formatter<'_>provides the formatting context and toolsf.debug_struct("Pair")declares that the value should be formatted as a debug struct with fields, and sets the struct name to"Pair".field("a", &self.a)and.field("b", &self.b)add theaandbfields toPairand associate each field with its value.finish()completes the formatting builder and returns the result to be printed
Output:
Pair { a: 1, b: 2 }
2.1.5. It Is Recommended to Implement the Send, Unpin, and Sync Traits
If your type does not implement Send, it cannot be moved to another thread (for example, thread::spawn requires T: Send). Wrapping a !Send value in Mutex<T> does not help either: Mutex<T> is only Send/Sync when T: Send, so it still cannot be shared across threads.
Example:
use std::rc::Rc;

fn main() {
    let x = Rc::new(42);

    std::thread::spawn(move || {
        println!("{:?}", x);
    });
}Rc<T>does not implementSend, so it cannot be used across threads
We can write a simple tuple struct ourselves to implement it manually (of course, it will not have Rc<T>’s reference counting feature):
#[derive(Debug)]
struct MyBox(*mut u8);

unsafe impl Send for MyBox {}

fn main() {
    let mb = MyBox(Box::into_raw(Box::new(42)));

    std::thread::spawn(move || {
        println!("{:?}", mb);
    });
}MyBoximplementsSend, so it can be used across threads- Traits such as
Sendthat act only as markers and do not provide concrete behavior are called marker traits. Marker traits provide compile-time information but do not add behavior. So implementingSendforMyBoxdoes not require any method body - Manually implementing
Sendis unsafe, so we must add theunsafemarker before theimplblock. Rust’s type system normally infersSendautomatically to ensure thread safety, while a manualSendimplementation may bypass Rust’s safety checks
Types that do not implement Sync cannot be shared across threads through Arc<T> (the atomic reference-counted pointer, the multithreaded version of Rc<T>), and they also cannot be stored in static items that require Sync.
Example:
use std::cell::RefCell;
use std::sync::Arc;

fn main() {
    let x = Arc::new(RefCell::new(42));
    std::thread::spawn(move || {
        let mut x = x.borrow_mut();
        *x += 1;
    });
}RefCell<T>does not implementSync, so it cannot be shared across threads withArc<T>
Unpin means “can be unpinned.” It is a marker trait used to indicate whether a type can be safely moved out of a Pin, that is, whether it can bypass the restrictions of Pin<P>.
Most types are Unpin by default. Self-referential types are usually made !Unpin by embedding a marker such as std::marker::PhantomPinned (or another !Unpin field). Rust does not automatically treat “has a self-reference” as !Unpin; without such a marker, the type would still be Unpin, and moving it could invalidate internal pointers.
If your type does not implement any of the above traits, it is recommended that you state that in the documentation.
2.2. API Design Principles of Unsurprising Pt.2 - Implementing Clone, Default, PartialEq, PartialOrd, Hash, Eq, and Ord
2.2.1. It Is Recommended to Implement the Clone Trait and the Default Trait
Clone Trait
The Clone trait in Rust allows an implementer to explicitly create a deep copy of itself through the clone method, as opposed to the by-value copy provided by the Copy trait.
Example:
#[derive(Debug, Clone)]
struct Person {
    name: String,
    age: u32,
}

impl Person {
    fn new(name: String, age: u32) -> Self {
        Self { name, age }
    }
}

fn main() {
    let person1 = Person::new("John".to_owned(), 25);
    let person2 = person1.clone();

    println!("{:?}", person1);
    println!("{:?}", person2);
}- The
Personstruct implements theClonetrait - In
main,person2clones the data fromperson1because it implementsClone
Output:
Person { name: "John", age: 25 }
Person { name: "John", age: 25 }
Default Trait
The Default trait in Rust allows a type to define a default value and return that default instance through the default() method.
Example:
#[derive(Default)]
struct Point {
    x: i32,
    y: i32,
}

fn main() {
    let p = Point::default();

    println!("Point is at ({}, {})", p.x, p.y);
}
Output:
Point is at (0, 0)
2.2.2. It Is Recommended to Implement the PartialEq, PartialOrd, Hash, Eq, and Ord Traits
PartialEq Trait
PartialEq provides support for the == and != operators, allowing custom types to participate in partial equality comparisons.
Example:
#[derive(Debug, PartialEq)]
struct Point {
    x: i32,
    y: i32,
}

fn main() {
    let point1: Point = Point { x: 1, y: 2 };
    let point2: Point = Point { x: 1, y: 2 };
    let point3: Point = Point { x: 3, y: 4 };

    println!("point1 == point2: {}", point1 == point2);
    println!("point1 == point3: {}", point1 == point3);
}- By implementing
PartialEq, we can compare whether two structs are equal
Output:
point1 == point2: true
point1 == point3: false
PartialOrd, Eq, and Ord Traits
PartialOrd provides support for the <, <=, >, and >= operators, allowing custom types to participate in partial ordering comparisons, where some values may not be comparable.
Eq is a stricter version of PartialEq that requires equality to be reflexive (a == a is always true). You must implement PartialEq before implementing Eq.
Ord is a stricter version of PartialOrd that requires a total ordering, enabling complete sorting logic for types such as BTreeMap and BTreeSet. You must implement PartialOrd before implementing Ord.
Example:
use std::collections::BTreeMap;

#[derive(Debug, PartialEq, PartialOrd, Eq, Ord, Clone)]
struct Person {
    name: String,
    age: u32,
}

fn main() {
    let mut ages = BTreeMap::new();

    let person1 = Person {
        name: String::from("Alice"),
        age: 25,
    };

    let person2 = Person {
        name: String::from("Bob"),
        age: 30,
    };

    let person3 = Person {
        name: String::from("Charlie"),
        age: 20,
    };

    ages.insert(person1.clone(), "Alice's Age");
    ages.insert(person2.clone(), "Bob's Age");
    ages.insert(person3.clone(), "Charlie's Age");

    for (person, description) in &ages {
        println!("{}: {} - {:?}", person.name, person.age, description);
    }
}BTreeMapstores entries in sorted order. Because it sorts by the key’s value, the key type must implementOrdfor total ordering andEqfor equality comparison.- Implementing
OrdrequiresPartialOrdfirst - Implementing
EqrequiresPartialEqfirst
- Implementing
Hash Trait
Hash allows a type to implement the hash() method, which supports hash-based collections such as HashMap and HashSet. The Hash trait itself does not require Eq as a supertrait, but hash collections require K: Eq + Hash, and equal values must produce the same hash. So in practice, you should implement PartialEq and Eq together with Hash whenever the type will be used as a hash-map/set key.
Example:
use std::collections::HashSet;
use std::hash::{Hash, Hasher};

#[derive(Debug, PartialEq, Eq, Clone)]
struct Person {
    name: String,
    age: u32,
}

impl Hash for Person {
    fn hash<H: Hasher>(&self, state: &mut H) {
        self.name.hash(state);
        self.age.hash(state);
    }
}

fn main() {
    let mut persons = HashSet::new();

    let person1 = Person {
        name: "Alice".to_string(),
        age: 25,
    };

    let person2 = Person {
        name: "Bob".to_string(),
        age: 30,
    };

    let person3 = Person {
        name: "Charlie".to_string(),
        age: 20,
    };

    persons.insert(person1.clone());
    persons.insert(person2.clone());
    persons.insert(person3.clone());

    println!("Persons: {:#?}", persons);
}HashSetis used to store a set of unique elements, whileHashMapis used to store key-value pairs.
Output:
Persons: {
    Person {
        name: "Bob",
        age: 30,
    },
    Person {
        name: "Charlie",
        age: 20,
    },
    Person {
        name: "Alice",
        age: 25,
    },
}
Eq and PartialEq, Ord and PartialOrd
Eq has additional semantic requirements compared with PartialEq, and Ord has additional semantic requirements compared with PartialOrd. You should only implement them when those semantics apply to your type.
The additional semantics of Eq compared with PartialEq are:
- Reflexivity: for all
a,a == amust always hold
(PartialEq already expects symmetry and transitivity; Eq is the marker that equality is also reflexive, so there are no “partial” equalities such as f32::NAN != f32::NAN.)
The additional semantics of Ord compared with PartialOrd are:
- Totality / comparability: for all
aandb, exactly one ofa < b,a == b, ora > bholds (equivalently,partial_cmpnever returnsNone) - Reflexivity: for all
a,a <= aanda >= amust always hold - Antisymmetry: if
a <= bandb <= a, thena == bmust hold - Transitivity: if
a <= bandb <= c, thena <= cmust hold
2.3. API Design Principles of Unsurprising Pt.3 - Implementing serde Serialize and Deserialize Traits, and Why Copy Is Not Recommended
2.3.1. It Is Recommended to Implement Serialize and Deserialize in serde
Serde is the core Rust library for serialization and deserialization:
- Serialization: converts a Rust struct or enum into a string or binary representation such as JSON or YAML
- Deserialization: parses a string or binary representation such as JSON or YAML back into a Rust struct or enum
Serialize and Deserialize are both traits from the serde crate.
Serialize Trait
The Serialize trait allows a type to be converted into a serializable data format such as JSON, YAML, or TOML.
Its main methods include:
serialize_boolserialize_i32serialize_strserialize_struct
These are methods on the Serializer (and related) traits that a Serialize implementation calls; the Serialize trait itself only requires serialize.
Its definition is:
#![allow(unused)]
fn main() {
pub trait Serialize {
    fn serialize<S>(&self, serializer: S) -> Result<S::Ok, S::Error>
    where
        S: Serializer;
}
}
Here is an example showing how to implement Serialize manually:
#![allow(unused)]
fn main() {
use serde::ser::{Serialize, SerializeStruct, Serializer};

struct Point {
    x: i32,
    y: i32,
}

impl Serialize for Point {
    fn serialize<S>(&self, serializer: S) -> Result<S::Ok, S::Error>
    where
        S: Serializer,
    {
        let mut state = serializer.serialize_struct("Point", 2)?;
        state.serialize_field("x", &self.x)?;
        state.serialize_field("y", &self.y)?;
        state.end()
    }
}
}
serializer.serialize_struct("Point", 2)?creates a struct serializer state, and2is the number of fieldsstate.serialize_field("x", &self.x)?serializes the struct fields one by onestate.end()finishes serialization
Deserialize Trait
The Deserialize trait allows Rust types to be parsed from various data formats.
Its main methods include:
deserialize_booldeserialize_i32deserialize_stringdeserialize_struct
These are methods on the Deserializer (and related) traits that a Deserialize implementation drives via a Visitor; the Deserialize trait itself only requires deserialize.
Its definition is:
#![allow(unused)]
fn main() {
pub trait Deserialize<'de>: Sized {
    fn deserialize<D>(deserializer: D) -> Result<Self, D::Error>
    where
        D: Deserializer<'de>;
}
}- The purpose of
deserializeis to usedeserializerto parse a Rust type from some data format
Here is an example showing how to implement Deserialize manually:
#![allow(unused)]
fn main() {
use serde::de::{self, Deserialize, Deserializer, Visitor, MapAccess};
use std::fmt;

struct Point {
    x: i32,
    y: i32,
}

impl<'de> Deserialize<'de> for Point {
    fn deserialize<D>(deserializer: D) -> Result<Self, D::Error>
    where
        D: Deserializer<'de>,
    {
        struct PointVisitor;

        impl<'de> Visitor<'de> for PointVisitor {
            type Value = Point;

            fn expecting(&self, formatter: &mut fmt::Formatter) -> fmt::Result {
                formatter.write_str("a struct Point with fields x and y")
            }

            fn visit_map<M>(self, mut map: M) -> Result<Point, M::Error>
            where
                M: MapAccess<'de>,
            {
                let mut x = None;
                let mut y = None;

                while let Some(key) = map.next_key::<String>()? {
                    match key.as_str() {
                        "x" => x = Some(map.next_value()?),
                        "y" => y = Some(map.next_value()?),
                        _ => {}
                    }
                }

                let x = x.ok_or_else(|| de::Error::missing_field("x"))?;
                let y = y.ok_or_else(|| de::Error::missing_field("y"))?;

                Ok(Point { x, y })
            }
        }

        deserializer.deserialize_struct("Point", &["x", "y"], PointVisitor)
    }
}
}PointVisitoris used to parse JSON fieldsvisit_mapparses the values ofxandyand ensures the fields exist
Automatically Implementing Serialize and Deserialize with #[derive(Serialize, Deserialize)]
Manually implementing Serialize and Deserialize is very tedious, so we usually use the serde_derive macro:
use serde::{Serialize, Deserialize};

#[derive(Serialize, Deserialize, Debug)]
struct Point {
    x: i32,
    y: i32,
}

fn main() {
    let p = Point { x: 10, y: 20 };

    let serialized = serde_json::to_string(&p).unwrap();
    println!("Serialized: {}", serialized); // {"x":10,"y":20}

    let deserialized: Point = serde_json::from_str(&serialized).unwrap();
    println!("Deserialized: {:?}", deserialized); // Point { x: 10, y: 20 }
}
Example Using Serialize and Deserialize
use serde::{Serialize, Deserialize};
use serde_json;

#[derive(Serialize, Deserialize, Debug)]
struct User {
    name: String,
    age: u32,
}

fn main() {
    let user = User {
        name: "Alice".to_string(),
        age: 30,
    };

    // Serialize
    let json_str = serde_json::to_string(&user).unwrap();
    println!("Serialized JSON: {}", json_str);

    // Deserialize
    let deserialized: User = serde_json::from_str(&json_str).unwrap();
    println!("Deserialized: {:?}", deserialized);
}
Output:
Serialized JSON: {"name":"Alice","age":30}
Deserialized: User { name: "Alice", age: 30 }
Other Notes
serde’s serde_derive crate provides a mechanism for overriding the serialization of individual fields or enum variants. Because serde is a third-party library, you may not want to force it as a dependency.
Most libraries choose to provide a serde feature, and only add serde support when the user enables that feature.
That means you can write this in your crate:
[dependencies]
serde = { version = "1.0", optional = true }

[features]
serde = ["dep:serde"]
- In the
[dependencies]section,serdeis introduced as a semver dependency withoptional = true, which means it is an optional dependency. This means serde is not included by default unless it is explicitly enabled - In the
[features]section,serde = ["dep:serde"]means that when the user enables theserdefeature, theserdedependency will also be enabled "dep:serde"indicates that this feature depends on the serde dependency (dep:is the dependency prefix that tells Cargo this feature depends on serde)
Someone else can enable serde when using your crate (assuming the crate is named my_crate) like this:
[dependencies]
my_crate = { version = "0.1", features = ["serde"] }
2.3.2. It Is Not Recommended to Implement the Copy Trait
Users usually do not expect a type to implement Copy. If they want a duplicate, they usually call clone.
The Copy trait changes the semantics of moving a value of a given type (see 1.9.2. How to Implement the Copy Trait). Example:
#[derive(Debug, Copy, Clone)]
struct Point {
    x: i32,
    y: i32,
}

fn main() {
    let point1 = Point { x: 10, y: 10 };
    let point2 = point1;

    println!("{:?}", point1);
    println!("{:?}", point2);
}
The value of point1 is assigned to point2. Normally, point1 would be invalid after that, but because the Point struct implements Copy, the assignment copies the value instead of moving it, and point1 remains valid. That can surprise users, so implementing Copy is not recommended.
In addition, types that implement Copy have many restrictions. A type that starts out simple can easily stop meeting the requirements for Copy. For example, once it contains a String or any other type that does not support Copy, you must remove Copy.
2.4. API Design Principles of Unsurprising Pt.4 - Ergonomic Trait Implementations, Wrapper Types, and Borrow Trait
2.4.1. Ergonomic Trait Implementations
Rust does not automatically provide implementations for references to a type that implements a given trait.
For example, if Bar implements Trait, you still cannot pass &Bar to fn foo<T: Trait>(t: T). That is because implementing Trait for Bar does not automatically implement Trait for &Bar.
Example:
trait Trait {
    fn name(&self) -> &'static str;
}

struct Bar;

impl Trait for Bar {
    fn name(&self) -> &'static str {
        "Bar"
    }
}

fn foo<T: Trait>(t: T) {
    println!("{}", t.name());
}

fn main() {
    let bar = Bar;
    foo(bar); // OK

    let bar_ref = &Bar;
    foo(bar_ref); // error[E0277]: the trait bound `&Bar: Trait` is not satisfied
}
If a user sees that a trait method only accepts &self (and not self or &mut self), they may still be surprised that &Bar does not satisfy T: Trait. That does not satisfy the unsurprising principle.
To solve this, when defining a new trait, we usually provide corresponding blanket implementations (see 1.17.2. Blanket Implementation) for the following (when the trait methods allow it—typically methods that take &self or &mut self):
&T where T: Trait + ?Sized&mut T where T: Trait + ?SizedBox<T> where T: Trait + ?Sized
Continuing the example above, to prevent foo(bar_ref); from failing, we need to manually provide a Trait implementation for &T:
#![allow(unused)]
fn main() {
impl<T: Trait + ?Sized> Trait for &T {
    fn name(&self) -> &'static str {
        (**self).name()
    }
}
}
Note: if a trait method takes self by value (consuming ownership), you generally cannot provide a blanket impl Trait for &T that forwards to T, because a shared reference cannot move out of T.
For iterators, if a type can be iterated, then its references should also provide the corresponding trait implementations. In other words: for any iterable type, consider implementing IntoIterator for &MyType and &mut MyType. That way, we can use borrowed values directly in loops, which matches user expectations.
Example:
struct MyCollection {
    items: Vec<i32>,
}

// Implement IntoIterator for MyCollection
impl IntoIterator for MyCollection {
    type Item = i32;
    type IntoIter = std::vec::IntoIter<Self::Item>;

    fn into_iter(self) -> Self::IntoIter {
        self.items.into_iter()
    }
}

// Implement IntoIterator for &MyCollection
impl<'a> IntoIterator for &'a MyCollection {
    type Item = &'a i32;
    type IntoIter = std::slice::Iter<'a, i32>;

    fn into_iter(self) -> Self::IntoIter {
        self.items.iter()
    }
}

// Implement IntoIterator for &mut MyCollection
impl<'a> IntoIterator for &'a mut MyCollection {
    type Item = &'a mut i32;
    type IntoIter = std::slice::IterMut<'a, i32>;

    fn into_iter(self) -> Self::IntoIter {
        self.items.iter_mut()
    }
}

fn main() {
    let mut collection = MyCollection { items: vec![1, 2, 3] };

    // Iterate by taking ownership
    for item in collection {
        println!("Owned: {}", item);
    }

    let collection = MyCollection { items: vec![4, 5, 6] };

    // Iterate by immutable borrow
    for item in &collection {
        println!("Borrowed: {}", item);
    }

    let mut collection = MyCollection { items: vec![7, 8, 9] };

    // Iterate by mutable borrow
    for item in &mut collection {
        *item *= 2;
    }

    // Make sure the modification took effect
    for item in &collection {
        println!("Modified: {}", item);
    }
}
2.4.2. Wrapper Types
Rust does not have inheritance in the traditional object-oriented sense, but Deref and AsRef provide something similar.
For example, if you have a value of type T and it satisfies Deref<Target = U>, then you can directly call methods from U on a value of type T.
Example:
use std::ops::Deref;

// Define a wrapper type Wrapper that stores a String internally
struct Wrapper(String);

// Implement Deref so that Wrapper dereferences to String
impl Deref for Wrapper {
    type Target = String;

    fn deref(&self) -> &Self::Target {
        &self.0
    }
}

fn main() {
    let my_wrapper = Wrapper(String::from("Hello, Rust!"));

    // Because Wrapper implements Deref<Target = String>,
    // we can call String methods directly without manual dereferencing
    let len = my_wrapper.len();
    let uppercased = my_wrapper.to_uppercase();

    println!("Length: {}", len);
    println!("Uppercased: {}", uppercased);
}
Output:
Length: 12
Uppercased: HELLO, RUST!
If you provide a relatively transparent type such as Arc<T>, then implementing Deref lets your wrapper type automatically dereference to the inner type at the point of use, so its methods can be called directly.
If accessing the inner type does not require any complicated or potentially inefficient logic, you should consider implementing AsRef, so users can easily use &WrapperType as &InnerType.
For most wrapper types, you should also implement From<InnerType> for the wrapper and From<Wrapper> for the inner type where possible (which also gives you Into for free), so users can easily add or remove the wrapper.
Example:
use std::ops::Deref;
use std::sync::Arc;

// Define a wrapper type
struct Wrapper(Arc<String>);

// Implement Deref to allow transparent access to the inner String
impl Deref for Wrapper {
    type Target = String;

    fn deref(&self) -> &Self::Target {
        &self.0
    }
}

// Implement AsRef<String> so users can obtain a `&String`
impl AsRef<String> for Wrapper {
    fn as_ref(&self) -> &String {
        &self.0
    }
}

// Implement From<String> so users can easily create a Wrapper
impl From<String> for Wrapper {
    fn from(s: String) -> Self {
        Wrapper(Arc::new(s))
    }
}

// Implement From<Wrapper> for String so users can convert the Wrapper back into a String (by cloning)
impl From<Wrapper> for String {
    fn from(w: Wrapper) -> Self {
        (*w).clone() // Deref allows Wrapper to be used as if it were a String
    }
}

fn main() {
    let wrapped = Wrapper::from("Hello, Rust!".to_string());

    // Because Deref is implemented, we can call String methods directly
    println!("Length: {}", wrapped.len());
    println!("Uppercased: {}", wrapped.to_uppercase());

    // Use AsRef to obtain a &String reference
    let str_ref: &String = wrapped.as_ref();
    println!("AsRef: {}", str_ref);

    // Convert back to String through Into (cloning the string)
    let original: String = wrapped.into();
    println!("Converted back: {}", original);
}
Output:
Length: 12
Uppercased: HELLO, RUST!
AsRef: Hello, Rust!
Converted back: Hello, Rust!
2.4.3. Borrow Trait
The Borrow trait is somewhat similar to Deref and AsRef, but it is aimed at a narrower use case and is more specialized.
The Borrow trait allows callers to provide any of several essentially identical variants of a unified type. These variants are called equivalents.
Note: The Borrow trait should only be used when your type is essentially equivalent to another type. In other words, Borrow is for “equivalent” cases, while AsRef and Deref are for “acts as” cases.
For example, for a HashSet<String>, Borrow allows callers to provide &str or &String.
Example:
use std::collections::HashSet;

fn main() {
    let mut set: HashSet<String> = HashSet::new();
    set.insert("hello".to_string());
    set.insert("world".to_string());

    // Query directly with &str without creating a String.
    // This works because the standard library already provides `impl Borrow<str> for String`.
    let exists = set.contains("hello");
    let not_exists = set.contains("rust");

    println!("Contains 'hello': {}", exists);
    println!("Contains 'rust': {}", not_exists);
}
Output:
Contains 'hello': true
Contains 'rust': false
Comparison with AsRef
Of course, the same effect as above can also be achieved with AsRef:
use std::collections::HashSet;

// Generic function that accepts any type implementing `AsRef<str>`, such as `&str` and `&String`
fn contains<S: AsRef<str>>(set: &HashSet<String>, value: S) -> bool {
    set.contains(value.as_ref()) // `AsRef<str>` converts `value` to `&str`
}

fn main() {
    let mut set: HashSet<String> = HashSet::new();
    set.insert("hello".to_string());
    set.insert("world".to_string());

    // Query directly with &str
    let exists = contains(&set, "hello");

    // You can also query with &String
    let string_value = "world".to_string();
    let exists_string = contains(&set, &string_value);

    println!("Contains 'hello': {}", exists);
    println!("Contains 'world': {}", exists_string);
}
Using AsRef can achieve the same result, but without the extra requirements of Borrow, this implementation is unsafe for hash-table lookup, because Borrow requires the Hash, Eq, and Ord implementations of the borrowed form to match those of the owned type.
The potential problem is that AsRef<U> does not require (even as documentation) consistency of Hash, Eq, and Ord between the source type and U.
For example:
use std::collections::HashSet;

#[derive(Hash, Eq, PartialEq)]
struct CustomType {
    value: String,
}

// Implement AsRef<str>, but that alone does not make HashSet lookup with &str legal
impl AsRef<str> for CustomType {
    fn as_ref(&self) -> &str {
        &self.value
    }
}

fn main() {
    let mut set: HashSet<CustomType> = HashSet::new();
    set.insert(CustomType { value: "hello".to_string() });

    // This will not compile (error[E0308]): `contains` is keyed on `Borrow`, not `AsRef`,
    // so `&str` does not match without `CustomType: Borrow<str>`
    let exists = set.contains("hello");
    println!("Exists: {}", exists);
}containsis typed in terms ofBorrow, soAsRef<str>does not participate- Even if you wrote a helper that converted via
AsRefand then looked up somehow, nothing in the type system would forceCustomType’sHash/Eqto matchstr’s
By contrast, Borrow<U> is the trait HashMap/HashSet use for lookup, and its documentation requires Hash, Eq, and Ord to remain consistent between the type and the borrowed form (the compiler does not prove this; implementors must uphold it):
use std::borrow::Borrow;
use std::collections::HashSet;

#[derive(Hash, Eq, PartialEq)]
struct CustomType {
    value: String,
}

// `Borrow<str>` is what enables `contains("hello")`, and you must keep Hash/Eq aligned with `str`
impl Borrow<str> for CustomType {
    fn borrow(&self) -> &str {
        &self.value
    }
}

fn main() {
    let mut set: HashSet<CustomType> = HashSet::new();
    set.insert(CustomType { value: "hello".to_string() });

    let exists = set.contains("hello"); // safe lookup if Hash/Eq match str
    println!("Exists: {}", exists);
}
Other Traits
Borrow also has blanket implementations for Borrow<T>, &T, and &mut T. This makes it convenient to use in trait bounds when you want to accept owned values or references of a given type.
The Rust standard library provides the following blanket implementations of Borrow<T> for all T, which means:
- The type
Titself canBorrow<T>, soTcan be used directly as an argument toBorrow<T> &Tcan alsoBorrow<T>, which lets an immutable reference satisfy aBorrow<T>bound&mut Tcan alsoBorrow<T>, which lets a mutable reference satisfy aBorrow<T>bound
Suppose we have a find_item function that looks up a key in a HashMap<K, V>:
use std::borrow::Borrow;
use std::collections::HashMap;
use std::hash::Hash;

fn find_item<'a, K, V, Q>(map: &'a HashMap<K, V>, key: &Q) -> Option<&'a V>
where
    K: Eq + Hash + Borrow<Q>,
    Q: ?Sized + Eq + Hash,
{
    map.get(key)
}

fn main() {
    let mut map: HashMap<String, i32> = HashMap::new();
    map.insert("hello".to_string(), 42);

    // Because `String: Borrow<str>`, we can use `&str` directly to query `HashMap<String, i32>`
    let value = find_item(&map, "hello");

    println!("Value: {:?}", value); // Output: Value: Some(42)
}
The convenience provided by Borrow<T> is as follows:
Stringcan be used asstr’sBorrow<T>implementation, soHashMap<String, i32>can be queried using&stras the keyfind_item(&map, "hello")passes&strdirectly without converting it toStringfind_item(&map, &"hello".to_string())also works because&Stringalso satisfiesBorrow<str>
2.5. API Design Principles of Flexibility Pt.1 - Contracts and More Flexible Interfaces with Generic Parameters
2.5.1. Code Contracts
Your code, whether explicitly or implicitly, contains a contract.
A contract has two sides:
- A contract is a requirement, which is a restriction on how the code is used
- A contract is a promise, which is a guarantee about how the code behaves
When designing APIs, there is a useful rule of thumb: avoid imposing unnecessary restrictions, and only make promises you can keep.
Why?
- Adding restrictions or removing promises requires a major semantic version change and may break other code
- When you first design an API, loosening restrictions and later adding extra promises is usually backward-compatible
2.5.2. Restrictions and Promises
Common forms of restrictions in Rust are:
- Trait bounds
- Argument types
Common forms of promises are:
- Trait implementations
- Return types
Some Examples
Let’s look at an API evolving through three versions:
#![allow(unused)]
fn main() {
fn frobnicate(s: String) -> String
}- The first version takes a
Stringand returns aString - Its contract is that the caller performs allocation (because both the parameter and return value are owned, allocation is inevitable), and its promise is that it returns an owned
String - The problem with this function is that, without changing the signature, it cannot later be turned into a “no-allocation” function, because both the argument and return value are owned
#![allow(unused)]
fn main() {
fn frobnicate(s: &str) -> Cow<'_, str>
}- The second version relaxes the contract a bit
- Its contract is that it accepts only a string reference, and its promise is that it returns either a string reference or an owned
String, namely theCowtype (introduced in 1.2.2. References and Pointers in Rust) - This version is still somewhat rigid. For example, the argument is
&str; if I pass in aString, I still have to convert it first. Also, because the return value isCow, it cannot return string-owning types other thanStringand&str(for example,OsString)
#![allow(unused)]
fn main() {
fn frobnicate<T: AsRef<str>>(s: T) -> T
}- The third version relaxes the contract further
- Now both the parameter and the return value only require a type that implements
AsRef<str>, that is, a type that can produce a string reference
These three functions all take a string and return a string; the only difference is the contract. None of them is better or worse than the others, only stricter or looser. When designing an API, carefully plan the contract, because changing it will cause breaking changes.
Let’s look at the full example:
use std::borrow::Cow;

fn frobnicate<T: AsRef<str>>(s: T) -> T {
    s
}

fn main() {
    let string: String = String::from("example");
    let borrowed: &str = "hello";
    let cow: Cow<str> = Cow::Borrowed("world");

    let result1: &str = frobnicate::<&str>(string.as_ref());
    let result2: &str = frobnicate::<&str>(borrowed);
    let result3: Cow<str> = frobnicate(cow);

    println!("Result1: {:?}", result1);
    println!("Result2: {:?}", result2);
    println!("Result3: {:?}", result3);
}- Whether it is
String,&str, orCow<str>(which is essentially also&str), this function can accept it (Stringneeds to be converted to&strfirst withas_ref) and return a value (the return value can also be a different type)
Output:
Result1: "example"
Result2: "hello"
Result3: "world"
2.5.3. Use Generic Parameters to Make Interfaces More Flexible
We can loosen function requirements by using generics. In most cases, it is worthwhile to use generics instead of concrete types.
Example of Using Generic Parameters
Example:
fn print_as_str<T: AsRef<str>>(s: T) {
    println!("{}", s.as_ref());
}

fn main() {
    let s: String = String::from("hello");
    let r: &str = "world";

    print_as_str(s);  // calls `print_as_str::<String>`
    print_as_str(r);  // calls `print_as_str::<&str>`
}- The
print_as_strfunction accepts a parameter that implementsAsRef<str> - This function is generic, which means it is monomorphized (see Rust Guide 10.2.6. Performance of Generic Code) for every type that implements
AsRef<str>that you use with it. For example, if you call it with aStringand a&str, you will have two copies of the function in your binary,print_as_str::<String>andprint_as_str::<&str>, and each call will invoke the corresponding function
Note: the advantage of monomorphization is that it avoids runtime overhead, while the drawback is that the compiler generates one function for each input type, increasing binary size.
If you do not want multiple copies of a function in the binary, you can use dynamic dispatch:
fn print_as_str(s: &dyn AsRef<str>) {
    println!("{}", s.as_ref());
}

fn main() {
    let s: String = String::from("hello");
    let r: &str = "world";

    print_as_str(&s);  // pass a trait object of type `&dyn AsRef<str>`
    print_as_str(&r);  // pass a trait object of type `&dyn AsRef<str>`
}- This function is no longer generic; it accepts a trait object that can be any type implementing
AsRef<str> - This means it uses dynamic dispatch at runtime to call
as_ref, and you will only have one copy of the function in your binary
See 1.15.4. Dynamic Dispatch for more details. Note that dynamic dispatch has some runtime overhead compared with monomorphization, but it is very small.
Do Not Take Generic Parameters to the Extreme
Do not overuse generic parameters; it depends on the specific situation.
Whether to use generics (or trait objects) or concrete types depends on whether users will reasonably and frequently want to substitute other types for the concrete type you initially chose. If so, making the parameter generic is more appropriate.
The Trade-Off Between Monomorphization and Dynamic Dispatch
The advantage of monomorphization is that it avoids runtime overhead; the drawback is that the compiler generates one function for each input type, increasing binary size.
If you are worried that the generated binary will be too large, you can use dynamic dispatch. Although dynamic dispatch has some runtime overhead compared with monomorphization, it is very small.
- In high-performance applications, using dynamic dispatch inside frequently executed hot loops can become a fatal issue!
Dynamic dispatch can only be used with simple trait bounds (a single trait bound), such as T: AsRef<str> or impl AsRef<str>. Because Rust cannot create a vtable for complex trait bounds (for example, two or more trait bounds; see 1.15.5. vtable), dynamic dispatch cannot be used there.
For parameters taken by reference (dyn Trait is not Sized, so a wide pointer is needed to use them), dynamic dispatch can be used instead of generic parameters.
Let’s look at an example:
#![allow(unused)]
fn main() {
// Generic function, static dispatch
fn process<T>(value: T) {
    println!("processing T");
}
}- This is the generic function form
#![allow(unused)]
fn main() {
// Dynamic dispatch
trait Processable {
    fn process(&self);
}

struct TypeA;
impl Processable for TypeA {
    fn process(&self) {
        println!("processing TypeA");
    }
}

fn process_trait_object(value: &dyn Processable) {
    value.process();
}
}- This is the dynamic-dispatch form
What if we put both together—how can we tell which one uses static dispatch and which one uses dynamic dispatch?
// Generic function, static dispatch
fn process<T>(value: T) {
    println!("processing T");
}

// Dynamic dispatch
trait Processable {
    fn process(&self);
}

struct TypeA;
impl Processable for TypeA {
    fn process(&self) {
        println!("processing TypeA");
    }
}

struct TypeB;
impl Processable for TypeB {
    fn process(&self) {
        println!("processing TypeB");
    }
}

fn process_trait_object(value: &dyn Processable) {
    value.process();
}

fn main() {
    let a = TypeA;
    let b = TypeB;

    process_trait_object(&a); // dynamic dispatch
    process_trait_object(&b); // dynamic dispatch

    process(&a);  // static dispatch
    process(&b);  // static dispatch

    process(&a as &dyn Processable); // static dispatch
    process(&b as &dyn Processable); // static dispatch
}- Calls to
process_trait_objectuse dynamic dispatch - Calls to
processuse static dispatch
The last two process calls are a little special. The argument passed in is &dyn Processable rather than a concrete type (because as &dyn Processable is used). The compiler will treat it as a type and monomorphize it, that is, it will monomorphize the code into:
#![allow(unused)]
fn main() {
fn process(value: &dyn Processable) {
    println!("processing T");
}
}
This part is still static dispatch because T = &dyn Processable is determined at compile time.
At runtime, because &dyn Processable does not have a concrete static type behind the fat pointer, any method call through that trait object would look up the implementation via the vtable. In this particular process example, however, the function body never calls a method on value, so no vtable dispatch occurs; monomorphization still produces a single process::<&dyn Processable> specialization at compile time.
But overall, we still consider the call to the generic process function itself to be static dispatch.
Output:
processing TypeA
processing TypeB
processing T
processing T
processing T
processing T
When using generic parameters, the caller can always choose dynamic dispatch by passing a trait object (process(&a as &dyn Processable);).
The reverse is not true: if you accept a trait object as a parameter, then the caller must provide a trait object and cannot use static dispatch.
How Should APIs Consider Generic Parameters?
We can start by writing interfaces with concrete types and then gradually convert them to generics. That approach works, but it is not necessarily backward-compatible.
Example:
fn foo(v: &Vec<usize>) {
    // ...
}

fn main() {
    let iter = vec![1, 2, 3].into_iter();
    foo(&iter.collect());
}- In
main, theinto_itermethod converts theVecinto anIntoIter<usize> iter.collect()then convertsiterfromIntoIter<usize>back intoVec<usize>, and adding&in front of it makes it fully match the parameter type required byfooHere,collectknows to collectiterinto aVec<usize>because the compiler knows thatfooaccepts&Vec<usize>
Now let’s rewrite foo using a trait bound:
fn foo(v: impl AsRef<[usize]>) {
    // ...
}

fn main() {
    let iter = vec![1, 2, 3].into_iter();
    foo(&iter.collect());
}- This program does not compile because the compiler does not know what type
collectshould collectiterinto. The compiler only knows thatfoo’s parameter isAsRef<[usize]>, but many types satisfy that, such asVec<usize>and&[usize]
Output:
error[E0283]: type annotations needed
  --> src/main.rs:7:15
   |
 7 |     foo(&iter.collect());
   |               ^^^^^^^ cannot infer type of the type parameter `B` declared on the method `collect`
   |
   = note: the type must implement `FromIterator<i32>`
help: consider specifying the generic argument
   |
 7 |     foo(&iter.collect::<Vec<_>>());
   |                      ++++++++++
To solve this, the caller must explicitly tell collect what type to collect into:
fn foo(v: impl AsRef<[usize]>) {
    // ...
}

fn main() {
    let iter = vec![1, 2, 3].into_iter();
    foo(&iter.collect::<Vec<usize>>());
}
2.6. API Design Principles of Flexibility Pt.2 - Object Safety, API Design, and Generic Trait Methods
2.6.1. Object Safety
When defining a trait, whether it is object-safe is also part of the unstated contract (see 2.5.1. Code Contracts).
Object safety is a concept in Rust related to trait objects. It determines whether a trait can be dynamically dispatched, that is, whether it can be used in the form of dyn Trait.
Traits That Are Object-Safe Must Satisfy the Following Conditions (Based on RFC 255)
-
All supertraits must also be object-safe
If a trait inherits from other traits (supertraits, see Rust Guide 19.2.5. Using Supertraits to Require Additional Trait Functionality), then those supertraits must also be object-safe. -
It must not require
Sized
A trait cannot useSized(see Rust Guide 19.5.4. Dynamically Sized Types and theSizedTrait) as a supertrait, meaning it cannot contain aSelf: Sizedbound, because the size of a trait object is unknown at compile time. -
It cannot have associated constants.
-
It cannot have associated types with type parameters.
-
All associated functions (methods) must satisfy one of the following rules:
-
Dispatchable functions:
- They cannot have any type parameters, though lifetime parameters are allowed.
- They must be methods, and
Selfmay only appear in receiver positions such as:&self&mut selfBox<Self>Rc<Self>Arc<Self>Pin<P>(wherePis one of the types above)
- They cannot require
Self: Sized, otherwise the trait would only be usable for types with known size and object safety would be broken.
-
Explicitly non-dispatchable functions:
- They may return
Self, but such functions must requireSelf: Sized, so they cannot be called on trait objects and can only be used with concrete types.
- They may return
-
If you cannot remember all of the above, just remember object safety describes whether a trait can be safely turned into a trait object.
What Object Safety Does
If a trait is object-safe, meaning it satisfies all of the conditions above, then we can use dyn Trait to treat different types that implement the trait as a single generic type.
If it is not object-safe, the compiler will prevent you from using dyn Trait.
Object Safety and API Design
When designing APIs, it is recommended to make traits object-safe, even if that slightly reduces convenience, because it provides new ways to use the trait and increases flexibility.
Let’s look at an example:
Suppose we have an
Animaltrait with two methods:nameandspeak. Thenamemethod returns&strand represents the animal’s name. Thespeakmethod prints an onomatopoeic sound for the animal and returns nothing. We have two structs,DogandCat, and both implement this trait.
trait Animal {
    fn name(&self) -> &str;
    fn speak(&self);
}

struct Dog {
    name: String,
}

impl Animal for Dog {
    fn name(&self) -> &str {
        &self.name
    }

    fn speak(&self) {
        println!("Woof!");
    }
}

struct Cat {
    name: String,
}

impl Animal for Cat {
    fn name(&self) -> &str {
        &self.name
    }

    fn speak(&self) {
        println!("Meow!");
    }
}

fn main() {
    let dog = Dog { name: String::from("George") };
    let cat = Cat { name: String::from("Hamilton") };

    let animals: Vec<&dyn Animal> = vec![&dog, &cat];

    for animal in animals {
        println!("The name of this animal is {}", animal.name());
        animal.speak();
    }
}- The
Animaltrait is object-safe because it does not returnSelfor use generic parameters - So we can use it to create a trait object:
let animals: Vec<&dyn Animal> = vec![&dog, &cat];, and thisVeceffectively becomes a trait-object collection
Output:
The name of this animal is George
Woof!
The name of this animal is Hamilton
Meow!
Next, let’s make a small change to the previous example:
We add a new
clonemethod to theAnimaltrait, and it returns aSelfvalue
trait Animal {
    fn name(&self) -> &str;
    fn speak(&self);
    fn clone(&self) -> Self;
}

struct Dog {
    name: String,
}

impl Animal for Dog {
    fn name(&self) -> &str {
        &self.name
    }

    fn speak(&self) {
        println!("Woof!");
    }

    fn clone(&self) -> Self {
        todo!()
    }
}

struct Cat {
    name: String,
}

impl Animal for Cat {
    fn name(&self) -> &str {
        &self.name
    }

    fn speak(&self) {
        println!("Meow!");
    }

    fn clone(&self) -> Self {
        todo!()
    }
}

fn main() {
    let dog = Dog { name: String::from("George") };
    let cat = Cat { name: String::from("Hamilton") };

    let animals: Vec<&dyn Animal> = vec![&dog, &cat];

    for animal in animals {
        println!("The name of this animal is {}", animal.name());
        animal.speak();
    }
}
Output:
error[E0038]: the trait `Animal` is not dyn compatible
  --> src/main.rs:47:27
   |
47 |     let animals: Vec<&dyn Animal> = vec![&dog, &cat];
   |                           ^^^^^^ `Animal` is not dyn compatible
   |
note: for a trait to be dyn compatible it needs to allow building a vtable
      for more information, visit <https://doc.rust-lang.org/reference/items/traits.html#dyn-compatibility>
  --> src/main.rs:4:24
   |
 1 | trait Animal {
   |       ------ this trait is not dyn compatible...
...
 4 |     fn clone(&self) -> Self;
   |                        ^^^^ ...because method `clone` references the `Self` type in its return type
   = help: consider moving `clone` to another trait
   = help: the following types implement `Animal`:
             Dog
             Cat
           consider defining an enum where each variant holds one of these types,
           implementing `Animal` for this new enum and using it instead
After adding clone, Animal is no longer object-safe because clone violates the rule that the return type cannot be Self. A dyn Trait is called through a pointer, while Self refers to the concrete implementation type, whose size is unknown at compile time.
For example:
fn main() {
    let dog = Dog { name: "Ver".to_string() };
    let dog2 = dog.clone(); // this is fine because Self = Dog

    let animal: Box<dyn Animal> = Box::new(Dog { name: "Ver".to_string() });
    let animal2 = animal.clone(); // compile error: the concrete size is unknown at compile time
}
If I want to keep Animal object-safe while also keeping the clone method, what should I do?
Going back to the first section of this article, look at explicitly non-dispatchable functions: they may return Self, but such functions must require Self: Sized, so they cannot be called on trait objects and can only be used with concrete types.
According to that requirement, we can change the code like this:
#![allow(unused)]
fn main() {
trait Animal {
    fn name(&self) -> &str;
    fn speak(&self);
    fn clone(&self) -> Self
    where
        Self: Sized;
}

// ...the rest of the code stays the same
}
Output:
The name of this animal is George
Woof!
The name of this animal is Hamilton
Meow!
That way, there is no error.
Note that clone can now only be called on concrete types; otherwise it will fail:
fn main() {
    let dog = Dog { name: String::from("George") };
    let cat = Cat { name: String::from("Hamilton") };

    let animals: Vec<&dyn Animal> = vec![&dog, &cat];

    for animal in animals {
        println!("The name of this animal is {}", animal.name());
        animal.speak();
        animal.clone();  // this will fail because `animal` is `&dyn Animal`, not a concrete type
    }
}
Output:
error: the `clone` method cannot be invoked on a trait object
  --> src/main.rs:54:16
   |
 6 |         Self: Sized;
   |               ----- this has a `Sized` requirement
...
54 |         animal.clone();  // this will fail because `animal` is `&dyn Animal`, not a concrete type
   |                ^^^^^
Because the trait method declares a Self: Sized requirement on the clone return value, and &dyn Animal does not have a known concrete size, the method cannot be called.
Of course, it definitely works on a concrete type:
fn main() {
    let dog = Dog { name: String::from("George") };
    let dog_clone = dog.clone(); // compiles successfully
}
Generic Trait Methods and API Design
Put Generic Parameters on the Trait
If a trait must have a generic method, consider putting the generic parameter on the trait itself (see 1.16.2. Generic (Type-Parameter) Traits).
Example:
use std::collections::HashSet;
use std::hash::Hash;

trait Container<T> {
    fn contains(&self, item: &T) -> bool;
}

impl<T> Container<T> for Vec<T>
where
    T: PartialEq,
{
    fn contains(&self, item: &T) -> bool {
        self.iter().any(|x| x == item)
    }
}

impl<T> Container<T> for HashSet<T>
where
    T: Eq + Hash,
{
    fn contains(&self, item: &T) -> bool {
        HashSet::contains(self, item)
    }
}

fn main() {
    // Create `Vec<T>` and `HashSet<T>` instances
    let vec_container: Box<dyn Container<i32>> = Box::new(vec![1, 2, 3]);
    let hashset_container: Box<dyn Container<i32>> =
        Box::new(vec![4, 5, 6].into_iter().collect::<HashSet<_>>());

    // Call the contains method
    println!("Vector contains 2: {}", vec_container.contains(&2));
    println!("HashSet contains 4: {}", hashset_container.contains(&4));
}- There is a trait called
Container, and it has a method calledcontains. The implementation ofcontainswill definitely need a generic parameter. But to preserve object safety, we cannot add type parameters to the method itself. - So we move the generic parameter to the trait rather than to the trait method, namely
Container<T>, whereTis the generic parameter - In this way, we can implement the
Containertrait for different container types, and each implementation has its own specific element type - For example, in the code above we implemented
ContainerforVec<T>andHashSet<T>
Output:
Vector contains 2: true
HashSet contains 4: true
Use Dynamic Dispatch
Another option is to consider whether the generic parameter can be expressed with dynamic dispatch in order to keep the trait object-safe.
Example:
Suppose we have a Foo trait with a generic method bar that takes a generic parameter T:
#![allow(unused)]
fn main() {
trait Foo {
    fn bar<T>(&self, x: T);
}
}
This trait is not object-safe, because object safety requires trait methods to have no generic parameters. The reason is that generic methods rely on monomorphization: Rust needs to determine the concrete type of T at compile time and generate different code for different Ts, while dyn Foo uses runtime dynamic dispatch, so the compiler cannot pre-generate code for every possible T.
But there is a workaround: replace the generic parameter with a dynamically dispatched form, like this:
#![allow(unused)]
fn main() {
trait Foo {
    fn bar(&self, x: &dyn Debug);
}
}
Then the bar method can call x’s Debug behavior through dynamic dispatch (via the vtable) without needing the concrete type at compile time, which keeps Foo object-safe.
Example:
trait Foo {
    fn bar<T>(&self, x: T); // generic method, so the trait is not object-safe
}

struct MyStruct;

impl Foo for MyStruct {
    fn bar<T>(&self, x: T) {
        println!("Received a value!");
    }
}

fn main() {
    let obj = MyStruct;

    let obj_ref: &dyn Foo = &obj; // compile error: the trait `Foo` is not dyn compatible
    obj_ref.bar(42);  // cannot call this because `T` must be known at compile time
}
This will not work, so we need to switch to a dynamic-dispatch version:
use std::fmt::Debug;

trait Foo {
    fn bar(&self, x: &dyn Debug); // use a trait object instead of a generic parameter to keep it object-safe
}

struct MyStruct;

impl Foo for MyStruct {
    fn bar(&self, x: &dyn Debug) {
        println!("Received a value: {:?}", x);
    }
}

fn main() {
    let obj = MyStruct;

    let obj_ref: &dyn Foo = &obj; // now it can be used as a trait object
    obj_ref.bar(&42);  // output: Received a value: 42
    obj_ref.bar(&"Hello"); // output: Received a value: "Hello"
}
The Cost of Object Safety
How much do we have to give up in order to achieve object safety?
- Think about how users will use your trait; if they are likely to treat it as a trait object, then do your best to make it object-safe
2.7. API Design Principles of Flexibility Pt.3 - Borrowed vs Owned, Cow Type, and Fallible and Blocking Destructors with Solutions
2.7.1. Borrowed vs. Owned
For almost every function, trait, and type in Rust, we need to decide:
- Should it own the data?
- Or should it hold a reference to the data?
If your code needs ownership of the data, then it must store owned data. When your code owns the data, you must require the caller to provide owned data rather than a reference or a clone. That lets the caller control allocation and clearly see the cost of using the interface.
If the code does not need to own the data, then it should operate on references to the data. But there are exceptions: for “small types” such as i32, bool, and f64, the cost of storing and copying them directly is basically the same as storing them by reference.
Most of these small types implement Copy, but not every Copy type can be called a “small type.” For example, [u8; 114514] implements Copy, but because it has so many elements, storing and copying it is too expensive, so passing by reference is recommended.
Cow Type
Sometimes we cannot tell whether code owns the data, because it depends on runtime conditions. The Cow type (introduced in 1.2.2. References and Pointers in Rust) is a perfect fit for this situation.
Cow allows you to hold either a reference or an owned value when needed. If an owned value is required while only a reference is available, Cow uses the ToOwned trait to create an owned value behind the scenes, usually by cloning. In general, we use Cow in return types to express functions that may sometimes allocate memory.
In other words:
- If the data does not need to be modified,
Cowcan borrow the existing data and avoid extra allocation. - If the data needs to be modified,
Cowwill clone the data to gain ownership and then modify it.
Example:
use std::borrow::Cow;

fn process_data(data: Cow<str>) {
    if data.contains("invalid") {
        // If it contains "invalid", it needs to be modified, and modification requires ownership first
        let owned_data = data.into_owned();

        // ...some modification operations
        println!("{}", owned_data); // final output
    } else {
        // No modification here, so we only need to read it
        println!("Data: {}", data);
    }
}

fn main() {
    let input1 = "Hello, world!";
    process_data(Cow::Borrowed(input1));

    let input2 = "This is invalid data".to_string();
    process_data(Cow::Owned(input2));
}- I wrote the logic of
process_datain the comments - In
main,input1does not contain"invalid"and requires no modification, so it only needs to be read. Therefore, there is no need to pass an owned value; passing a reference (Cow::Borrowed(input1)) is enough input2contains"invalid"and needs to be modified, so an owned value (Cow::Owned(input2)) should be passed
When Should You Consider Taking Ownership of Data?
Sometimes reference lifetimes make an interface especially complicated and hard to use. If users encounter compilation problems while using it, that is a sign that we need to own the data, even if it is not strictly necessary.
If you decide to do that, the first thing to consider is converting easy-to-clone or performance-insensitive data into owned values, instead of mechanically heap-allocating large chunks of data content. That can avoid performance problems and improve usability.
2.7.2. Fallible and Blocking Destructors
Destructors, that is, the Drop trait, are special methods that are called automatically when an object reaches the end of its lifetime (see 1.9.3. Dropping Values), and are used to release resources.
Destructors are generally not allowed to fail and are expected to be non-blocking, but there are exceptions:
- Releasing resources may require closing a network connection or writing to a log file, and these operations may fail
- The
dropmethod may need to perform blocking work, such as waiting for a thread to finish or waiting for an async task to complete
Problems with I/O Operations and Destructors
In I/O-related types such as files and network connections, resource management is very important, and the Drop mechanism (destructors) can ensure that cleanup operations are performed correctly when the object is dropped, avoiding resource leaks.
More specifically:
- File operations: when a file object is dropped,
Dropneeds to ensure that all data has been written to disk to prevent data loss - Network connections: when a
TcpStreamorUdpSocketis dropped,Dropneeds to close the connection properly to prevent resource leaks - Database connections: when a database connection object goes out of scope,
Dropneeds to disconnect and free server-side resources
The problem is that in Rust’s Drop mechanism, if an error occurs while performing cleanup, there is no direct way to return a Result for the caller to handle. The only thing you can do is trigger panic! and crash the program.
Problems with Async Code and Destructors
Async code has a similar problem. In Rust’s async programming (async/await), we often want to perform cleanup operations in Drop, such as:
- Closing a database connection
- Flushing and closing a file
- Closing a WebSocket or TCP connection
- Releasing a lock or resource
However, async code may be running while other tasks are still pending, for example:
- A network I/O operation has not finished
- Other async tasks are still waiting for a signal
- The current task needs
await, butDropcannotawait
The problem is that Rust’s Drop trait cannot await, because drop() is not async:
#![allow(unused)]
fn main() {
trait Drop {
    fn drop(&mut self);
}
}drop()cannotawait, which means it cannot perform async cleanup tasks such as closing a database connection asynchronously- But async cleanup usually needs
await, for example:
#![allow(unused)]
fn main() {
async fn close_connection() {
    // Simulate closing a database connection
    println!("Closing database connection...");
}
}
This code cannot be called directly from Drop, because Drop cannot await.
A common approach is to start another async executor inside drop() to run the cleanup code, for example:
#![allow(unused)]
fn main() {
impl Drop for MyAsyncResource {
    fn drop(&mut self) {
        tokio::spawn(async {
            self.close().await;
        });
    }
}
}- This allows you to run async tasks inside
drop() - But there is a problem: if
drop()happens whenmain()is ending or after other async tasks finish, the task spawned insidedrop()may not finish before the program exits
For These Two Problems
For these two problems, there is no perfect solution. The best we can do is use Drop to clean up as much as possible. If cleanup produces an error, at least we tried, and we can only ignore the error and continue.
If an executor is still available, we can try to create a Future to perform cleanup, but if the Future will never be allowed to run, there is nothing we can do.
A Small Extension: About Future
In Rust’s async model, a Future represents a value that will be produced by an asynchronous computation:
#![allow(unused)]
fn main() {
async fn cleanup() {
    println!("Cleaning up...");
}
}- This
cleanup()function returns aFuture; it does not run immediately and instead must be polled by an executor
#![allow(unused)]
fn main() {
struct MyResource;

impl Drop for MyResource {
    fn drop(&mut self) {
        let fut = async {
            println!("Cleaning up...");
        };

        // A `Future` is created here, but nobody executes it!
    }
}
}- A
Futureis created insidedrop(), but it will not run by itself; an executor must drive it - If no executor is available, the
Futurewill never run, and the cleanup task cannot complete
The Solution — Explicit Destructors
Now that we have covered Future, let us return to solving these two problems.
If users do not want to leave behind “dangling threads,” we can provide an explicit destructor. Such a destructor is usually a method that takes ownership of self and exposes any errors (using Result<T, E>) or asynchrony (using async fn), both of which are related to destruction.
“Dangling threads” refers to the following:
- Resources such as threads, database connections, or file handles are not cleaned up properly, so they are still occupied when the process exits
- For example, some background tasks may not terminate normally and may continue running, leak resources, or prevent the process from exiting
“Explicit destructor” means:
- Because Rust’s
Dropcannot returnResult<T, E>and also cannot beasync(sincedrop()cannotawait), it cannot handle async cleanup or errors- Therefore, we can provide an explicit
close()orshutdown()method that users call manually to ensure resources are released correctly and to supportResultorasyncerror handling
Example:
use std::os::fd::{FromRawFd, IntoRawFd};
use std::fs::{File as StdFile, OpenOptions, metadata};
use std::io::Error;

/// A type that represents a file handle
struct File {
    /// File name
    name: String,
    /// File descriptor
    fd: i32,
}

impl File {
    /// A constructor that opens a file and returns a `File` instance
    fn open(name: &str) -> Result<File, Error> {
        // Open the file with read and write permissions
        let file: StdFile = OpenOptions::new()
            .read(true)
            .write(true)
            .open(name)?;

        // Take ownership of the file descriptor (do not use as_raw_fd:
        // dropping StdFile would close the fd while we still hold a copy)
        let fd: i32 = file.into_raw_fd();

        // Return a `File` instance
        Ok(File {
            name: name.to_string(),
            fd,
        })
    }

    /// An explicit destructor that closes the file and returns any error
    fn close(self) -> Result<(), Error> {
        // Convert the fd back into a `File` using `FromRawFd`
        let file: std::fs::File = unsafe {
            std::fs::File::from_raw_fd(self.fd)
        };

        // Flush file data to disk
        file.sync_all()?;

        // Truncate the file to 0 bytes
        file.set_len(0)?;

        // Flush the file again
        file.sync_all()?;

        // Drop the file instance, which will close the file automatically
        drop(file);

        // Return success
        Ok(())
    }
}

fn main() {
    // Create a file named "test.txt" and write some content into it
    std::fs::write("test.txt", "Hello, world!").unwrap();

    // Open the file and obtain a `File` instance
    let file: File = File::open("test.txt").unwrap();

    // Print the file name and fd
    println!("File name: {}, fd: {}", file.name, file.fd);

    // Close the file and handle any error
    match file.close() {
        Ok(()) => println!("File closed successfully"),
        Err(e) => println!("Error closing file: {}", e),
    }

    // Check the file size after closing
    let metadata = metadata("test.txt").unwrap();
    println!("File size: {} bytes", metadata.len());
}- I wrote the important details in the code comments
closeis an explicit destructor: it closes the file and returns any error, takesselfas its parameter, and returns aResult- In
main, we explicitly call the destructor and usematchfor pattern matching
A Small Note
Explicit destructors need to be highlighted in the documentation.
2.8. API Design Principles of Flexibility Pt.4 - Problems with Explicit Destructors and Three Solutions
2.8.1. Problems with Explicit Destructors
Problems arise when you add an explicit destructor:
- When a type implements
Drop, you cannot move any of its fields out inside the destructor. That is because after the explicit destructor runs,drop()will still be called, and it takes&mut self, which requires all parts ofselfto remain in place. Droptakes&mut selfrather thanself, soDropcannot simply call the explicit destructor and ignore its result, becauseDropdoes not ownself
Based on the example from the previous article, if we add both a Drop implementation and a close method:
use std::os::fd::{FromRawFd, IntoRawFd};
use std::fs::{File as StdFile, OpenOptions, metadata};
use std::io::Error;

/// A type that represents a file handle
struct File {
    /// File name
    name: String,
    /// File descriptor
    fd: i32,
}

impl File {
    /// A constructor that opens a file and returns a `File` instance
    fn open(name: &str) -> Result<File, Error> {
        // Open the file with read and write permissions using `OpenOptions`
        let file: StdFile = OpenOptions::new()
            .read(true)
            .write(true)
            .open(name)?;

        // Obtain the file descriptor
        let fd: i32 = file.into_raw_fd();

        // Return a `File` instance
        Ok(File {
            name: name.to_string(),
            fd,
        })
    }

    /// An explicit destructor that closes the file and returns any error
    fn close(self) -> Result<(), Error> {
        // Convert the fd back into a `File` using `FromRawFd`
        let file: std::fs::File = unsafe {
            std::fs::File::from_raw_fd(self.fd)
        };

        // Flush file data to disk
        file.sync_all()?;

        // Truncate the file to 0 bytes
        file.set_len(0)?;

        // Flush the file again
        file.sync_all()?;

        // Drop the file instance; it will close the file automatically
        drop(file);

        // Return success
        Ok(())
    }
}

// Implement `Drop`
impl Drop for File {
    fn drop(&mut self) {
        let _ = self.close(); // call `close` while dropping
        println!("File dropped");
    }
}

fn main() {
    // Create a file named "test.txt" and write some content to it
    std::fs::write("test.txt", "Hello, world!").unwrap();

    // Open the file and obtain a `File` instance
    let file: File = File::open("test.txt").unwrap();

    // Print the file name and fd
    println!("File name: {}, fd: {}", file.name, file.fd);

    // Close the file and handle any error
    match file.close() {
        Ok(()) => println!("File closed successfully"),
        Err(e) => println!("Error closing file: {}", e),
    }

    // Check the file size after closing
    let metadata = metadata("test.txt").unwrap();
    println!("File size: {} bytes", metadata.len());
}
Output:
error[E0507]: cannot move out of `*self` which is behind a mutable reference
  --> src/main.rs:59:17
   |
59 |         let _ = self.close(); // call `close` while dropping
   |                 ^^^^ ------- `*self` moved due to this method call
   |                 |
   |                 move occurs because `*self` has type `File`, which does not implement the `Copy` trait
   |
note: `File::close` takes ownership of the receiver `self`, which moves `*self`
  --> src/main.rs:33:14
   |
33 |     fn close(self) -> Result<(), Error> {
   |              ^^^^
note: if `File` implemented `Clone`, you could clone the value
  --> src/main.rs:6:1
   |
 6 | struct File {
   | ^^^^^^^^^^^ consider implementing `Clone` for this type
...
59 |         let _ = self.close(); // call `close` while dropping
   |                 ---- you could clone this value
The error message shows that we cannot move a value out of *self because it sits behind &mut self.
2.8.2. Solutions
First, it is important to note that there is no perfect solution; we can only try our best to compensate.
Solution 1: Wrap the Struct in Option<T> and Add Another Layer of Struct
We can turn the outer layer into a new type that wraps Option<T>, so that the Option<T> internally holds a type containing all the fields.
At that point, we need two destructors, one outer and one inner. In both destructors, we use Option::take to get ownership of the data and remove the value.
Because the inner type does not implement Drop, you can take ownership of all fields.
The downside is that every method you want to provide on the outer type now has to include code to access the fields on the inner type through the Option<T> wrapper.
We modify the earlier example as follows:
Step 1: Change the File definition and add a wrapper layer
First, we need to move the two fields into another struct and wrap that struct in Option<T> as a field of File.
#![allow(unused)]
fn main() {
/// A type that represents a file handle
struct InnerFile {
    /// File name
    name: String,
    /// File descriptor
    fd: i32,
}

/// A wrapper around `InnerFile`
struct File {
    /// Wrap `InnerFile` in `Option<T>`
    inner: Option<InnerFile>,
}
}
Step 2: Update the methods on File
There are two methods on File, and we need to add code to access the inner fields through the Option<T> wrapper.
First, the open method:
#![allow(unused)]
fn main() {
/// A constructor that opens a file and returns a `File` instance
fn open(name: &str) -> Result<File, Error> {
    // Open the file with read and write permissions using `OpenOptions`
    let file: StdFile = OpenOptions::new()
        .read(true)
        .write(true)
        .open(name)?;

    // Obtain the file descriptor
    let fd: i32 = file.into_raw_fd();

    // Return a `File` instance
    Ok(File {
        inner: Some(InnerFile {
            name: name.to_string(),
            fd,
        }),
    })
}
}- Because this code only uses
Filein the return value, only the return value needs to change
Next, the close method:
#![allow(unused)]
fn main() {
/// An explicit destructor that closes the file and returns any error
fn close(mut self) -> Result<(), Error> { // remember to make `self` mutable, otherwise `take` will not work
    // Use pattern matching to extract the field values
    if let Some(inner) = self.inner.take() {
        let name = inner.name;
        let fd = inner.fd;
        println!("Closing file: {} with fd: {}", name, fd);

        // Convert the fd back into a `File` using `FromRawFd`
        let file: std::fs::File = unsafe {
            std::fs::File::from_raw_fd(fd)
        };

        // Flush file data to disk
        file.sync_all()?;

        // Truncate the file to 0 bytes
        file.set_len(0)?;

        // Flush the file again
        file.sync_all()?;

        // Drop the file instance; it will close the file automatically
        drop(file);

        // Return success
        Ok(())
    } else {
        // If `inner` is `None`, the file has already been closed or dropped, so return an error
        Err(Error::new(
            std::io::ErrorKind::Other,
            "File is already closed",
        ))
    }
}
}- After receiving the parameter, we first use pattern matching to access the field values
- If the
innerfield isNone, that is, if pattern matching fails, we need to return an error ourselves
Step 3: Update the Drop implementation
Drop::drop needs to be changed:
#![allow(unused)]
fn main() {
fn drop(&mut self) {
    // Use pattern matching to get the field values
    if let Some(inner) = self.inner.take() {
        let name = inner.name;
        let fd = inner.fd;
        println!("Dropping file: {} (fd: {})", name, fd);

        // Convert the fd back into a `File` using `FromRawFd`
        let file: std::fs::File = unsafe {
            std::fs::File::from_raw_fd(fd)
        };

        // Drop the `File` instance
        drop(file);
    } else {
        // If the `inner` field is `None`, the file has already been dropped or closed; do nothing
    }
}
}- After receiving the parameter, we first use pattern matching to get the field values
- If the
innerfield isNone, the file has already been dropped or closed, so we do nothing
Step 4: Slightly Adjust main
The parts of main that need to access field values must be updated:
fn main() {
    // ...unchanged above, omitted

    // Print the file name and fd (this needs to change)
    println!("File name: {}, fd: {}",
        file.inner.as_ref().unwrap().name,
        file.inner.as_ref().unwrap().fd
    );

    // ...unchanged below, omitted
}- The original type is
Option<InnerFile>. After calling.as_ref(), it becomesOption<&InnerFile> - Once it becomes
Option<&InnerFile>, the value extracted byunwrapis a reference rather than an owned value file.inneris anOption<InnerFile>. Accessing theOptionvalue directly would require moving ownership or pattern matching (for example throughtake()orunwrap()), which would destroy the inner value of theOption, soas_ref()is needed
Full Code
use std::os::fd::{FromRawFd, IntoRawFd};
use std::fs::{File as StdFile, OpenOptions, metadata};
use std::io::Error;

/// A type that represents a file handle
struct InnerFile {
    /// File name
    name: String,
    /// File descriptor
    fd: i32,
}

/// A wrapper around `InnerFile`
struct File {
    /// Wrap `InnerFile` in `Option<T>`
    inner: Option<InnerFile>,
}

impl File {
    /// A constructor that opens a file and returns a `File` instance
    fn open(name: &str) -> Result<File, Error> {
        // Open the file with read and write permissions using `OpenOptions`
        let file: StdFile = OpenOptions::new()
            .read(true)
            .write(true)
            .open(name)?;

        // Obtain the file descriptor
        let fd: i32 = file.into_raw_fd();

        // Return a `File` instance
        Ok(File {
            inner: Some(InnerFile {
                name: name.to_string(),
                fd,
            }),
        })
    }

    /// An explicit destructor that closes the file and returns any error
    fn close(mut self) -> Result<(), Error> {
        // Use pattern matching and `std::mem::take` to extract the `name` field value
        if let Some(inner) = self.inner.take() {
            let name = inner.name;
            let fd = inner.fd;
            println!("Closing file: {} with fd: {}", name, fd);

            // Convert the fd back into a `File` using `FromRawFd`
            let file: std::fs::File = unsafe {
                std::fs::File::from_raw_fd(fd)
            };

            // Flush file data to disk
            file.sync_all()?;

            // Truncate the file to 0 bytes
            file.set_len(0)?;

            // Flush the file again
            file.sync_all()?;

            // Drop the file instance; it will close the file automatically
            drop(file);

            // Return success
            Ok(())
        } else {
            // If the `inner` field is `None`, the file has already been closed or dropped, so return an error
            Err(Error::new(
                std::io::ErrorKind::Other,
                "File is already closed",
            ))
        }
    }
}

// Implement `Drop` for code that runs when the value leaves scope
impl Drop for File {
    fn drop(&mut self) {
        // Use pattern matching to get the field values
        if let Some(inner) = self.inner.take() {
            let name = inner.name;
            let fd = inner.fd;
            println!("Dropping file: {} (fd: {})", name, fd);

            // Convert the fd back into a `File` using `FromRawFd`
            let file: std::fs::File = unsafe {
                std::fs::File::from_raw_fd(fd)
            };

            // Drop the file instance
            drop(file);
        } else {
            // If the `inner` field is `None`, the file has already been dropped or closed; do nothing
        }
    }
}

fn main() {
    // Create a file named "test.txt" and write some content to it
    std::fs::write("test.txt", "Hello, world!").unwrap();

    // Open the file and obtain a `File` instance
    let file: File = File::open("test.txt").unwrap();

    // Print the file name and fd (this needs to change)
    println!("File name: {}, fd: {}",
        file.inner.as_ref().unwrap().name,
        file.inner.as_ref().unwrap().fd
    );

    // Close the file and handle any error
    match file.close() {
        Ok(()) => println!("File closed successfully"),
        Err(e) => println!("Error closing file: {}", e),
    }

    // Check the file size after closing
    let metadata = metadata("test.txt").unwrap();
    println!("File size: {} bytes", metadata.len());
}
Solution 2: Wrap Each Field in Option<T>
We can also keep the struct unchanged, but wrap each field in Option<T>. When ownership is needed, use Option::take; when a reference is needed, use .as_ref() and .unwrap().
This works very well if the type has a reasonable empty value.
The downside is that if you have to wrap almost every field in Option and then match and unwrap those fields on every access, the code becomes very verbose.
We modify the earlier example as follows:
Step 1: Change the File definition
Add one layer of Option<T> to each field:
#![allow(unused)]
fn main() {
/// A type that represents a file handle
struct File {
    /// File name
    name: Option<String>,
    /// File descriptor
    fd: Option<i32>,
}
}
Step 2: Update the methods on File
There are two methods on File, and we need to add code to access the fields through the Option<T> wrapper.
First, the open method:
#![allow(unused)]
fn main() {
/// A constructor that opens a file and returns a `File` instance
fn open(name: &str) -> Result<File, Error> {
    // Open the file with read and write permissions using `OpenOptions`
    let file: StdFile = OpenOptions::new()
        .read(true)
        .write(true)
        .open(name)?;

    // Obtain the file descriptor
    let fd: i32 = file.into_raw_fd();

    // Return a `File` instance
    Ok(File {
        name: Some(name.to_string()),
        fd: Some(fd),
    })
}
}- The
openmethod’s parameter does not involve theFilestruct, so the parameter part does not need to change - The
openmethod’s return value involvesFile, so each field needs to be wrapped inSome
Next, the close method:
#![allow(unused)]
fn main() {
/// An explicit destructor that closes the file and returns any error
fn close(mut self) -> Result<(), Error> {
    // Pattern-match and use `std::mem::take` to take out the `name` field value
    if let Some(name) = std::mem::take(&mut self.name) {
        // Pattern-match and use `std::mem::take` to take out the `fd` field value
        if let Some(fd) = std::mem::take(&mut self.fd) {
            // Print
            println!("Closing file: {} with fd: {}", name, fd);

            // Convert the fd back into a `File` using `FromRawFd`
            let file: std::fs::File = unsafe {
                std::fs::File::from_raw_fd(fd)
            };

            // Flush file data to disk
            file.sync_all()?;

            // Truncate the file to 0 bytes
            file.set_len(0)?;

            // Flush the file again
            file.sync_all()?;

            // Drop the file instance; it will close the file automatically
            drop(file);

            // Return success
            Ok(())
        } else {
            // If the `fd` field is `None`, the file has already been closed or dropped, so return an error
            Err(Error::new(
                std::io::ErrorKind::Other,
                "File descriptor already dropped or taken",
            ))
        }
    } else {
        // If the `name` field is `None`, the file has already been closed or dropped, so return an error
        Err(Error::new(
            std::io::ErrorKind::Other,
            "File name already dropped or taken",
        ))
    }
}
}- The parameter must first be pattern-matched, and we use
std::mem::taketo take out the value inside it - If any field is
None, it means the file has already been closed or dropped, so an error is returned
Step 3: Update the Drop implementation
#![allow(unused)]
fn main() {
fn drop(&mut self) {
    // Use pattern matching to get the field values
    if let Some(name) = self.name.take() {
        if let Some(fd) = self.fd.take() {
            println!("Dropping file: {} (fd: {})", name, fd);

            // Convert the fd back into a `File`
            let file: std::fs::File = unsafe {
                std::fs::File::from_raw_fd(fd)
            };

            // Drop the file instance
            drop(file);
        } else {
            // If the `fd` field is `None`, the file has already been closed or dropped; do nothing
        }
    } else {
        // If the `name` field is `None`, the file has already been closed or dropped; do nothing
    }
}
}- The parameter must first be pattern-matched, and we use
std::mem::taketo take out the value inside it - If any field is
None, it means the file has already been closed or dropped; do nothing
Step 4: Slightly Adjust main
fn main() {
    // ...unchanged above, omitted

    // Print the file name and fd (this needs to change)
    println!("File name: {}, fd: {}",
         file.name.as_ref().unwrap(),
         file.fd.as_ref().unwrap()
    );

    // ...unchanged below, omitted
}- The original type is wrapped in
Option<T>, so calling.as_ref()gives you a reference to the value inside - Once it becomes a reference,
unwrapextracts a reference rather than an owned value - Accessing the
Optionvalue directly requires moving ownership or pattern matching (for example throughtake()orunwrap()), which destroys the inner value of theOption, soas_ref()is needed
Full Code
use std::os::fd::{FromRawFd, IntoRawFd};
use std::fs::{File as StdFile, OpenOptions, metadata};
use std::io::Error;

/// A type that represents a file handle
struct File {
    /// File name
    name: Option<String>,
    /// File descriptor
    fd: Option<i32>,
}

impl File {
    /// A constructor that opens a file and returns a `File` instance
    fn open(name: &str) -> Result<File, Error> {
        // Open the file with read and write permissions using `OpenOptions`
        let file: StdFile = OpenOptions::new()
            .read(true)
            .write(true)
            .open(name)?;

        // Obtain the file descriptor
        let fd: i32 = file.into_raw_fd();

        // Return a `File` instance
        Ok(File {
            name: Some(name.to_string()),
            fd: Some(fd),
        })
    }

    /// An explicit destructor that closes the file and returns any error
    fn close(mut self) -> Result<(), Error> {
        // Pattern-match and use `std::mem::take` to take out the value inside `name`
        if let Some(name) = std::mem::take(&mut self.name) {
            // Pattern-match and use `std::mem::take` to take out the value inside `fd`
            if let Some(fd) = std::mem::take(&mut self.fd) {
                // Print
                println!("Closing file: {} with fd: {}", name, fd);

                // Convert the fd back into a `File` using `FromRawFd`
                let file: std::fs::File = unsafe {
                    std::fs::File::from_raw_fd(fd)
                };

                // Flush file data to disk
                file.sync_all()?;

                // Truncate the file to 0 bytes
                file.set_len(0)?;

                // Flush the file again
                file.sync_all()?;

                // Drop the file instance; it will close the file automatically
                drop(file);

                // Return success
                Ok(())
            } else {
                // If the `fd` field is `None`, the file has already been closed or dropped, so return an error
                Err(Error::new(
                    std::io::ErrorKind::Other,
                    "File descriptor already dropped or taken",
                ))
            }
        } else {
            // If the `name` field is `None`, the file has already been closed or dropped, so return an error
            Err(Error::new(
                std::io::ErrorKind::Other,
                "File name already dropped or taken",
            ))
        }
    }
}

// Implement `Drop` for code that runs when the value leaves scope
impl Drop for File {
    fn drop(&mut self) {
        // Use pattern matching to get the field values
        if let Some(name) = self.name.take() {
            if let Some(fd) = self.fd.take() {
                println!("Dropping file: {} (fd: {})", name, fd);

                // Convert the fd back into a `File`
                let file: std::fs::File = unsafe {
                    std::fs::File::from_raw_fd(fd)
                };

                // Drop the file instance
                drop(file);
            } else {
                // If the `fd` field is `None`, the file has already been closed or dropped; do nothing
            }
        } else {
            // If the `name` field is `None`, the file has already been closed or dropped; do nothing
        }
    }
}

fn main() {
    // Create a file named "test.txt" and write some content to it
    std::fs::write("test.txt", "Hello, world!").unwrap();

    // Open the file and obtain a `File` instance
    let file: File = File::open("test.txt").unwrap();

    // Print the file name and fd (this needs to change)
    println!("File name: {}, fd: {}",
         file.name.as_ref().unwrap(),
         file.fd.as_ref().unwrap()
    );

    // Close the file and handle any error
    match file.close() {
        Ok(()) => println!("File closed successfully"),
        Err(e) => println!("Error closing file: {}", e),
    }

    // Check the file size after closing
    let metadata = metadata("test.txt").unwrap();
    println!("File size: {} bytes", metadata.len());
}
Solution 3: Store Data in ManuallyDrop
If data is stored in ManuallyDrop, it dereferences to the inner type, so there is no need to use unwrap anymore.
When destroying values inside drop, you can use ManuallyDrop::take to gain ownership.
The downside is that ManuallyDrop::take is unsafe, so it must be placed inside an unsafe block.
We modify the earlier example as follows:
Step 1: Change the File definition
Add a ManuallyDrop wrapper to each field:
#![allow(unused)]
fn main() {
/// A type that represents a file handle
struct File {
    /// File name
    name: ManuallyDrop<String>,
    /// File descriptor
    fd: ManuallyDrop<i32>,
}
}
Step 2: Update the methods on File
There are two methods on File, and we need to add code to access the fields through the wrapper.
First, the open method:
#![allow(unused)]
fn main() {
/// A constructor that opens a file and returns a `File` instance
fn open(name: &str) -> Result<File, Error> {
    // Open the file with read and write permissions using `OpenOptions`
    let file: StdFile = OpenOptions::new()
        .read(true)
        .write(true)
        .open(name)?;

    // Obtain the file descriptor
    let fd: i32 = file.into_raw_fd();

    // Return a `File` instance
    Ok(File {
        name: ManuallyDrop::new(name.to_string()),
        fd: ManuallyDrop::new(fd),
    })
}
}- The
openmethod’s parameter does not involve theFilestruct, so the parameter part does not need to change - The
openmethod’s return value involvesFile, so each field must be passed withManuallyDrop::new
Next, the close method:
#![allow(unused)]
fn main() {
/// An explicit destructor that closes the file and returns any error
fn close(mut self) -> Result<(), Error> {
    // Use `std::mem::replace` to replace the `name` field with an empty string, and keep the original value in `name`
    let name =
        std::mem::replace(&mut self.name, ManuallyDrop::new("".to_string()));

    // Use `std::mem::replace` to replace the `fd` field with an invalid value (-1), and keep the original value in `fd`
    let fd =
        std::mem::replace(&mut self.fd, ManuallyDrop::new(-1));

    // Print
    println!("Closing file: {:?} with fd: {:?}", name, fd);

    // Convert the fd back into a `File` using `FromRawFd`
    let file: std::fs::File = unsafe {
        std::fs::File::from_raw_fd(*fd) // `fd` must be dereferenced first
    };

    // Flush file data to disk
    file.sync_all()?;

    // Truncate the file to 0 bytes
    file.set_len(0)?;

    // Flush the file again
    file.sync_all()?;

    // Drop the file instance; it will close the file automatically
    drop(file);

    // Return success
    Ok(())
}
}- Use
std::mem::replaceto replace thenamefield with an empty string and store the original value inname - Use
std::mem::replaceto replace thefdfield with an invalid value (-1) and store the original value infd - In
std::fs::File::from_raw_fd(*fd), the argument must be dereferenced first, so write*fd
Step 3: Update the Drop implementation
#![allow(unused)]
fn main() {
fn drop(&mut self) {
    // Use `ManuallyDrop::take` to take the `name` field value and check whether it is an empty string
    let name = unsafe { ManuallyDrop::take(&mut self.name) };

    // Use `ManuallyDrop::take` to take the `fd` field value and check whether it is an invalid value
    let fd = unsafe { ManuallyDrop::take(&mut self.fd) };

    // Print
    println!("Dropping file: {:?} (fd: {:?})", name, fd);

    // If the `fd` field is not the invalid value, the file has not been closed or dropped yet, so perform the drop operation
    if fd != -1 || !name.is_empty() {
        let file = unsafe { std::fs::File::from_raw_fd(fd) };
        // Drop it
        drop(file);
    }
}
}- Use
ManuallyDrop::taketo take the values ofnameandfd, and check whether they are an empty string or an invalid value - If the
fdfield is not the invalid value (-1), or thenamefield is not empty, then the file has not been closed or dropped yet, so a drop operation is needed - In fact, you do not need both conditions (
fd != -1 || !name.is_empty()); one is enough, because the value changes ofnameandfdhappen together, and if one is invalid it means the whole struct has not yet been cleaned up
Step 4: Slightly Adjust main
fn main() {
    // ...unchanged above, omitted

    // Print the file name and fd (this needs to change)
    println!("File name: {}, fd: {}", *file.name, *file.fd);

    // ...unchanged below, omitted
}- Use dereferencing to print the values
Full Code
use std::os::fd::{FromRawFd, IntoRawFd};
use std::fs::{File as StdFile, OpenOptions, metadata};
use std::io::Error;
use std::mem::ManuallyDrop;

/// A type that represents a file handle
struct File {
    /// File name
    name: ManuallyDrop<String>,
    /// File descriptor
    fd: ManuallyDrop<i32>,
}

impl File {
    /// A constructor that opens a file and returns a `File` instance
    fn open(name: &str) -> Result<File, Error> {
        // Open the file with read and write permissions using `OpenOptions`
        let file: StdFile = OpenOptions::new()
            .read(true)
            .write(true)
            .open(name)?;

        // Obtain the file descriptor
        let fd: i32 = file.into_raw_fd();

        // Return a `File` instance
        Ok(File {
            name: ManuallyDrop::new(name.to_string()),
            fd: ManuallyDrop::new(fd),
        })
    }

    /// An explicit destructor that closes the file and returns any error
    fn close(mut self) -> Result<(), Error> {
        // Use `std::mem::replace` to replace the `name` field with an empty string, and keep the original value in `name`
        let name =
            std::mem::replace(&mut self.name, ManuallyDrop::new("".to_string()));

        // Use `std::mem::replace` to replace the `fd` field with an invalid value (-1), and keep the original value in `fd`
        let fd =
            std::mem::replace(&mut self.fd, ManuallyDrop::new(-1));

        // Print
        println!("Closing file: {:?} with fd: {:?}", name, fd);

        // Convert the fd back into a `File` using `FromRawFd`
        let file: std::fs::File = unsafe {
            std::fs::File::from_raw_fd(*fd) // `fd` must be dereferenced first
        };

        // Flush file data to disk
        file.sync_all()?;

        // Truncate the file to 0 bytes
        file.set_len(0)?;

        // Flush the file again
        file.sync_all()?;

        // Drop the file instance; it will close the file automatically
        drop(file);

        // Return success
        Ok(())
    }
}

// Implement `Drop` for code that runs when the value leaves scope
impl Drop for File {
    fn drop(&mut self) {
        // Use `ManuallyDrop::take` to take the `name` field value and check whether it is an empty string
        let name = unsafe { ManuallyDrop::take(&mut self.name) };

        // Use `ManuallyDrop::take` to take the `fd` field value and check whether it is an invalid value
        let fd = unsafe { ManuallyDrop::take(&mut self.fd) };

        // Print
        println!("Dropping file: {:?} (fd: {:?})", name, fd);

        // If the `fd` field is not the invalid value, the file has not been closed or dropped yet, so perform the drop operation
        if fd != -1 || !name.is_empty() {
            let file = unsafe { std::fs::File::from_raw_fd(fd) };
            // Drop it
            drop(file);
        }
    }
}

fn main() {
    // Create a file named "test.txt" and write some content to it
    std::fs::write("test.txt", "Hello, world!").unwrap();

    // Open the file and obtain a `File` instance
    let file: File = File::open("test.txt").unwrap();

    // Print the file name and fd (this needs to change)
    println!("File name: {}, fd: {}", *file.name, *file.fd);

    // Close the file and handle any error
    match file.close() {
        Ok(()) => println!("File closed successfully"),
        Err(e) => println!("Error closing file: {}", e),
    }

    // Check the file size after closing
    let metadata = metadata("test.txt").unwrap();
    println!("File size: {} bytes", metadata.len());
}
Choosing Between the Three Solutions
Which of these three solutions you choose depends on the actual situation, and usually the second one is the best. But if there are so many fields that unwrap becomes too noisy, you need to consider other options.
If the code is simple enough that you can easily verify its safety, then the third ManuallyDrop solution is also a very good choice.
2.9. API Design Principles of Obviousness Pt.1 - Documentation and Type System, Semantic Types, and Zero-Sized Types
2.9.1. Documentation and the Type System
Users may not fully understand all of an API’s rules and restrictions. So your API should be easy for users to understand and hard to misuse.
With Rust’s documentation and type system, we can try to achieve that.
2.9.2. Documentation
The first step toward making an API transparent is to write good documentation.
Writing good documentation has several requirements:
1. Clearly Document Things
Clearly document any unexpected situations that may occur, or any behavior that depends on the user doing something beyond the type signature.
For example: when panic can happen, when an error is returned. If you use an unsafe function, you must explain the conditions under which the user can safely call it.
Example:
#![allow(unused)]
fn main() {
/// Division operation, returning the result of two numbers
///
/// # Panics
///
/// This function will panic if the divisor is 0.
///
/// # Example
///
/// ```
/// let result = divide(10, 2);
/// assert_eq!(result, 5);
/// ```
pub fn divide(dividend: i32, divisor: i32) -> i32 {
    // ...omitted here
}
}- Here we documented the cases in which a panic may occur
2. Include End-to-End Examples
At the crate or module level, include end-to-end examples rather than examples for a specific type or method.
The benefit of doing this is that users can see how the pieces fit together and get a relatively clear understanding of the API’s overall structure, which helps developers quickly understand what each method and type does and where to use them.
Once you provide an end-to-end example, users can copy and paste that code into their own project, effectively giving them a customized starting point.
For example:
Suppose we have a
math_utilscrate that provides some mathematical operations, including basic addition, subtraction, and a complex calculation function. I will only write the function descriptions briefly in the doc comments here, but when you write your own code, you must document each function properly.
// lib.rs (crate root module)
pub mod math_utils {
    /// Calculate the sum of two numbers
    pub fn add(a: i32, b: i32) -> i32 {
        a + b
    }

    /// Calculate the difference between two numbers
    pub fn subtract(a: i32, b: i32) -> i32 {
        a - b
    }

    /// Perform a complex mathematical operation (such as a * b + (a - b))
    pub fn complex_calculation(a: i32, b: i32) -> i32 {
        (a * b) + subtract(a, b)
    }
}

// --- End-to-end example (crate-level doc test) ---
/// ```
/// use my_crate::math_utils;
///
/// fn main() {
///     let sum = math_utils::add(10, 5);
///     let difference = math_utils::subtract(10, 5);
///     let result = math_utils::complex_calculation(10, 5);
///
///     println!("Sum: {}", sum); // 15
///     println!("Difference: {}", difference); // 5
///     println!("Complex Calculation Result: {}", result); // 55
/// }
/// ```
3. Organize the Documentation Well
Use modules to group semantically related items, and then connect them with internal documentation links.
Sometimes you may want to use #[doc(hidden)] to mark interfaces that are not meant to be public but must remain for legacy reasons, so they do not clutter the documentation.
Example:
#![allow(unused)]
fn main() {
/// A simple module containing some functions and structs for internal use.
pub mod internal {
    /// A helper function used only internally.
    #[doc(hidden)]
    pub fn internal_helper() {
        // The concrete implementation of the internal calculation...
    }

    /// A struct used only internally.
    #[doc(hidden)]
    pub struct InternalStruct {
        // The struct's fields and methods...
    }
}
}- The
internal_helper()function and theInternalStructstruct are both for internal use only - By marking them with
#[doc(hidden)], their documentation comments will not appear in the generated docs
4. Enrich the Documentation as Much as Possible
Sometimes you need to explain content and concepts, and you can add links to external resources, such as RFCs, blogs, and white papers.
At the top-level documentation, you should guide users to common modules, traits, types, and methods.
Some notes about documentation features:
- Use
#[doc(cfg(..))]to highlight items that are available only under specific configurations, so users can quickly understand why a method shown in the docs is unavailable - Use
#[doc(alias = "...")]to let users search for a type or method under alternative names
Example 1:
#![allow(unused)]
fn main() {
//! This is a library for image processing.
//!
//! This library provides some common image processing features, such as:
//! - Reading and saving image files in different formats [`Image::load`] [`Image::save`]
//! - Resizing, rotating, and cropping images [`Image::resize`] [`Image::rotate`] [`Image::crop`]
//! - Applying different filters and effects [`Filter`] [`Effect`]
//!
//! If you want to learn more about the principles and algorithms of image processing, you can refer to the following resources:
//! - [Digital Image Processing](https://book.douban.com/subject/5345798/), a classic textbook that introduces the basic concepts and methods of image processing.
//! - [Learn OpenCV](https://learnopencv.com/), a website with many tutorials and sample code for implementing image processing with OpenCV.
//! - [Awesome Computer Vision](https://github.com/jbhuang0604/awesome-computer-vision), a GitHub repository collecting many computer vision resources and projects.

/// A struct representing an image
#[derive(Debug, Clone)]
pub struct Image {
    // ...
}
// ...
}- Here we used external links. You can see that the link format is
[text to display in the docs](link), which is standard Markdown and should be familiar to anyone who has written a README before
Example 2:
#![allow(unused)]
fn main() {
impl Image {
    // ...
    // ...
    #[doc(alias = "read")]
    #[doc(alias = "open")]
    pub fn load<P: AsRef<Path>>(path: P) -> Result<Self, Error> {
        // ...
    }
    // ...
}
}- We used
#[doc(alias = "read")]and#[doc(alias = "open")], so searching for “read” and “open” in the docs will find this function
Example 3:
/// A struct that is only available when the `foo` feature is enabled.
#[cfg(feature = "foo")]
#[doc(cfg(feature = "foo"))]
pub struct Foo;

impl Foo {
    /// A method that is only available when the `foo` feature is enabled.
    #[cfg(feature = "foo")]
    #[doc(cfg(feature = "foo"))]
    pub fn bar(&self) {
        // ...
    }
}

fn main() {
    println!("Hello, world!");
}
#[cfg(feature = "foo")]: only when the"foo"feature is enabled will theFoostruct and itsbarmethod be included in the final build artifact#[doc(cfg(feature = "foo"))]: marks the struct and method in the API docs as depending on thefoofeature, so users know they are not available by default
2.9.3. The Type System
Using Rust’s type system can ensure that APIs are:
- Obvious
- Self-describing
- Hard to misuse
Semantic Types
Some values have meaning beyond their surface form. For example, 1 and 0 can represent male and female. In that case, we can add types to represent the meaning of the value.
Example:
#![allow(unused)]
fn main() {
fn processData(dryRun: bool, overwrite: bool, validate: bool) {
    // data processing logic
}
}- The three parameters of this function are all booleans, so they are easy to confuse, and users are very likely to use them incorrectly
To solve this, we can create three types and make the parameters have three different types:
#![allow(unused)]
fn main() {

enum DryRun {
    Yes,
    No,
}

enum Overwrite {
    Yes,
    No,
}

enum Validate {
    Yes,
    No,
}

fn processData(dryRun: DryRun, overwrite: Overwrite, validate: Validate) {
    // data processing logic
}
}- Turn the three booleans into three enum types
When users call the function, they will write:
#![allow(unused)]
fn main() {
processData(DryRun::Yes, Overwrite::No, Validate::Yes)
}
That is much clearer.
Using Zero-Sized Types to Represent Facts About a Type Instance
For example:
Suppose we have a
Rocketstruct with alaunchmethod for launching it. If the rocket is not already launched, calling this method is perfectly fine. But if the rocket is already launched, you should not be able to launch it again. Likewise, after launch we can control acceleration and deceleration, but not while on the ground.
#![allow(unused)]
fn main() {
// Define different rocket states
struct Grounded;
struct Launched;

// Color enum
enum Color {
    White,
    Black,
}

// Mass type, using the newtype pattern to wrap `u32`
struct Kilograms(u32);

// Generic rocket struct with a default state of `Grounded`
struct Rocket<Stage = Grounded> {
    stage: std::marker::PhantomData<Stage>,
}

// Implement `Default` for `Rocket<Grounded>`
impl Default for Rocket<Grounded> {
    fn default() -> Self {
        Self {
            stage: Default::default(),
        }
    }
}

// Implement methods for `Rocket<Grounded>`
impl Rocket<Grounded> {
    pub fn launch(self) -> Rocket<Launched> {
        Rocket {
            stage: Default::default(),
        }
    }
}

// Implement methods for `Rocket<Launched>`
impl Rocket<Launched> {
    pub fn accelerate(&mut self) {}
    pub fn decelerate(&mut self) {}
}

// Implement common methods for rockets in all states
impl<Stage> Rocket<Stage> {
    pub fn color(&self) -> Color {
        Color::White
    }

    pub fn weight(&self) -> Kilograms {
        Kilograms(0)
    }
}
}-
GroundedandLaunchedhave no fields, so their size is zero, and the Rust compiler does not allocate memory for them. They are used only to mark which stateRocketis in, without extra storage cost -
We define a
Rocketstruct with a generic parameterStage, which defaults toGrounded. In the definition we also usestd::marker::PhantomData<T>, which is a zero-sized type (ZST, Zero-Sized Type). It affects the type system at compile time but does not occupy memory at runtime -
The
launchmethod is only available onRocket<Grounded> -
After
launch()is called, it returns aRocket<Launched>, indicating that the rocket has entered the launched state.Rocket<Launched>no longer has alaunch()method, ensuring that it cannot be launched twice -
The
acceleratemethod represents acceleration anddeceleraterepresents deceleration. These methods apply only toRocket<Launched>, preventing acceleration or deceleration while in theGroundedstate -
Some methods can be used in any state, and we place them in the
impl<Stage> Rocket<Stage>block
#[must_use] Attribute
After you add the #[must_use] attribute to a type, trait, or function, if user code receives a value of that type or trait, or calls that function, and does not explicitly handle it, the compiler will emit a warning.
Example:
#![allow(unused)]
fn main() {
#[must_use]
fn process_data(data: Data) -> Result<(), Error> {
    // ...

    Ok(())
}
}- We use the
#[must_use]attribute to markprocess_dataas a function whose return value must be used - If the user does not explicitly handle the returned
Resultafter calling the function, the compiler will issue a warning - This helps remind users to be careful when dealing with potential error cases and reduces the chance of mistakes
2.10. API Design Principles of Constrained Pt.1 - Changing Types
2.10.1. Think Carefully Before Changing an Interface
If your interface is going to change in a way that is visible to users, think twice before doing it.
You need to make sure that the changes you make:
- Do not break existing user code
- Should remain in place for a while
Frequently shipping backward-incompatible changes (major version bumps) will make users unhappy.
2.10.2. Backward-Incompatible Changes
Some backward-incompatible changes are obvious, such as changing the name of a public type or removing a public item from it.
Some backward-incompatible changes are more subtle and are closely tied to how Rust works. This article mainly focuses on those changes and how you, as a developer, should plan for them.
In the process, you sometimes need to make trade-offs and compromises in interface flexibility.
2.10.3. Modifying Types
If you remove or rename a public type, it will almost certainly break user code. The solution is to use visibility modifiers as much as possible. For example:
pub(crate): visible within the current cratepub(in path): visible within the specified path
Example:
#![allow(unused)]
fn main() {
pub mod outer_mod {
    pub mod inner_mod {
        // This function is visible only to `outer_mod`
        pub(in crate::outer_mod) fn outer_mod_visible_fn() {}

        // This function is visible to the entire crate
        pub(crate) fn crate_visible_fn() {}

        // This function is visible only to `outer_mod` (using `super` to refer to the outer module)
        pub(super) fn super_mod_visible_fn() {
            // `inner_mod_visible_fn` is visible within the same module, so it can be called normally
            inner_mod_visible_fn();
        }

        // This function is visible only inside `inner_mod`, equivalent to `private`
        pub(self) fn inner_mod_visible_fn() {}
    }

    pub fn foo() {
        inner_mod::outer_mod_visible_fn();
        inner_mod::crate_visible_fn();
        inner_mod::super_mod_visible_fn();

        // This function is no longer visible because we are outside `inner_mod`
        // Error! `inner_mod_visible_fn` is private
        inner_mod::inner_mod_visible_fn();
    }
}

fn bar() {
    // This function is still visible because we are in the same crate
    outer_mod::inner_mod::crate_visible_fn();

    // This function is no longer visible outside `outer_mod`
    // Error! `super_mod_visible_fn` is private
    outer_mod::inner_mod::super_mod_visible_fn();

    // This function is also not visible outside `outer_mod`
    // Error! `outer_mod_visible_fn` is private
    outer_mod::inner_mod::outer_mod_visible_fn();

    outer_mod::foo();
}
}
Visibility control for the functions in the inner_mod module:
outer_mod_visible_fn(): visible only insideouter_mod, not accessible from outsidecrate_visible_fn(): visible to the entire crate, sobar()can still access itsuper_mod_visible_fn(): visible only insideouter_mod, sobar()cannot access itinner_mod_visible_fn(): private, visible only insideinner_mod
The fewer public types you expose in your API, the more freedom you have to change it later (freedom here means not breaking existing code).
#[non_exhaustive] Attribute
User code depends on more than just the name of your type. Example:
An Example of a Breaking Change
At the beginning, I wrote a struct called Unit in lib.rs:
#![allow(unused)]
fn main() {
pub struct Unit;
}
Then I used Unit in main.rs:
fn main() {
    let u = constrained::Unit;
}- That works fine.
Later, I modified Unit because users needed it:
#![allow(unused)]
fn main() {
pub struct Unit {
    pub field: bool,
}
}
The code in main.rs would also change:
fn is_true(u: constrained::Unit) -> bool {
    matches!(u, constrained::Unit { field: true })
}

fn main() {
    let u = constrained::Unit {
        field: true,
    };
}- The
is_truefunction uses the modifiedUnitfield - But the original code in
mainwould then fail to compile
The same thing happens when Unit has a private field. The compiler knows that Unit has fields, but you did not provide values for them.
Solution
For this situation, Rust provides the #[non_exhaustive] attribute to mitigate these problems. It can be applied to struct, enum, and enum variants. It indicates that the type or enum may gain more fields or variants in the future.
If you use it, then when others use your crate, the compiler will:
- Forbid explicit construction, such as
lib::Unit { field: true } - Forbid non-exhaustive pattern matching, that is, patterns without a trailing
..
If your interface is relatively stable, you should avoid using this attribute.
Example:
lib.rs:
#![allow(unused)]
fn main() {
#[non_exhaustive]
pub struct Config {
    pub window_width: u16,
    pub window_height: u16,
}

fn some_function() {
    let config: Config = Config {
        window_width: 640,
        window_height: 480,
    };

    // Non-exhaustive structs can be matched exhaustively within the defining crate.
    if let Config {
        window_width,
        window_height,
    } = config
    {
        // ...
    }
}
}- With
#[non_exhaustive],lib.rscan still use explicit construction and exhaustive matching, because this code belongs to the same crate that defines the struct
What if I write this in main.rs?
use constrained::Config;

fn main() {
    let config: Config = Config {
        window_width: 640,
        window_height: 480,
    };

    if let Config {
        window_width,
        window_height,
    } = config {}
}- This will fail to compile, because this code belongs to an external crate, and the compiler will prohibit the two operations mentioned above
Output:
error[E0639]: cannot create non-exhaustive struct using struct expression
 --> src/main.rs:4:26
  |
4 |       let config: Config = Config {
  |  __________________________^
5 | |         window_width: 640,
6 | |         window_height: 480,
7 | |     };
  | |_____^

error[E0638]: `..` required with struct marked as non-exhaustive
  --> src/main.rs:9:12
   |
 9 |       if let Config {
   |  ____________^
10 | |         window_width,
11 | |         window_height,
12 | |     } = config {}
   | |_____^
We can slightly change the code so that the match in main.rs becomes a non-exhaustive pattern with ..:
#![allow(unused)]
fn main() {
if let Config {
    window_width,
    window_height,
    .. // this ignores the remaining fields or variants in a struct, tuple, or enum
} = config {
}
}
2.11. API Design Principles of Constrained Pt.2 - Sealed Traits, Re-exports, and Auto Traits
2.11.1. Trait Implementations
Rust’s coherence rules forbid multiple implementations of the same trait for the same type.
In general, the following trait-related operations are breaking changes:
- Adding a blanket implementation to an existing trait (see 1.17.2. Blanket Implementations) is usually a breaking change
- Implementing an external trait for an existing type, or implementing an existing trait for an external type
- Removing a trait implementation (implementing a trait for a new type does not cause a breaking change)
Most changes to an existing trait are also breaking changes, for example:
- Changing the signature of an existing trait method
- Adding a new method (if the new method has a default implementation, it is not a breaking change)
Be Careful When Implementing Any Trait for Any Type
A quick reminder: be careful when implementing any trait for any type.
Example:
lib.rs:
#![allow(unused)]
fn main() {
pub struct Unit;

// Define trait
pub trait Foo1 {
    fn foo(&self);
}

impl Foo1 for Unit {
    fn foo(&self) {
        println!("foo1");
    }
}
}main.rs:
use constrained::{Foo1, Unit};

// Define trait
trait Foo2 {
    fn foo(&self);
}

// Implement Foo2 for Unit
impl Foo2 for Unit {
    fn foo(&self) {
        println!("foo2");
    }
}

// Run the main function
fn main() {
    Unit.foo();
}
Output:
error[E0034]: multiple applicable items in scope
  --> src/main.rs:14:10
   |
14 |     Unit.foo();
   |          ^^^ multiple `foo` found
   |
   = note: candidate #1 is defined in an impl of the trait `Foo1` for the type `Unit`
note: candidate #2 is defined in an impl of the trait `Foo2` for the type `Unit`
  --> src/main.rs:8:5
   |
 8 |     fn foo(&self) {
   |     ^^^^^^^^^^^^^
help: disambiguate the method for candidate #1
   |
14 -     Unit.foo();
14 +     Foo1::foo(&Unit);
   |
help: disambiguate the method for candidate #2
   |
14 -     Unit.foo();
14 +     Foo2::foo(&Unit);
   |
This code will fail to compile. Do you see where the error is? The problem is the foo method. main.rs and lib.rs each define a Foo2 and Foo1 trait, and both traits have a foo method. The Unit struct implements both Foo1 and Foo2. When foo is used in main.rs, the compiler does not know which trait’s foo method it should use.
That is why you must be careful when implementing any trait for any type—implementing a trait can accidentally cause breaking changes.
Sealed Traits
Earlier, I kept saying “most of the time” and “in general,” because Rust has sealed traits.
Their characteristic is that they can be used by other crates, but cannot be implemented in other crates. They can prevent breaking changes when new methods are added to a trait.
Sealed traits are not a built-in language feature; there are several ways to implement them.
Sealed traits are often used for derived traits. More specifically, they are traits that provide blanket implementations for types that implement certain other traits.
Example:
mod sealed {
    pub trait Sealed {} // private trait, not exposed publicly
}

// Only `i32` and `f64` can implement `MyTrait`
impl sealed::Sealed for i32 {}
impl sealed::Sealed for f64 {}

pub trait MyTrait: sealed::Sealed {
    fn describe(&self) -> String;
}

// Blanket implementation: only `Sealed` implementers can use `MyTrait`
impl MyTrait for i32 {
    fn describe(&self) -> String {
        format!("I am an i32: {}", self)
    }
}

impl MyTrait for f64 {
    fn describe(&self) -> String {
        format!("I am an f64: {}", self)
    }
}

// Test
fn main() {
    let x: i32 = 42;
    let y: f64 = 3.14;

    println!("{}", x.describe()); // output: I am an i32: 42
    println!("{}", y.describe()); // output: I am an f64: 3.14
}Sealedis private (because it lives insidemod sealed), so other crates cannot use it, which achieves the sealing goal- Only
i32andf64are allowed to implementSealed
The above is a relatively simple example. Now let us bring in a derived trait:
Use
Sealedas a sealed trait to restrictBaseTraitso that only certain types can implement it. DeriveDerivedTrait, make it inheritBaseTrait, and provide additional behavior.
mod sealed {
    pub trait Sealed {} // private trait, not exposed publicly
}

// Only `i32` and `f64` can implement `BaseTrait`
impl sealed::Sealed for i32 {}
impl sealed::Sealed for f64 {}

/// Base trait, implementable only by types that implement `sealed::Sealed`
pub trait BaseTrait: sealed::Sealed {
    fn base_method(&self) -> String;
}

// Blanket implementation for BaseTrait
impl BaseTrait for i32 {
    fn base_method(&self) -> String {
        format!("I am an i32: {}", self)
    }
}

impl BaseTrait for f64 {
    fn base_method(&self) -> String {
        format!("I am an f64: {}", self)
    }
}

/// Derived trait that extends `BaseTrait`
pub trait DerivedTrait: BaseTrait {
    fn derived_method(&self) -> String;
}

// Blanket implementation for DerivedTrait
impl DerivedTrait for i32 {
    fn derived_method(&self) -> String {
        format!("Derived trait: {} squared = {}", self, self * self)
    }
}

impl DerivedTrait for f64 {
    fn derived_method(&self) -> String {
        format!("Derived trait: sqrt({}) = {}", self, self.sqrt())
    }
}

fn main() {
    let x: i32 = 5;
    let y: f64 = 9.0;

    println!("{}", x.base_method()); // "I am an i32: 5"
    println!("{}", x.derived_method()); // "Derived trait: 5 squared = 25"

    println!("{}", y.base_method()); // "I am an f64: 9"
    println!("{}", y.derived_method()); // "Derived trait: sqrt(9) = 3"
}BaseTraitcannot be implemented by external types; it can only be used fori32andf64, because it inherits fromsealed::SealedDerivedTraitextendsBaseTraitand addsderived_method()BaseTraitandDerivedTraitare implemented only fori32andf64; external types cannot implement these traits
When should you use sealed traits? Only when external crates should not be able to implement your trait. This form severely limits the usability of the trait—downstream traits cannot implement it for their own types.
We can use sealed traits to restrict which types can be used as type parameters. Remember the Rocket struct we wrote earlier? (in 2.9.3. The Type System) The Stage generic parameter of Rocket was restricted to only Grounded and Launched using this approach.
2.11.2. Hidden Contracts
Sometimes, changes you make to one part of the code can subtly affect the contract of other parts of the interface.
This mainly happens with:
- Re-exports
- Auto-traits
Re-exports
Re-exports are covered in Rust Guide 14.3.1. Re-Exporting APIs with pub use.
If part of your interface exposes an external type, then any changes to that external type also become changes to your interface.
It is usually better to wrap the external type in a newtype (see Rust Guide 19.2.6. Using the Newtype Pattern to Implement an External Trait on an External Type) and expose only the parts of the external type that you consider useful.
Auto-Traits
Some traits, based on the contents of a type, are implemented for it automatically, such as Send and Sync. Because of their nature, these traits add a hidden promise to almost every type in an interface.
These traits propagate, whether the type is concrete or type-erased through things like impl Trait.
Implementations of these traits are usually added automatically by the compiler, and if the situation does not apply, they are not added automatically.
For example:
- Type A contains private type B, and by default both A and B implement
Send - Later, B is changed so that it no longer implements
Send, and then A also stops implementingSend - That kind of change is breaking, and it is also very hard to trace and discover
For this kind of problem, you can include a few simple tests in your library to check whether all of your types implement the relevant traits.
Example:
This is the original code:
use std::thread;

/// 1. Private type B, initially `Send`
struct B;

/// 2. Public type A, containing B
struct A {
    _b: B, // depends on B's traits
}

// 3. Prove that `A` is `Send`
fn assert_send<T: Send>() {}

fn main() {
    assert_send::<A>(); // passes, A is Send

    // 4. Prove that A can be safely passed between threads
    let a = A { _b: B };
    thread::spawn(move || {
        let _ = a; // runs successfully because A is still Send
    }).join().unwrap();
}
Then we modify B so that it no longer implements the Send trait:
use std::rc::Rc;
use std::thread;

/// 1. Modify `B` so that it is no longer `Send`
/// `Rc<T>` is not `Send`, so `B` is not `Send` either
struct B {
    _data: Rc<i32>,
}

/// 2. A still contains B
struct A {
    _b: B,
}

// 3. Prove that `A` is `Send`
fn assert_send<T: Send>() {}

fn main() {
    assert_send::<A>(); // compile error[E0277]: `Rc<i32>` cannot be sent between threads safely (so `A: Send` fails)

    let a = A { _b: B { _data: Rc::new(42) } };
    thread::spawn(move || {
        let _ = a; // this will fail because `Rc<i32>` cannot be safely sent across threads
    }).join().unwrap();
}Bnow containsRc<T>, butRc<T>is notSend. That means B is no longerSend, becauseRc<T>cannot be safely transferred between threads- A is no longer
Sendeither, which makesassert_send::<A>()fail to compile. We can detect the error at compile time